


Custom fields
Overview
Default types of custom fields
Dependent custom fields
Custom fields with formula (Business plan required)
Common custom field attributes
How to migrate data from existing custom fields into project's native fields?
Corner situations
Overview
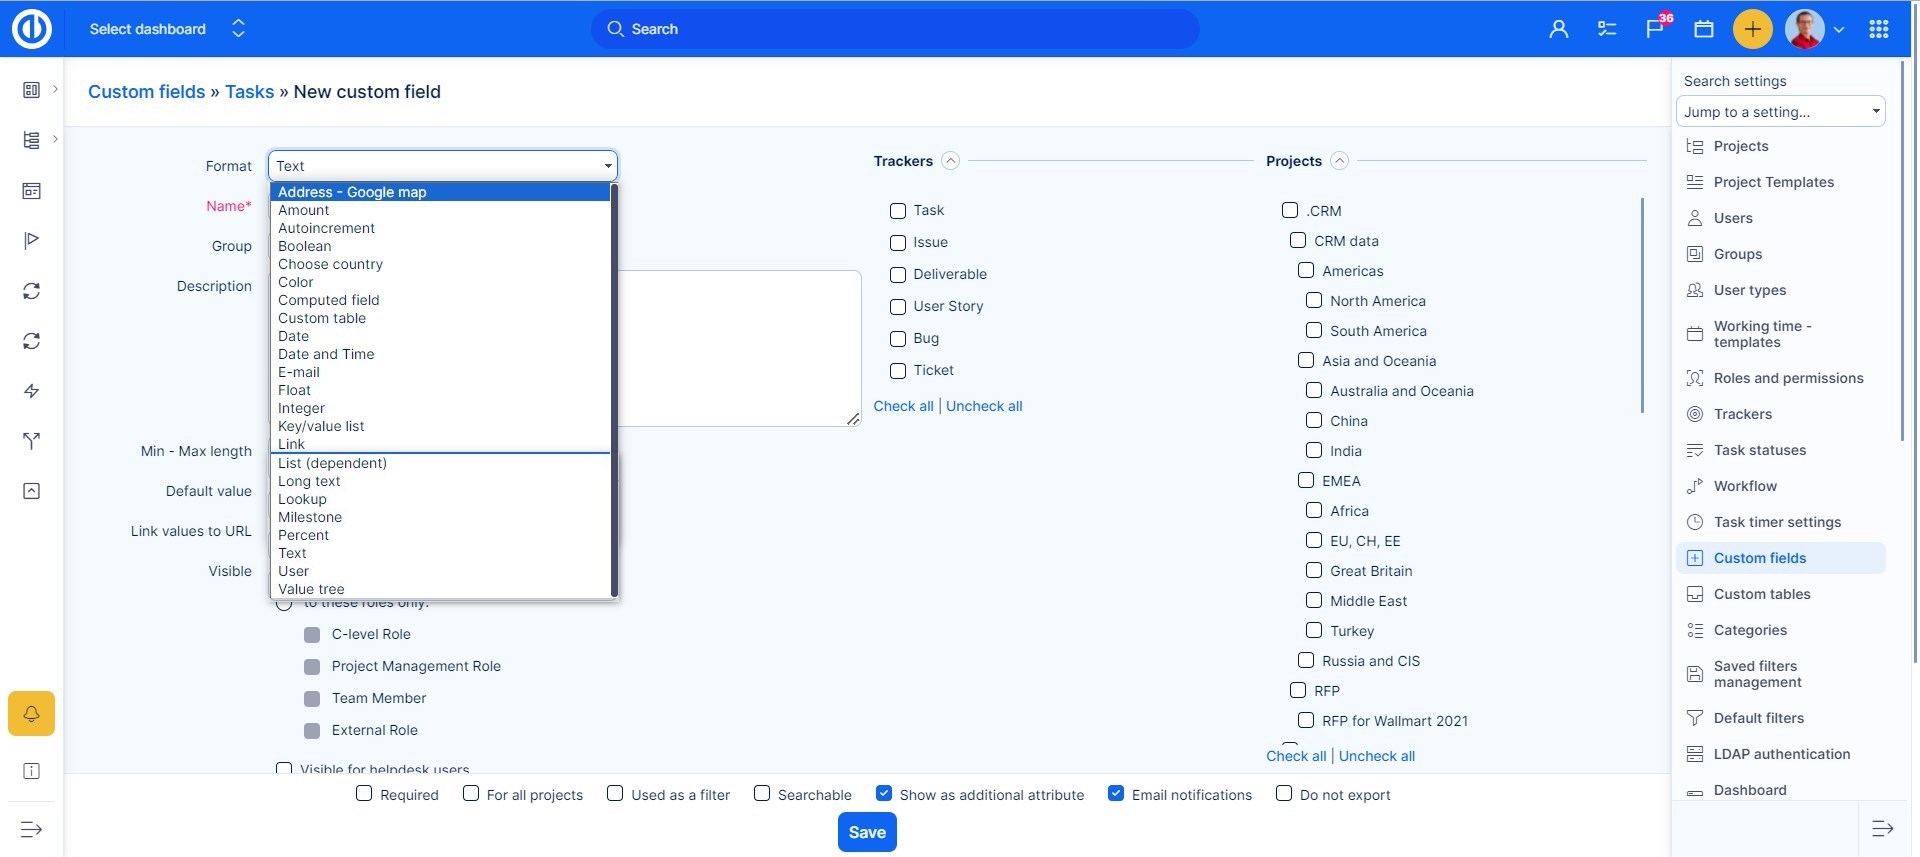
Custom fields can be managed in More: Administration: Custom fields. You can create a custom field for every entity in the system. You can create a new custom field by clicking on the "New custom field" button in the top right corner. Then the following list appears.

There are various formats of custom fields.
Some validations can be defined for each custom field:
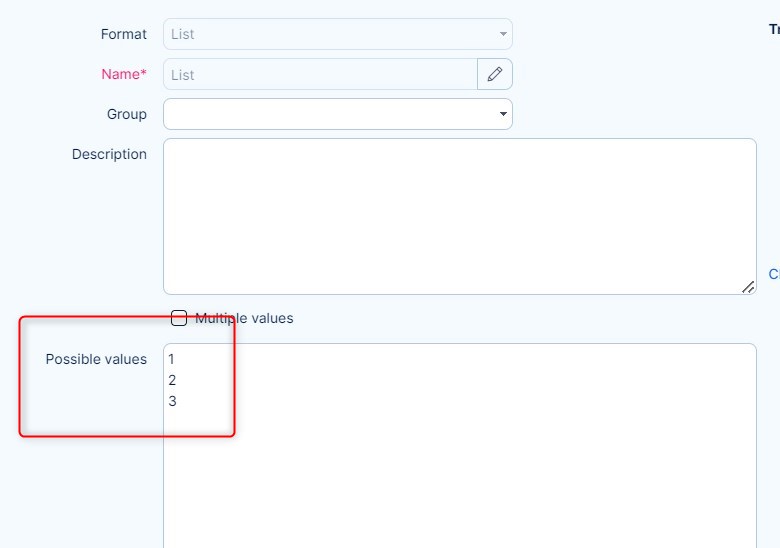
- Group: Custom fields can be grouped for quicker navigation among them. To create a new group, enter its name into the field. To select an existing group, just start typing its name and select one from the found results. To edit groups go to Administration >> Categories.
- Min-max length: Minimum and maximum length for the field (0 means that there is no restriction)
- Multiple values: While enabled, more than one item may be selected.
- Possible values: Possible values for the "List" fields. One line for each value.
- Default value: A default value to apply if none is selected. The default value is prefilled just in the new entity's form with this custom field but is not prefilled in already existing entities with this custom field.
Default types of custom fields
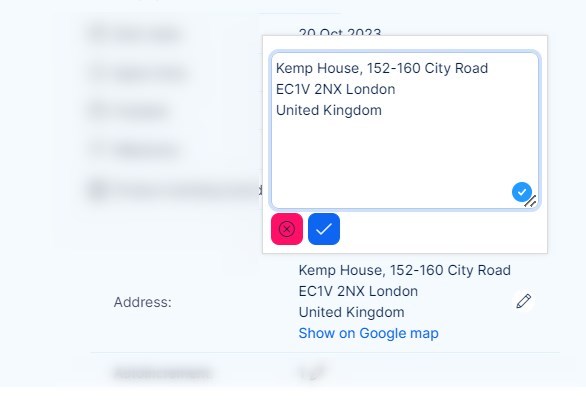
Address - Google map
This field is perfect for adding addresses and allows you to search google maps with only one click. After activating the field, you will have this box to fill in the address. Link to google maps will appear right under the entered address. ( Refresh of the page might be needed if you change the address on task detail to get the correct link)
Amount
This custom field comes in handy when you want to have a unit of measurement.
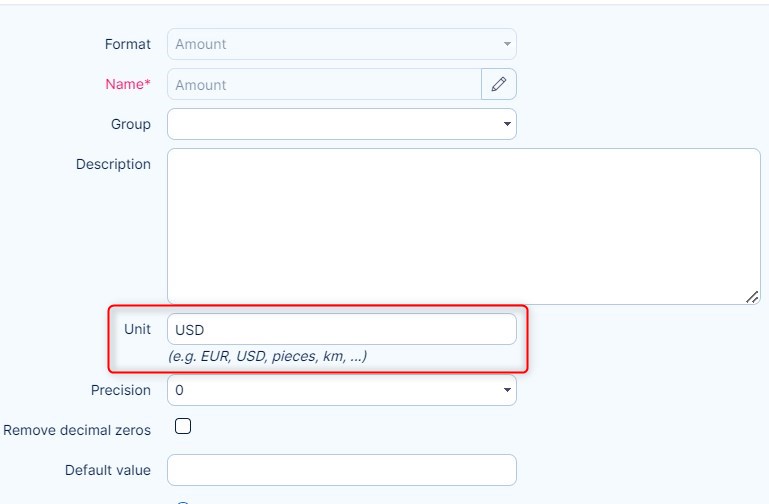
It can be used for various calculations with a calculated custom field, which we will be looking at later. This is how it looks when you are editing a task. You just fill in the number.
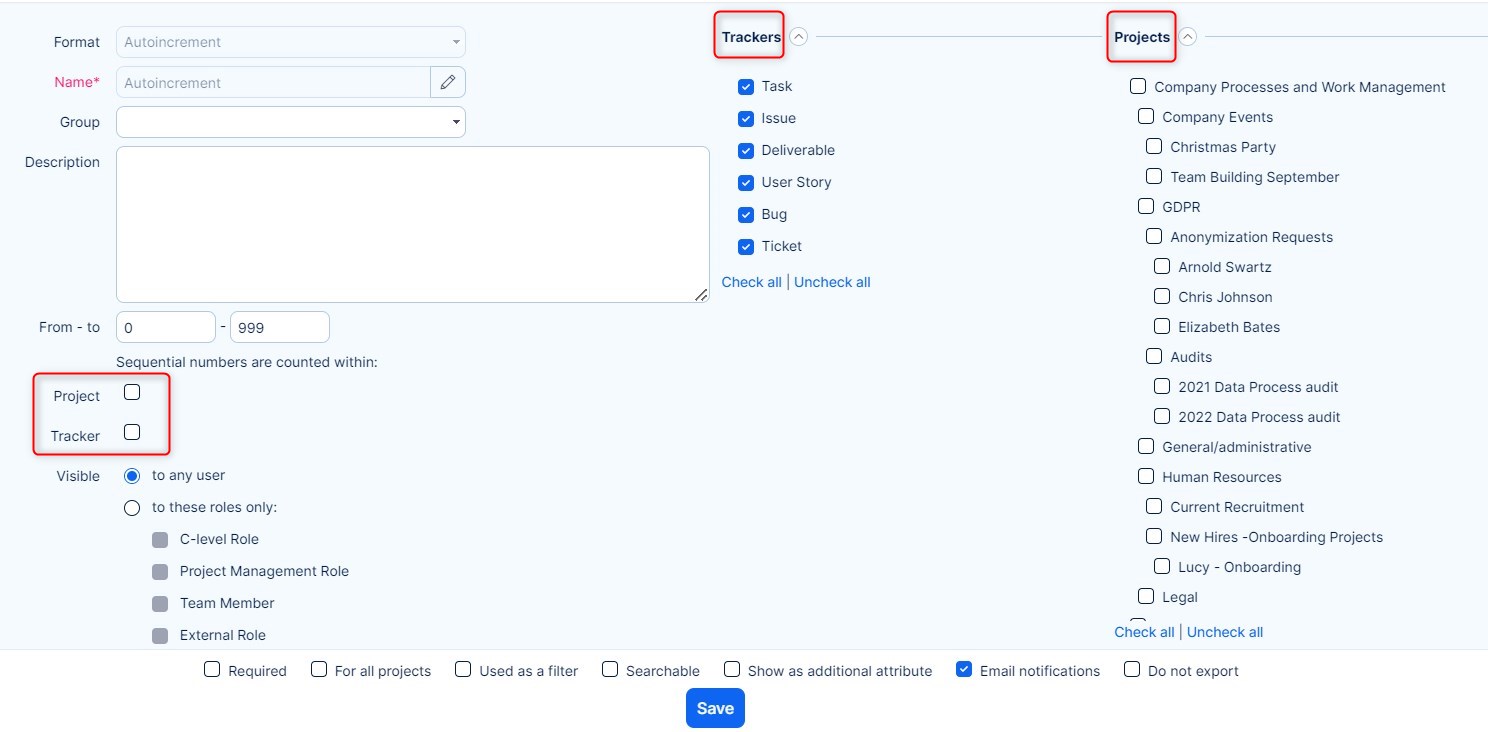
Autoincrement
This is a numeric custom field that will automatically increase by 1 for each new issue that is created until it reaches the maximum value within "from-to" range. After it reaches the limit, all the following items get the "from" value (usually 1) so the counting does not start again from the beginning. Sequential numbers can be counted globally (one row) or within each project or tracker individually (more duplicate rows) depending on whether the respective checkboxes "sequential numbers are counted within" are ticked or not. There are two options that can be chosen individually or together (combination):
- Project - the numeric sequence starts with Nr. 1 for each project independently (unless the minimum number is set differently)
- Tracker - the numeric sequence starts with Nr. 1 for each tracker independently (unless the minimum number is set differently)
- Project & Tracker - the numeric sequence starts with the minimum number independently for each tracker and each project
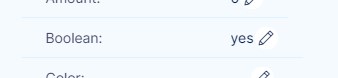
Boolean
This custom field (checkbox) is used to confirm or deny anything you want by using YES or NO answers.

There are three possible ways to display boolean field. You can either have a drop down list like you can see above, only with YES or NO, or you can a have a boolean checkbox or radio buttons. In this example the custom field is named Boolean, but you can put anything there, for example, you want the user to confirm that he performed some kind of test, you can name it "Test performed" and he will fill in yes or no. You will then see the result in task detail.
Corner situations for Boolean field:
- When a boolean custom field is displayed as a checkbox and set as required, no action will actually be required because an empty checkbox is considered as "no" value.
- When a new field is created,then when displayed on already existing entities, it will appear blank with none option selected. Until the entity is updated in any way, only then the default value will appear in the field.
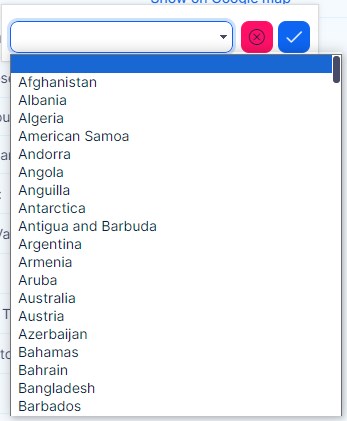
Choose country
This custom field offers a list of countries to choose from
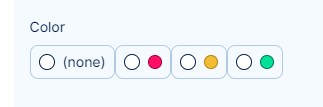
Color
this custom field enables you to choose from predefined colors. Green, orange, red or none.
Custom table
This custom field is related to the Assets and Configuration management, please find more details on the following link
Date
This custom field has many uses. For example, you want to have Date of a contract in your task? Just add it in this field and you will have it in the task overview.

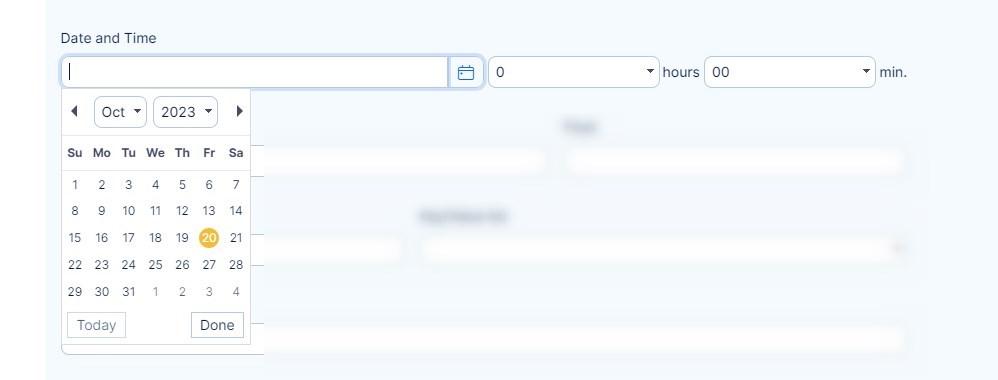
Date and time
If you want to be a little more specific you can use the date and time field. This field can be only edited from task edit view.
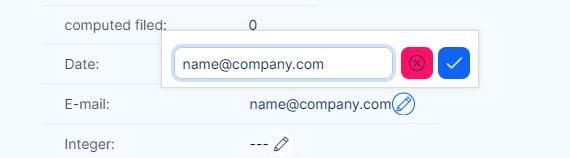
A simple text field designed for entering an e-mail address.
Float
The term floating point is derived from the fact that there is no fixed number of digits before and after the decimal point; that is, the decimal point can float. There are also representations in which the number of digits before and after the decimal point is set, called fixed-point representations.
Integer
Positive or negative number without decimal digits.
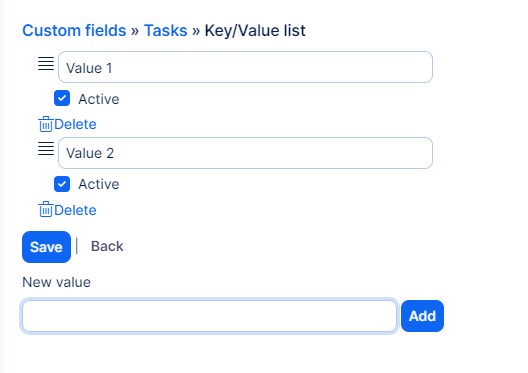
Key/value list
You can create your own list of values that you want your users to add. In principle, this is almost the same as "List" type except that a change in values of "List" type will not affect any existing records created in the past, while a change in values of "Key/value list" will also affect existing records created in the past. To create this type of custom field, follow these steps:
- Create a new Key/value list
- Save the field without adding values (because you can't do that anyway)
- The option to add values appears after saving

Example scenario
Let's say you have a "list" type with the following items:
- Value1
- Value2
Then you assign to the particular instance Value1.
Later on, you change your list to:
- ValueOne
- ValueTwo
Your particular instance will still have assigned older Value1. With "key/value list" type all the instances will change to the new value.
Link
Just insert an URL address. It is required to input protocol as well to make it function correctly. Example:
incorrect → www.seznam.cz
correct → https://www.seznam.cz
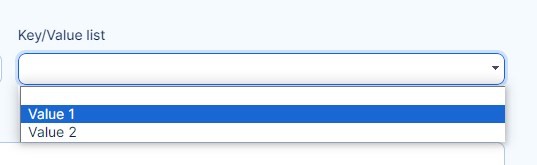
List
You can create your own list of values which you want your users to add. Please note that a change in values of "List" type will not affect any existing records created in the past.
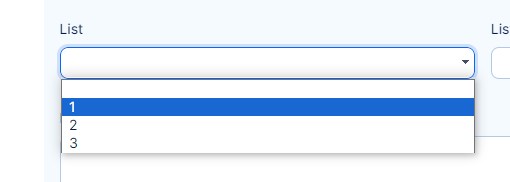
This is how it looks when set, each row is a choosable value.
Important!
Please be aware that any change you make in the list's possible values will not automatically update existing values in objects (such as Users, Project templates, Activities etc.) until you edit them manually. Therefore, a change in custom field's list of values cannot be used as the shortcut for mass change of saved values in objects.
Example of a situation where a change like this could cause a problem:
You created a custom field called "Division" to assign users to their respective divisions, such as "Programming." You assign this division to User Alena Gray. After renaming the "Programming" division to "Development" in the custom field settings, the change did not automatically update in existing user profiles, like Alena's, where the old value remains. To fix this, you need to manually update each user profile with the new "Development" value, though new users will see only the updated option.
For this reason we strongly recommend using Key/Value list instead. Where the change will appear as it is expected to.
Long Text
Resizeable multiple lines of text which is always formatted as of version 13.3.0
Due to the formatting, you are allowed to enter larger number of characters use paragraphs, bullet points etc. The character limit is practically determined by the application server and database. However, please use this filed type mindfully. It is not designed to replace for example a Knowledge base. Too long of a text will fit, but it might not be readable.
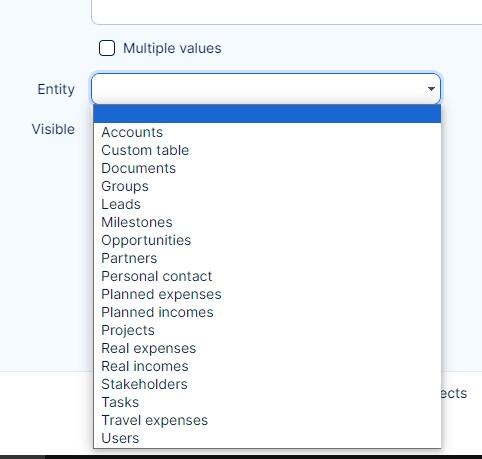
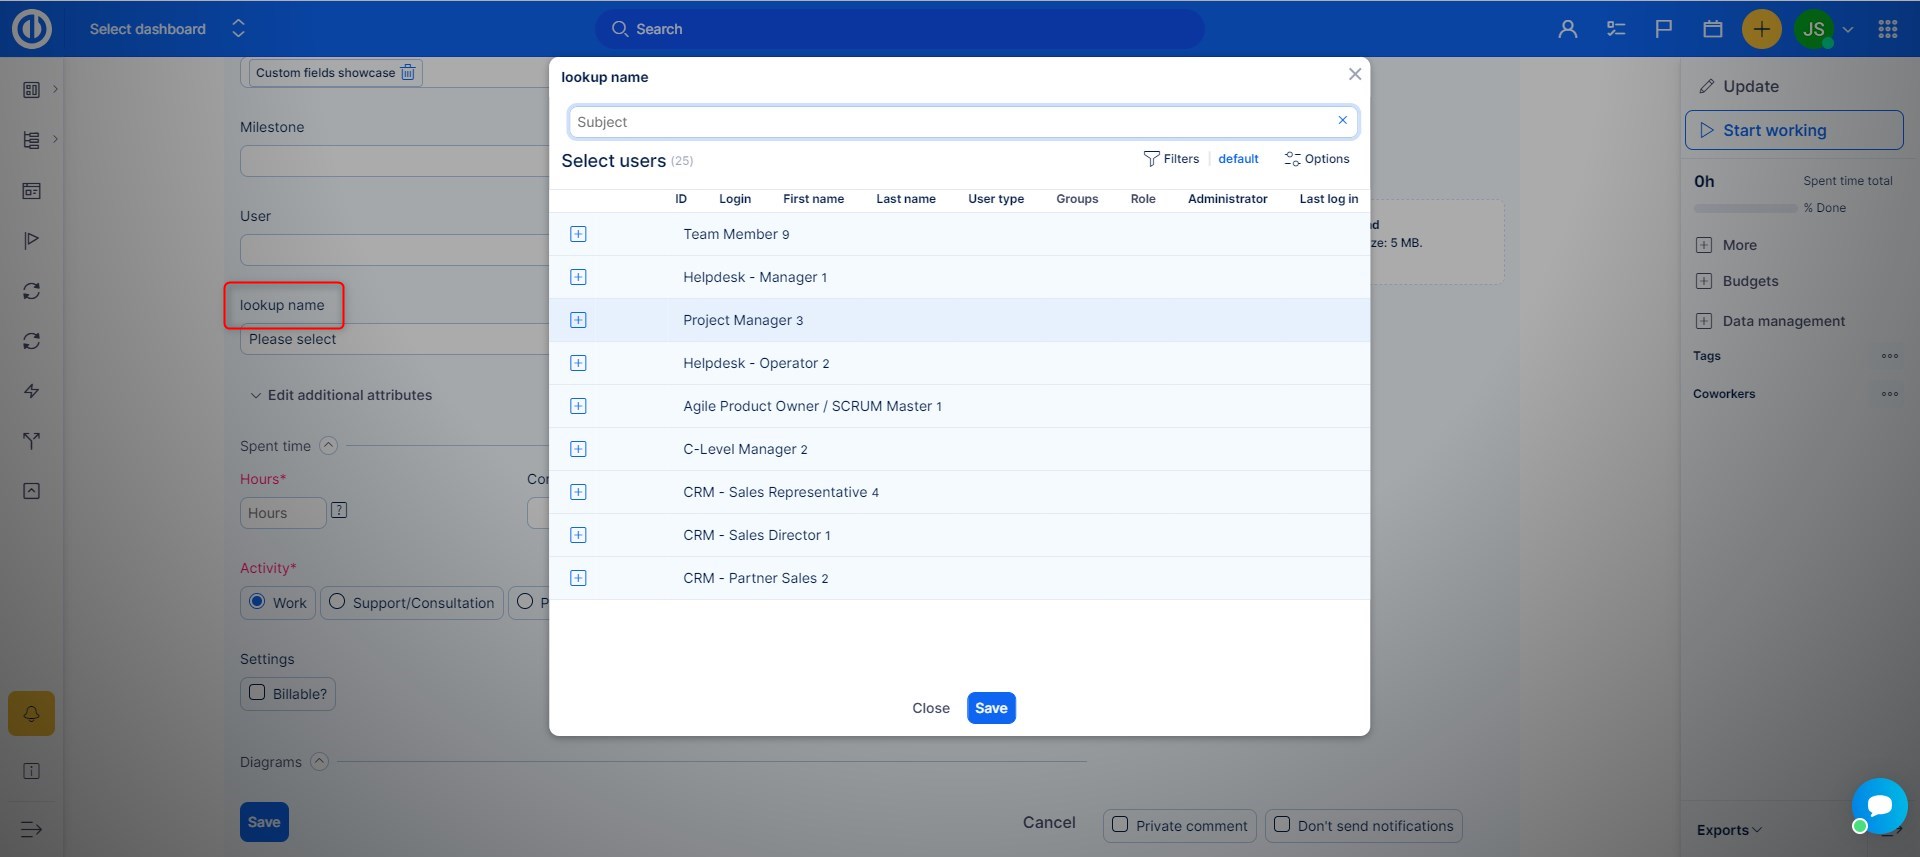
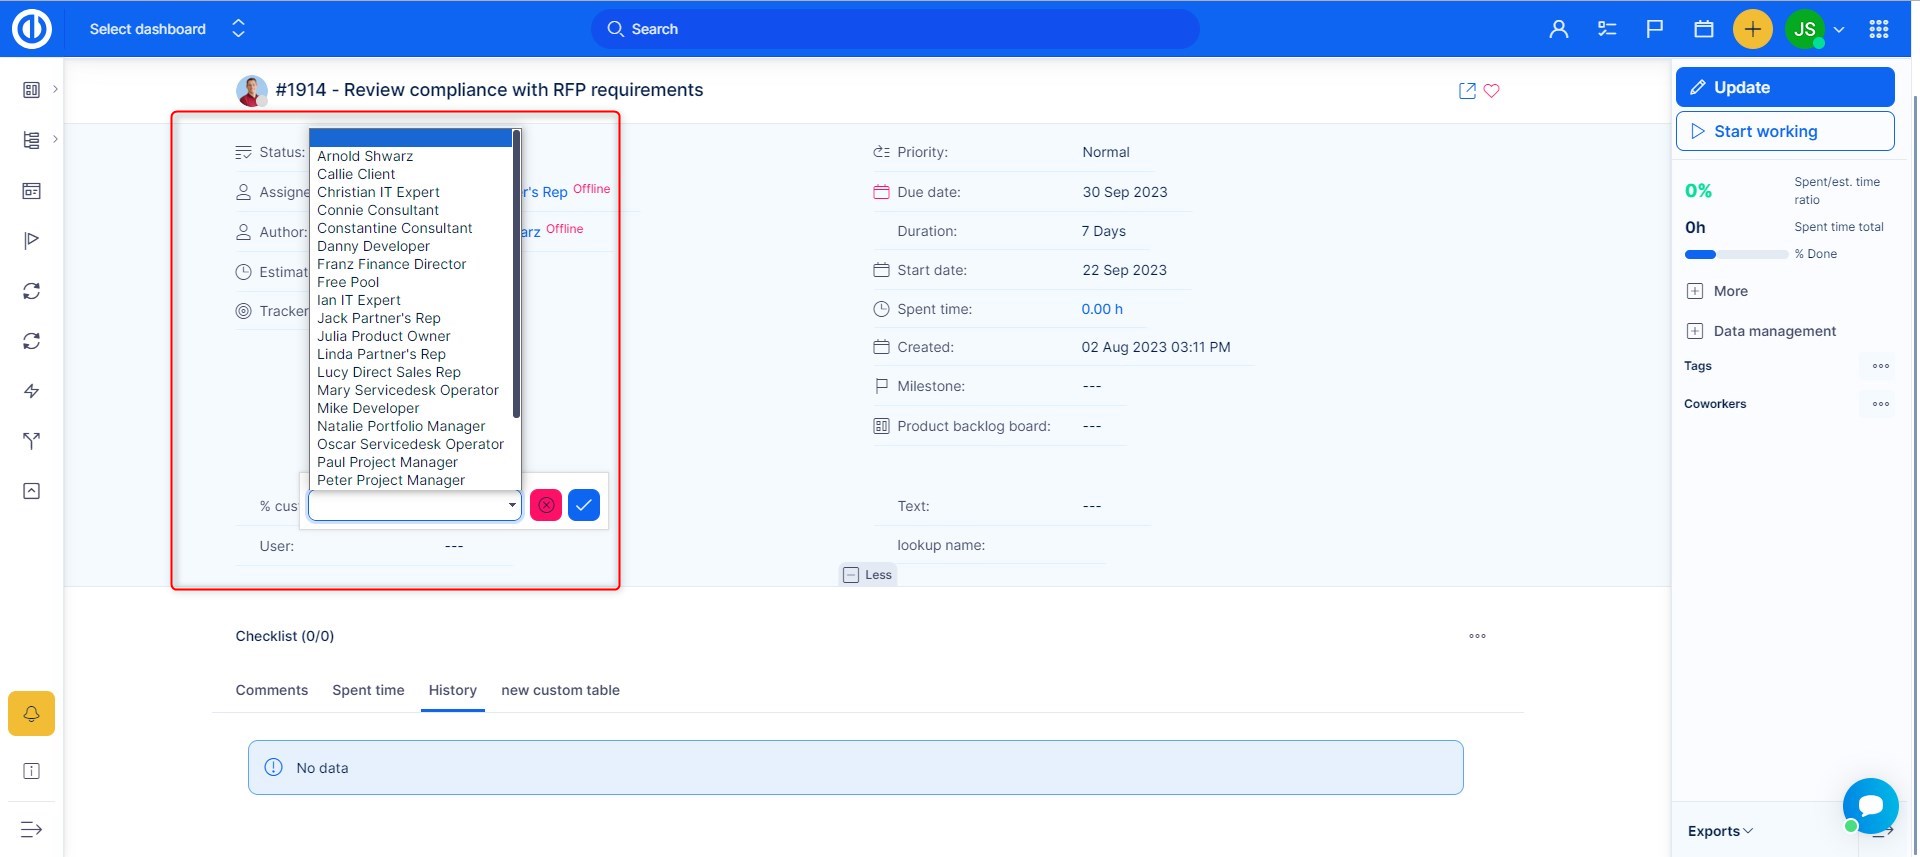
Lookup
Allows you to look up in a specific entity. This field has great functionality. You are able to lookup from a specific entity without the need to fill the entries. It takes data directly from the system. Here, for example, I created this lookup field.

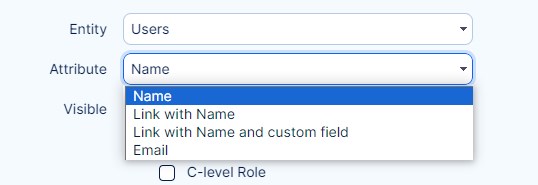
I decided that I want to add a project contact to the task I create. You have to choose the entity in which the system will allow you to pick, in this case, Users.
After that, I choose what attribute this field will have (Name).
After saving, you will be able to fill in this field in both existing and new tasks under the projects and task types you checked in the settings. To add a project contact to an existing task click on Update and >>> Click here to change additional attributes <<< You will see this.
Click on the plus sign and you will be able to add a project user there.
Here you can see the field in the task overview after a user was selected.

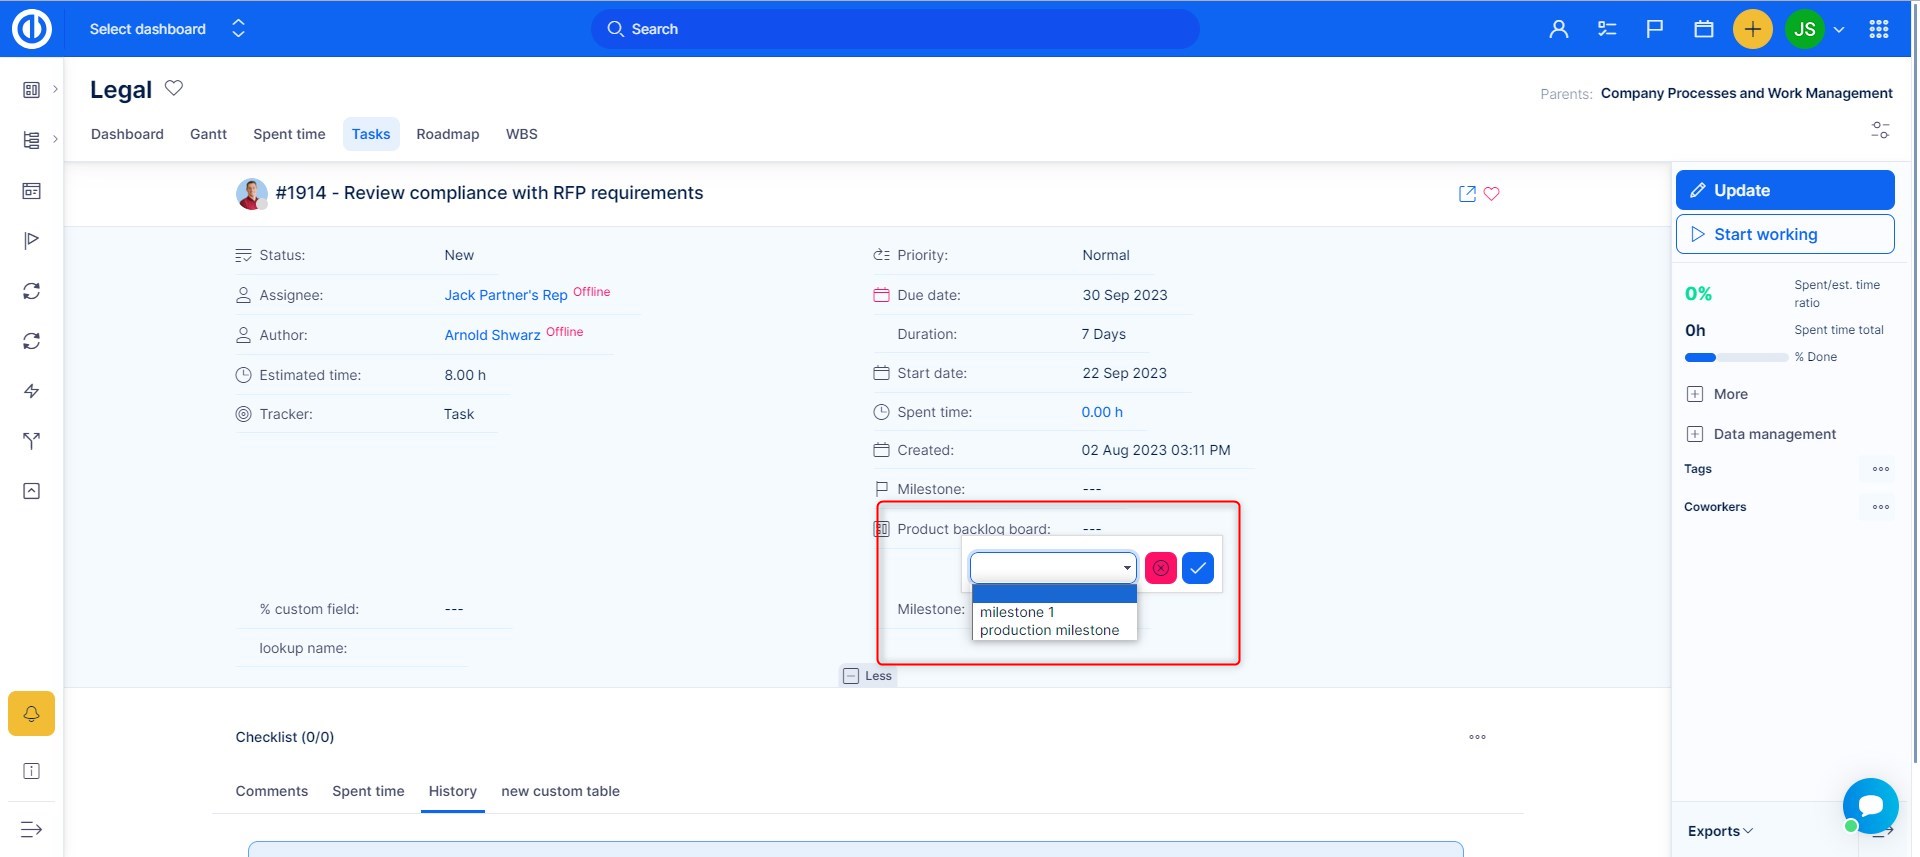
Milestone
This custom field allows you to select a milestone from a drop-down menu or tick one or more milestones as checkboxes, depending on your custom field settings. Only milestones created in the selected project are available to select.
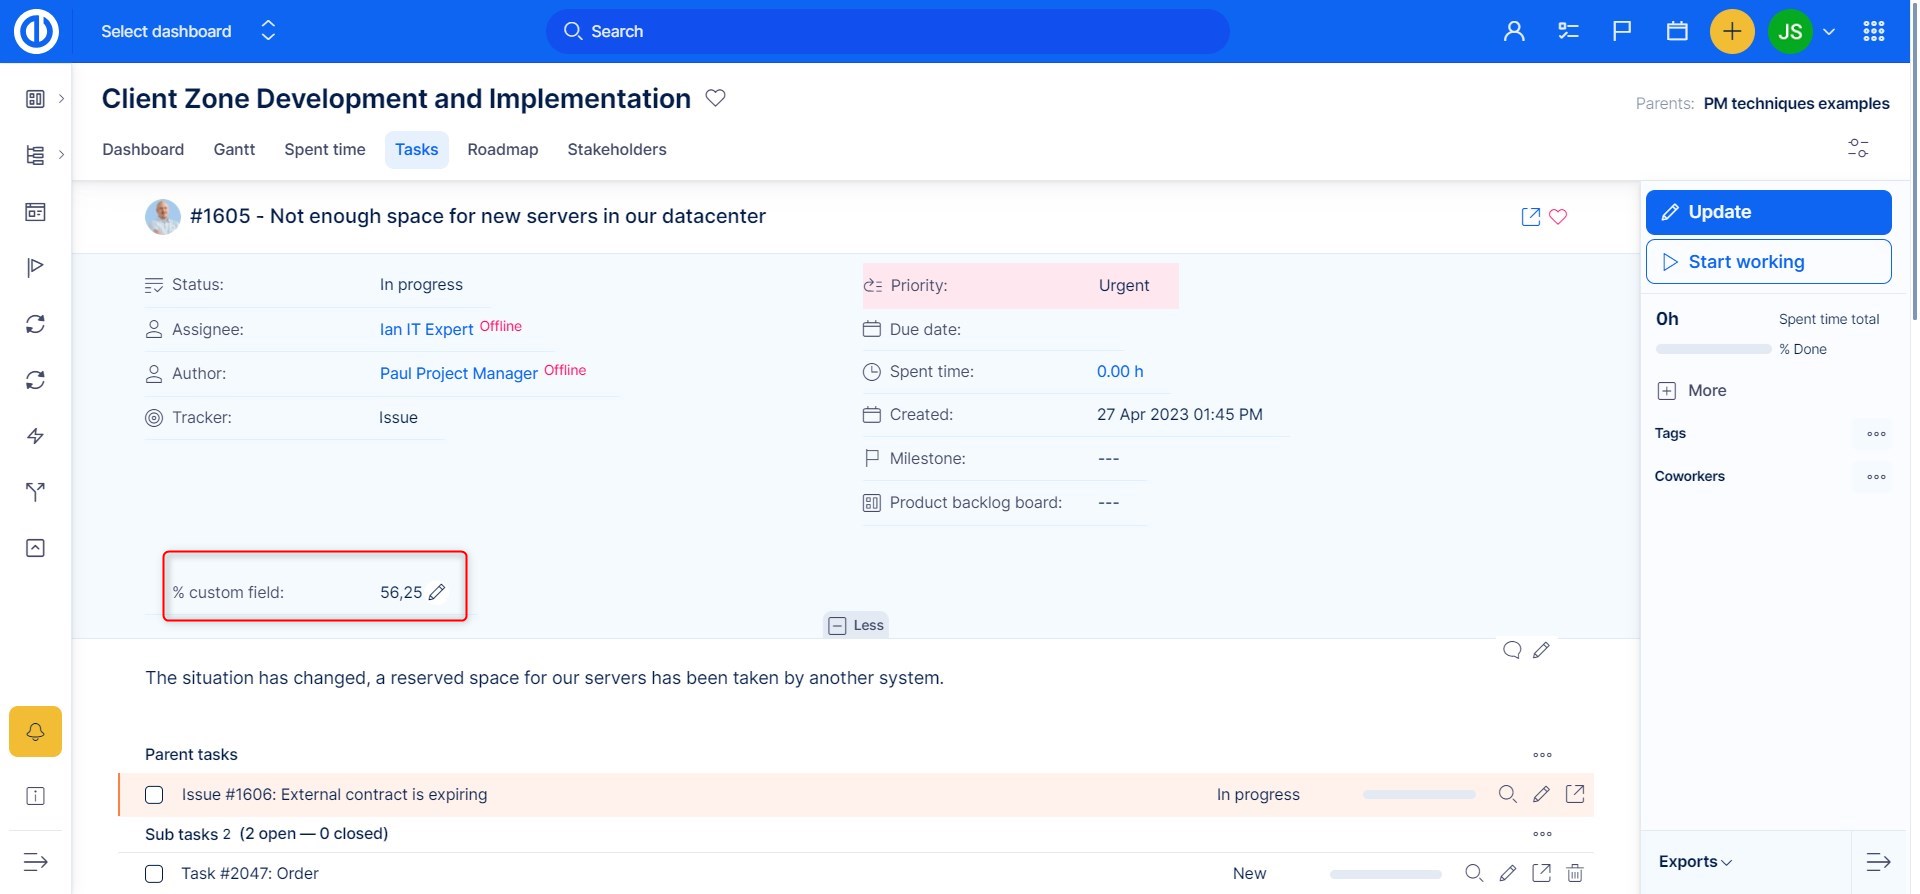
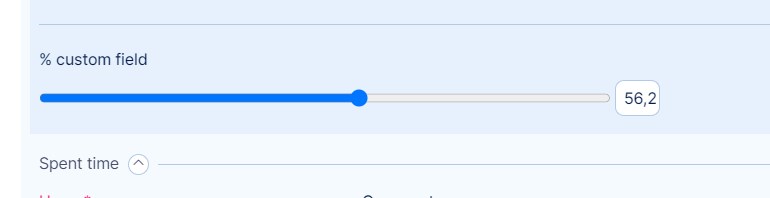
Percent
A simple custom field with a percentage value entered by a user.
% can be used with up to 2 decimals, It may be edited directly on task detail as simple text:
Or in task edit view via a slider:
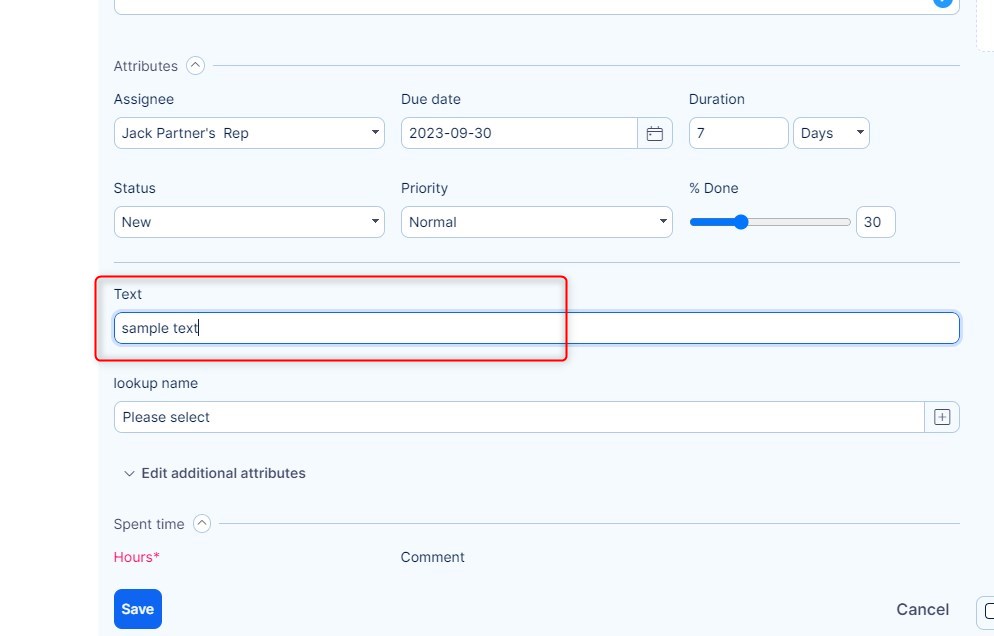
Text
This field is designed to enter a few words, there is a limit of 256 characters. For longer texts please use Long Text custom field.
User
This custom field allows you to select any existing user from a drop-down list or checkboxes. A custom field of the format User only works correctly on project-linked entities like Tasks, Spent time, Milestones, Documents, and Projects. When created on a different entity, no users are visible in the custom field. In such a case, use Lookup custom field instead of User custom field.
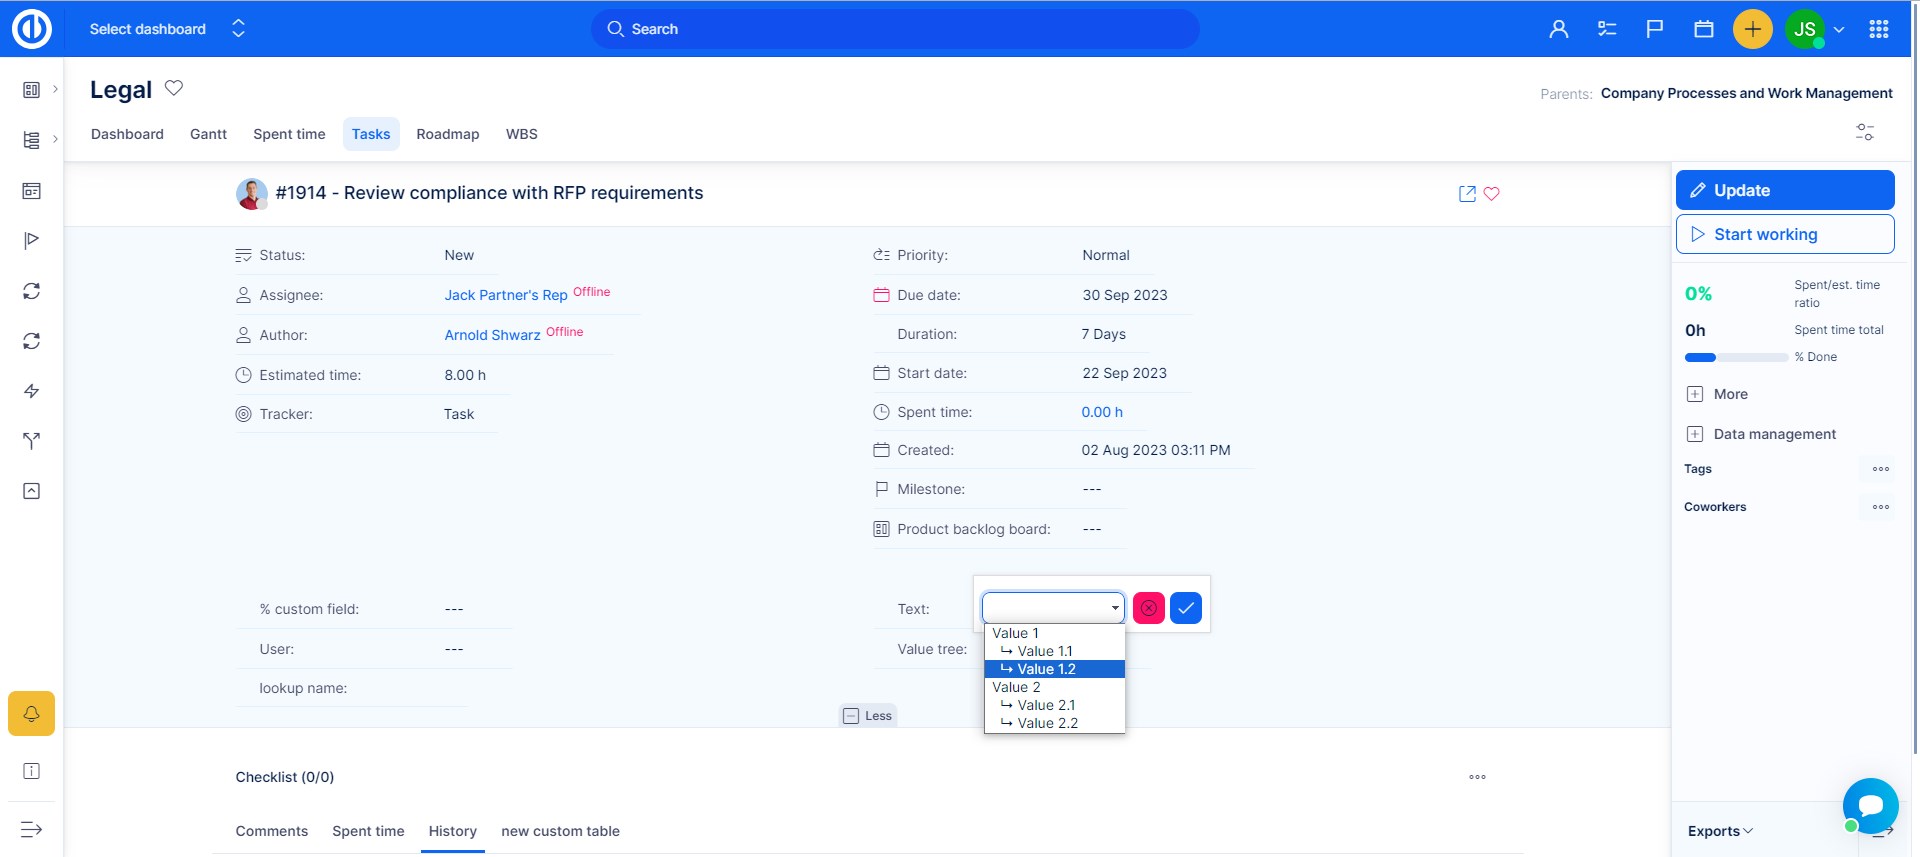
Value tree
You can make multiple possible values which you can then select simultaneously. The setting is pretty simple.
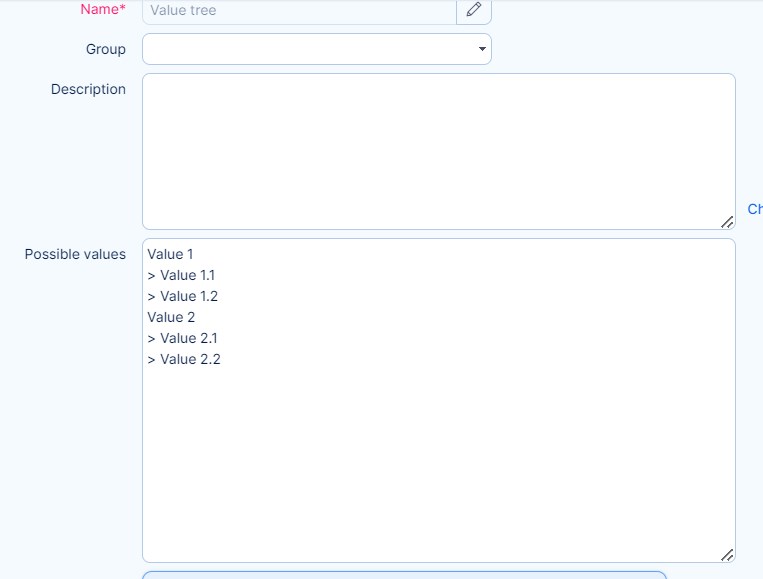
After filling in the values according to your liking, you will be able to choose them in the ticket by clicking the Update button.
Dependent custom fields
This is another widely desired feature that comes to life. It brings great possibilities but also corner cases that just can't be logically avoided due to the complexity of the available configurations. Please use it without unnecessary limiting factors. Dependent custom fields do not support quick edit mode.
How to set
1. The top custom field (Brand) must always be in format List with disabled multi-select and output drop-down list.
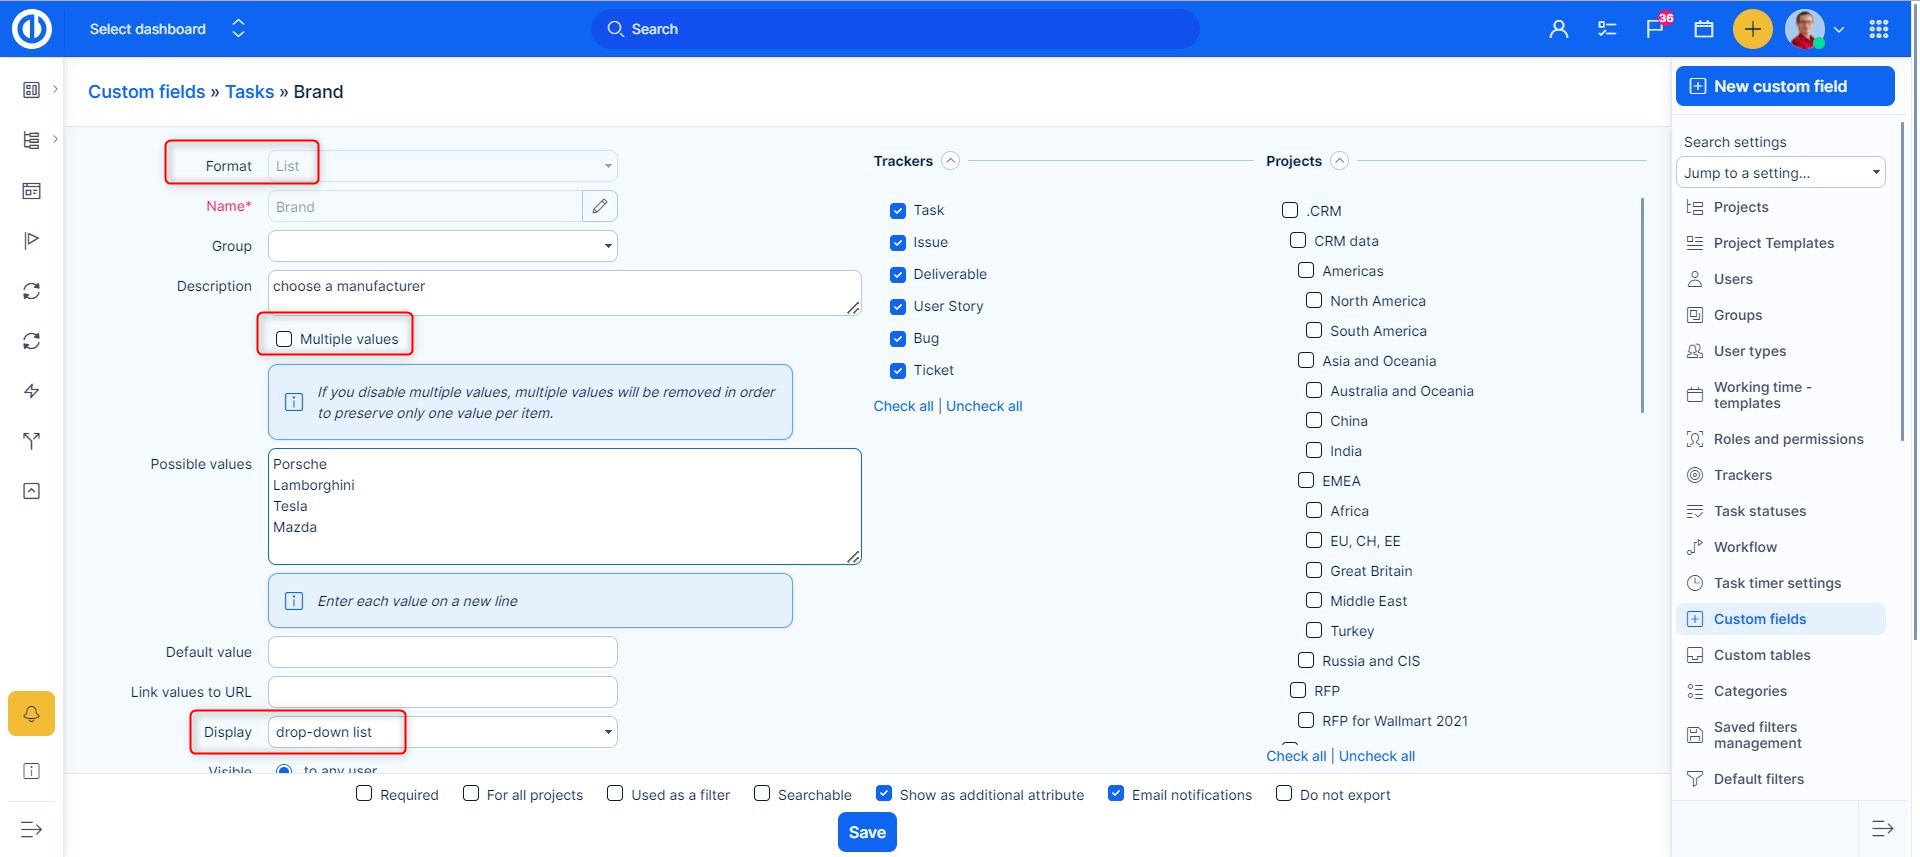
2. Now it is possible to create a secondary - dependent field. Here, enter all values that should be available on this level - for all possible options of the parent field. Again, set it as a drop-down list. At this point, choose the parent field, based on which you will determine the available values of this field. Save.

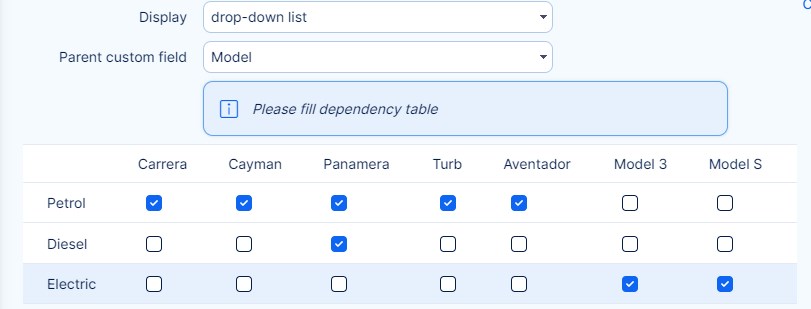
3. After saving, a matrix of available selections will appear. Select which Model goes with each Brand.
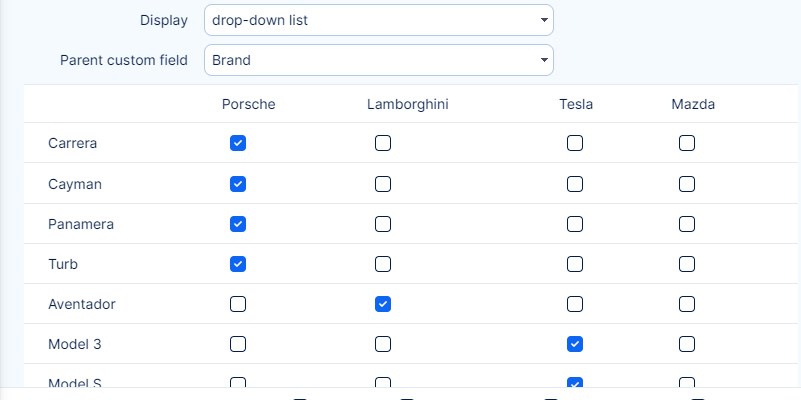
4. If needed, you can add another level of dependency by creating a new custom field and setting a Model as a parent field.
Carefully consider settings and changes
- Required, read-only, hidden - there are many cases when incorrect settings may lead to errors. For example, if you set a 2nd level field as required (either via workflow or in the setting of the field), you can't hide the parent field from any role (via workflow or special visibility). We recommend keeping visibility, edit and security settings overall identical to all fields in a "dependency chain".
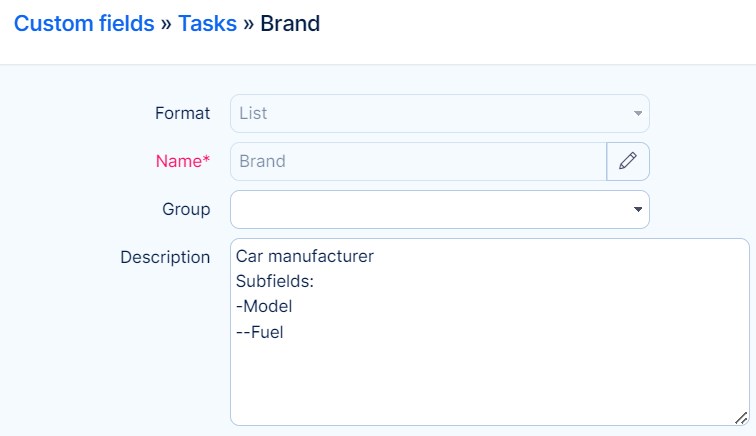
- Changes in available values - if you change possible values in any parent field, you need to make sure to reconfigure all dependent fields as well.
We recommend listing the dependent fields into the description of the field. This way you will realize that your change requires further steps. - If the value of the parent custom field has changed (or is cleared), the values of dependent custom fields (children) allow choosing new relevant values after refreshing so as to remain relevant to the dependency table (or are cleared as well).
Custom fields with formula (Business plan required)
Apart from the default custom fields, you can create a custom field with formula (also called a computed field) for every entity in More >> Administration>> Custom fields. Please note that you must have purchased the plugin in your Client zone, otherwise, it's not available in the selection of custom field formats.
First, choose an entity where you want the computed custom field to appear. Here I created an example custom field, where I will demonstrate, how you can use it. When creating a custom field of any kind, don't forget to set trackers and other attributes, so it will appear where you need it to appear.
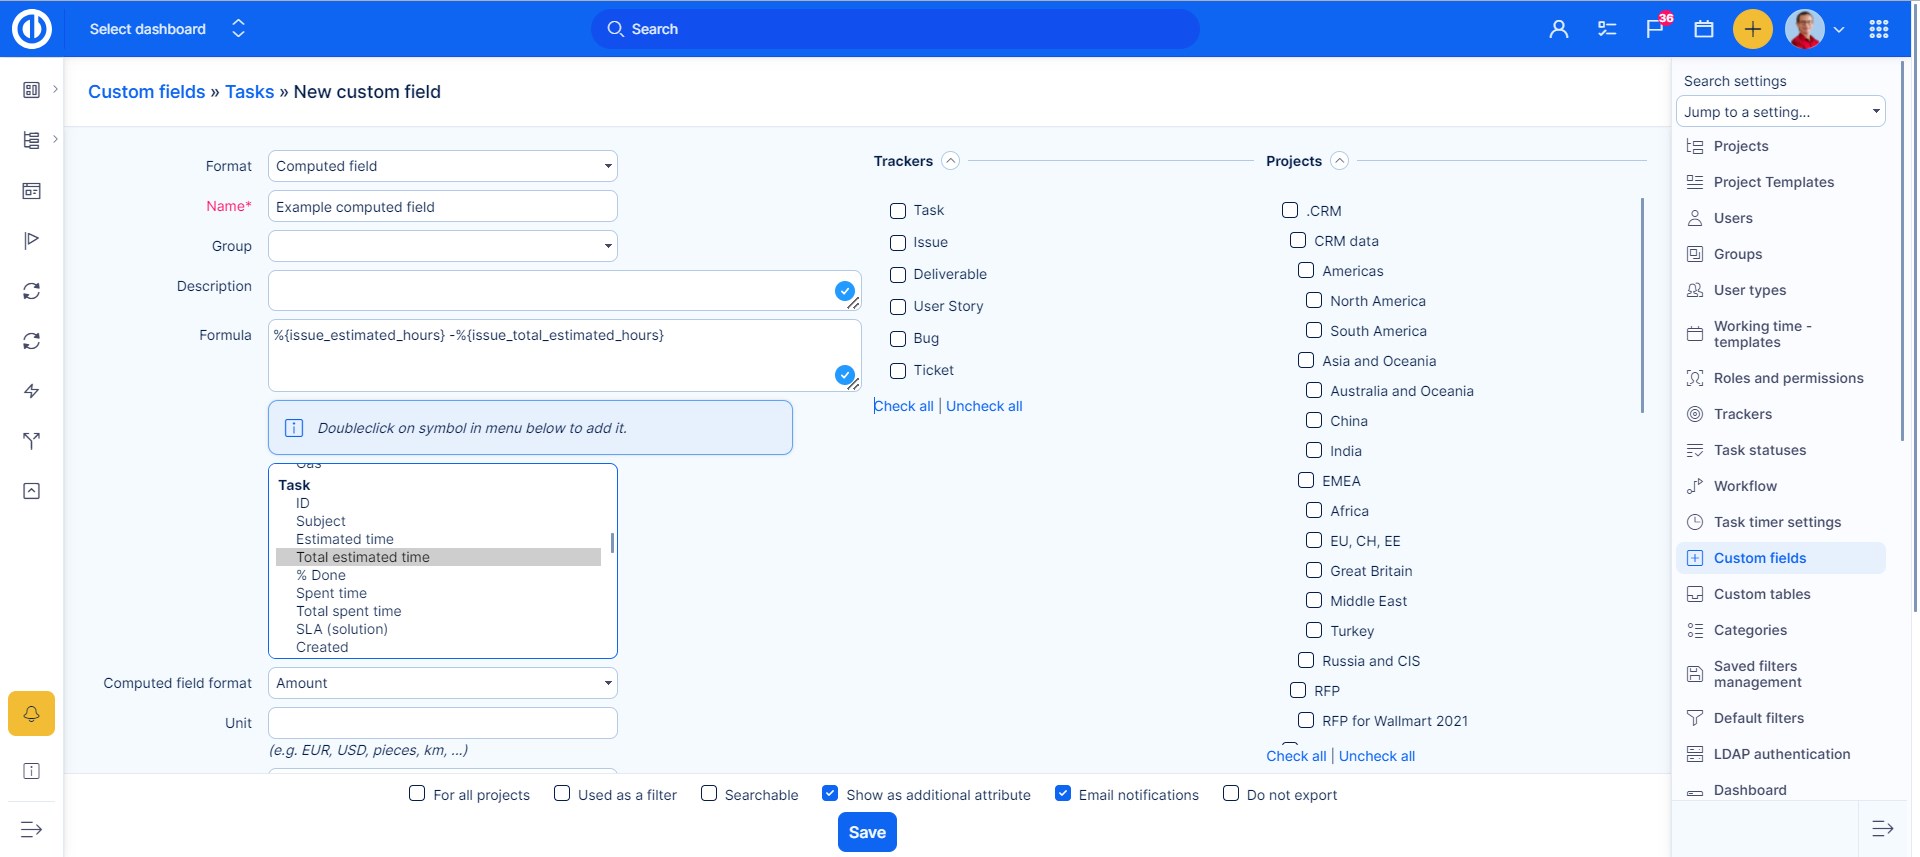
Computed custom field can be used with classic math symbols, to reach your desired result. In this example, I want to see how many hours remain when an issue is 50% done and estimated time was set to 2 hours. You can calculate this by creating this equation 2-2*50%/100. So you find the field for estimated time*%done/100. If you don´t put /100 there, you will get a wrong result. Correctly it would be 2-2*0,5 but since it is not possible to divide a field itself, you can help yourself by dividing the result.
When choosing the computed field format Use the Float format. The term Float refers to the fact that a number's decimal point can "float"; that is, it can be placed anywhere relative to the significant digits of the number. When you set up the custom field like this, you have to wait around ten minutes for them to recalculate. You can speed this process up via Rake tasks (/easy_rake_tasks) where you can execute the One shot task (executes background custom actions)
Data input and data output in the formula of a computed custom field must be of the same data type (such as number or text) to be compatible. Otherwise, the computed custom field is invalid due to incompatible output for calculated values. Please review the settings of your computed custom fields for this reason. Example: text value on input cannot result in numerical value on output.
Common custom field attributes
The following attributes are available as checkboxes for each custom field type, however, not all attributes are available for all types of object to which the custom field is to be attached.
- Required - this custom field must contain some data, otherwise, it cannot be saved
- For all projects - this custom field cannot be disabled from any project
- Used as a filter - this custom field can be used as a filter in the query search
- Searchable - this custom field can be found by typing its name into the search box and pressing the ENTER key
- Show as additional attribute - this custom field is not shown among basic task attributes but additional ones
- Email notifications - e-mail notification is sent when data is changed in this custom field
- Do not export - this custom field will be removed from exported data
How to migrate data from existing custom fields into project's native fields?
The contents of project custom fields of User/Lookup types can be migrated into the native fields called Project Manager and Project Owner, which are created on each project. To start the migration process, go to Administration >> CF migrator >> click MIGRATE on the respective field >> select the old custom field >> confirm. No other custom field formats (e.g. text) are supported by the CF migrator.

The system will change the following:
- Copy values of the custom field
- Change saved filters
- It will try to change filters on your personal dashboard modules
- Disable the selected custom field
Migration-related restriction: If you had any saved personal filters, columns, or personal dashboard modules with the selected custom field included (i.e. the one from which the data was migrated) before you started the migration process, you may need to recreate/reset these entities because disabling the selected custom field also removed it from all these entities.
Corner situations
- A computed custom field from a filter that is computed from a computed custom field from a filter cannot be applied (will not be processed).
- A lookup-type custom field cannot be edited via quick edit or the Quick task editor but only in task detail but only in task update view.
- When enabling Multiple values option in combination with dependent custom fields, it would work too but the value would be shown doubled (or tripled, according to the field setting). That's why we do not recommend using Multiple values along with dependent custom fields.
- Computed custom fields only compute numerical values and their results can only be a numerical value as well. For example, if a user entity is added to a formula of a computed custom field, the user ID (which is a number) will be used to compute the resulting value.
- All custom fields having active the special visibility setting (which means they are visible to selected user types, groups or users only) are excluded from the bulk edit option due to system performance reasons. Therefore, the values in these custom fields can only be changed individually, not all at once during a single bulk edit.
- The default names of two or more custom fields within the same entity cannot be identical. This is being validated already during custom field creation. However, an issue with identical names may still occur due to translations of custom fields in various languages. For example, one custom field may have a default English name and its German translation. A second custom field may have a default German name, which is identical to the German translation of the first custom field. This is not being validated during custom field creation but only during project creation where both such custom fields are present.
- An Autoincrement field is not increased by 1 for a new task created via e-mail. It only works for a new task created via the form.
- If you select the "Multiple values" option in the custom field settings, it cannot be displayed as a drop-down list because it does not support multiple values. It is therefore displayed as checkboxes.
- Long text custom fields cannot be displayed in Gantt due to the large number of characters.
- With Date custom field you will find the option to check "default is today" , this value fills in only with newly created entity( Task). If this type of custom field is enabled on already existing entities, the date will not automaticaly fill with the current date.

