


Task tracking
Task tracking features overview
Task tracking global settings
How to work with attachments
Quick task editor
Task statuses
Workflow
Task relations
How to add/change parent task
How to copy tasks
How to merge existing tasks
Bulk edit
How to mark a task as favourite
How to use comments reactions
How to use private comments
Assigning a task to multiple users
Distributed tasks
Repeating tasks
Checklists
Task Templates
How to show task ID in Task list and Tasks list widget on My dashboard
Task categories
Corner situations
Task tracking features overview
In this post, we´re going to learn how to work with tasks. In task you have some basic attributes like author of the task, assignee of the task, start date, due date, estimated time, spent time, task priority, tracker, and status.
- Spent time = reported project time, always without subprojects
- Total spent time = reported project time, always with subprojects
- Estimated hours = estimated time from tasks, always without subprojects
- Total estimated hours = estimated time from tasks, subprojects are considered depending on "Display subprojects tasks on parent projects by default" setting (can be changed in Administration >> Settings >> Task tracking >> Display)
![]()
If you hover over each attribute a pencil will show up, when you click it, you will be able to change any attribute if you are in a hurry.
![]()
Another way to change task attributes is via the "Update" button. You will be able to add a comment and change all the attributes you need to change at once.
![]()
You can also change additional attributes if needed. Those differ according to your settings of what fields you have in a task, or in custom fields.
![]()
There are more options of what you can do with a task in the right column after clicking the "More" button.
![]()
You can add a task as your favorite, with this, you will be able to access it quickly. You can watch the task so you will get updates even when you are not assigned or a co-worker. You can Copy the task if you click it a new task form will open, it will be prefilled according to this task and then you can just click save and the copy will be created. You can Move the task between projects.
Deleting the task is also possible, but we do not recommend it unless you really mean it. If you got to tasks that you want to merge into one task, use the merge button. You can add a related task, there are many task relations which you can find in the task relations post. If you need to do something that you need to differ from the original task purpose, you can add a subtask. Those tasks will be linked and you will see it here:
![]()
You can create a project based on a particular task. If you have a knowledge base plugin, you can create a knowledge post by clicking the "Knowledge" icon (bulb).
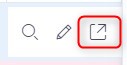
And of course, you can print the task by pressing Ctrl+P. You can also export it in many ways using the export options in the bottom right corner.
For each comment, the "Link to journal" button is available under its context menu (the sprocket icon) and enables to copy/paste the link directly to the particular comment in the journal. Just click on it with the left mouse button to make it copied in your clipboard instantly.
![]()
Task tracking global settings
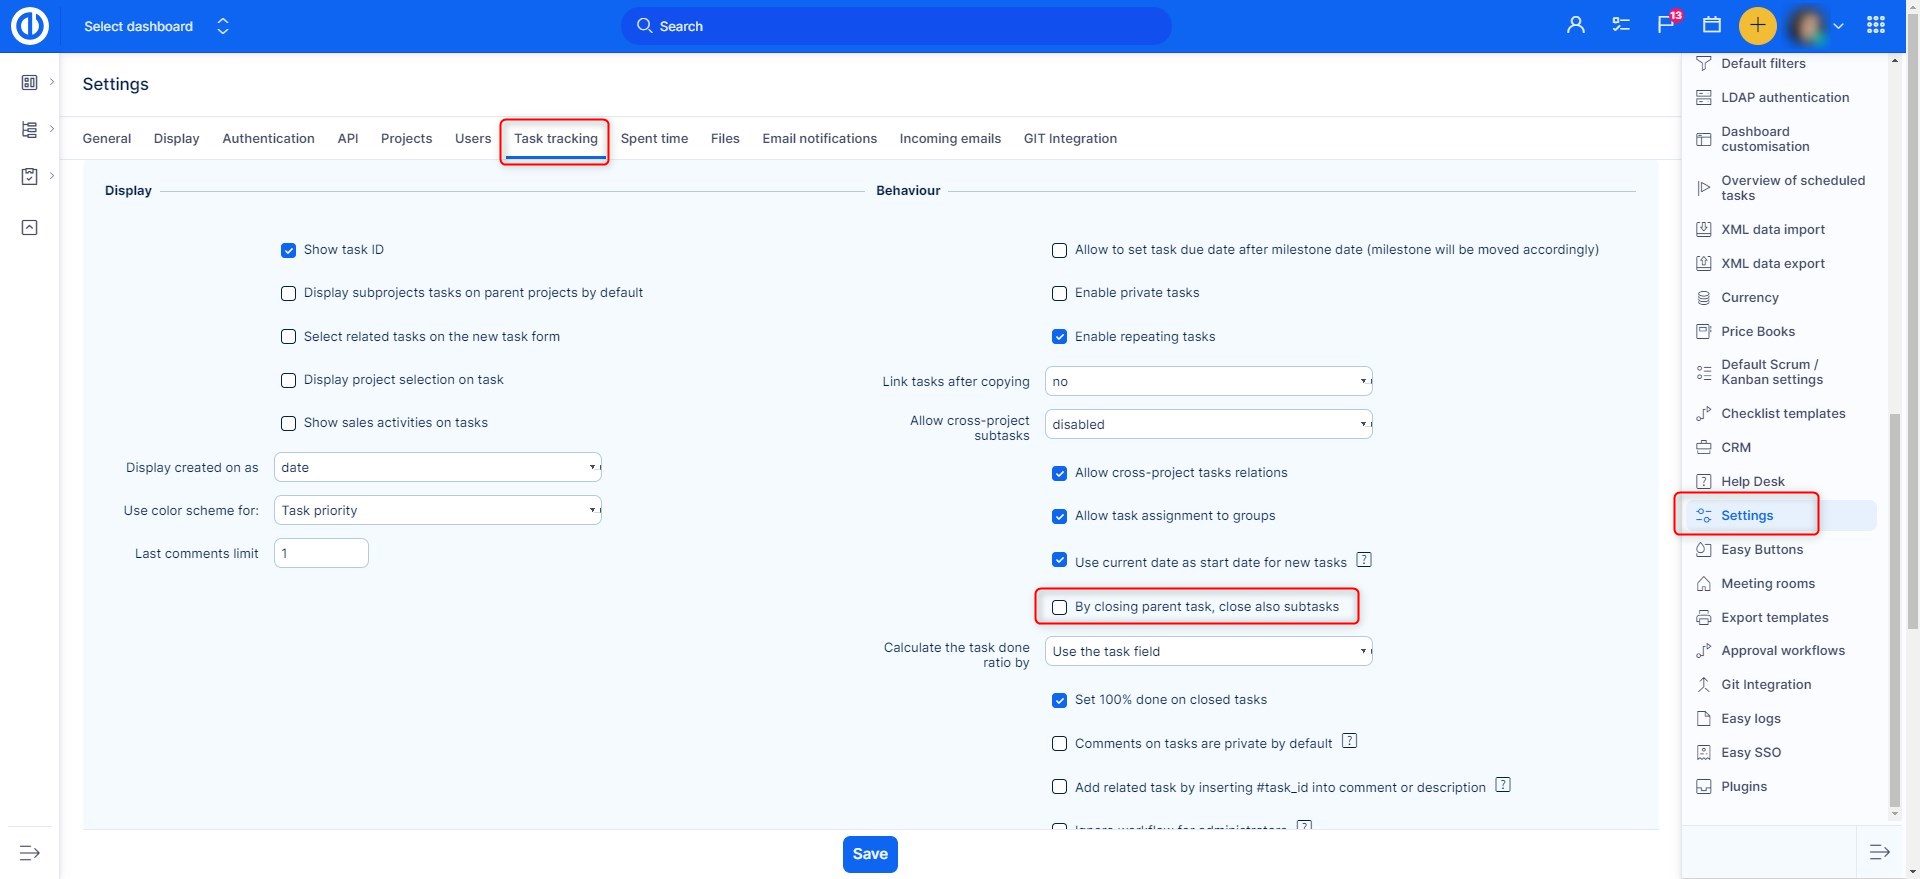
Task tracking global settings can be found under Administration >> Settings >> Task tracking.
![]()
1) Display
Show task ID
This sets up, whether you see the task Id in the task title or not.
Display subprojects tasks on main projects by default
This allows you to set up whether you want to see subproject tasks on parent tasks main age or not.
Select related tasks on the new task form
If you turn this option on, you will be able to select a related task when creating a new task directly.
Display project selection on task
This turns on the option of selecting and changing project in line on a task.
Show sales activities on tasks
When turned on, sales activities from CRM cases will be shown directly on tasks.
Display created on as
With this, you can set how you want the Created on date displayed, with or without time.
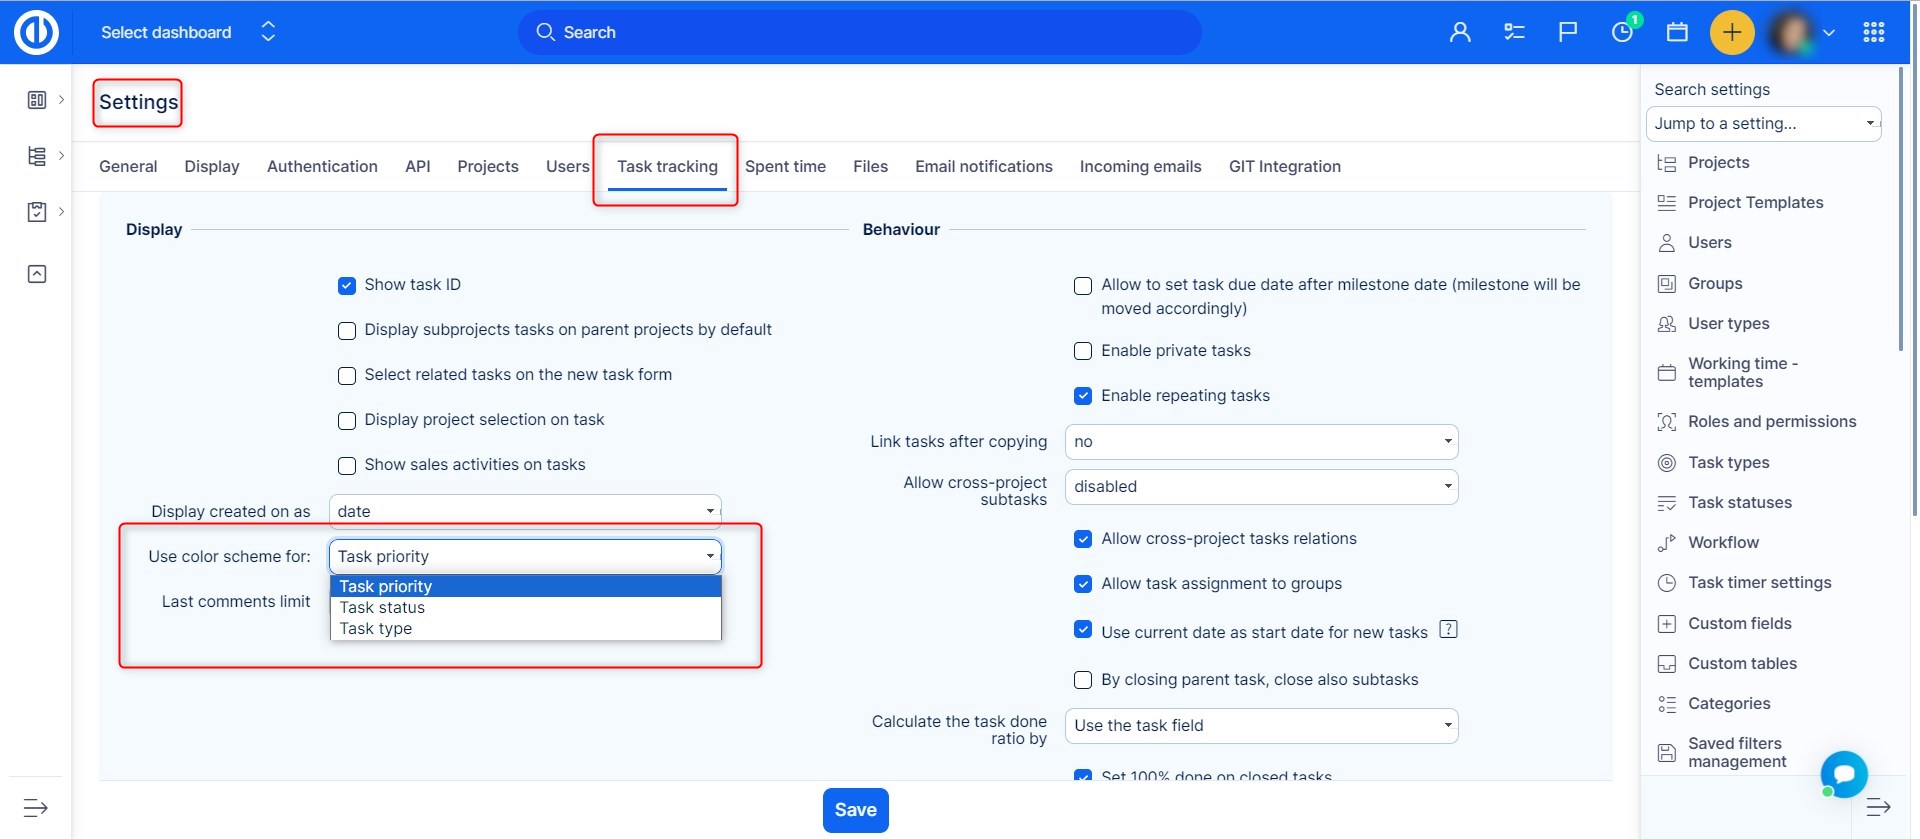
Use color scheme for
Here you choose based on what is the color scheme used. It can be based on task priority, status, or task type. You can find the details in this post.
2) Behaviour
Allow to set task due date after milestone date
This setting allows or prevents users from setting due date of a task after a milestone date. For example, if the milestone is on 1. 1. 2016, the user will be able to create a task with a due date on 1. 2. 2016 when the option is checked. If this isn´t allowed, the user will be only able to set the due date up until 1. 1. 2016. When a task is moved beyond the milestone in Easy Gantt, the milestone will be moved automatically to the point of task's due date because no tasks should actually stay beyond the milestone day, which represents a point in time when all associated tasks are done.
Enable private tasks
Sometimes, you might have an exclusive task that no one else should see, except author, assignee, and coworker(s) of the task. For this purpose, private tasks come handy. To be able to create private tasks, you have to activate this option on tasks. To do so, go to Administration >> Settings >> Task tracking where you need to check the option "Enable private tasks". Moreover, a permission called "Set tasks as private" is required for user's role to allow him to create private tasks. In addition to that, the "Private" standard field must be checked in the tracker settings (Administration >> Trackers >> select tracker >> Standard fields). Only after meeting these conditions can private tasks be used.
When creating a new task, the "Private" checkbox is available. When checked, the task will only be seen by author, assignee, and co-worker. No one else will be able to see it. To recognize private tasks easily, there is a clearly visible label and an icon next to the name of the task. Another way to make sure the tasks are seen by only certain users is to add them a role where they have only permission to see tasks where they are the assignee, coworker, or author.
Allow repeating tasks
This allows users to create repeating tasks. How to create repeating tasks can be found here.
Link tasks after copying
With this setting, you can choose if you want to link tasks that you copy, you set here if the system should ask you, or that the system can do this automatically.
Allow cross-project subtasks
You can set here if you want to enable cross-project sub-tasks, and if under what circumstances. You will have these options:
- Disabled
- With all projects
- With project tree
- With project hierarchy
- With subprojects
Allow cross-project tasks relations
You can set here if you want to enable cross project task relations. If have this disabled, task from project A cannot be related to a task from project B.
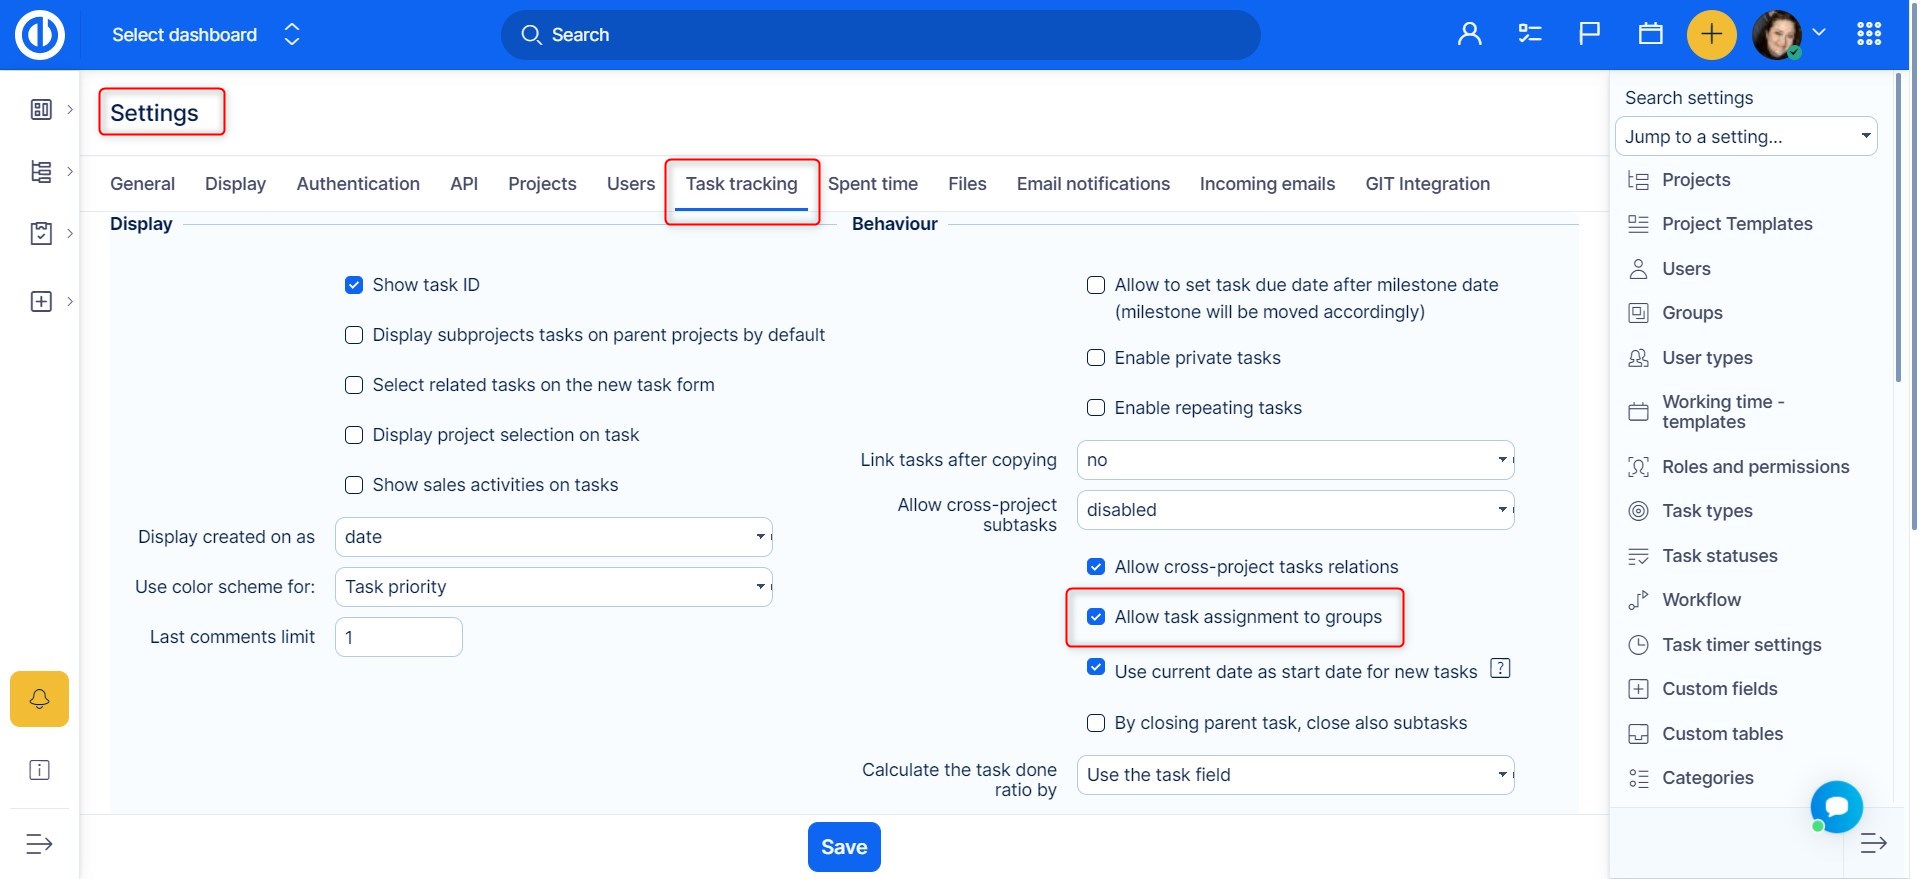
Allow task assignment to groups
With this turned on, you are able to assign tasks to groups of users. The group has to be set as a member of the project.
Use current date as the start date for new tasks
This setting automatically sets the current date as the start day of a task. the box will be pre-filled with the current date. If you turn this off, the start date box will be empty.
By closing parent task, close also subtasks
With this option checked in all the subtasks will be closed with parent task.
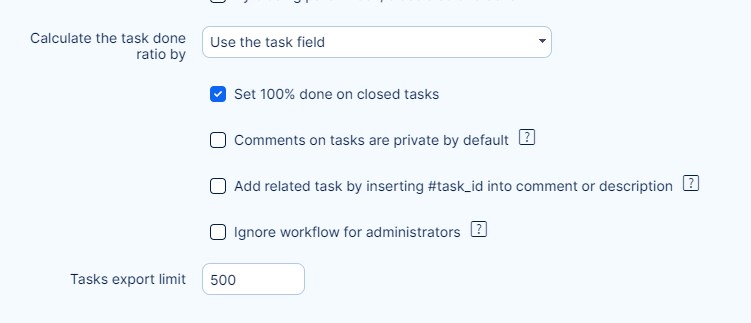
Calculate the task done ratio by
Here you choose how you want to calculate the done ratio of a task.
Set 100% done on closed tasks
When you choose this to be on, the percentage will automatically fill in 100% when you mark a task as closed.
Comments on tasks are private by default
All the notes added will be by default checked in as private.
Ignore workflow for administrators
With this option turned on, the administrator can basically do whatever they want, no matter what roles they have and what workflow settings are assigned to those roles. This option only applies to Task status transitions, not Task fields permissions or CRM fields permissions.
Tasks export limit
When exporting tasks, you can set how many task maximum may be exported. If you want to export more than for example 500 tasks at once, make sure you don´t have the limit set to 400 for example.
How to work with attachments
Attachents can be added to the task anytime. To add an attachment click on the box or drag a file to the box in the following picture:
![]()
The file size limit can be changed in Administration >> Settings >> Files
![]()
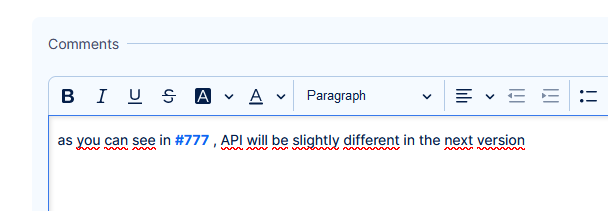
To display an attached image in the comments within the text we reccomend using the following way, which will save up space on the server and keep the loading time quick.
Add the following text and file name :
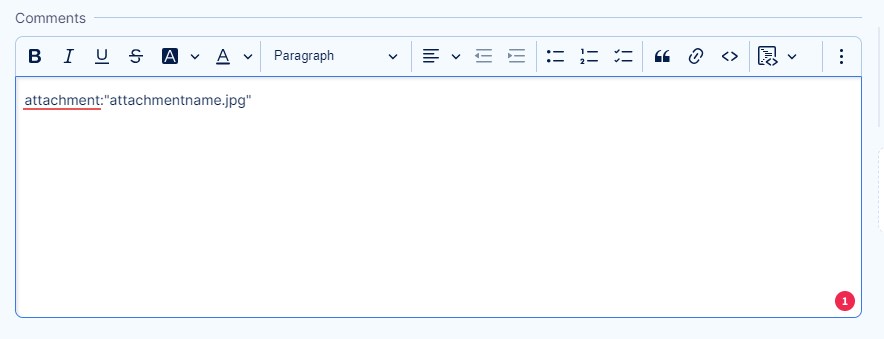

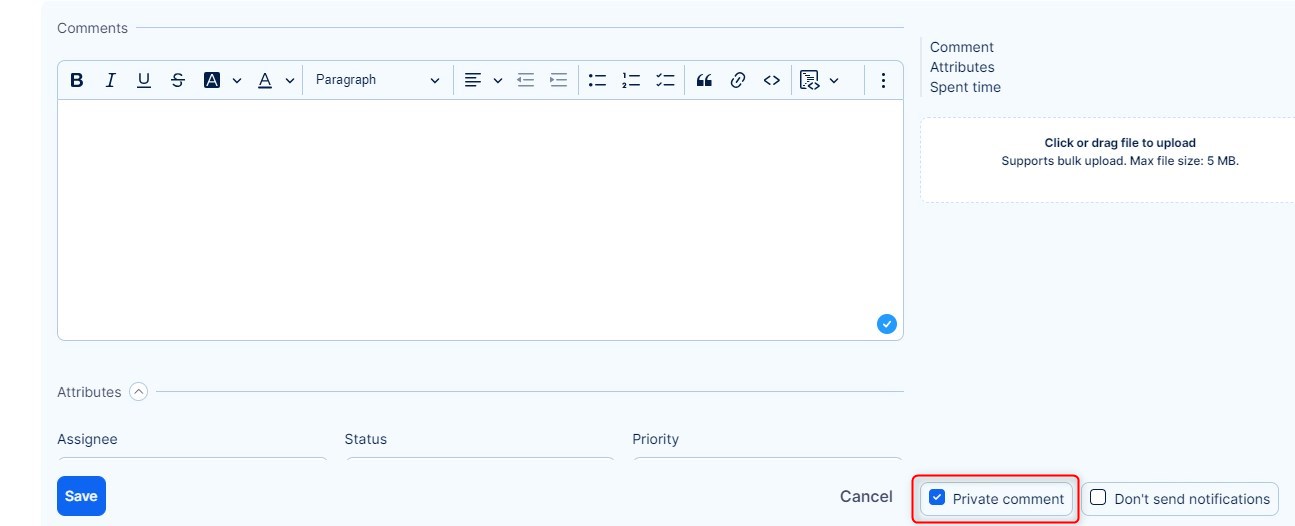
You will be able to limit visibility of files using the private comment feature.
If a comment is marked as private, the attachment connected to that particular update will be also kept private, visible only to users who have the permissions to see private comments.
Warning: If you leave the comment empty and only check the private box, the attachment will NOT be marked as private. A private comment must contain some text, otherwise it is not a comment.
How to use Quick task editor
Overview
How to access Quick task editor
The look and functions of Quick task editor
Limitations of Quick task editor
Overview
Quick task editor is available in the following features of Easy Redmine:
- Agile board - Scrum & Kanban
- Easy Gantt PRO
- Resource Management
- Scheduler
- Task list
- WBS - Work Breakdown Structure
Quick task editor enables to see and/or edit all important data related to a specific task in a single-screen pop-up window, eliminating the need for opening the task in a separate tab. So, it is like a compact view of everything that can usually be found under various tabs, columns or buttons of the normal task view. Most importantly, Quick task editor is extremely fast and easy to use and its main purpose is saving time while doing standard task management.
How to access Quick task editor
Here is how to access Quick task editor in various features:
- Agile board - Scrum & Kanban: To open Quick task editor of a specific task from the Scrum/Kanban board, just click on the task itself.
- Easy Gantt PRO: Double-click on any task on the timeline or in the left-side tree to open Quick task editor. When editing a task using Quick task editor in Easy Gantt, the changes will not be saved unless the user clicks on the Save button in the top right corner of the timeline window.
- Resource Management: Double-click on any task on the timeline or in the left-side tree to open Quick task editor. When editing a task using Quick task editor in Resource Management, the changes will not be saved unless the user clicks on the Save button in the top right corner of the timeline window.
- Scheduler: To open Quick task editor of a specific task from Scheduler, just click on the task itself.
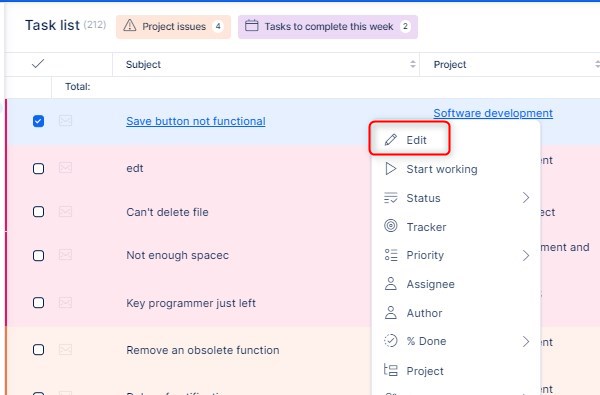
- Task list: To open Quick task editor for a specific task from the task list, just click on the "pencil in a square" icon in the context menu of a task while the mouse cursor is hovering over it.
- WBS - Work Breakdown Structure: To open Quick task editor of a specific task from WBS, just click on any task in the mind map and select the pencil icon.
The look and functions of Quick task editor
For example, this is how it looks like on the task list. The "pencil in a square" icon opens Quick task editor immediately. To access Quick task editor inside any other feature (besides task list) from the above-listed ones, just take standard steps to edit a task and Quick task editor usually pop-ups automatically so you should not have any trouble finding it.
Below is how Quick task editor looks like. As you can see, the sidebar menu contains buttons for quick navigation to required task attributes you would like to check or edit, namely details, description, comments, attachments, spent time, coworkers, tags, subtasks, parent task, and related tasks.
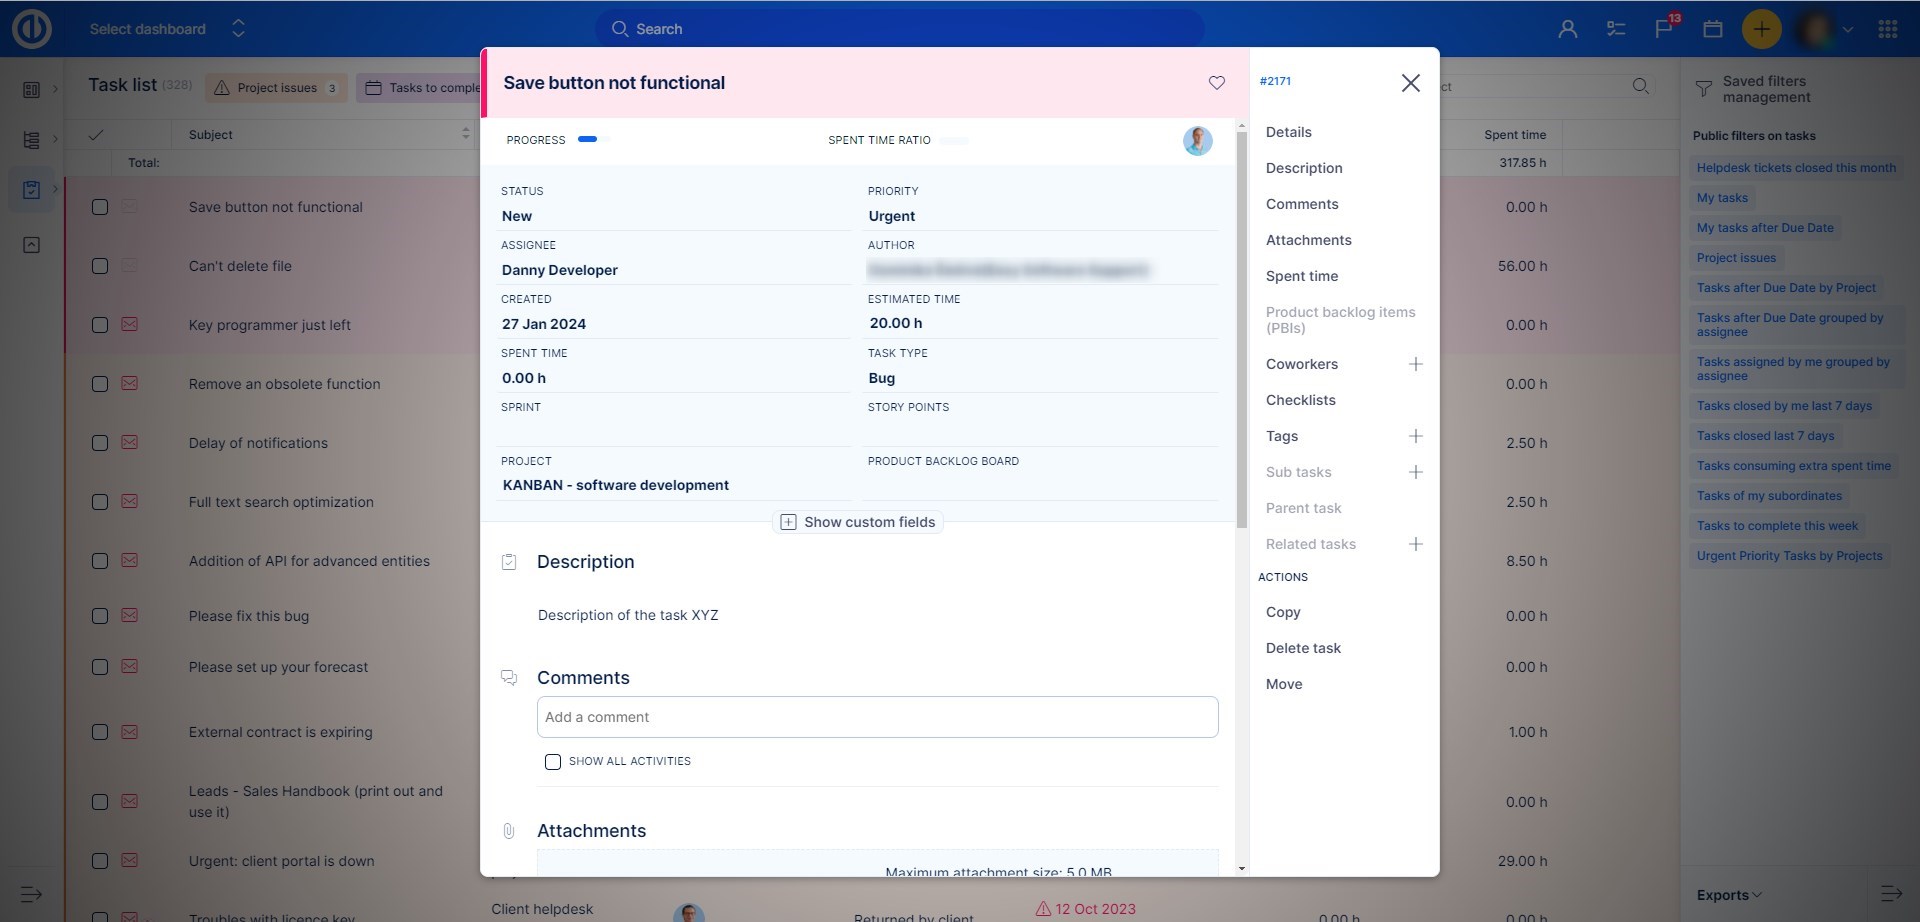
Of course, Quick task editor is definitely not a passive view but is fully interactive so you can quickly edit any of these visible task attributes or add missing text just by clicking to the respective area on the screen.
Limitations of Quick task editor
General limitations:
- It is not possible to show diagrams in Quick task editor.
- In WBS, not just tasks but also projects can be viewed using Quick task editor (by clicking on the pencil icon). In case of projects, however, only project name and description can be edited in this view.
- DMS does not work with Quick task editor. It is not possible to store DMS attachments in in it, even if this is set in the system.
The Gantt chart and Resource Management limitations:
- When editing a task using Quick task editor, the changes will not be saved unless the user clicks on the Save button in the top right corner of the timeline window. Only the following fields are saved automatically: Description, Tasks, Comments, Log time, Tags, Coworkers, Custom fields.
Custom fields limitations:
- Lookup – not possible to edit, it is only shown in Quick task editor
- Key/value list, Milestone, User + display multiple setting – shown only as a dropdown box in Quick task editor
- Color - not shown in Quick task editor
Task statuses
To manage task statuses, go to Global menu >> Administration >> Task statuses
You will have the option to create a new status by clicking on the New status button.
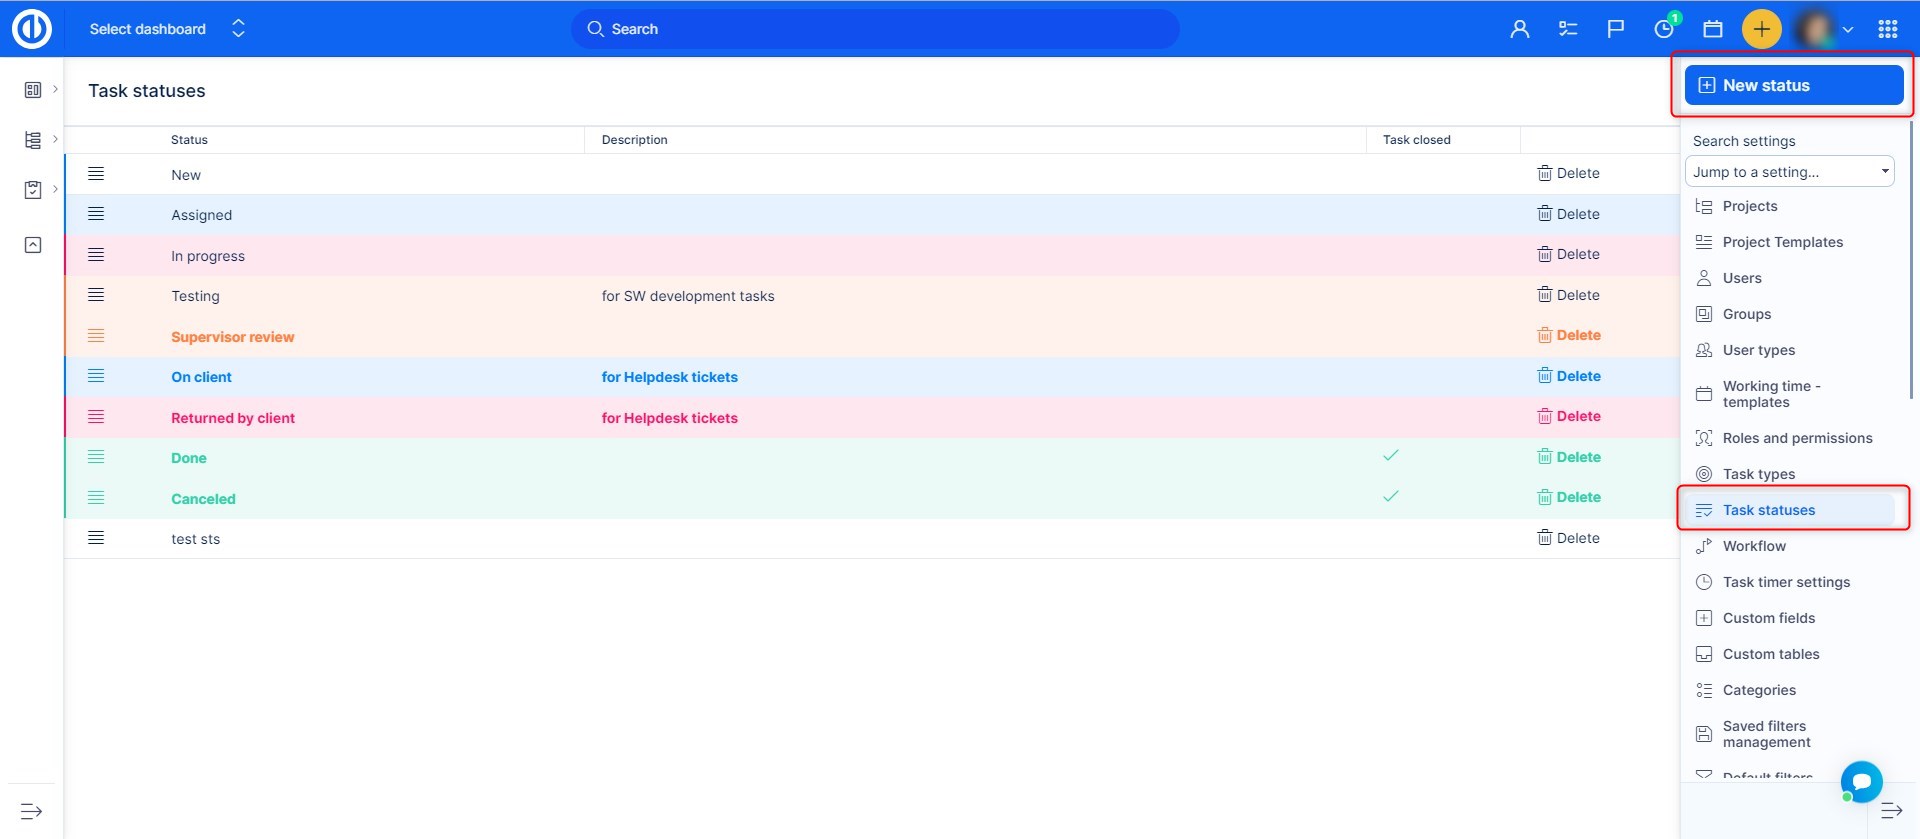
You will land on this page:
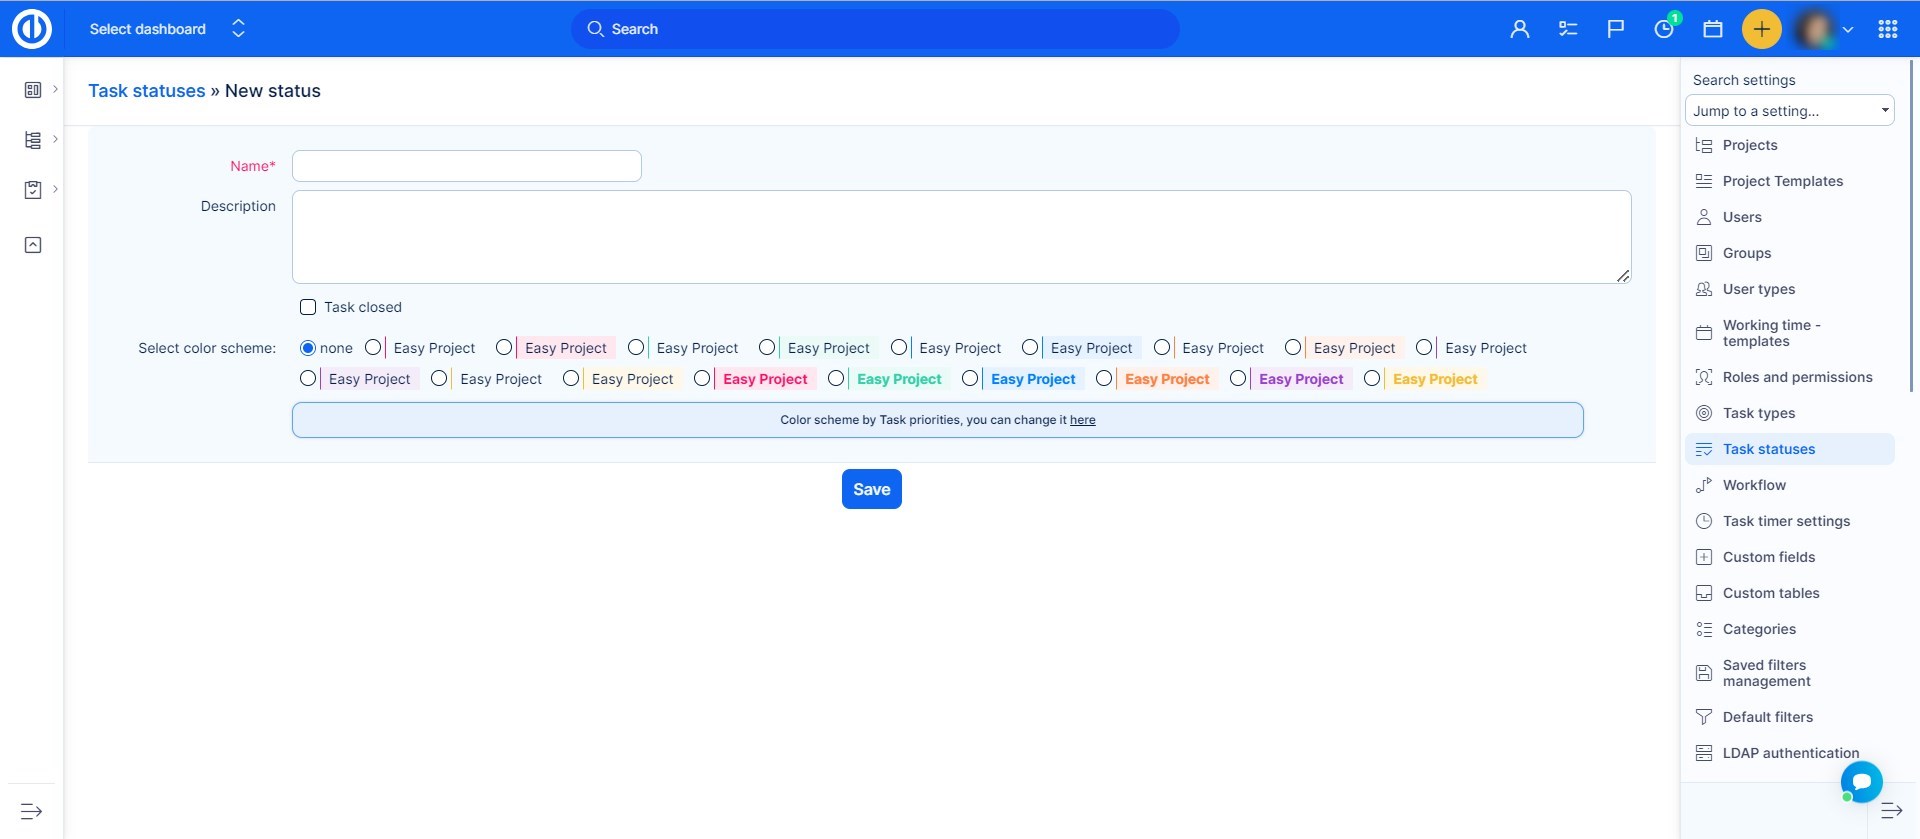
Here you fill in the name of the status, describe for example what it should be used for and you can choose whether will the task be closed by this status. And you can also set color scheme.
To make the color scheme by status work, you have to choose it in the settings.
To delete a status, simply click on the trash bin icon on the right.
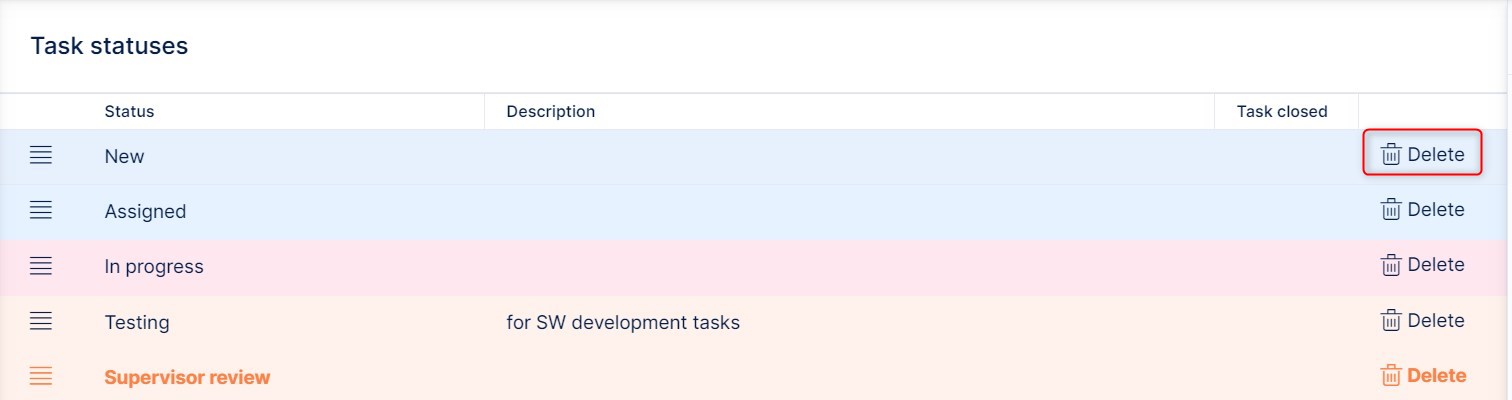
IMPORTANT: If you want to delete a status, make sure it is not used in an existing project, or even in a template. Used status cannot be deleted.
On the status list, you are able to also change the order of the statuses by dragging them by the icon on the left side up or down. Order of closed statuses is important regarding , for example, merging tasks, where the first closed status is used for closing one of the tasks.
Workflow
Video tutorials and webinars for Easy Redmine 11
Status transitions
Task fields permissions
Tips and tricks
Status transitions
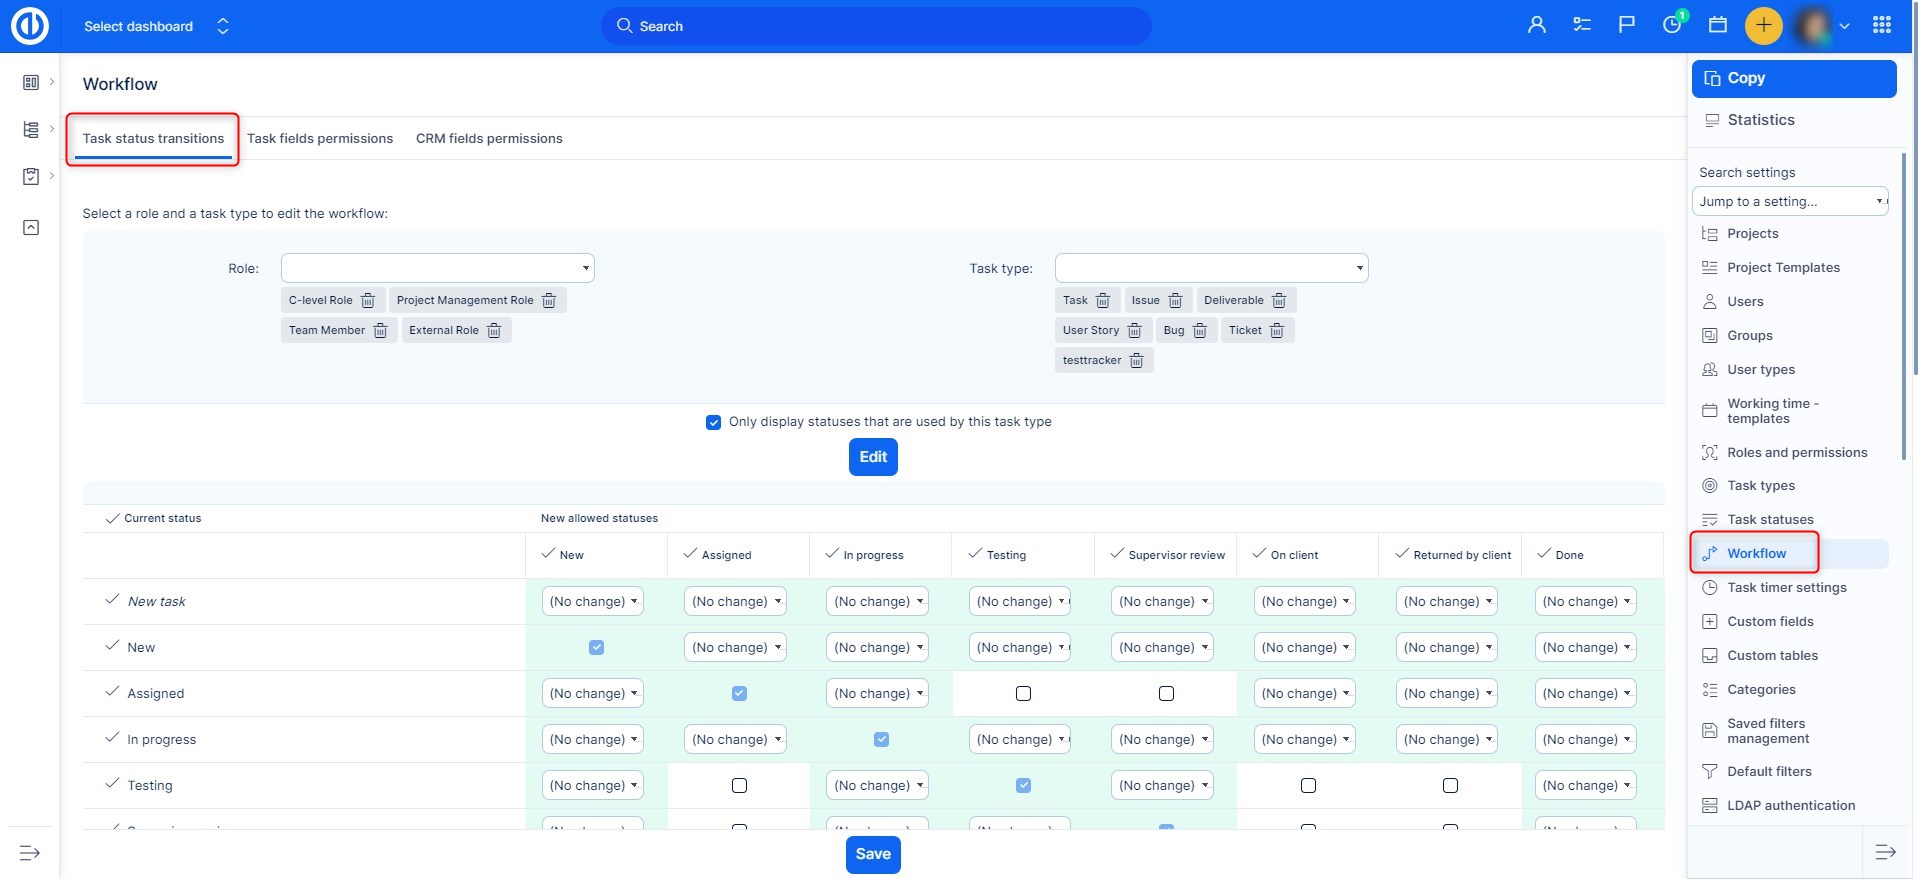
The workflow settings can be accessed in Global menu >> Administration >> Workflow.
Here you have to choose a role and what changes can this role make on a task with a particular tracker. Click on the green "Edit" button and the options will reveal. In the left column is the list of all current statuses a task might have, while on the right side are "New statuses allowed" with checkboxes, which might be checked (status allowed) or unchecked (status is not allowed) for selection when the current status, role, and tracker have already been set on the task. According to the below example, when a task has a tracker Task, Project Manager can only change the status from New to Realization, nothing more.
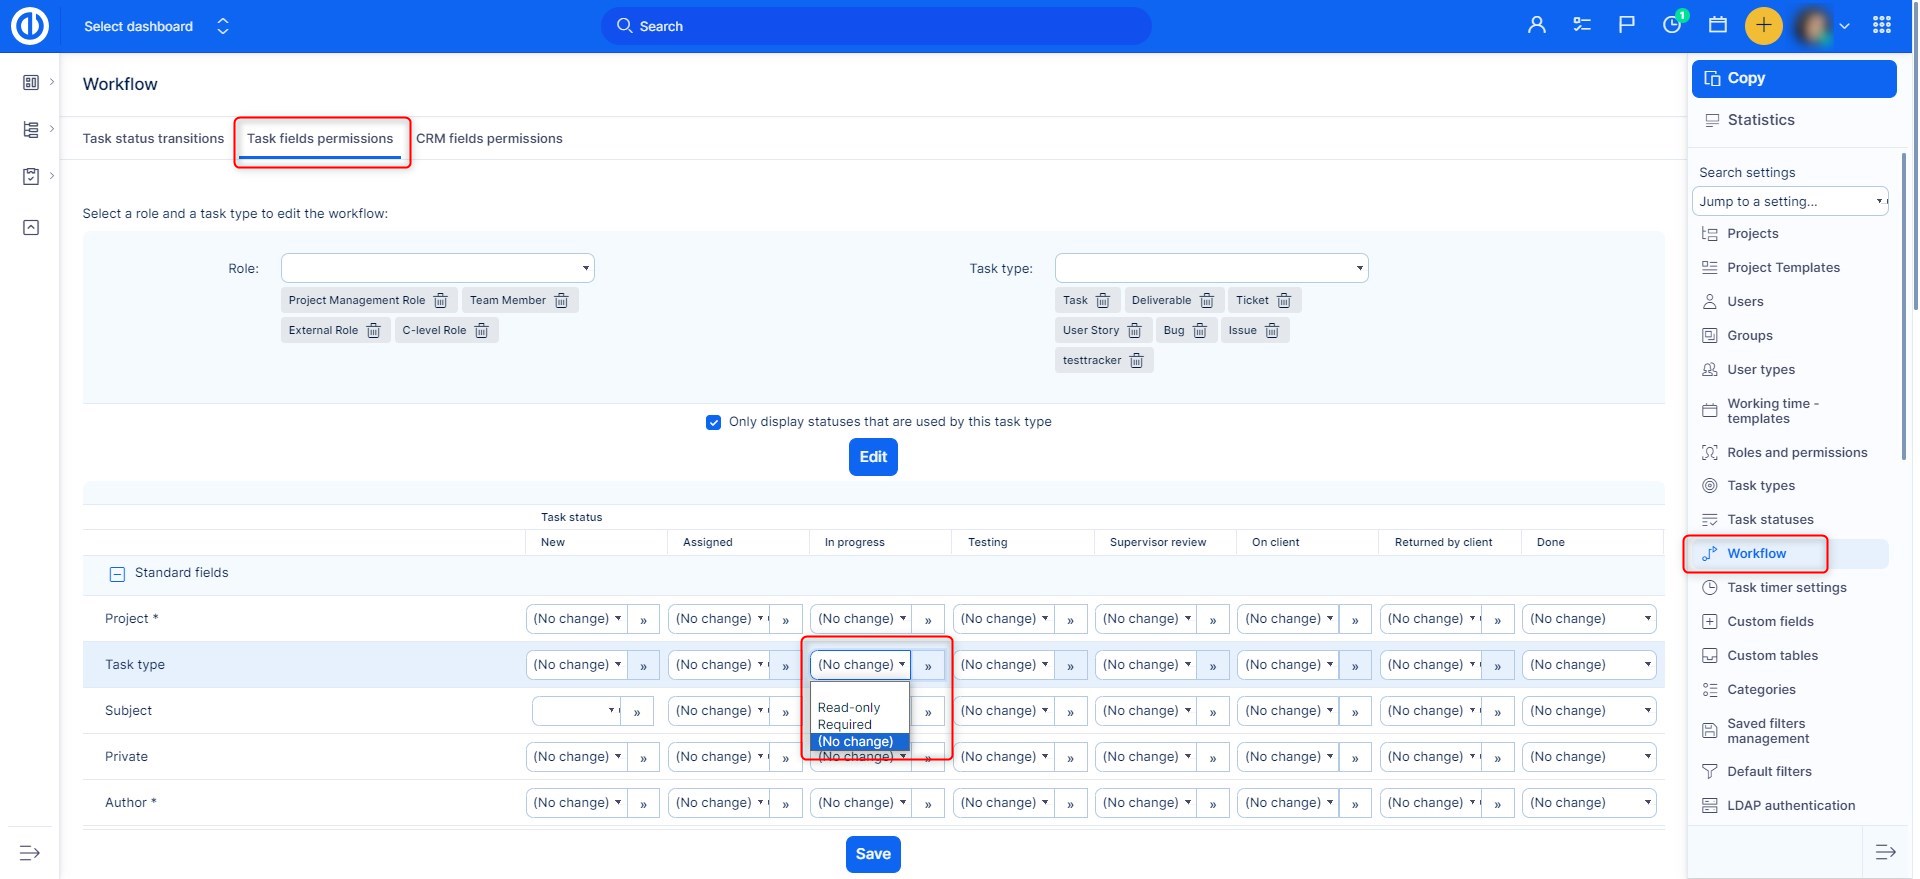
Task fields permissions
Field permissions stand for what a particular role may fill in or what he has to fill in per various task fields. Choose a role and tracker for which these permissions apply. You can set the permissions for standard fields and also for custom fields. If the field has a red star next to it, it is a globally required field that has to be always filled in no matter your role. The field without the red star can be set as:
- Required
- Read-only
- Blank (the field can be either filled in or not)
Tips and tricks
If a status is not to be used under a tracker at all, make sure to deselect respected checkboxes in a cross formation.
Use case 1 - Configure a chain of approval
Below is an example of how the chain of approval works. Each role (e.g. representative, manager, technician, etc…) may only change the status of a task in a certain way that ensures the process is smooth and there are no internal conflicts. For example, only the representative who is in direct contact with the customer may change status to “Done” once the whole process is finished and once the client has been informed. While only manager may approve or decline particular requests initiated by the client.
The client initiates a new request (task), the representative then replies to the client that the request has been forwarded for further approval and marks it with the “Waiting for approval” status. The manager has a list of all the requests (tasks) which are marked as “waiting for approval”. Once he decides whether the respective request shall be approved for further action(s), he then changes the status of the request (task) accordingly to either “Approved” or “Declined”.
The technician has a list where all the “approved” requests are shown. He continuously works on these and once he is finished with any, he changes its status to “To check and invoice”. At this moment, the request (task) is shown in the representative's list, who double-checks the work of the technician. If all the requirements of the client are met, he marks the task as “done” and informs the client accordingly.
Use case 2 - Force users to enter important data - required
In order to obtain certain data that are crucial to you, you may make certain fields mandatory, this can be done by setting such a field to “Required” status. For example, when you need the date of birth of your client (e.g. in order to establish whether the client is of legal age) you may set the “Date of birth” field as “Required” so that the client may not proceed without duly filling-in such field first.
Use case 3 - Disable unauthorized users to change important data - read-only
Be careful as subject and description must be enabled in a new task. Certain users are allowed only to perform certain actions, and they may not edit or remove important information, this can be achieved by enabling the “Read-only” mode.
For example, if a customer fills-in his or her date of birth, then such field may be set to a Read-only mode in order to prevent an accidental loss of such data. Alternatively, only a manager (or any other suitable person) may be enabled to change/remove this data while others cannot.
Use case 4 - Disable unnecessary status on the type of work where you do not need it
Status “code review” is important for the IT department, but not for other departments. IT specialists will be able to use the "Code review" status, but users from other departments will not have access to it.
Task relations
Easy Redmine provides multiple types of task relations
- related to - Just adds a link to the other task.
- duplicates - Links tasks so that closing one, will close the other (e.g. closing A will close B).
For example, if task B duplicates A:
- closing B will leave A open
- closing A will automatically close B
- duplicated by - Reciprocal of duplicates.
For example, if task A is duplicated by task B: - closing B will leave A open
- closing A will automatically close B
- blocks - Links tasks so that closing one can be blocked by an task which is still open. If task B blocks A, A can't be closed unless B is.
- blocked by - Reciprocal of blocks.
- precedes - Links tasks to define an "order", where A needs to be completed x days before B can be started on. If B follows A, you can't give B a starting date equal or less than the ending date of A.
- follows - Reciprocal of precedes.
If task B follows A (ex A ends the 21/04 and B begin the 22/04)and you add +2 day at the ending date of A, the starting and ending dates of B will be +2 too.
- copied from - Links tasks to identify whether it was copied, and from which task it was copied from.
- copied to - Reciprocal of copied from.
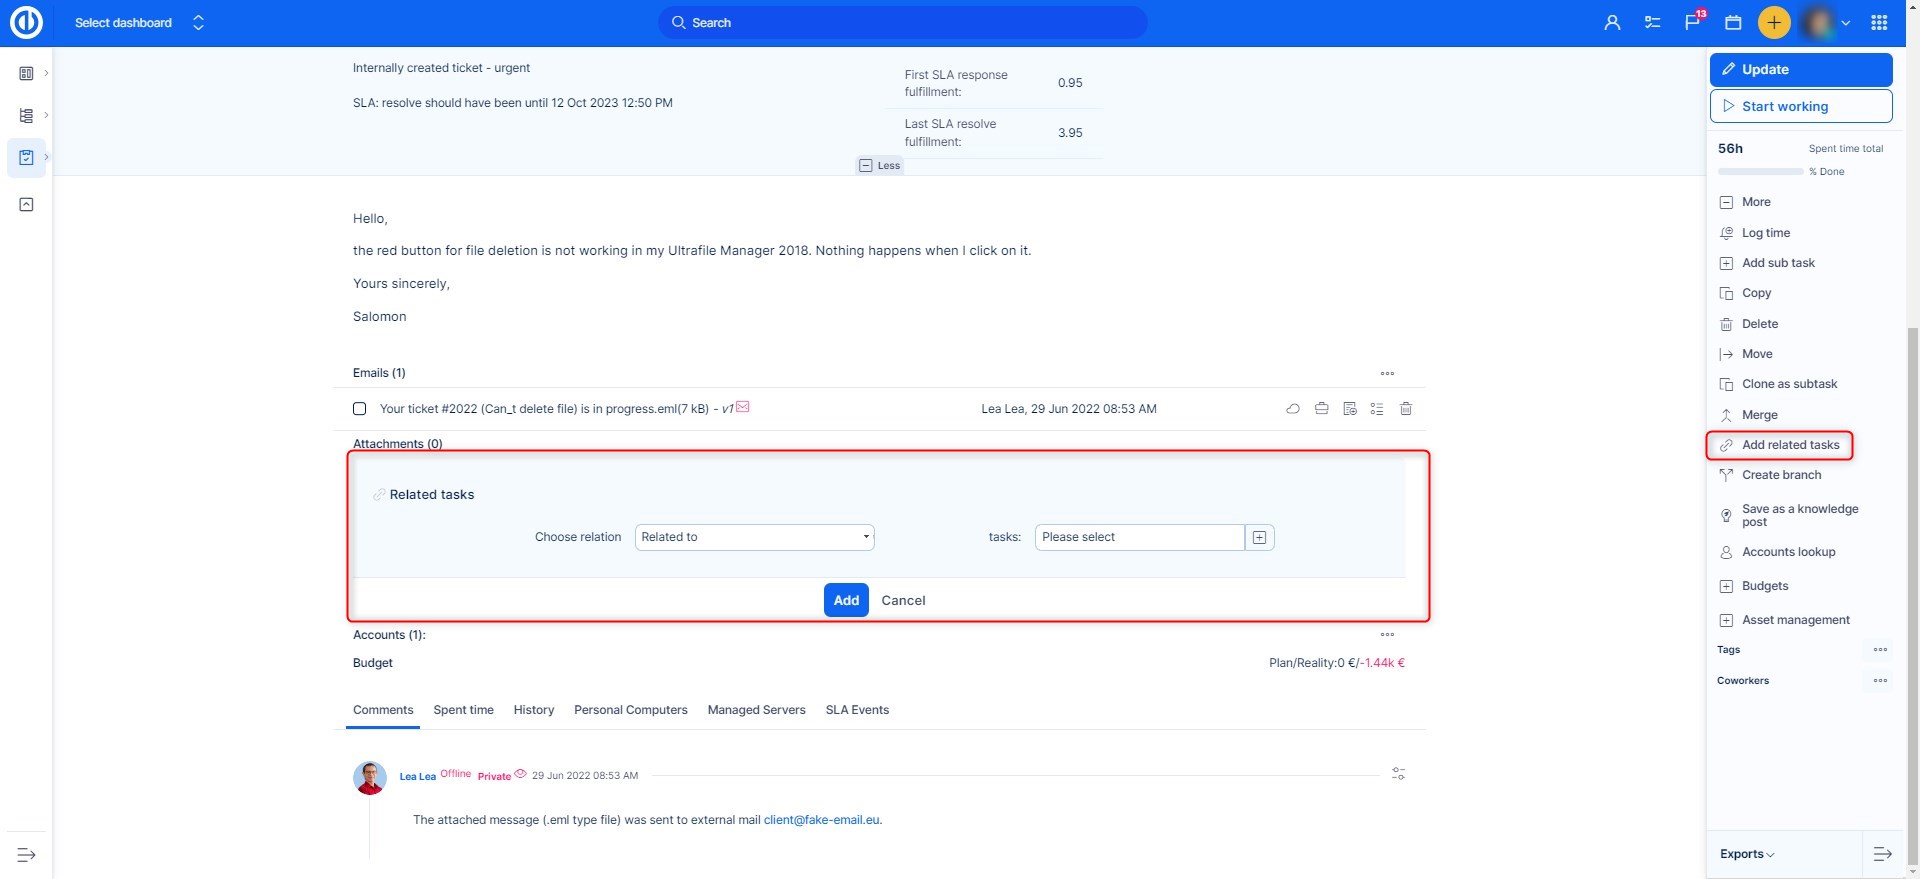
To add a new task relation, take the following steps:
On particular tasks in Global menu, choose the option Add related task. Here you choose the relation type, the task, and for Precedes or Follows relation types, you can choose the delay in days also.
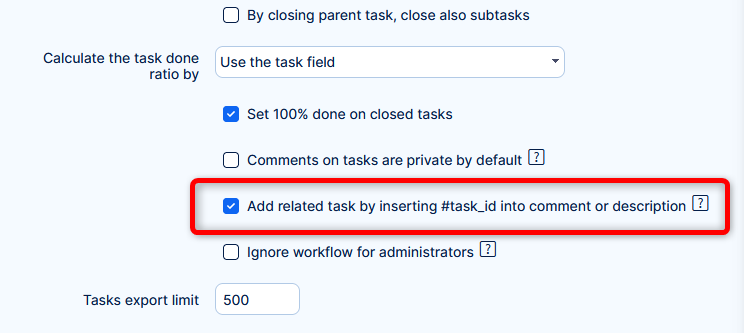
Another option to add a related task is to mention #ID in the comment or task description.
A global setting (Admin >> Settings >> Task tracking) must be enabled to make it work. This setting is disabled by default, to avoid unexpected behaviour.
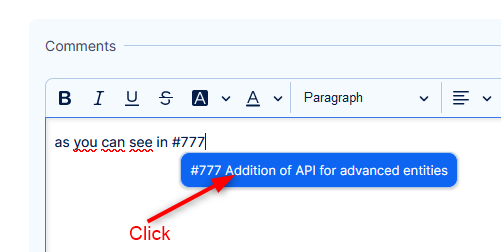
How it works
When creating or editing task, enter # + ID into comment or description. You have to select the task from the suggestor. After saving, a relation between the tasks will be created.
This operation respects permissions of the current user and other validations for related tasks (cross project relations settings, etc.)
Why does it require select from suggestor?
To avoid relating tasks through other channels from which tasks can be created or edited (API tasks, webhooks, Help desk). Or by manual input of large number of task IDs in attempt to overwhelm the system (security).
How to add/change parent task
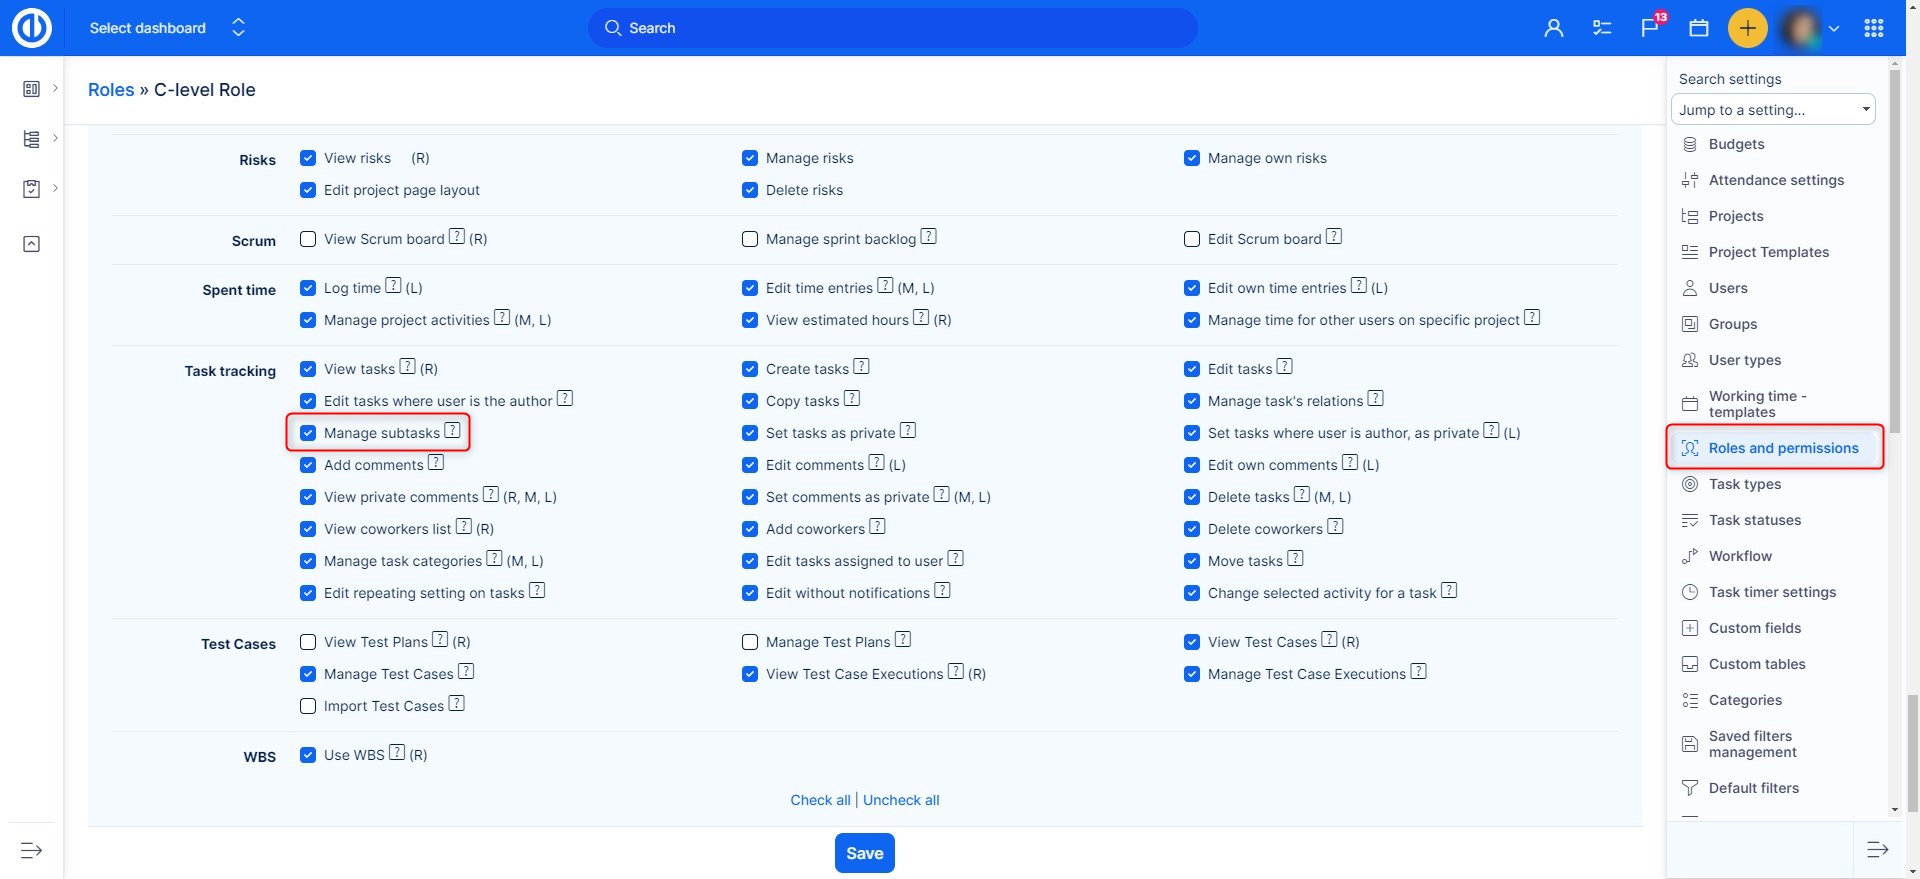
In this post, I´m going to show you how to set the roles and permissions and system so that your users can add parent tasks to existing tasks or while creating a new task. The first thing is to go to Administration >> Roles and Permissions and a specific role. For example Project manager. Here you have to set that this role can manage subtasks.
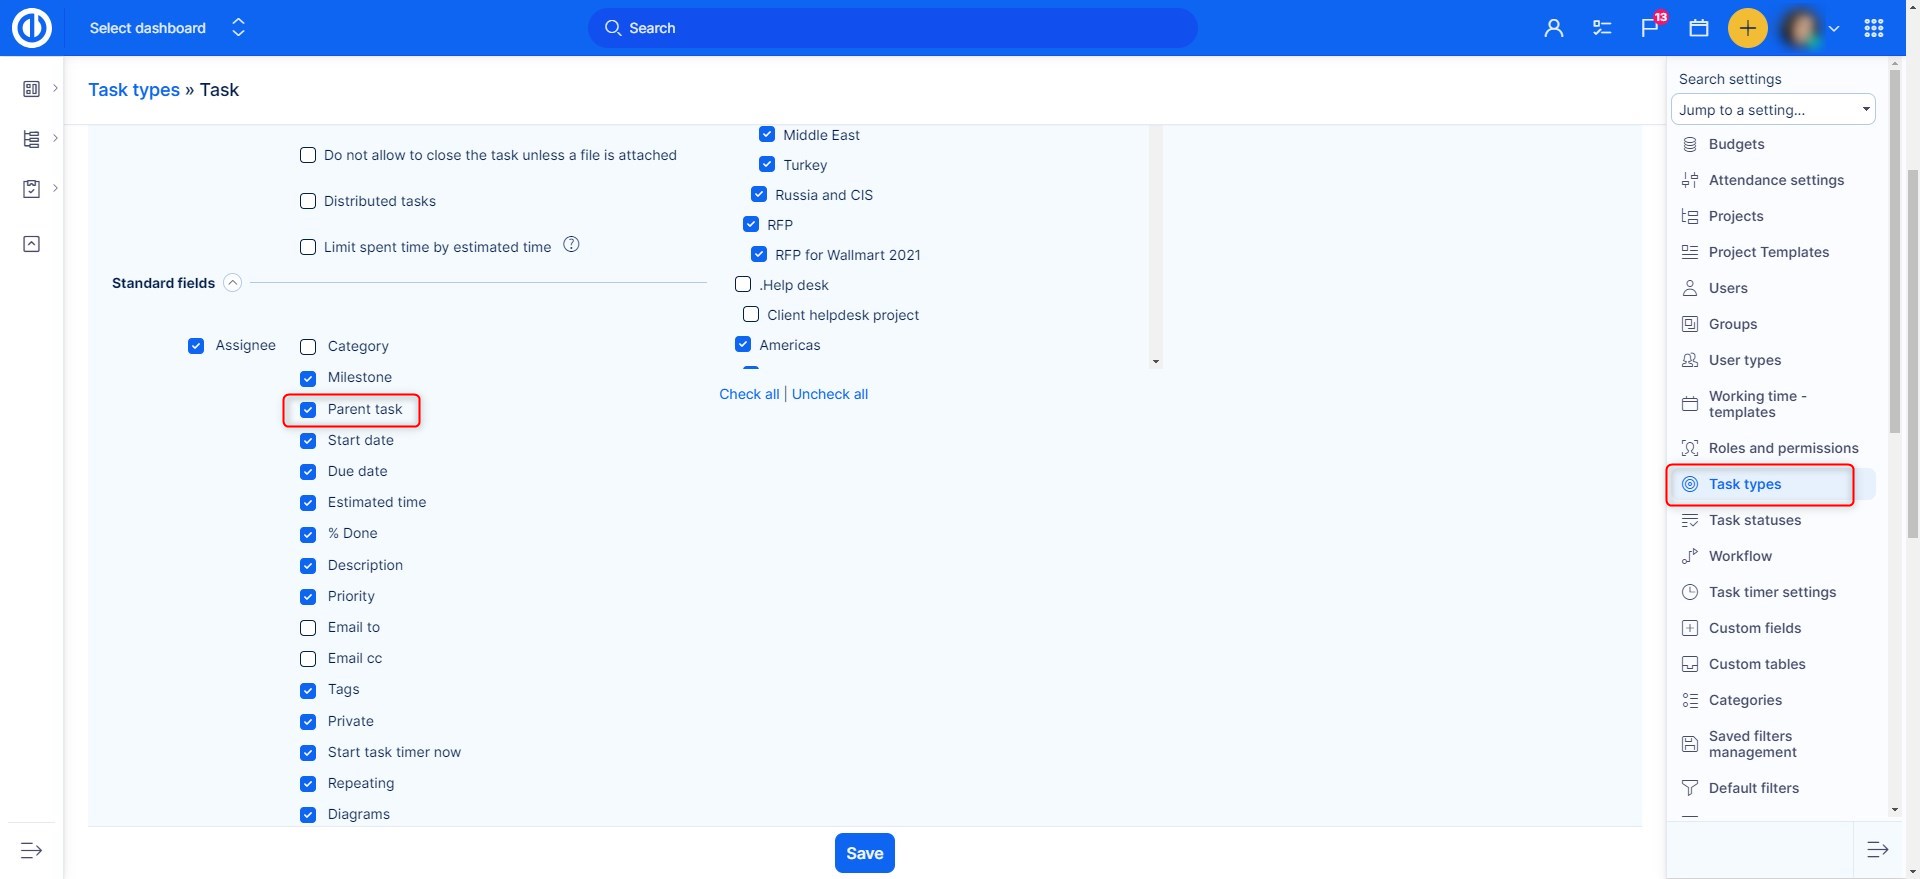
A little tip = you can easily find anything if you use the Ctrl+F command and type what you are looking for. Then you have to do one more thing. Make sure that you have the parent task checked in the tracker settings.
If you have everything set correctly, you will be able to add a parent task to your tasks. It should then look like this when you are updating the task and click » click here to change additional attributes.
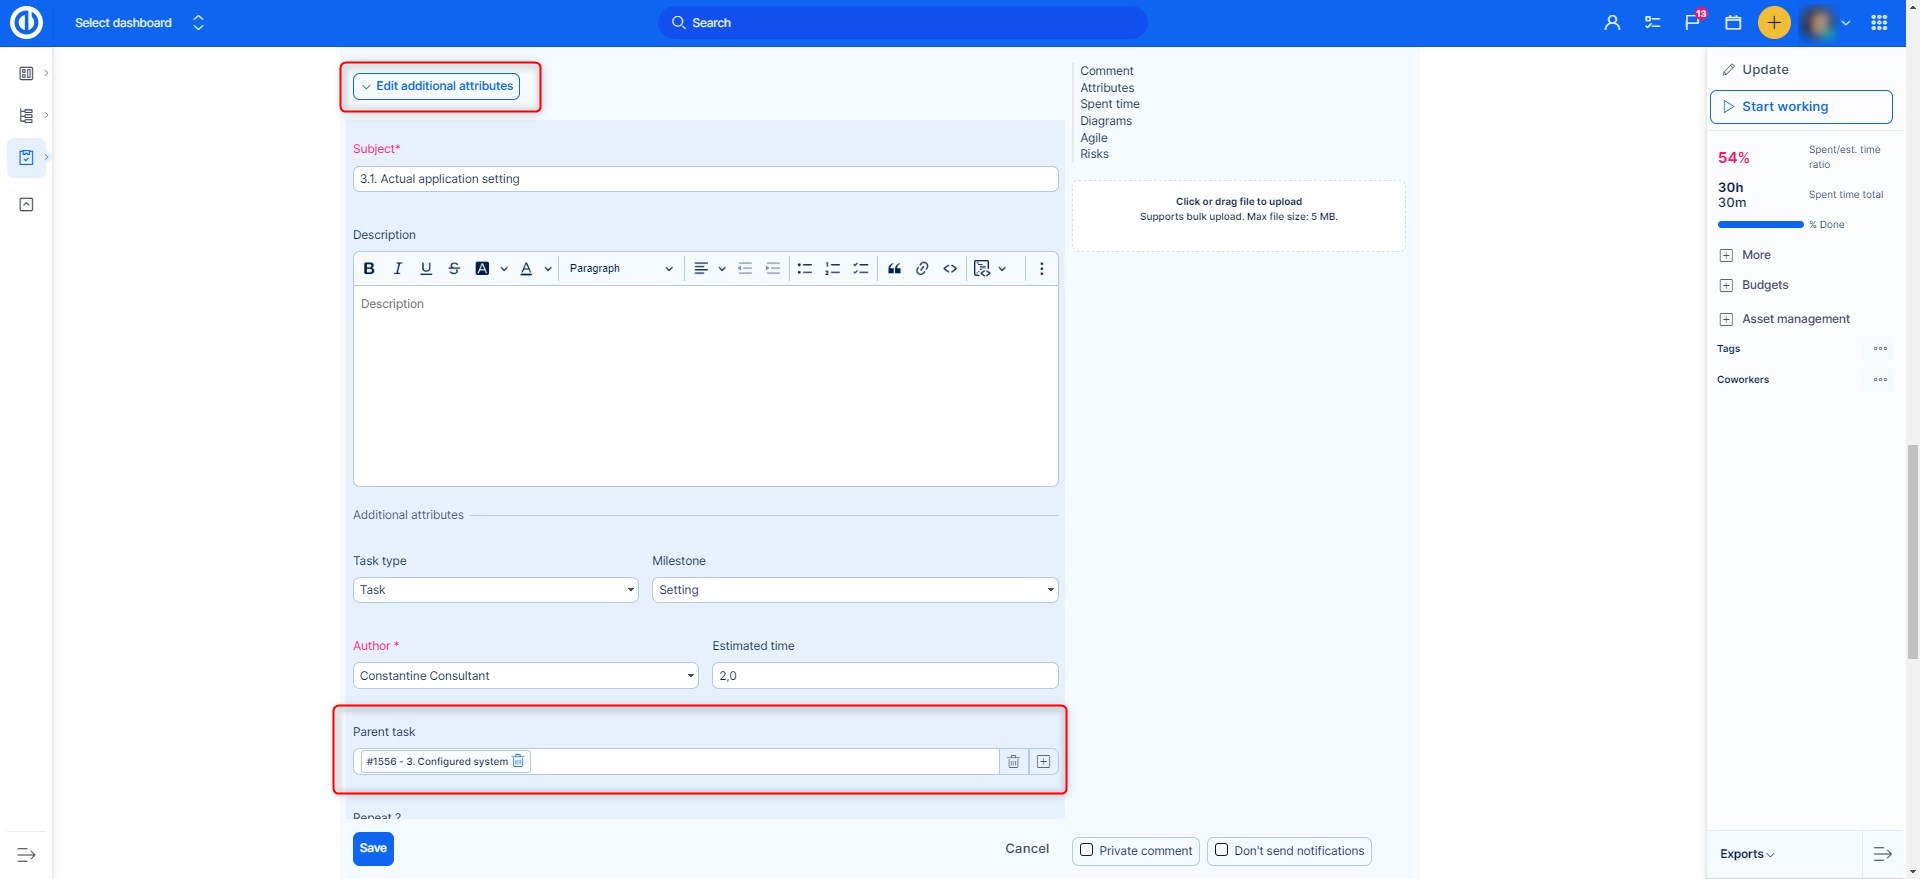
After you click on a plus sign, a pop-up window will appear.
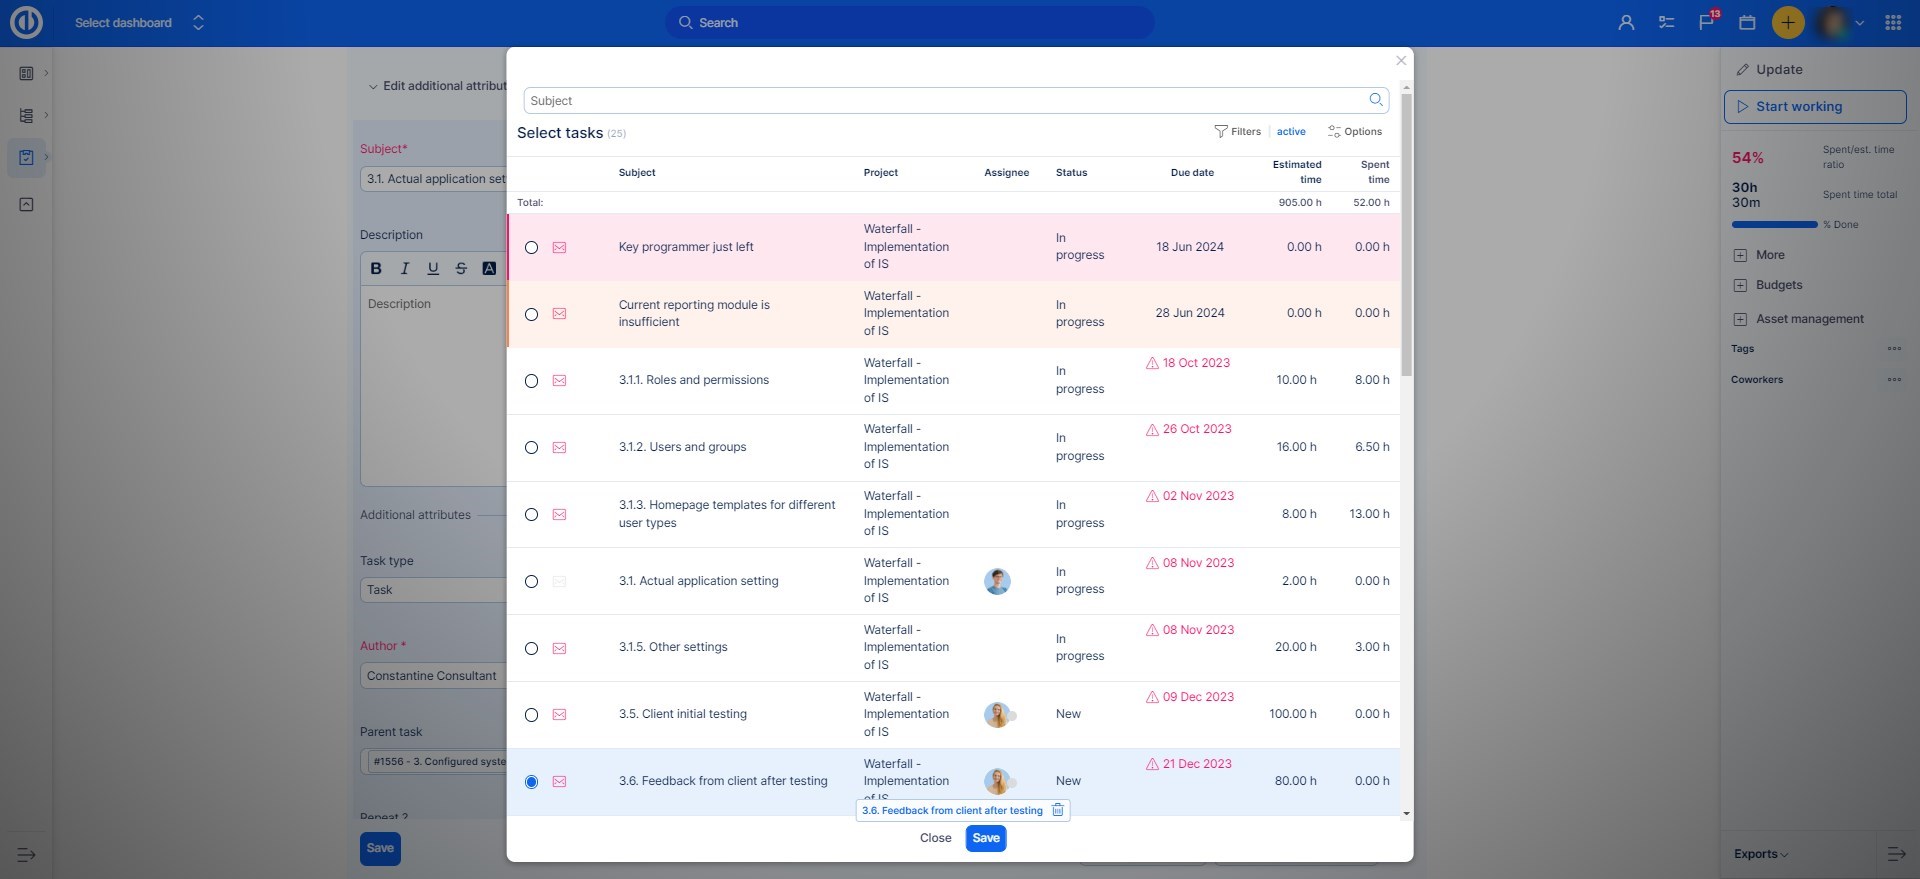
You can search, or simply choose a task and click Save.
How to copy tasks
You can copy either a single task and more tasks in bulk. Here's how to do it.
How to copy a single task
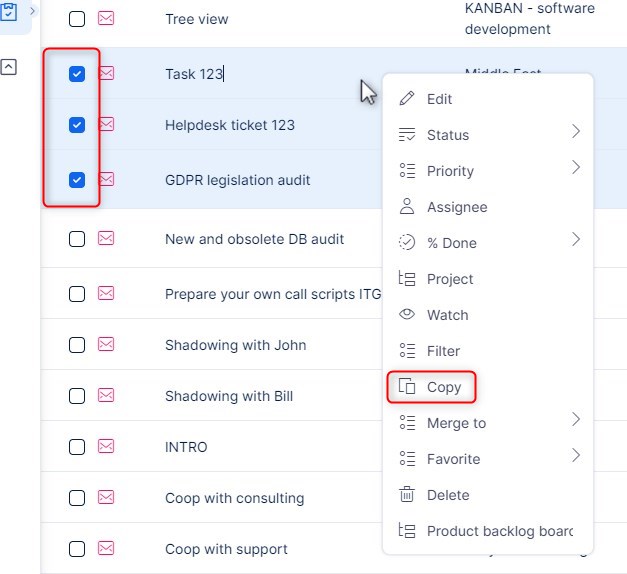
Before you copy a task, you must select one from the task list. When you are on the task list, and you need to copy a task, click on it with the right mouse button and select Copy from the context menu as illustrated below.
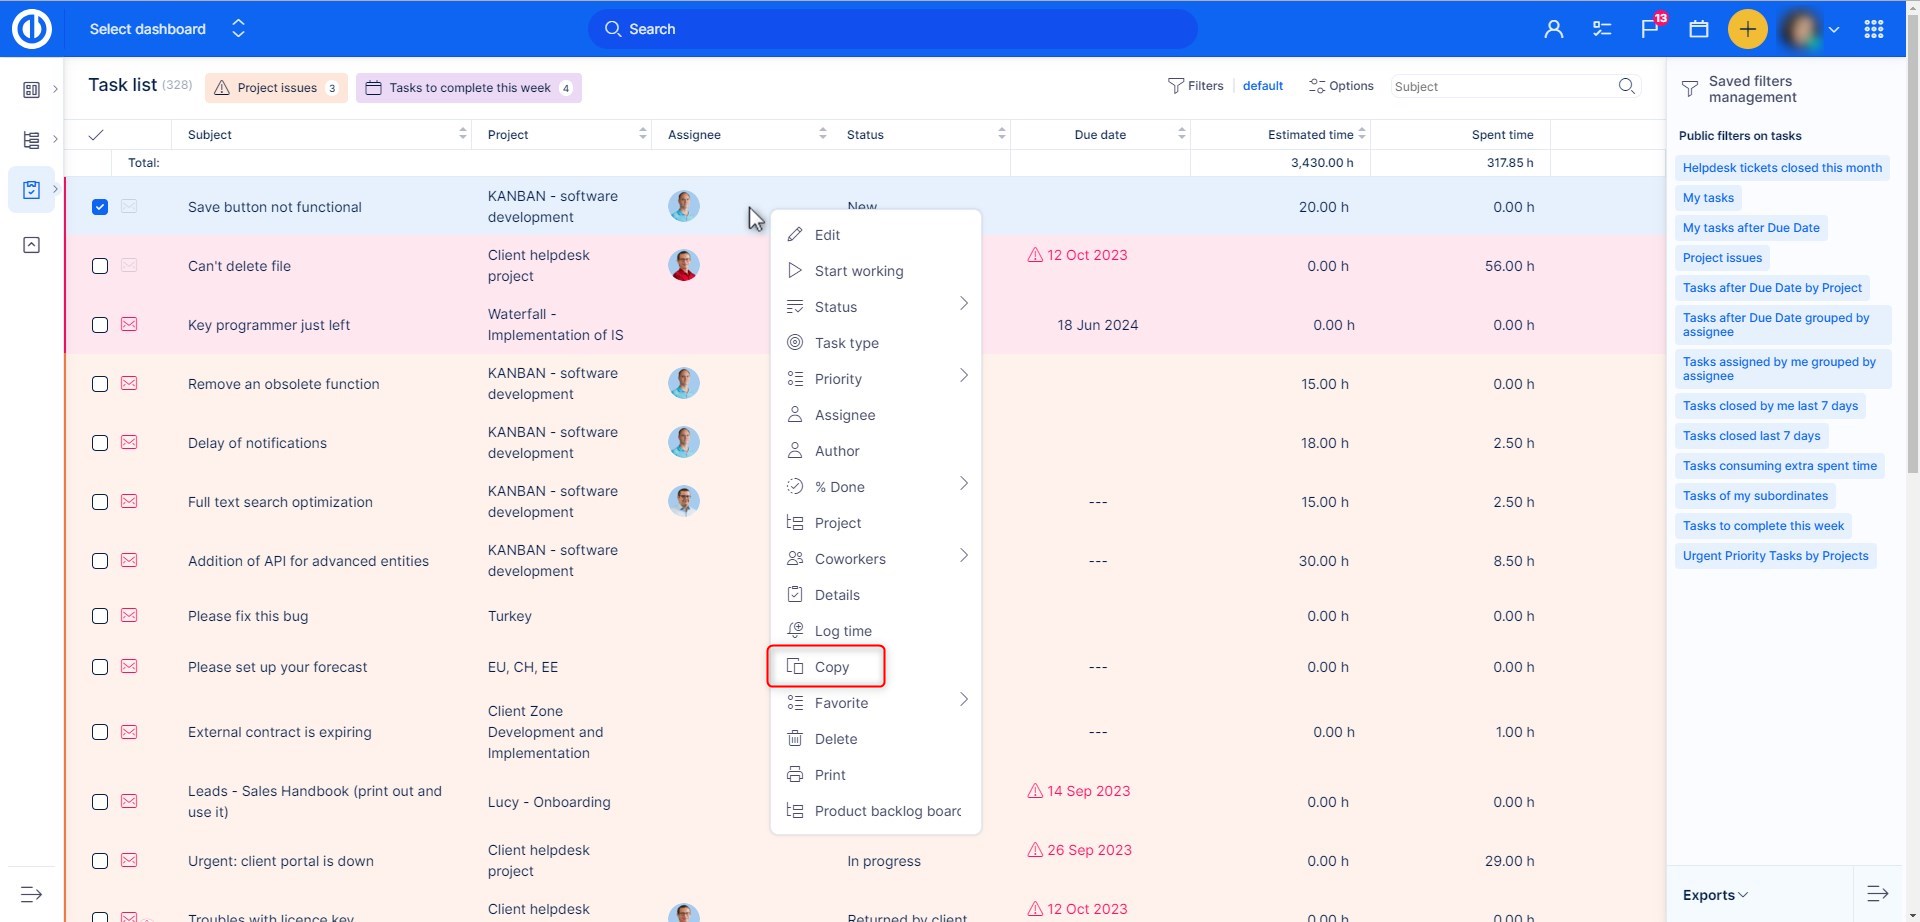
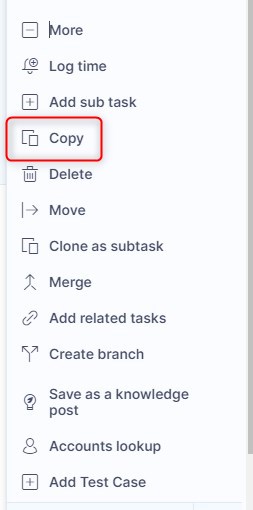
Another way is going directly to the detail view of the particular task and select option Copy from the right menu list as illustrated below.
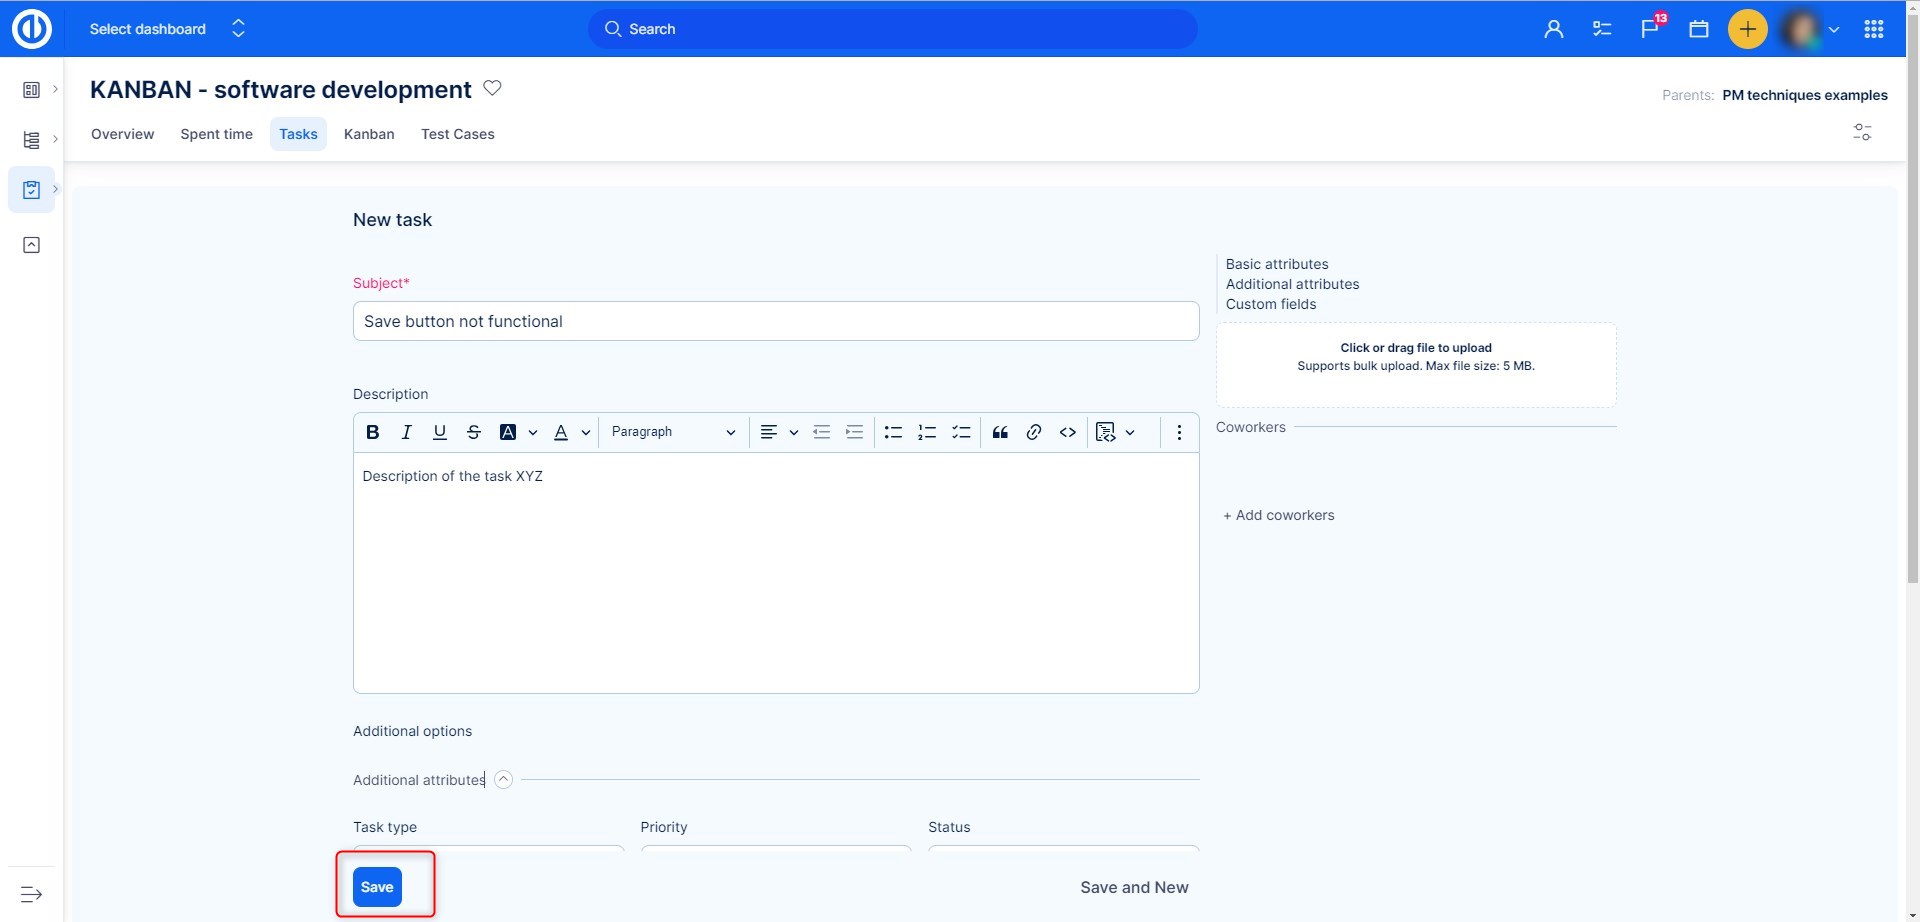
After clicking on Copy, a New task window opens. As illustrated below, most of the attributes are already pre-filled and pre-selected from the original task. This way, you can easily change some attributes you don't need to have in the new one.
If you want a perfect, unchanged copy, just click on the Create button down the page and the task will copy into the same project as the original one.
Copy more tasks at once
The procedure is pretty similar. On the task list, tick the checkboxes of all the tasks you need to copy, then click with the right mouse button somewhere in the task area and select Copy from the context menu as illustrated below.
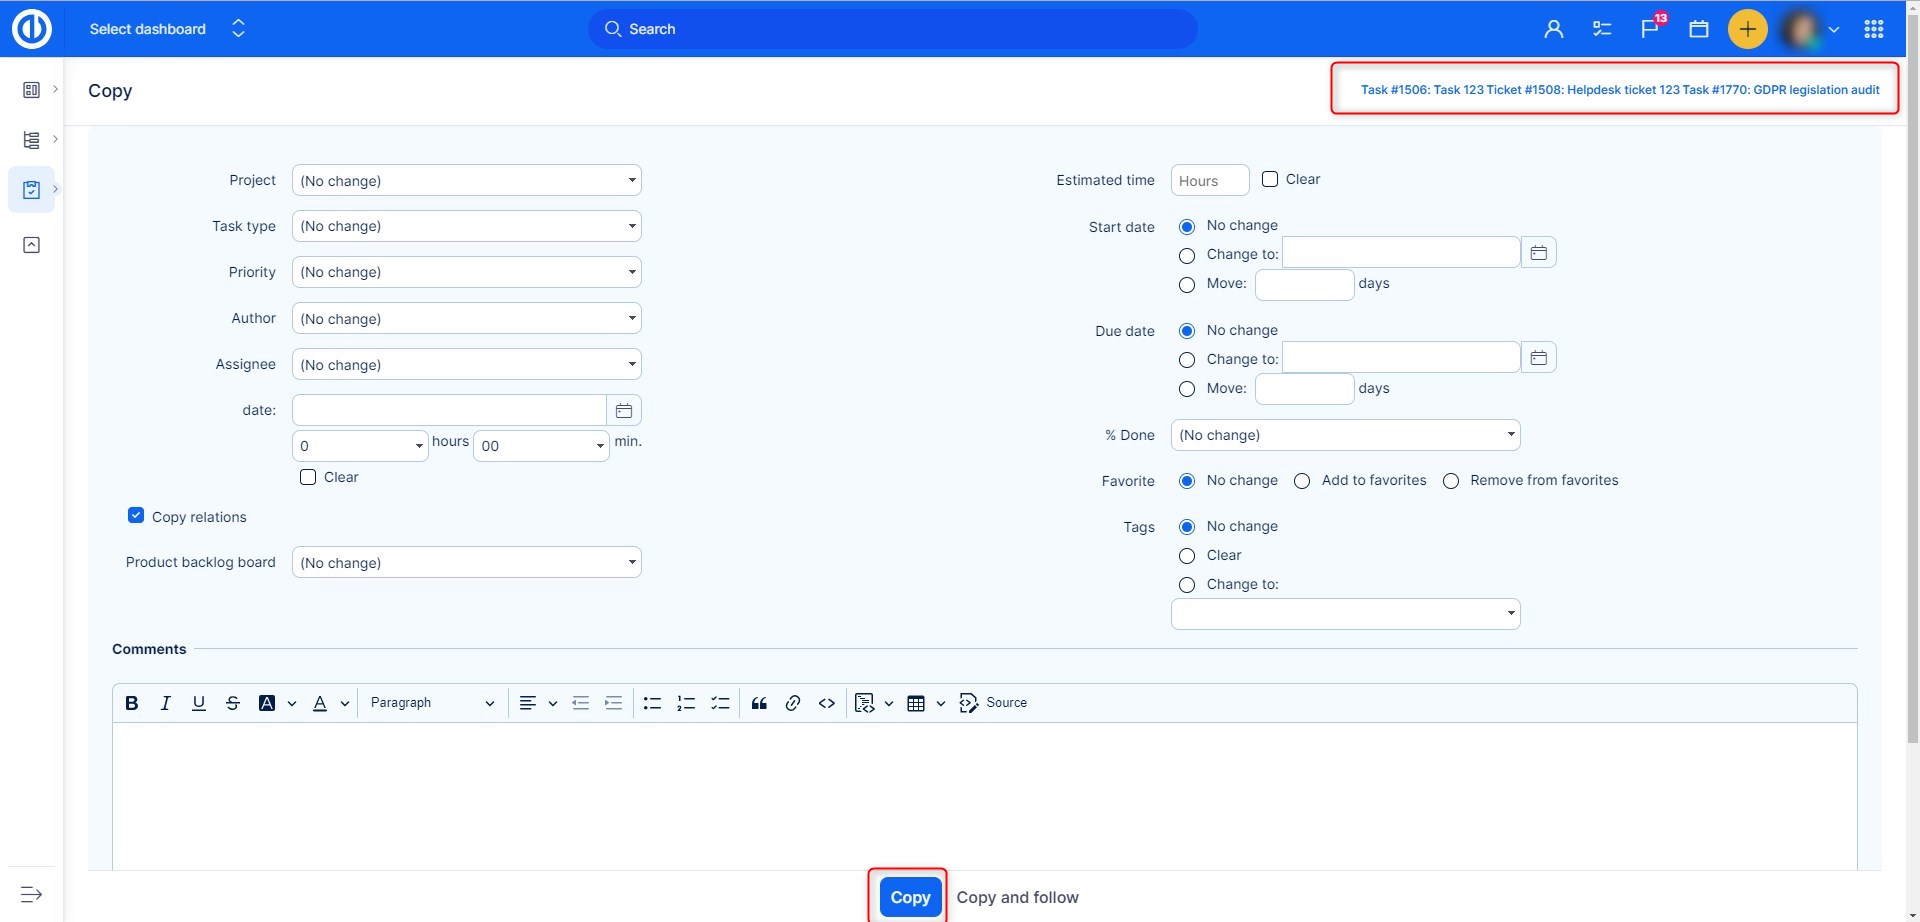
On the following screen, you can change some attributes for all the tasks in bulk (such as project, tracker, priority, assignee etc.) or you can leave everything unchanged. You create the copies by clicking on the respective button down the page, as illustrated below.
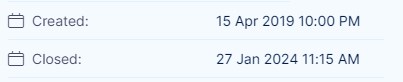
IMPORTANT NOTE: Each task contains the dates of creation and closure (if closed or re-opened) in the upper right corner of the detail view, as illustrated below. All this information was also copied unchanged.
By nature, copying operation uses all the attributes from the database for the copy. Some can be changed (via task edit), but some are not editable via user interface.
How to merge existing tasks
Do you need to merge one task into another? There is a button for that!
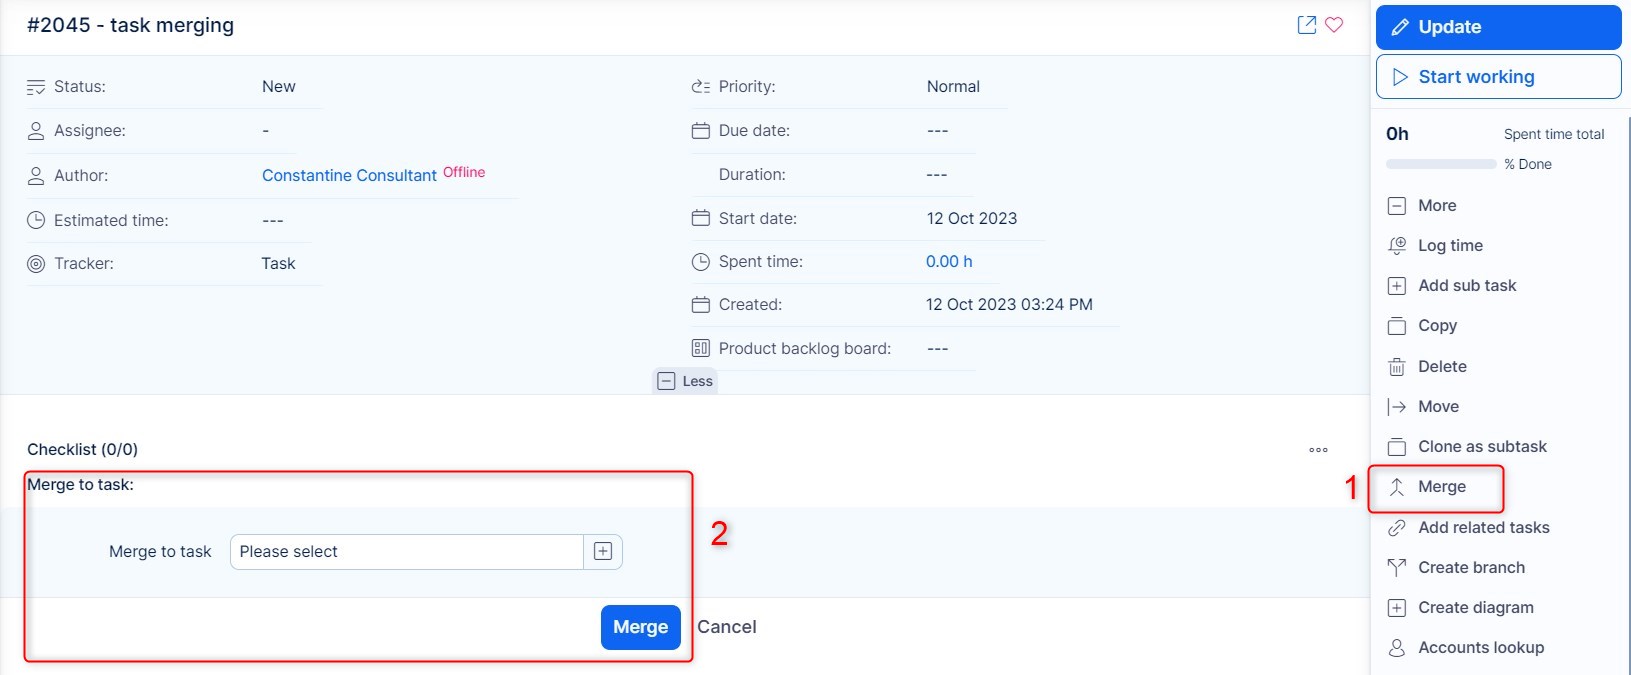
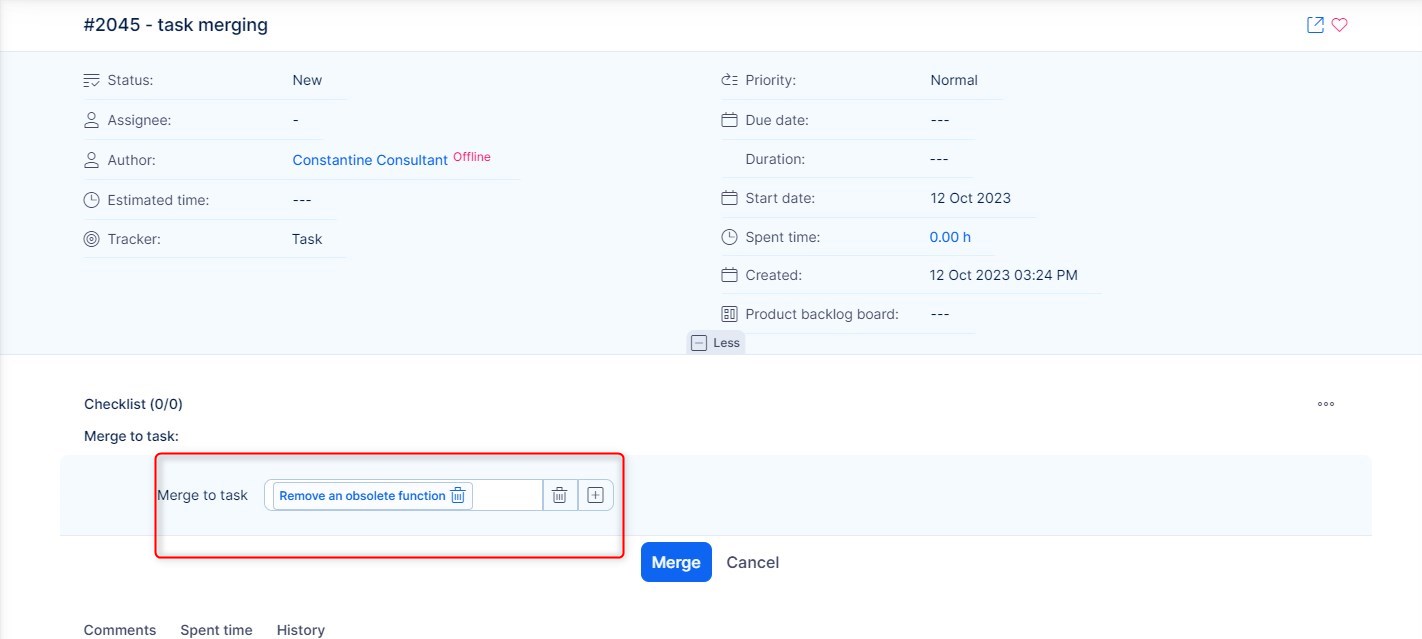
Just open a task you want to merge and on the right side click on the "More" button. Set of the options will unveil and you can choose the Merge option. This box will appear on the task, by clicking on the plus button you can choose and add the task you want to merge to.
This is the popup, you can directly search the task, or just choose it.
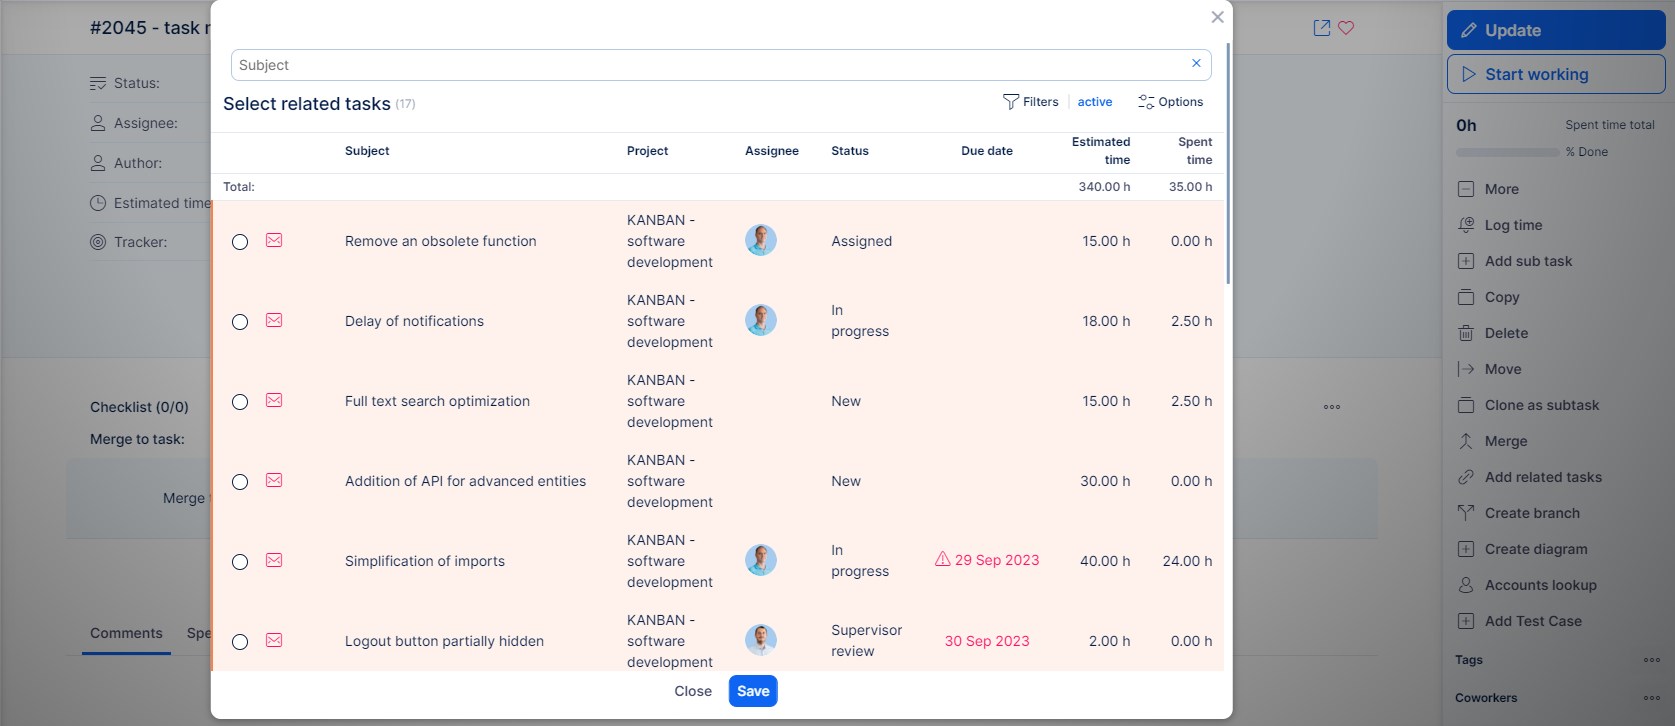
It will be filled in the box and all you have to do now is press Merge:
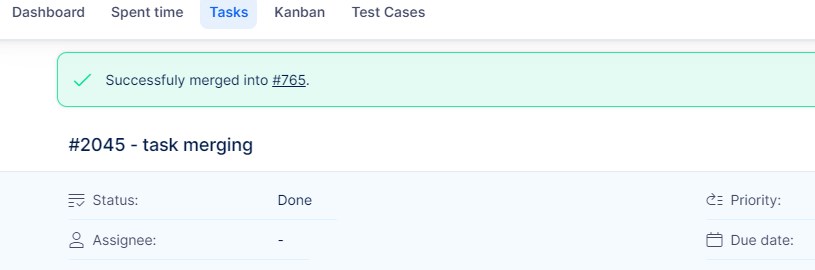
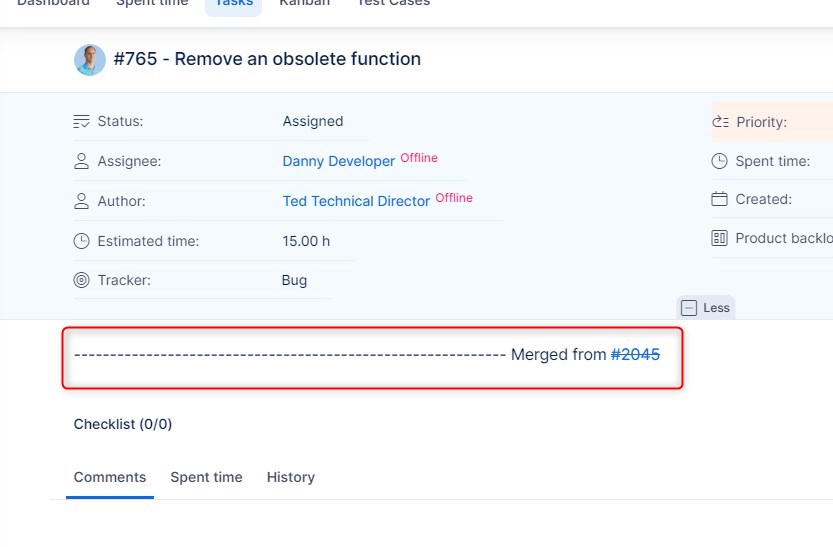
The system will confirm the merge and the merged task will be marked as closed with the first available closed status, and all the update swill be merged into the second one.
Mergeable fields
There are some limitations regarding fields that can and cannot be merged.
Fields that can be merged are the following:
- custom fields are restricted to these types: email, text, long text
- attachments
- related tasks
- journals (history)
- coworkers
- description
Bulk edit
If you need to change multiple items at once (such as tasks, CRM records, help desk tickets, etc.) in order to make the change happen faster and thus save time, this is how to do it. The bulk edit option can be used for up to 500 items at once and is available for the following entities:
- Tasks
- Help desk tickets
- CRM records
- Users
- Contacts
- Contact groups
- Attendance records
- Timesheets
- Personal statements (spent time records)
- Payroll and invoicing sheets
- Profit & Loss statement
- Test Cases (only bulk delete is supported)
- Documents
- Milestones (project roadmap)
Since the majority of users need to work with tasks more often than any other entity listed above, let's show an example of the bulk edit procedure on tasks. For any other entity, the procedure is very similar, just the available options to select/change might be different. You can select multiple tasks in the task list by ticking the particular checkboxes on the left side of the list.
When selected, click with the right mouse button anywhere in the area of selected tasks to open a small context menu like this. To change only one attribute in all the selected tasks (such as Status, Priority, or Assignee), just choose it from the available options in the context menu and confirm by left-mouse click. The change will take effect immediately.
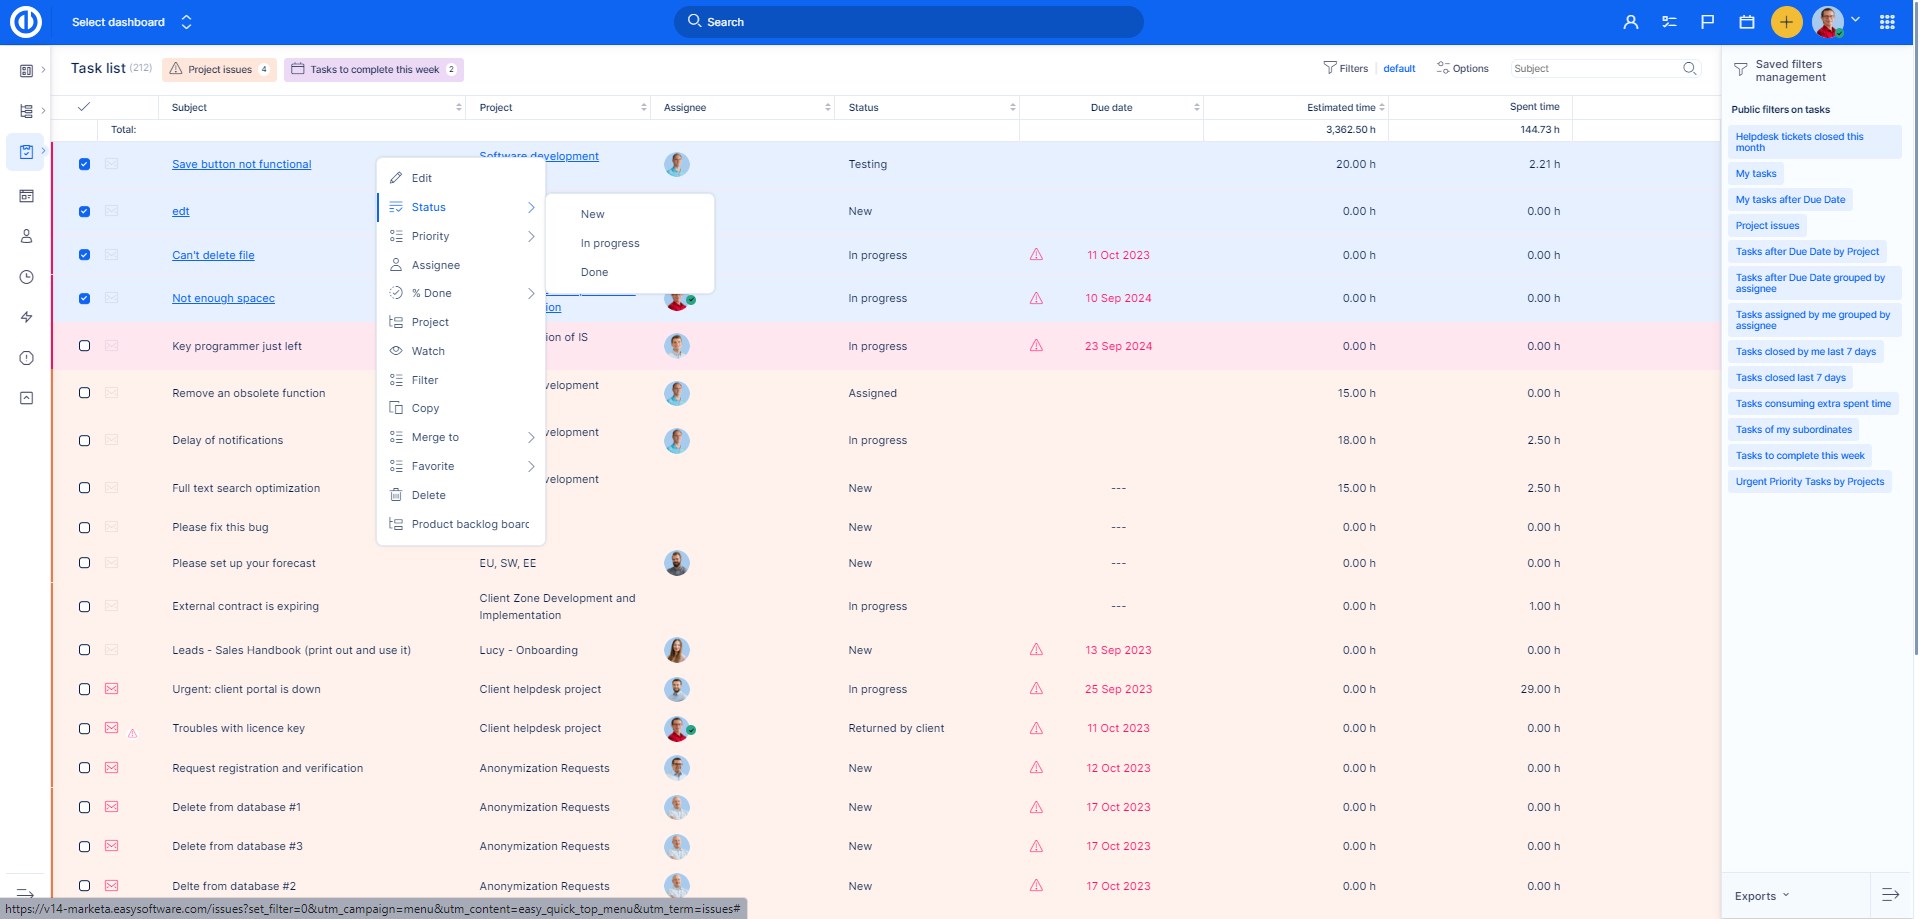
In order to change one or multiple attributes at once (such as Status and Priority together), go to the "Edit" option, which is the first item in the context menu from the top.
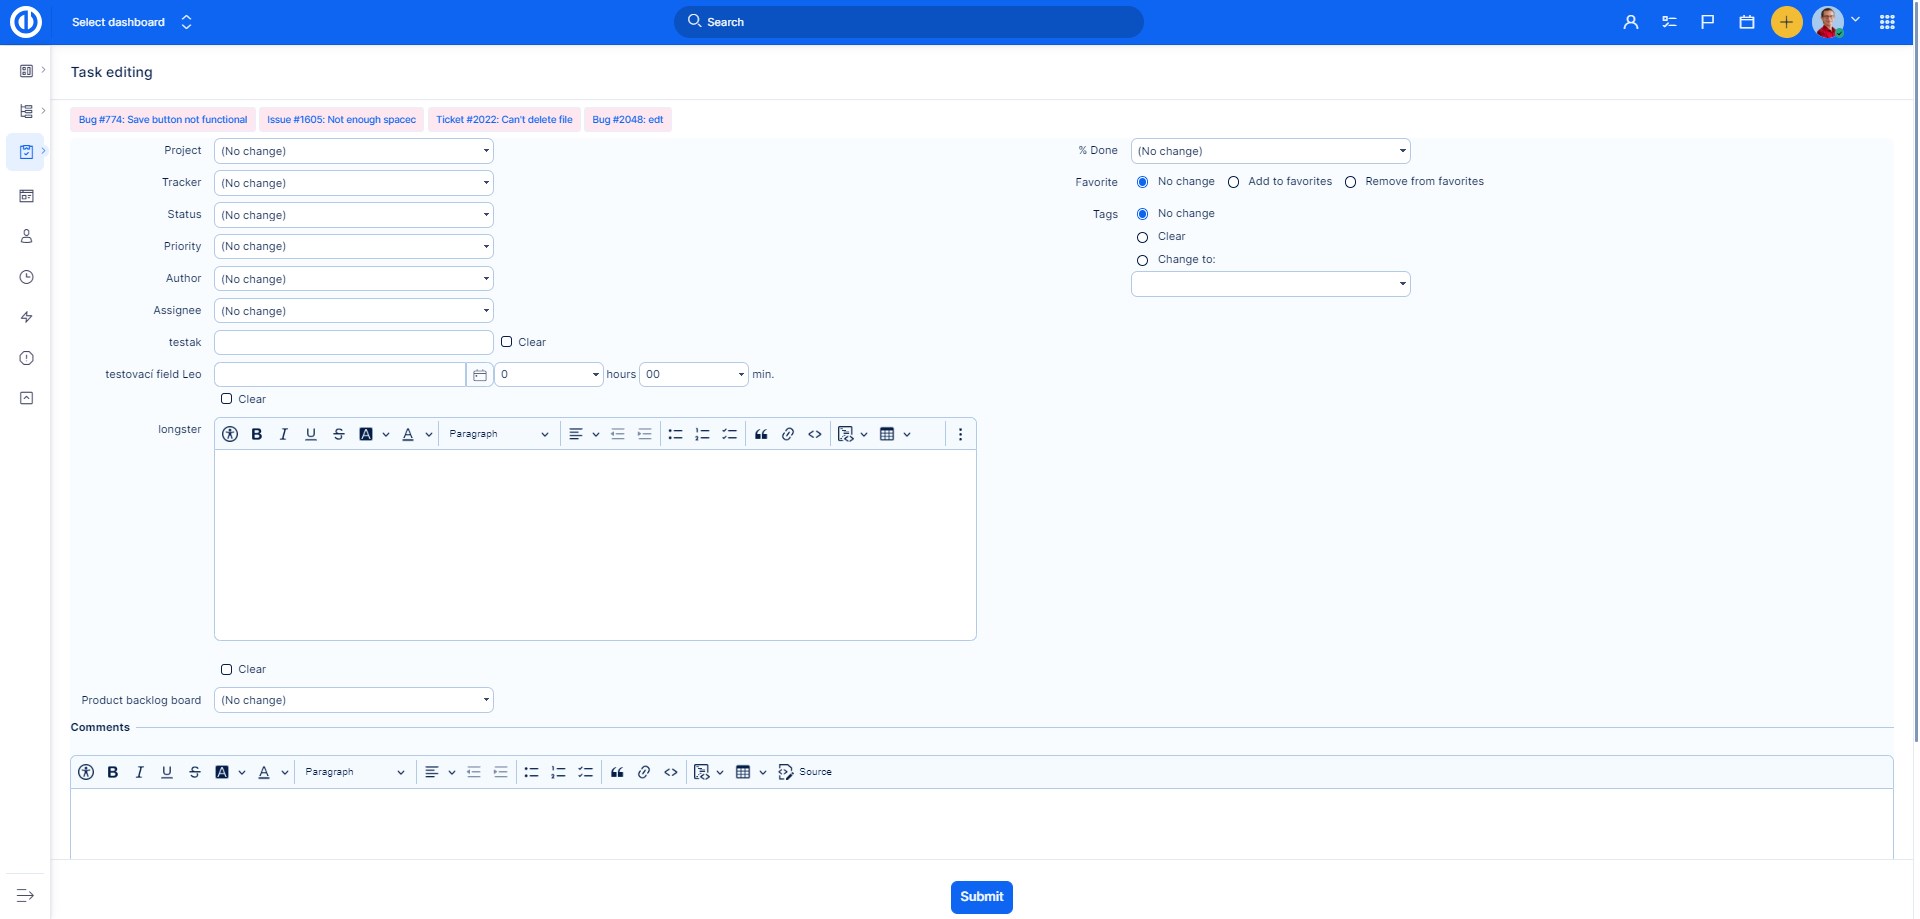
A new form will open where you can select one or more attributes to change on all the tasks selected in the previous step. Confirm the change by clicking on the green "Submit" button below and the chosen tasks will be edited at once.
How to mark a task as favourite
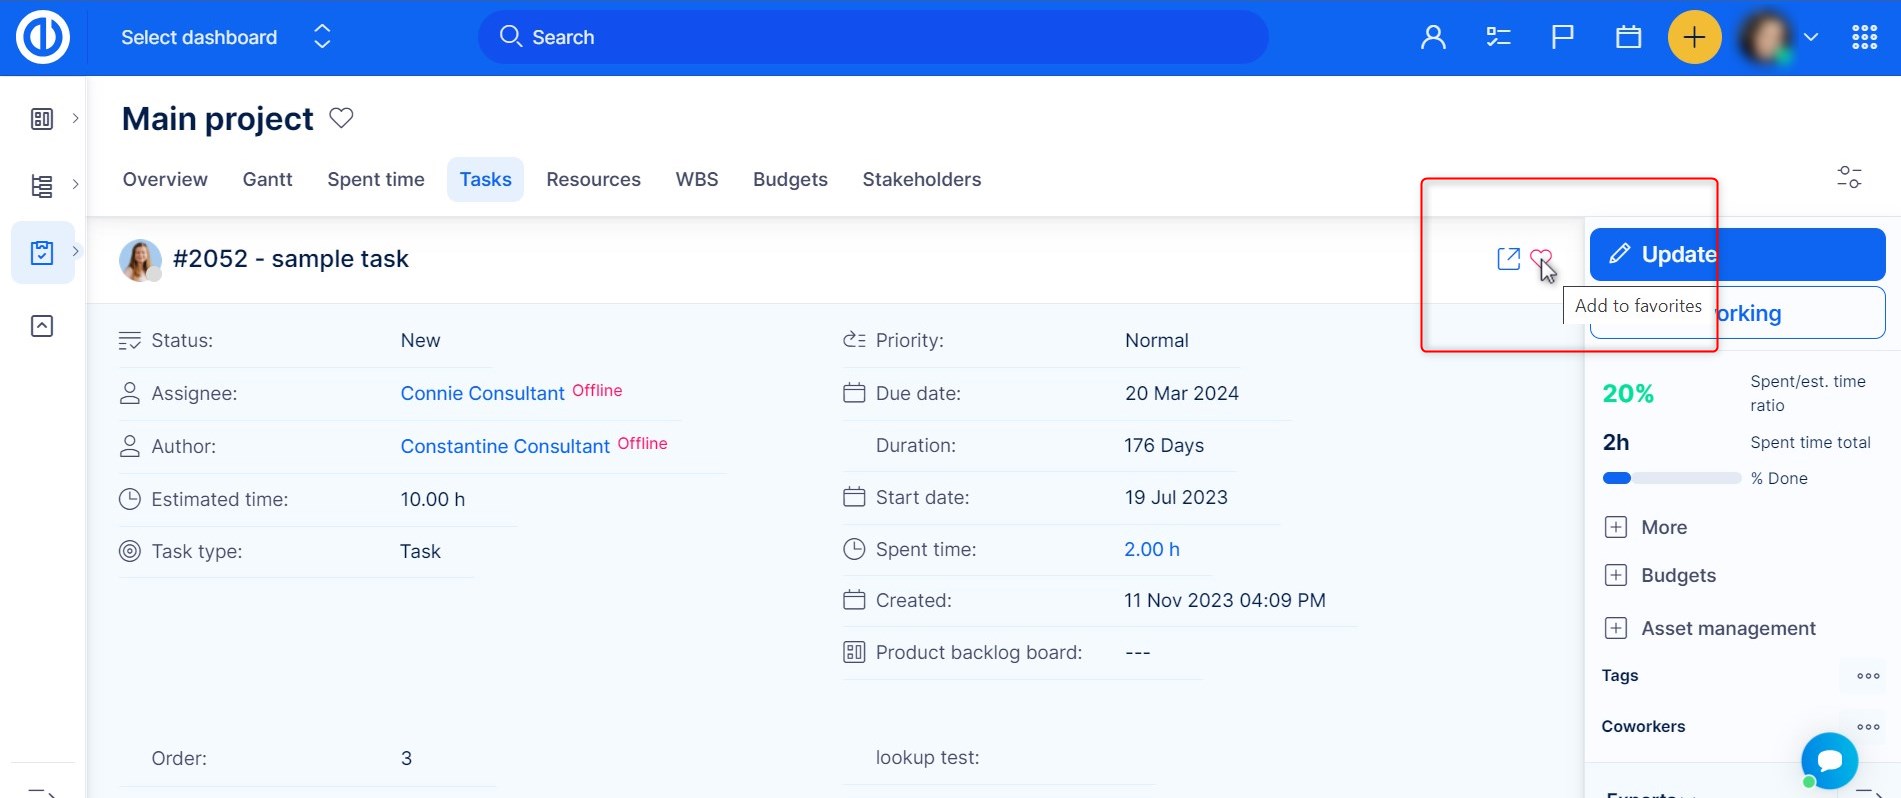
You are able to mark any issue as favourite which will help you find it quickly anytime.
To add a favourite, click on the heart icon in task detail:
On your personal Dashboard add a widget : List >> Entity - Tasks In the filters choose the filter "Favourite" , set it to YES and save the widget.
How to use comments reactions
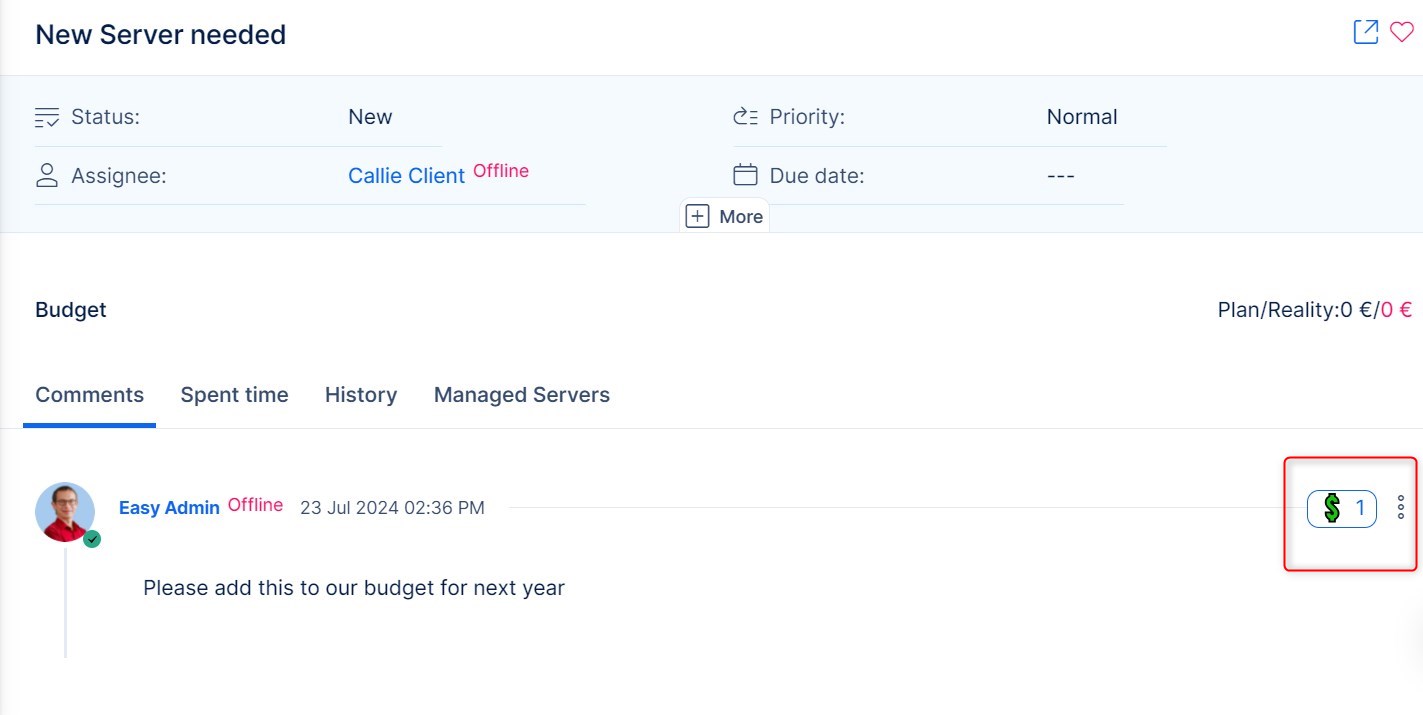
There is an option to react to comments via emoji reactions. This feature helps keep tasks tidy. Users can show an acknowledgment without flooding the task with unnecessary comments. Reactions are in the form of basic emojis ( hear, thumbs up etc...) and users will receive notifications about them according to their user profiles' settings.
What can be the use of this feature in examples:
- Acknowledging Completion: Use a thumbs-up emoji to acknowledge task completion or agree with a proposed solution.
- Expressing Approval: Use a heart or clapping hands emoji to show appreciation for a colleague’s input or effort.
- Providing Quick Feedback: Use a smiley face or thumbs-up emoji to quickly react to suggestions or comments without interrupting the flow of work.
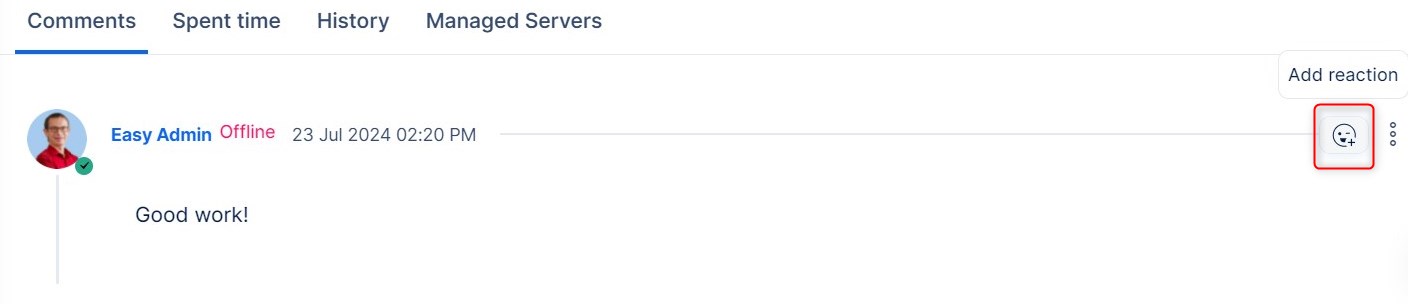
The reaction option can be found on the right side by each comment:
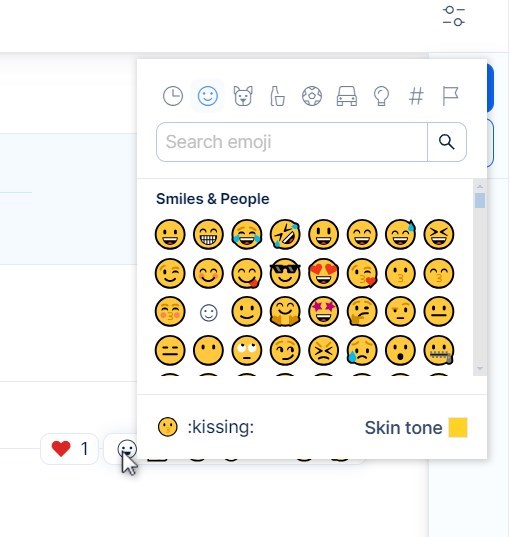
After you click on it, you will have 6 selected emojis and an option to select different ones.

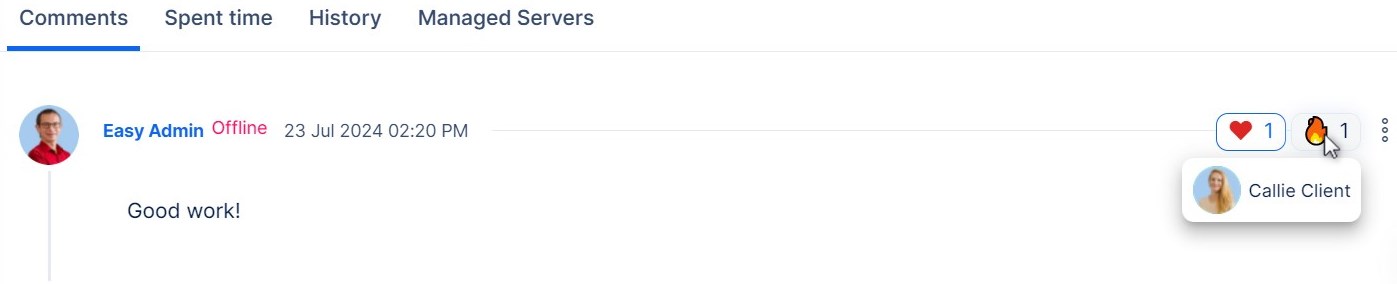
Once reactions start to roll in, by simply hovering your cursor over one, you will see who added that specific reaction.
Comment reactions notifications
You will be notified about reactions via standard email notifications, the same way you are about any other change on a task. Notification settings on each user's profile affect whether they will be notified only about reaction on their own comments, or if they will be notified about reactions on other people's comments.
Example:
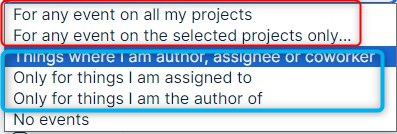
On the following picture we highlighted in red notification settings which will set that you will get notified about any events, including reactions to other people's comments.
And in blue, which will set that you will get only notified about reactions to your own comments.
How to use private comments
You can control who sees which comments in a task. With this feature, you can prevent for example your client from seeing internal communication.
Enabeling users to use private comments
To use and see private comments, you firstly have to enable it in Roles and permissions. When a user has these permissions he will be able to set the comment as private.

Set private comments as default
All the comments added will be by default checked in as private. How to achieve this? Go to Administration >> Settings >> Task tracking. Here you will find this checkbox.
The Private comment checkbox will then be always prechecked.
Assigning a task to multiple users
If you need multiple users to work on one Task, there are overall three ways to do it.
1) Assignee and co-workers
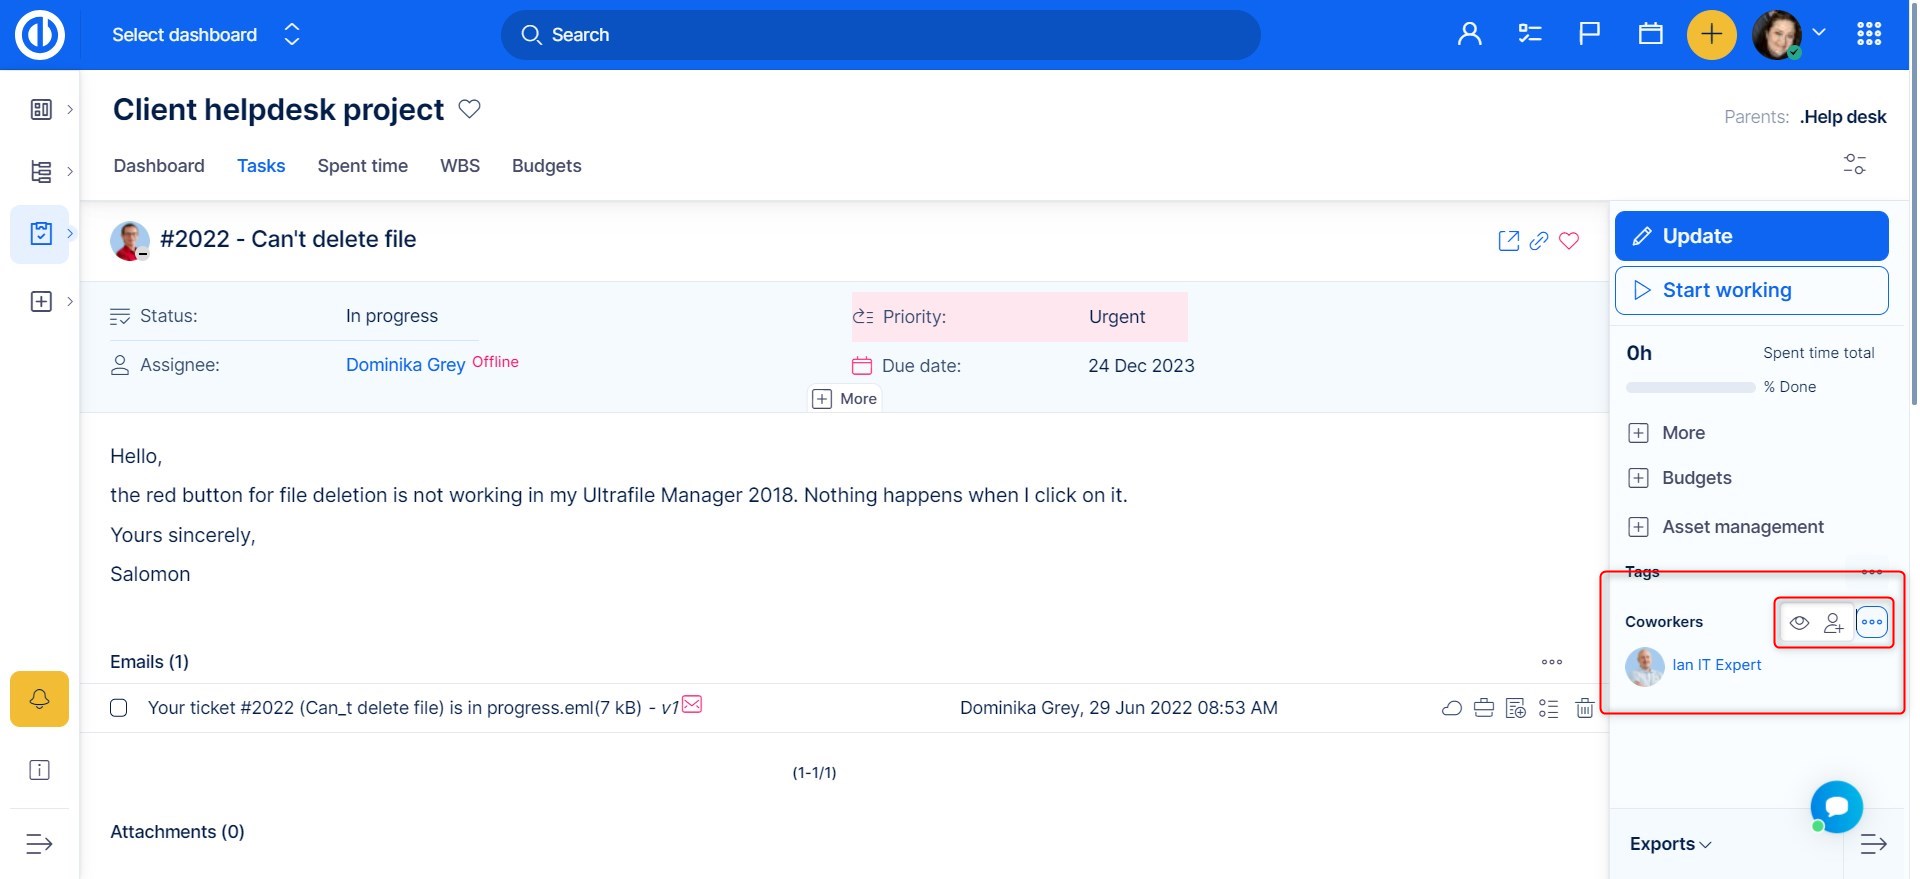
you can set one person as an assignee, and the others as coworkers. Co-workers get notifications and are able to manage the task just like the assignee. You can add him to an existing task:
2) Group assignment
You can assign a task to a group, and the group will receive notifications and can manage the task as one. To be able to assign a task to a group, make sure, you have this option turned on in Administration » Settings » Task tracking. Look for this checkbox on the right side. You will then see a group in the assignee list ( the group has to be a member of the project, just like a regular user).
3) Distributed task
How to use distributed tasks and how to set them up can be found in this in the following chapter:
Distributed tasks
Distributed tasks allow you to create subtasks, which you can assign to different people at once and also assign to each person estimated time they got to finish the task. All updates within each of the subtasks will be added to the journal of every other subtask, therefore creating a sort of shared task but assigned to different users.
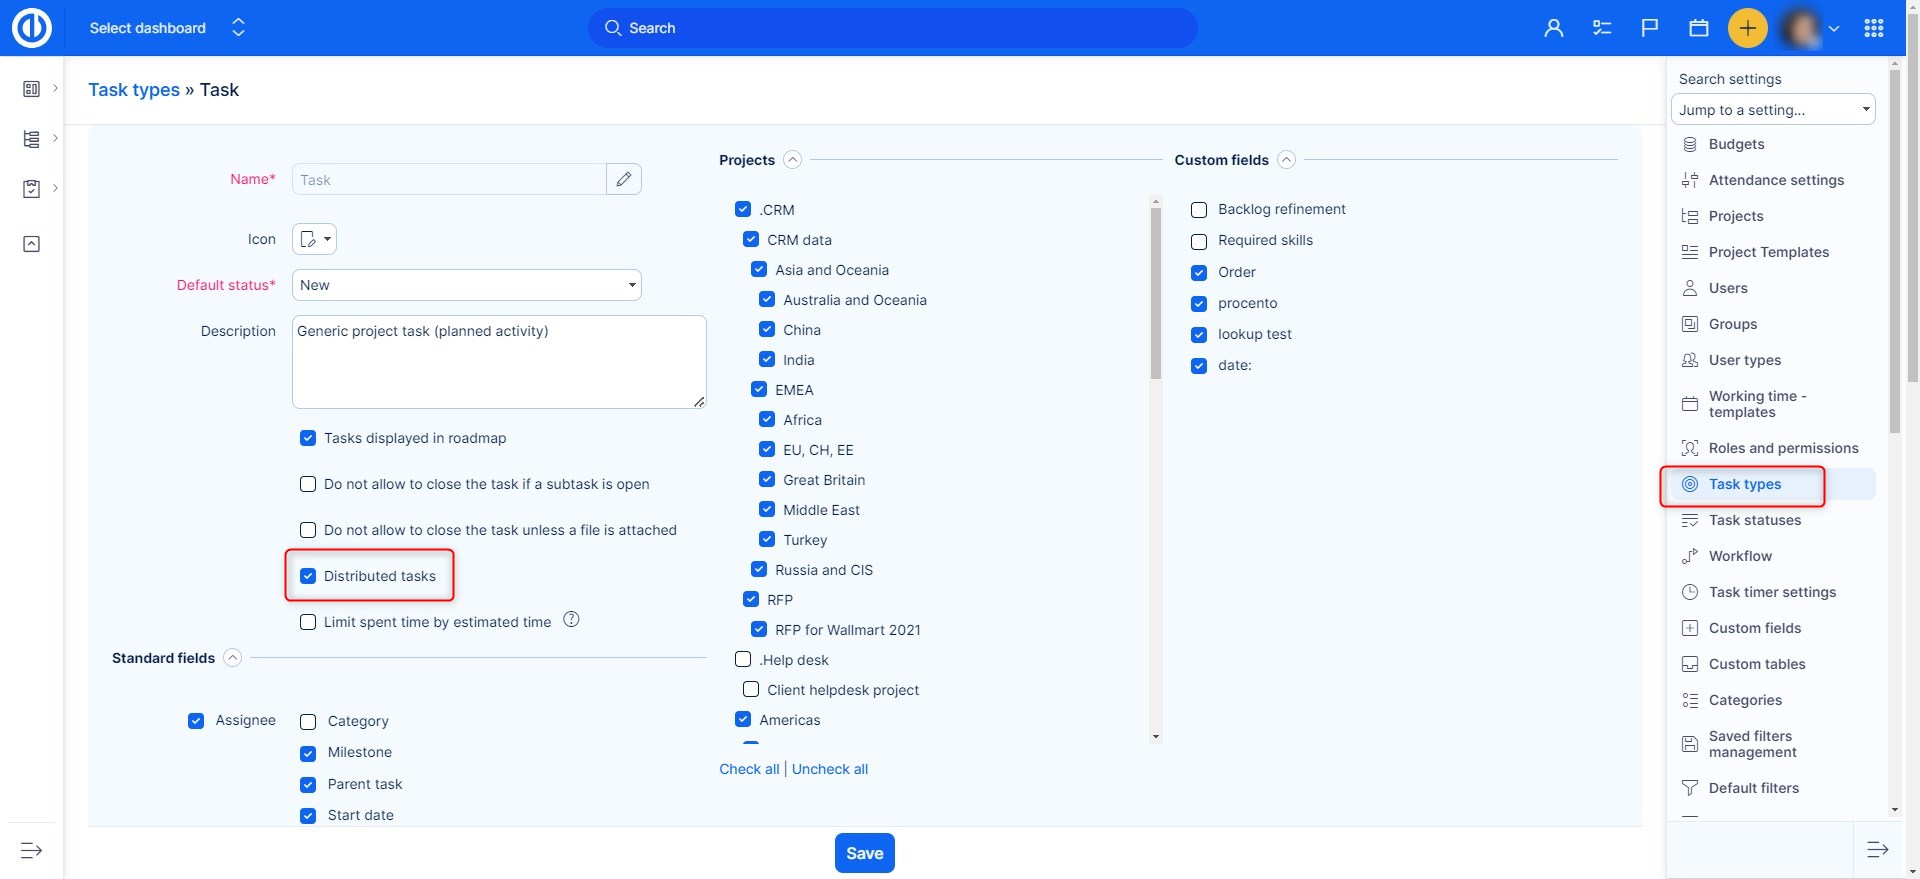
This feature is great if you have a number of people who are working on one task. It forms a parent task and subtasks, but in a form, where updates from the subtasks are projected into the parent task. So you have all the information about the progress in one place. This feature has to be turned on, on tracker level. Open Administration >> Trackers >> specific tracker. Find the Distributed tasks check box.
For better understanding, a distributed task is a standard task with a "distributed" tracker, which creates subtasks in a tracker other than the "distributed" tracker itself. Otherwise, subtasks would also have the same "distributed" tracker, which is not possible in order to prevent infinite task distribution. Therefore, those subtasks must not be in a tracker that is marked as distributed. For that purpose, is automatically selected the first non-distributed tracker in the sorted list of trackers in Administration. If there is no "non-distributed" tracker enabled on the project, you can not create any distributed tasks.
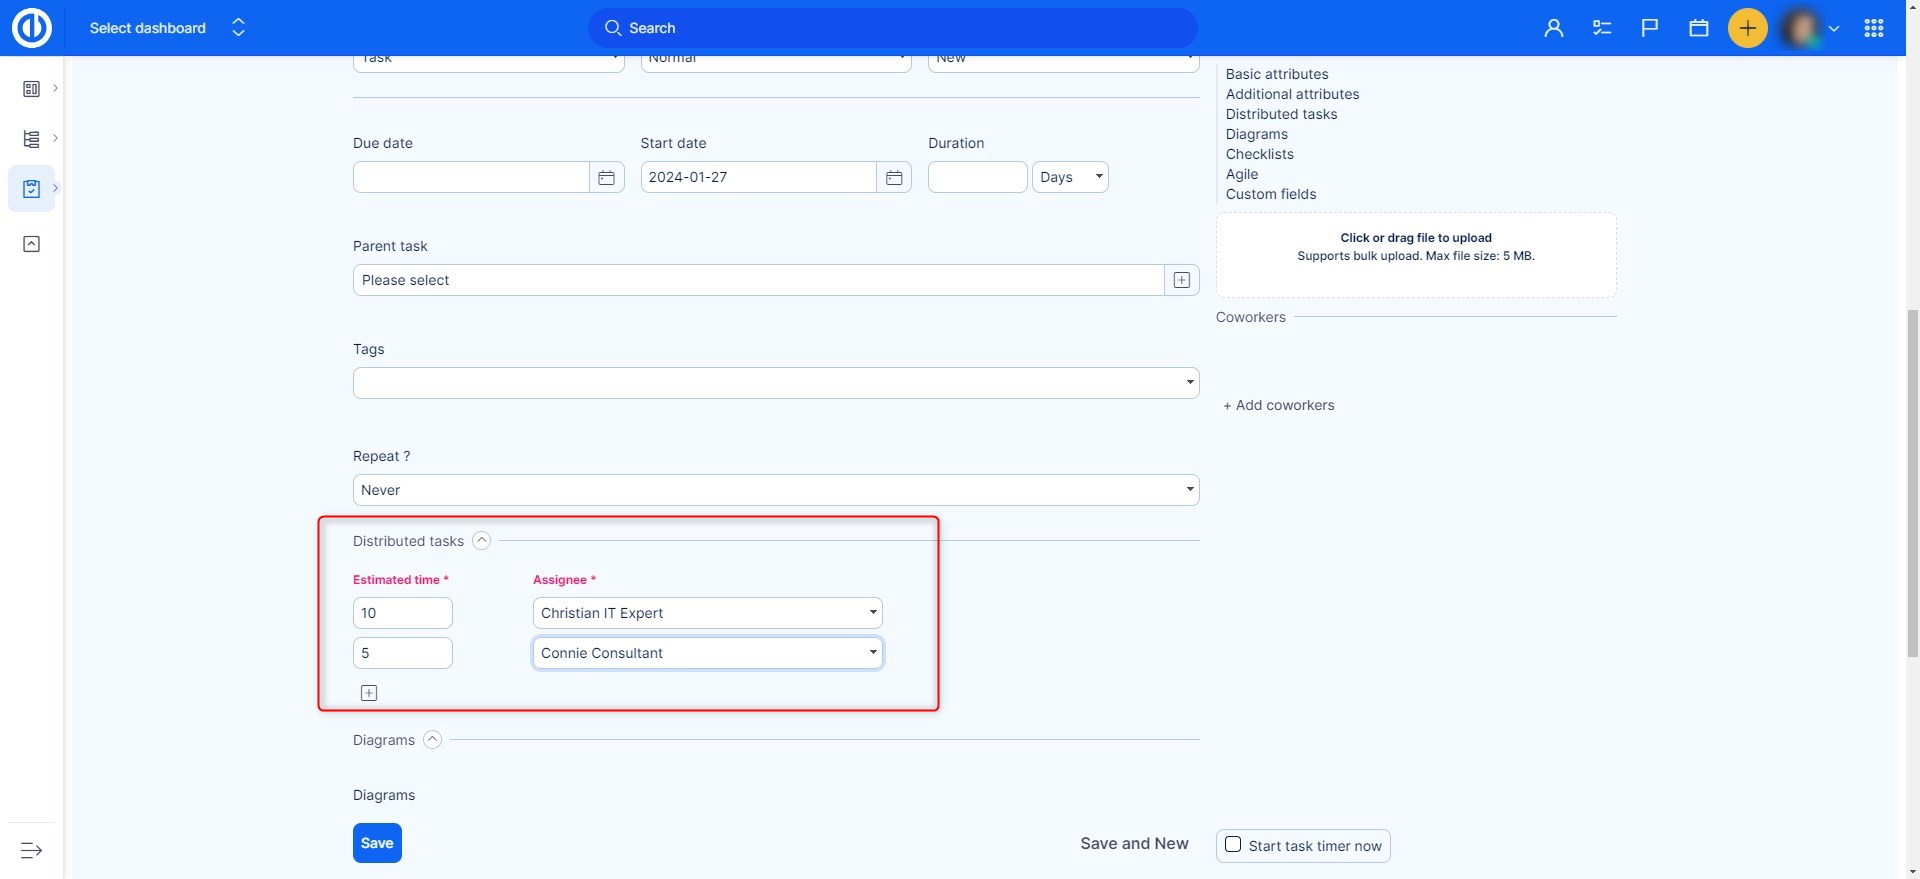
If you choose this tracker while creating a new task, you will be able to distribute the task right away. In this box, you can add users, and you can even assign a particular estimated time for each user.
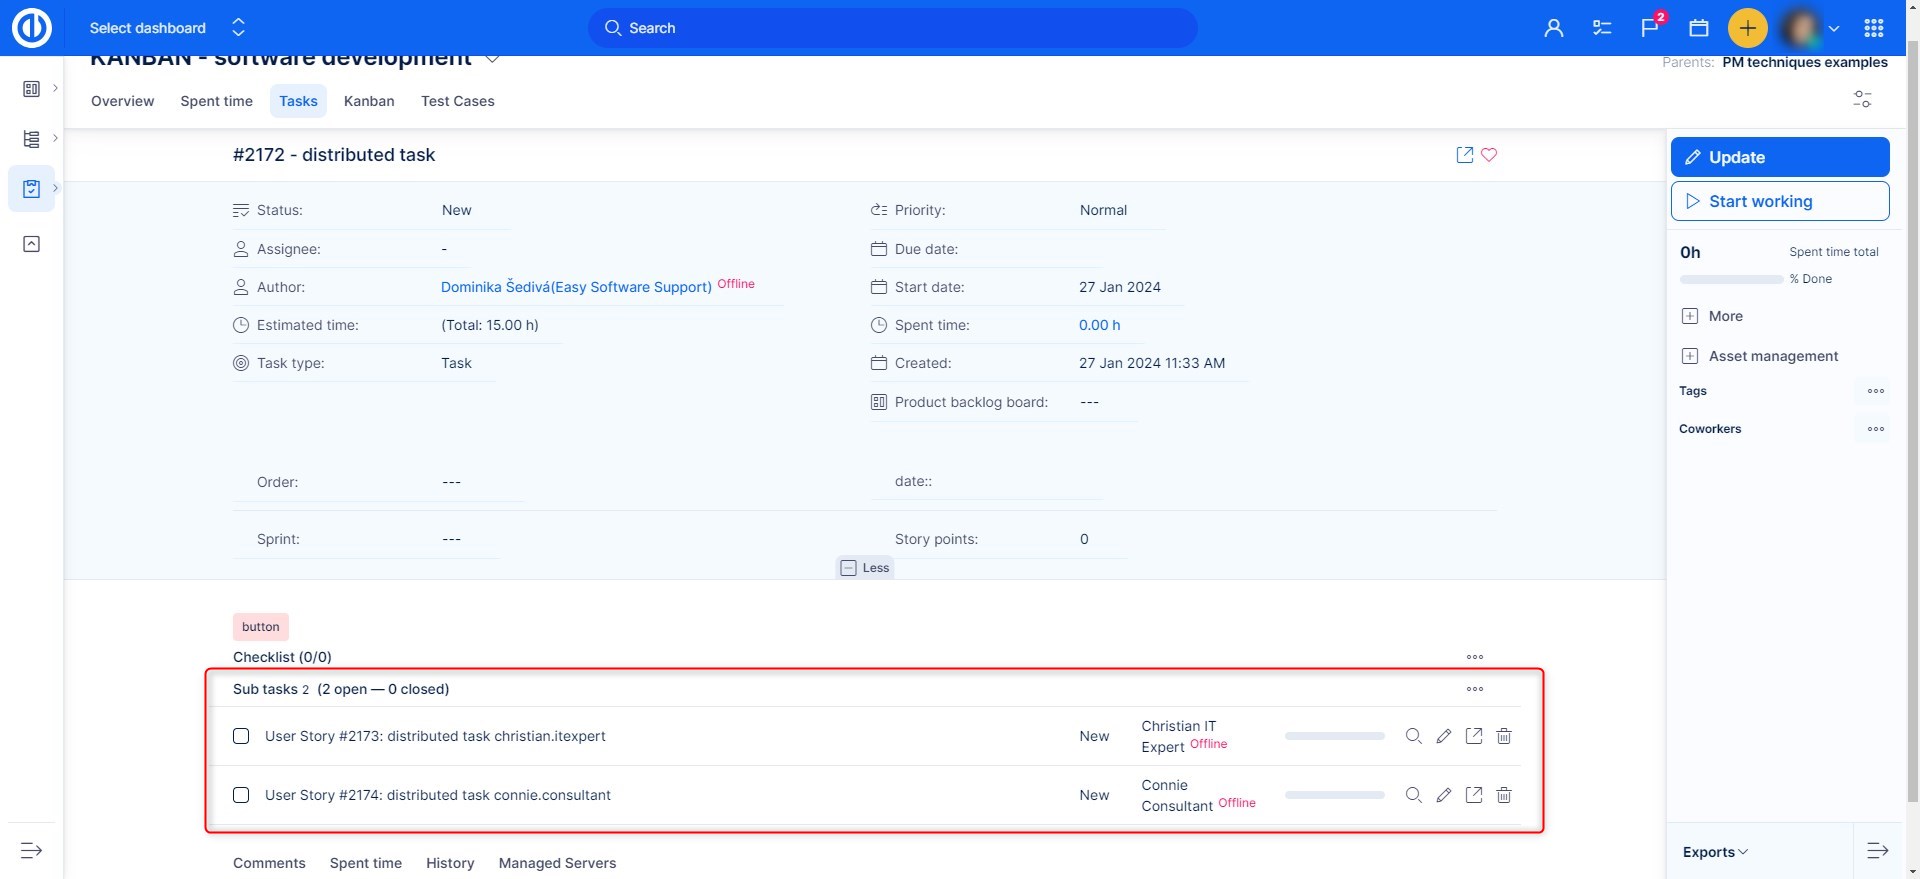
When you create distributed task like this, subtasks will be created automatically, with names of users you added, as you can see below. I also draw the example of how it looks when comments are copied into the parent task.
Repeating tasks
If you have a task that needs to be performed again and again, you can use this option. To use repeating tasks, make sure that all of the following preconditions are met:
- Enable repeating tasks in Admin >> Settings >> Task tracking
- Go to Admin >> Trackers – enable Repeating on the tracker
- The task creator (user) has the permission "Edit repeating setting on tasks"
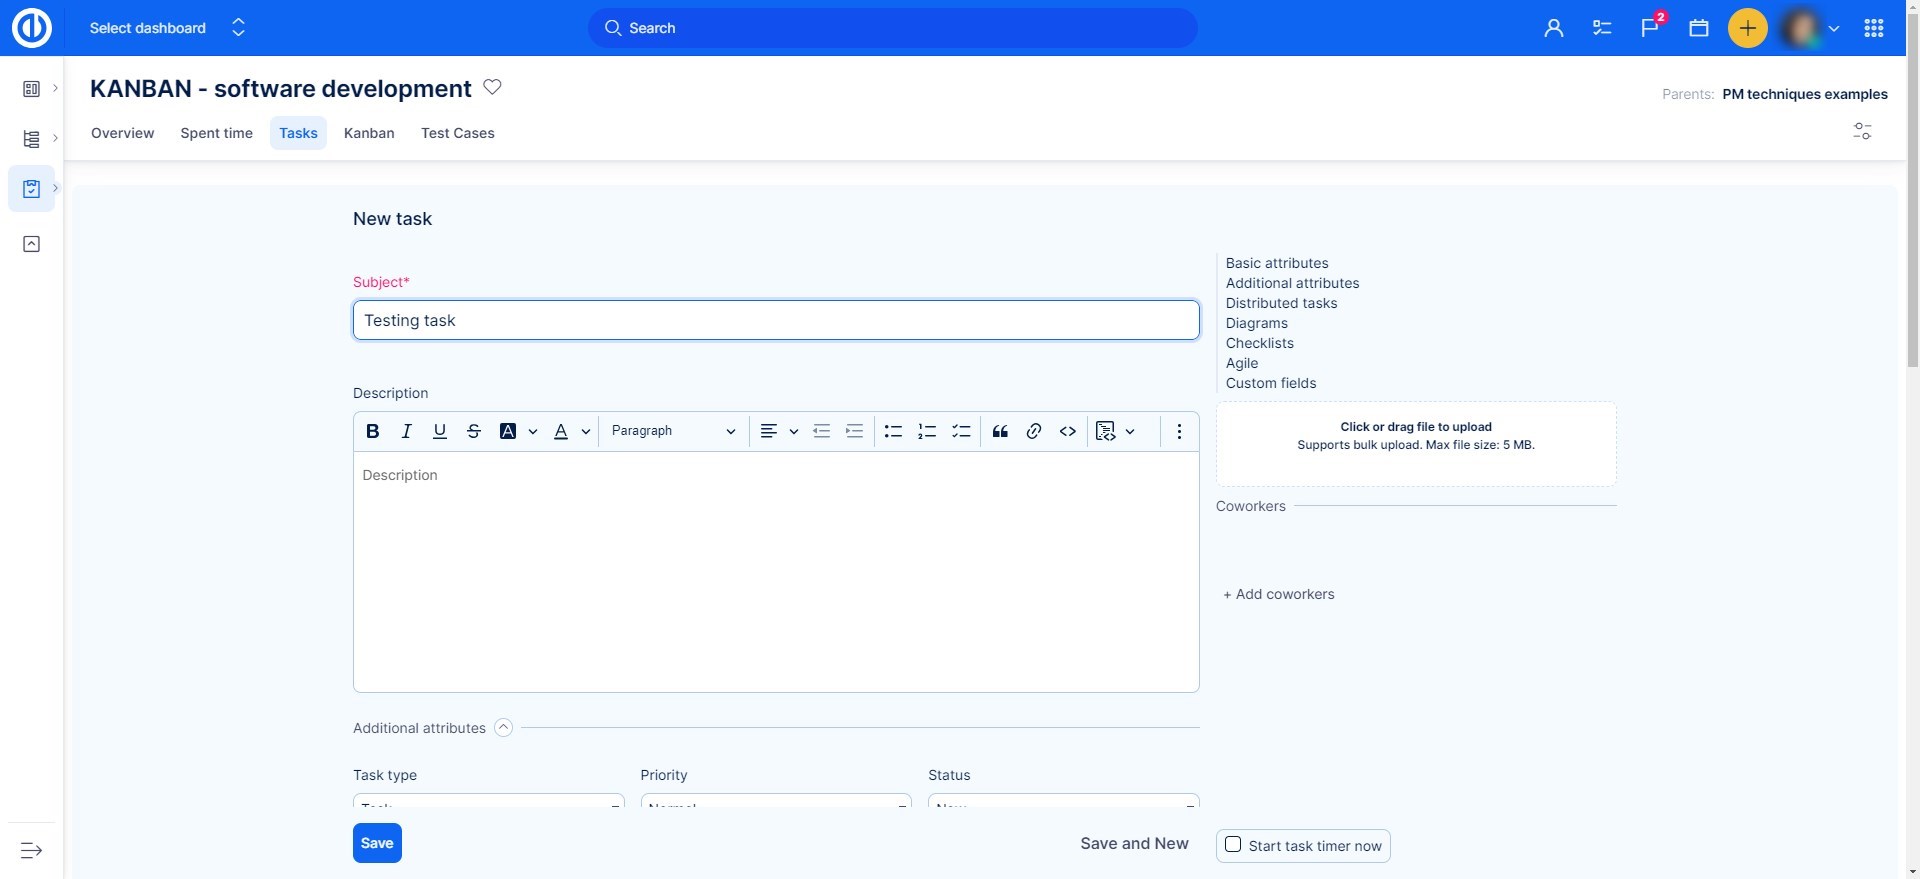
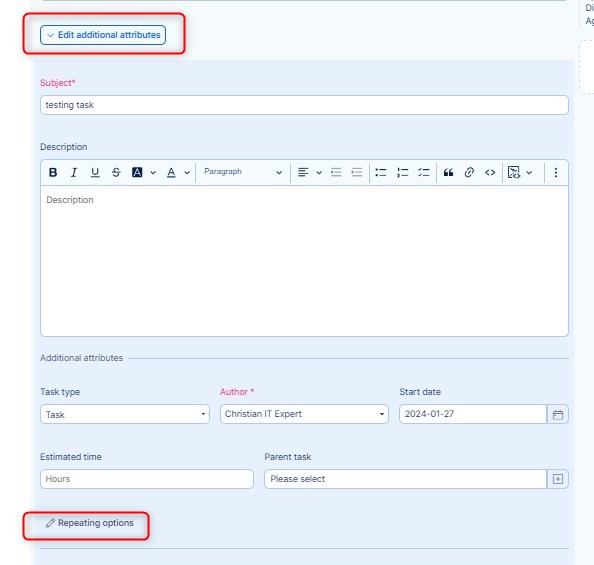
Then create a new task, give it a name. In this case, we put "Testing task".
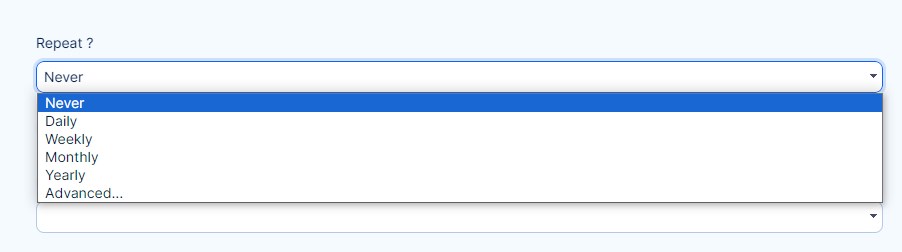
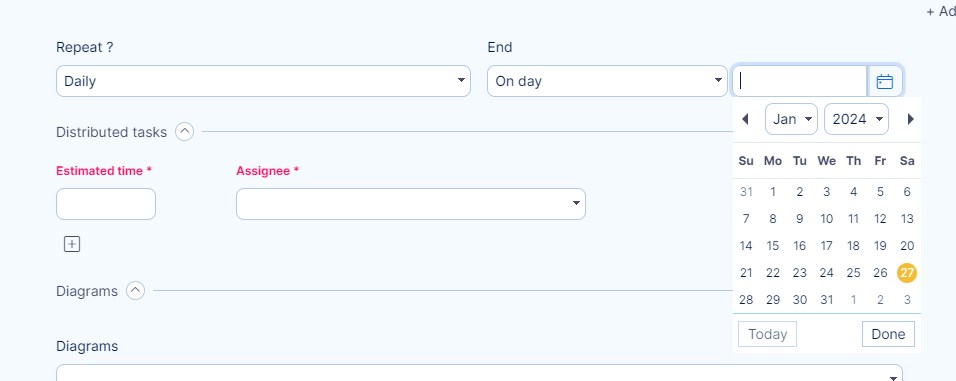
Under the description, you can choose how often you want the task to repeat and when you want it to end. Which can be determined in various ways :

The advanced option will open like this. As you can see, the default values are already predefined (usually as every 1 day or the first day in a month/year) but you can change those values manually.
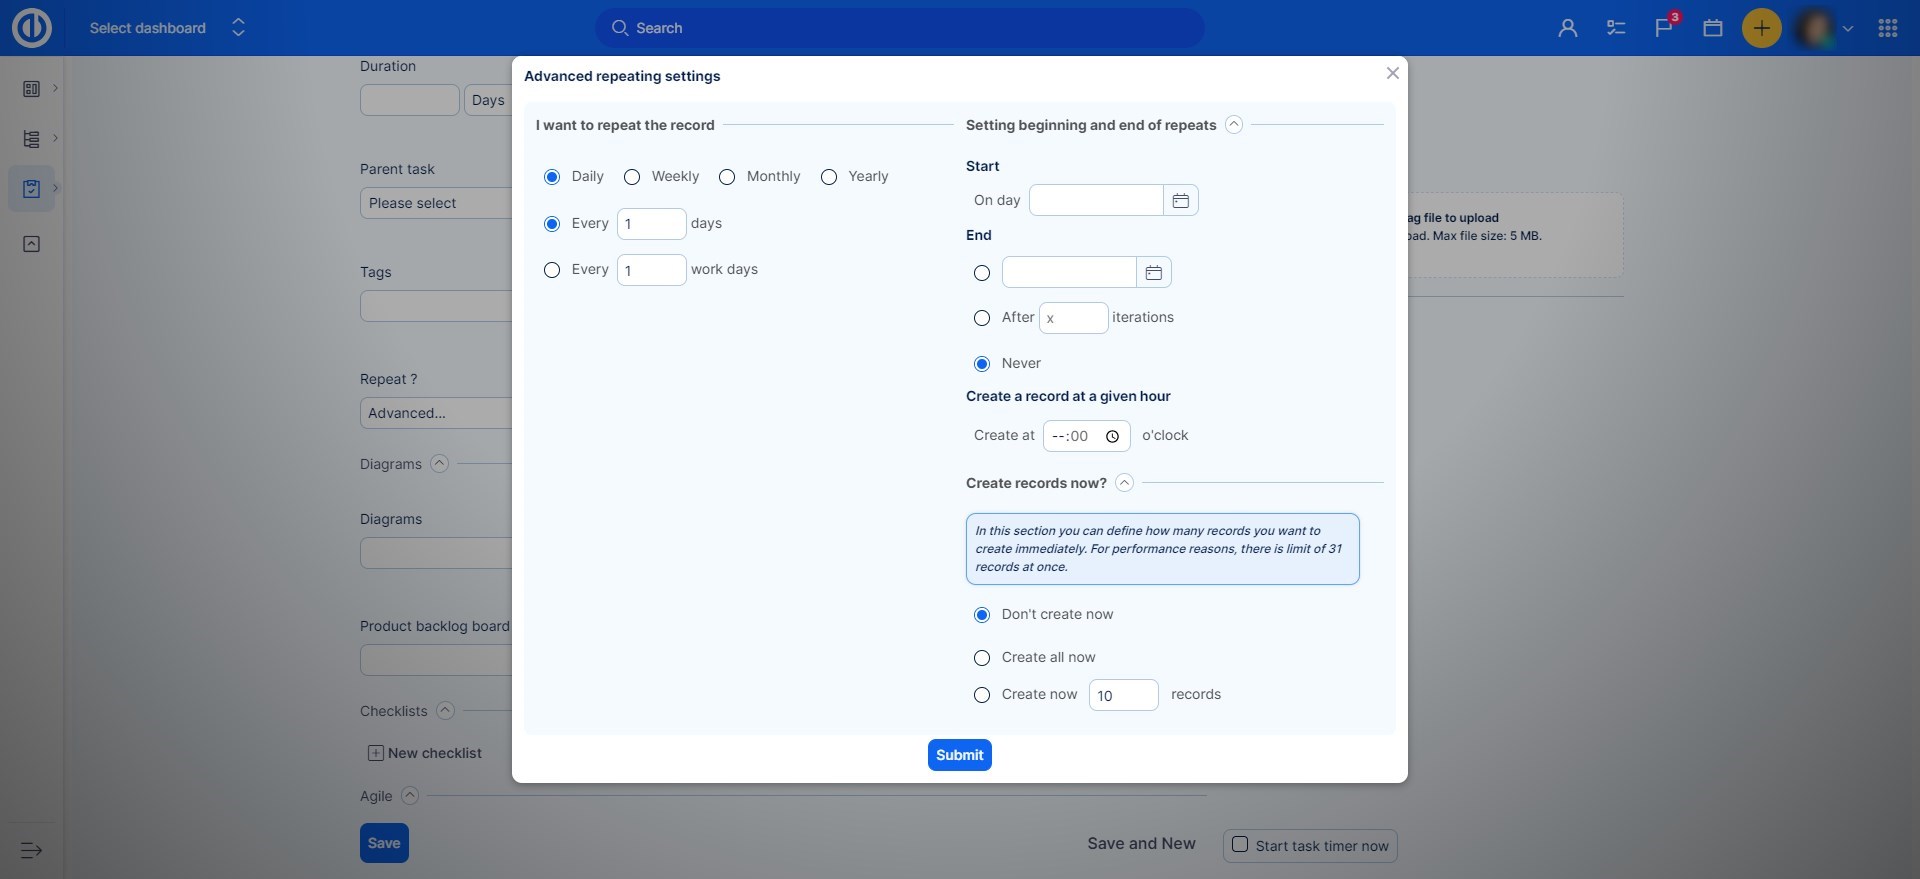
1, Setting the beginning and end of repeats
Here you can set when exactly you want the repeating to begin. If you want to repeat a task, for example, every month from 28.7.2021, you set the start date to 28.7.2021.
Setting:
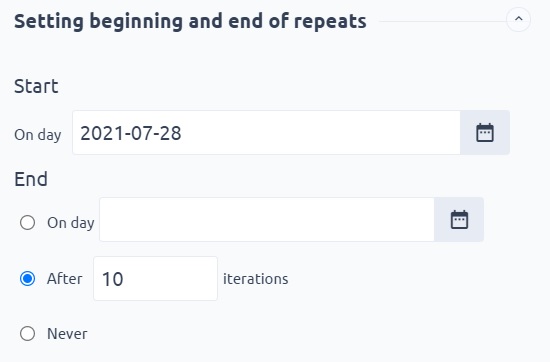
Result:

You can see the next start, which means the next task will be created on the first of March.
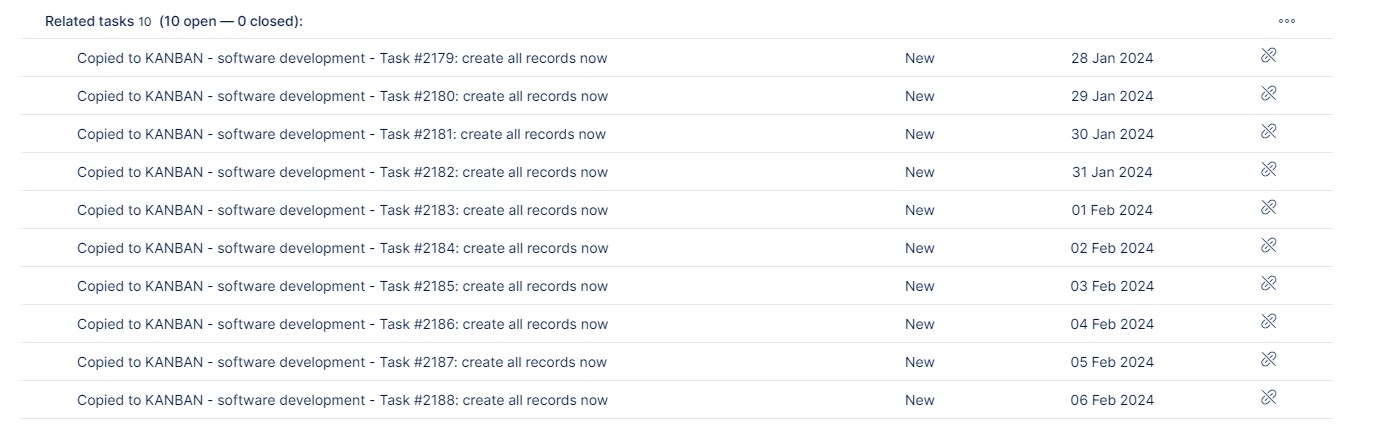
2, Create all records now
When the creation is successful, You will end up with this. You can see the repeating task and all the related tasks that you created.
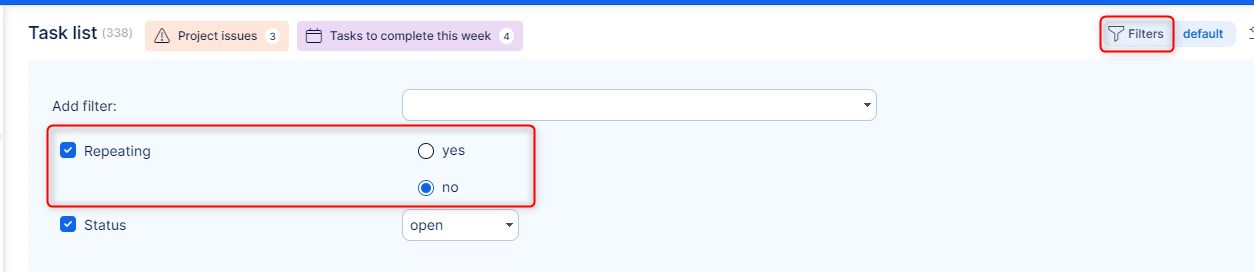
The task will then repeat according to your settings. It will have the same duration and same attributes. If you don't create the tasks at once, they will be automatically created according to your settings. To "hide" the (Repeating) task, you can set the filter like this.
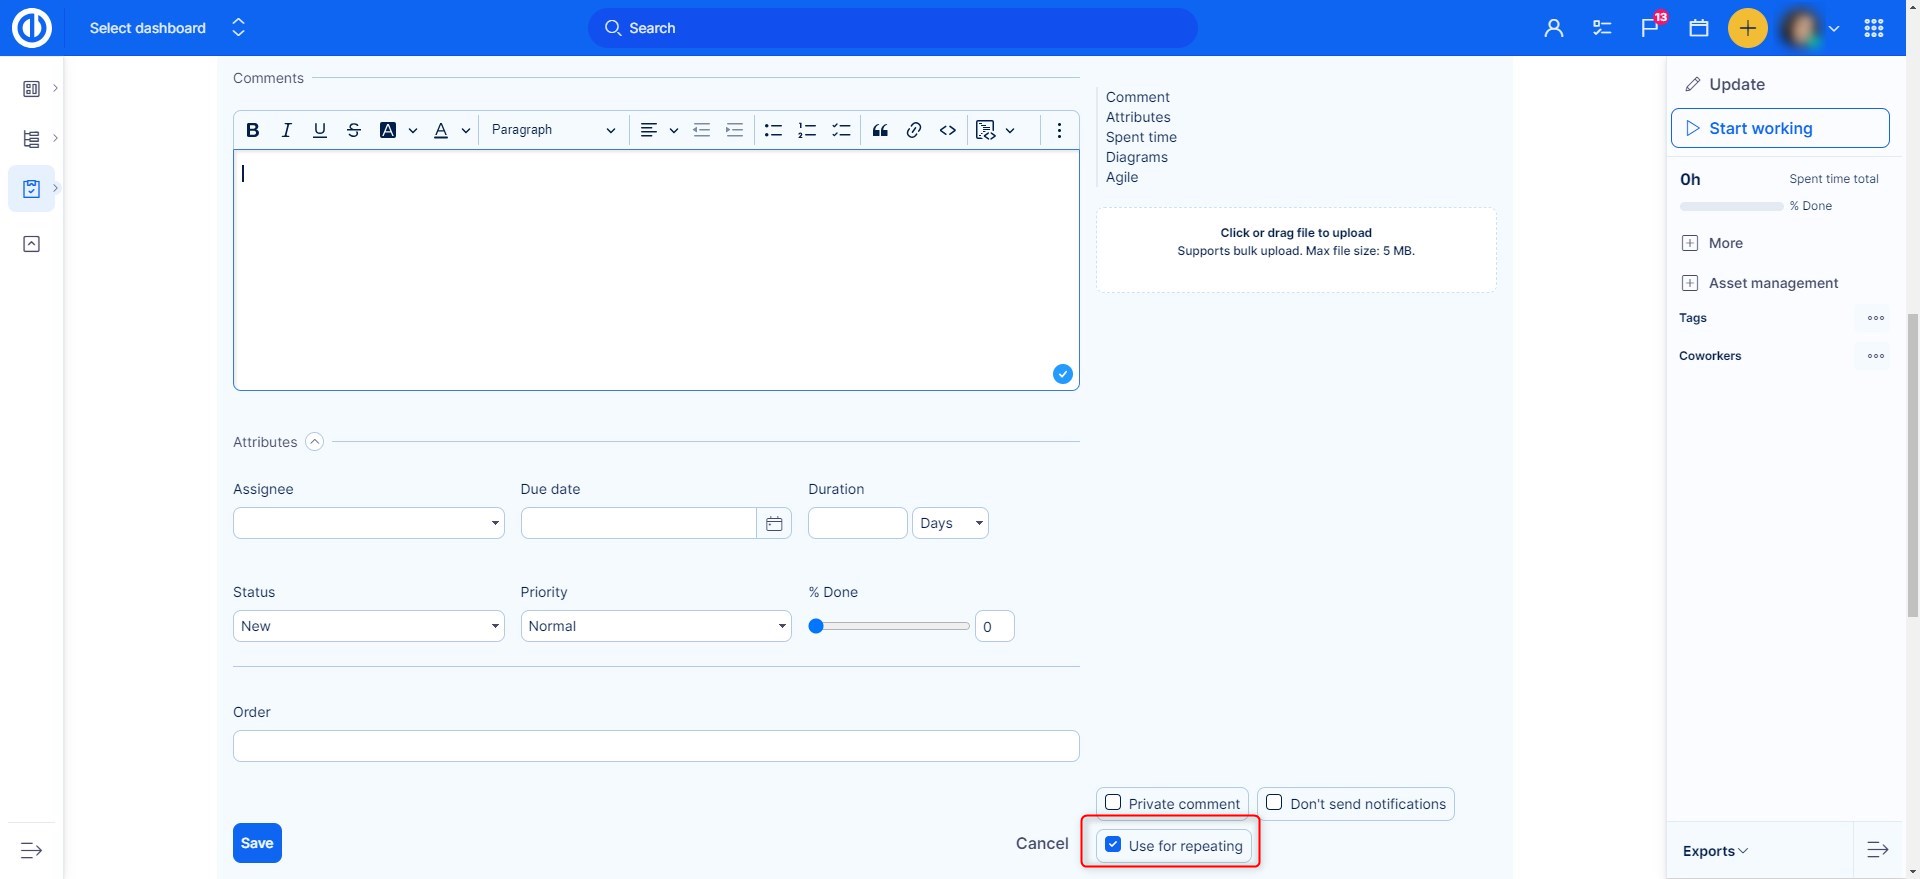
3, How to change task attributes without affecting the iterations
In the current version of Easy Redmine you additionally have an option to keep the attributes of created future iterations regardless of any changes you make in the repeated task from which the iterations are created by default. For this purpose, each time you make a change in your repeated task, you will find a checkbox "Use for repeating" above the Save button (next to Private notes). If you uncheck it (default status is checked), all future iterations will keep original attributes of the repeated task from the last time it was saved with the box checked. Otherwise, they will inherit current (changed) attributes. This functionality works both for tasks and subtasks.
You will find the checkbox highly useful especially when you need to keep your future task iterations open while the repeated task has already been closed. So you can close the repeated task without being concerned that the iterations will inherit the closed status if not desirable. To have this properly working in subtasks, just turn off the option "After closing parent task, close subtasks in Administration >> Settings >> Task Tracking (see the picture below).
If you have a repeating task, and you need to pause the repeating, for a certain amount of time, here is how you do it.
There isn't really a pause button for repeating task, but you can change the date of next action.
1, update the repeating task
2, edit additional attributes and look for Repeating options
3, find "setting beginning and end of repeats
4, overwrite the start date, and there you have it.
The next action will be moved to the date you filled in there. You can also see the next action date in the task detail. You can pause the repeating tasks like this for however long you need. Without losing track about previous repetitions.
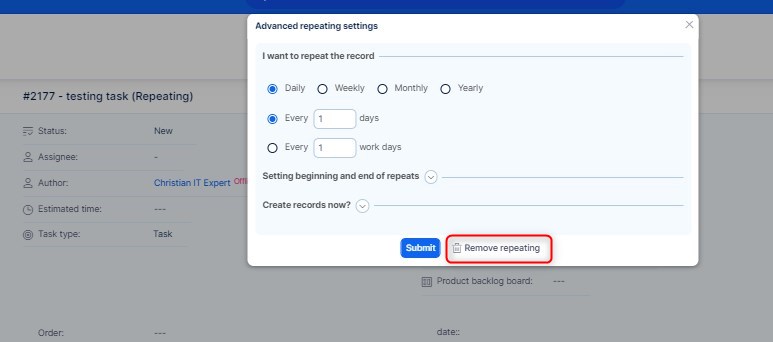
4, How to remove the repeating task
You have the flexibility to eliminate repetitions from the task as required.
1, go to the repeating task
2, click update button
3, click edit additional attributes
4, repeating options
5, remove repeating
Checklists
A checklist is a type of informational job aid used to reduce failure by compensating for potential limits of human memory and attention. It helps to ensure consistency and completeness in carrying out a task. A basic example is the "to do list." A more advanced checklist would be a schedule, which lays out tasks to be done according to a time of day or other factors. A primary task in a checklist is documentation of the task and auditing against the documentation.
Checklists is a project-based module. Before start using it, you need to enable the module on a particular project. To do so, go to Project controls >> Modules >> tick the checkbox "Checklists" and save.
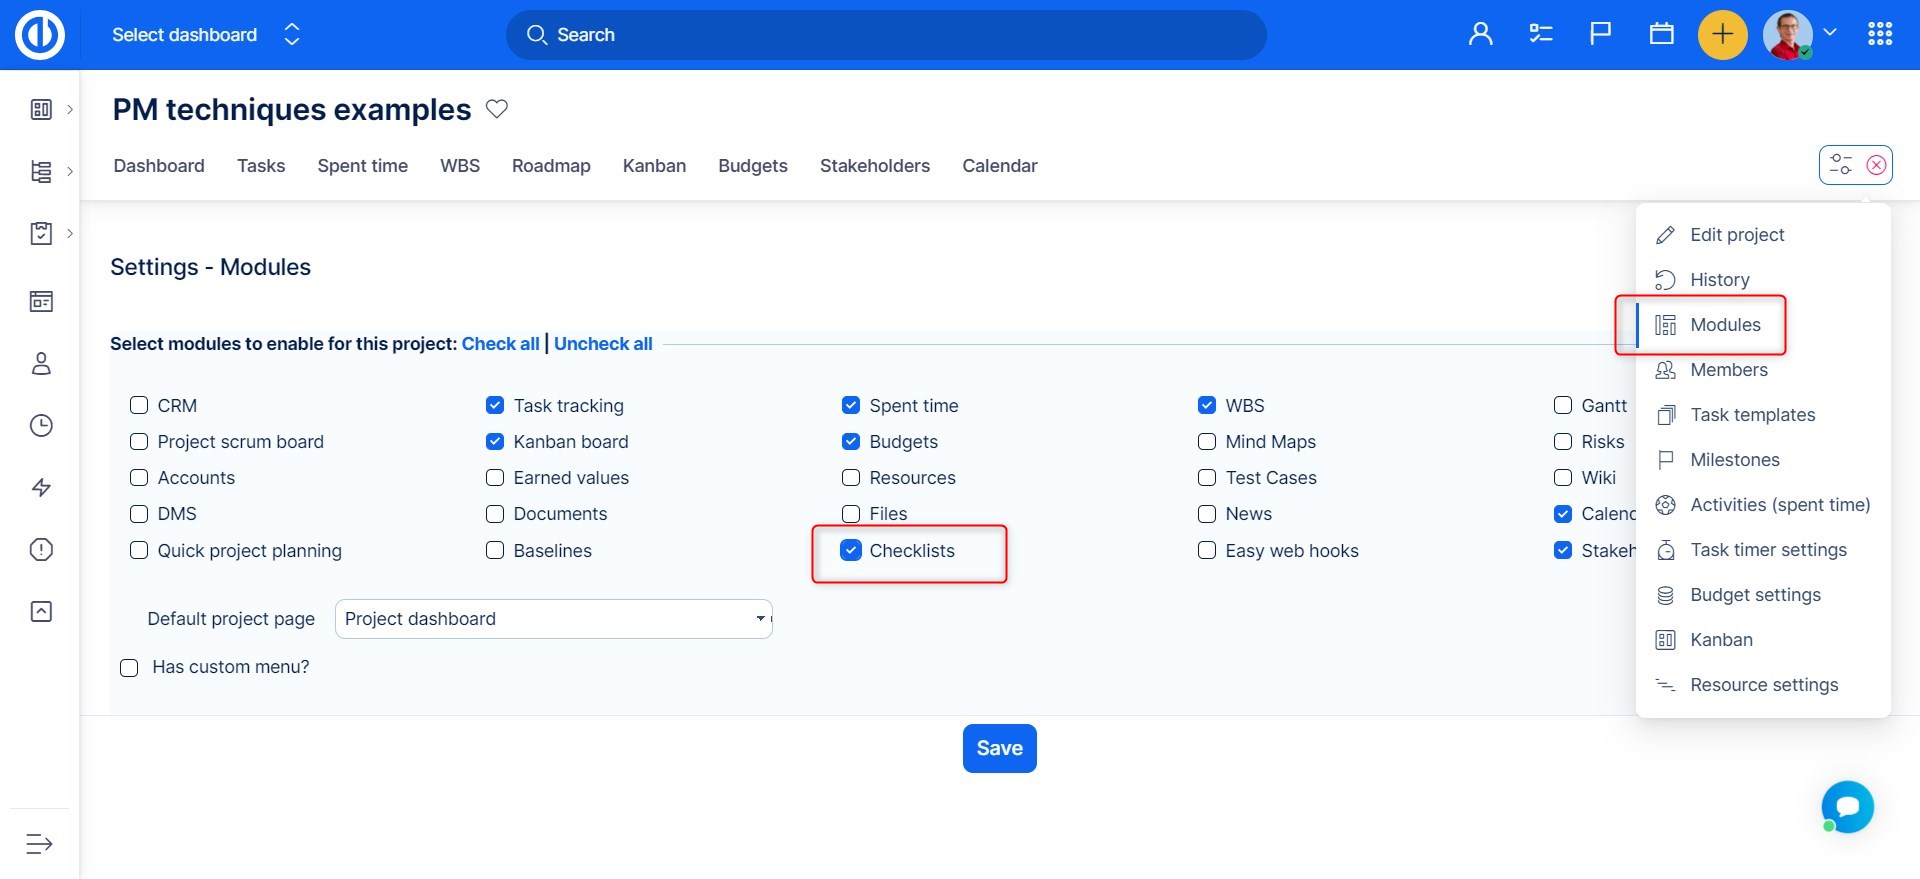
Moreover, make sure you have the project permissions to view and edit checklists on your role. This can be set by Administrator in Global menu >> Administration >> Roles and permissions.

Once checklists are enabled and you have the necessary permissions, you can find them on the project's tasks. Just open any task and you see there is a Checklists section above the journal. To add a new checklist, click on the three dots on the right side. Then click on the small "+" symbol, enter the name and finally click on the floppy icon , or hit ENTER to save the checklist.
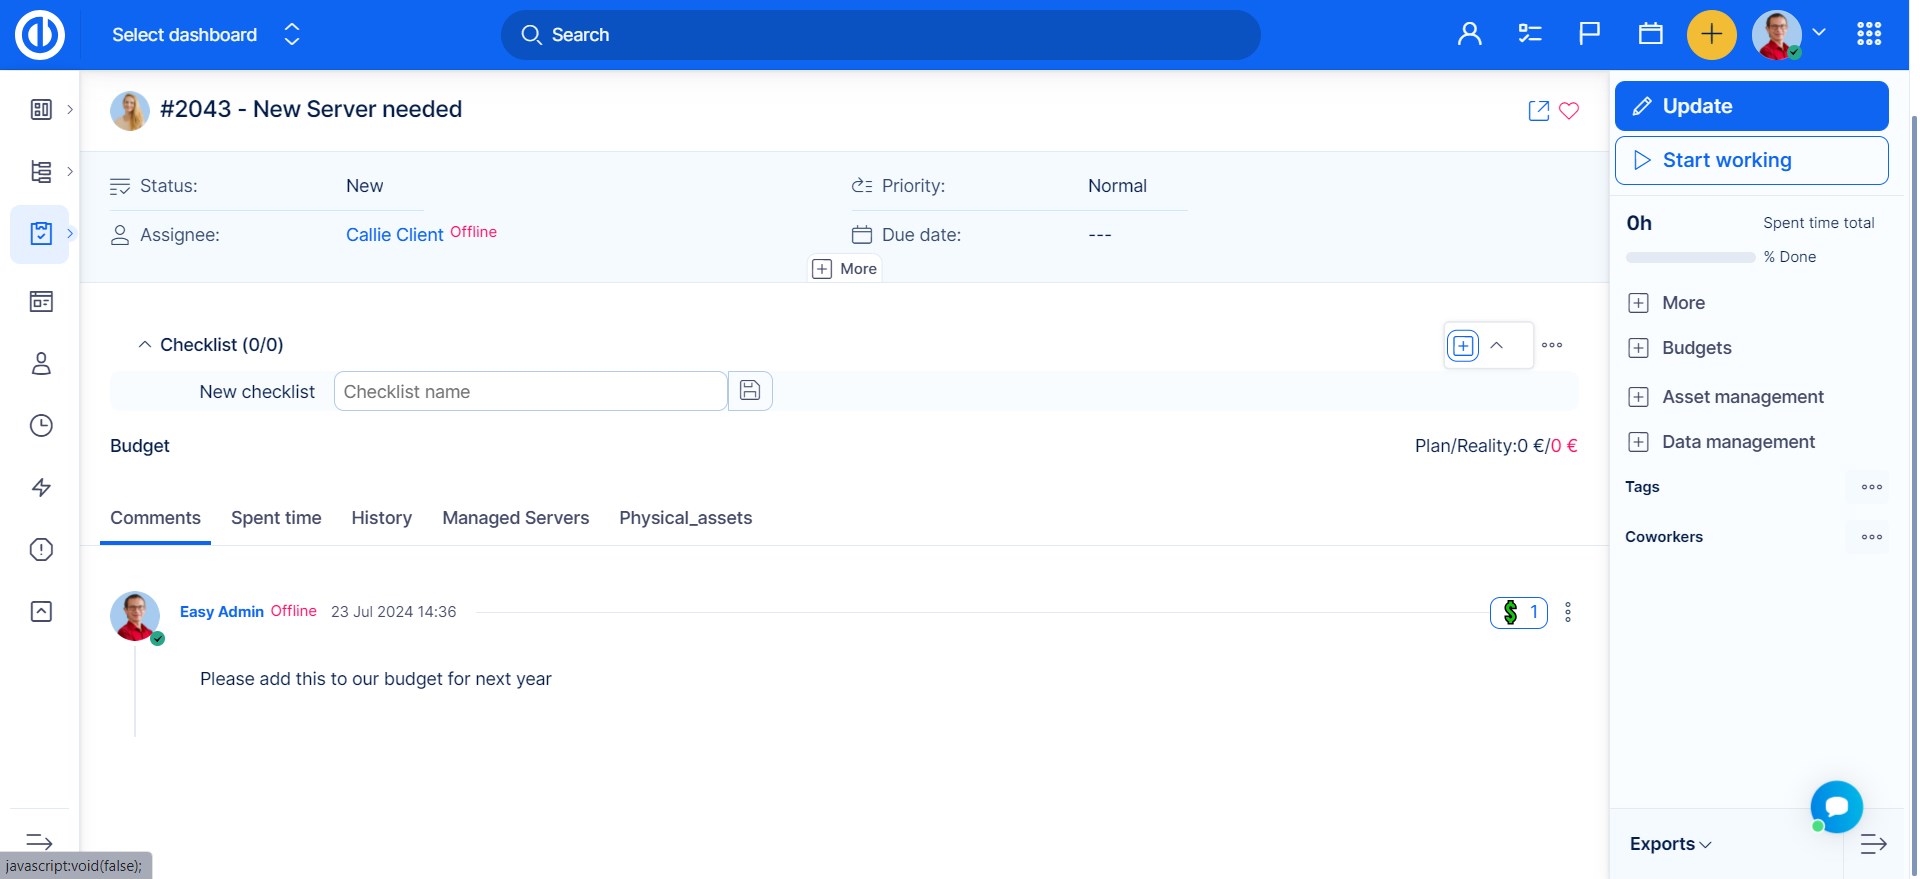

Now, the checklist name appears within the section and you can add new items to it. To add a new item, enter the name and click on the floppy icon or hit ENTER. The cross icon will cancel the item. You will also find option to edit and delete each item after they are created.
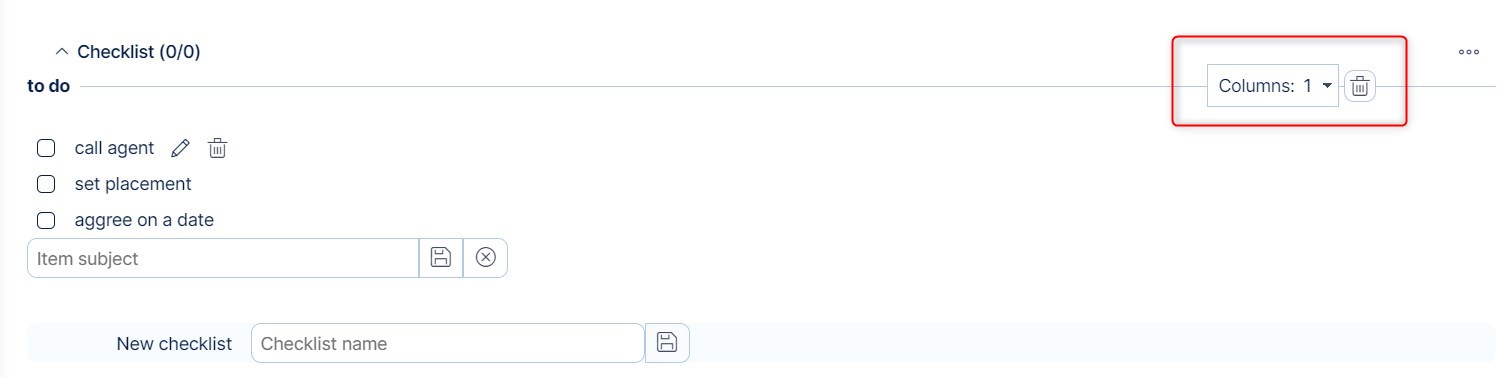
![]()
As the created items sort into columns, you can select the number of columns show. Using the trash icon, you can delete a whole checklist.
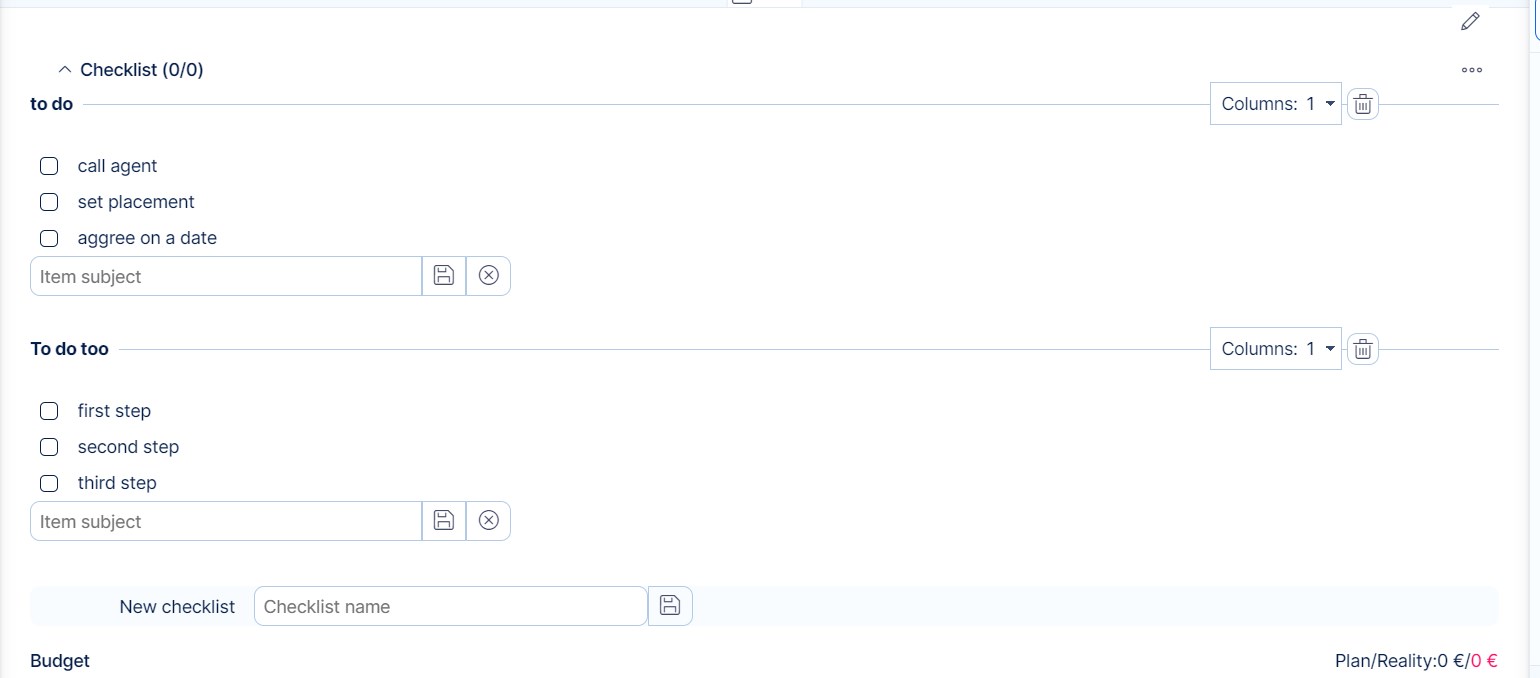
Multiple checklists can be added to one task. and each can be edited separately.
Global templates and settings
You can find the global checklist templates and settings in Global menu >> Administration >> Checklist templates.
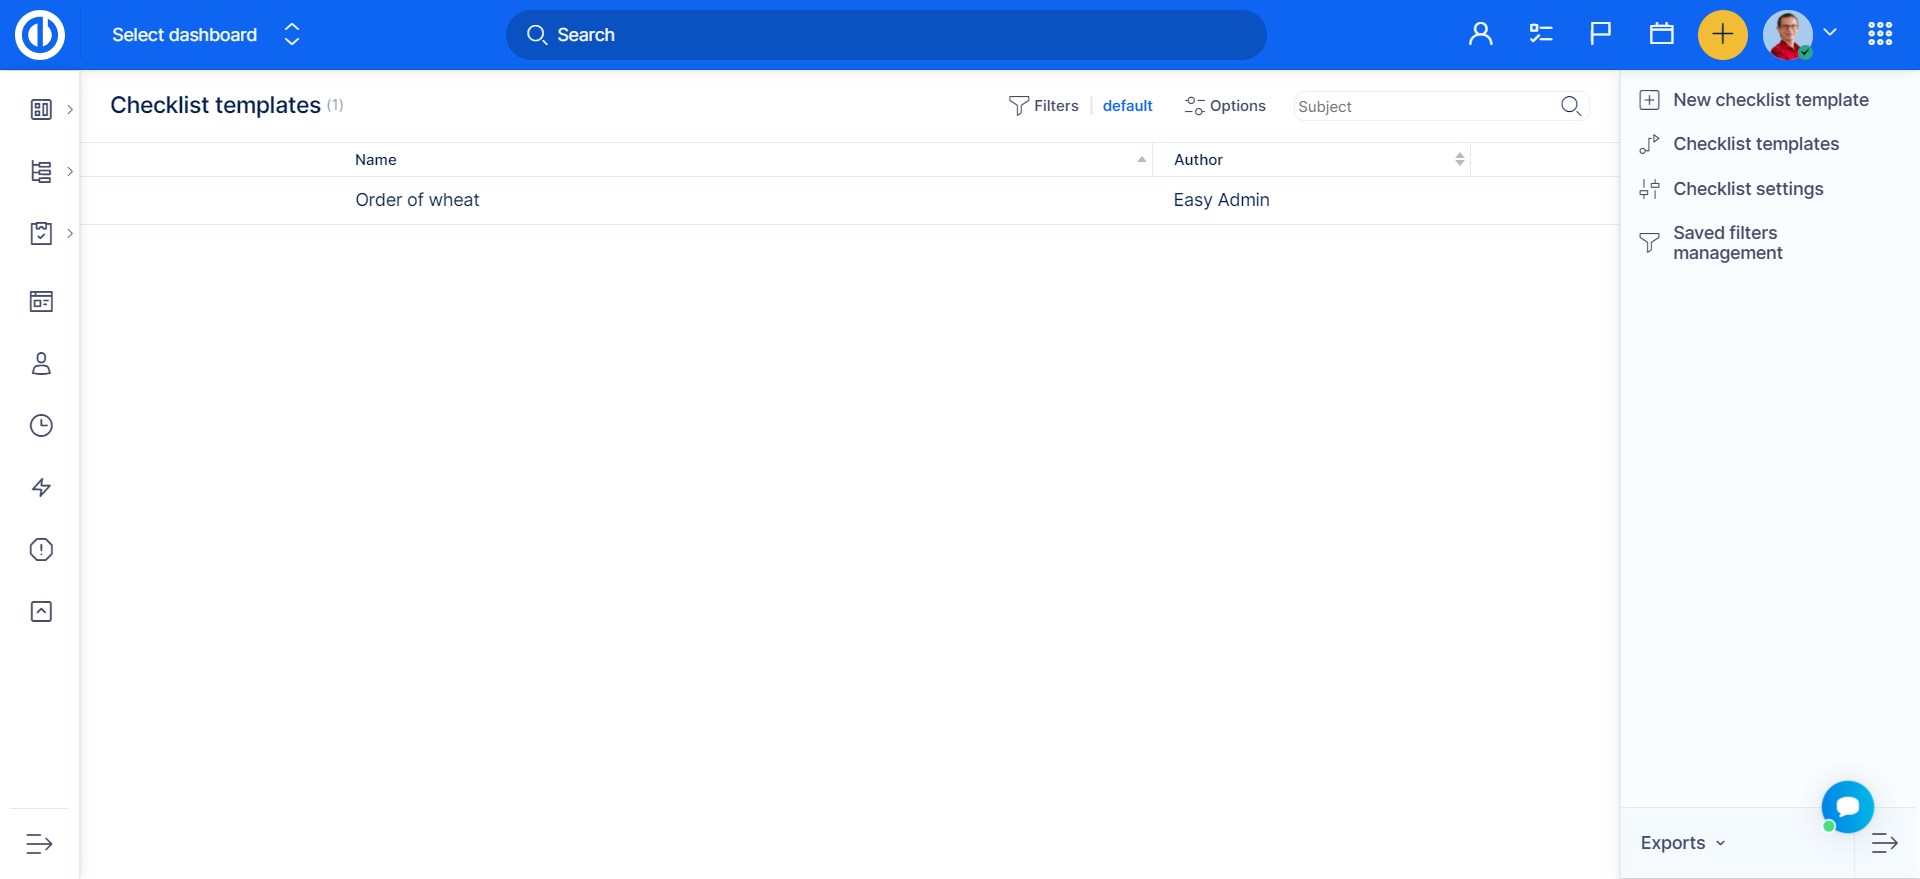
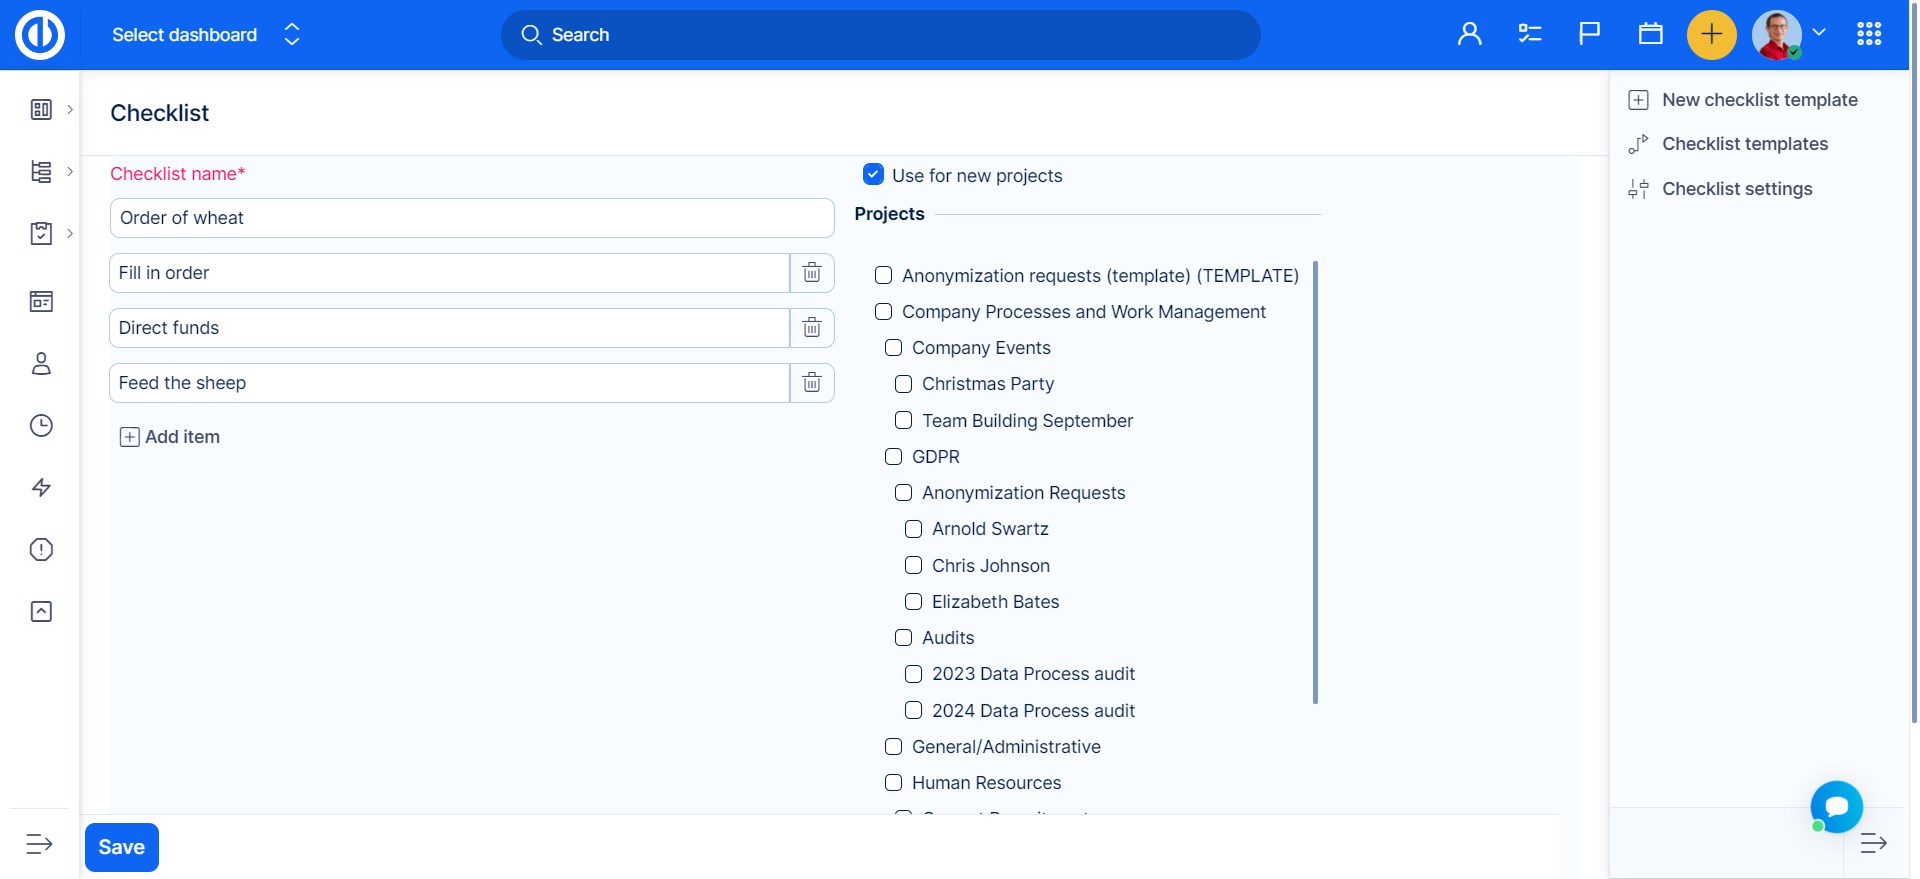
To add a new checklist template, click on the plus button at the upper right. Then enter the checklist name, item subjects and select projects where to use the template.
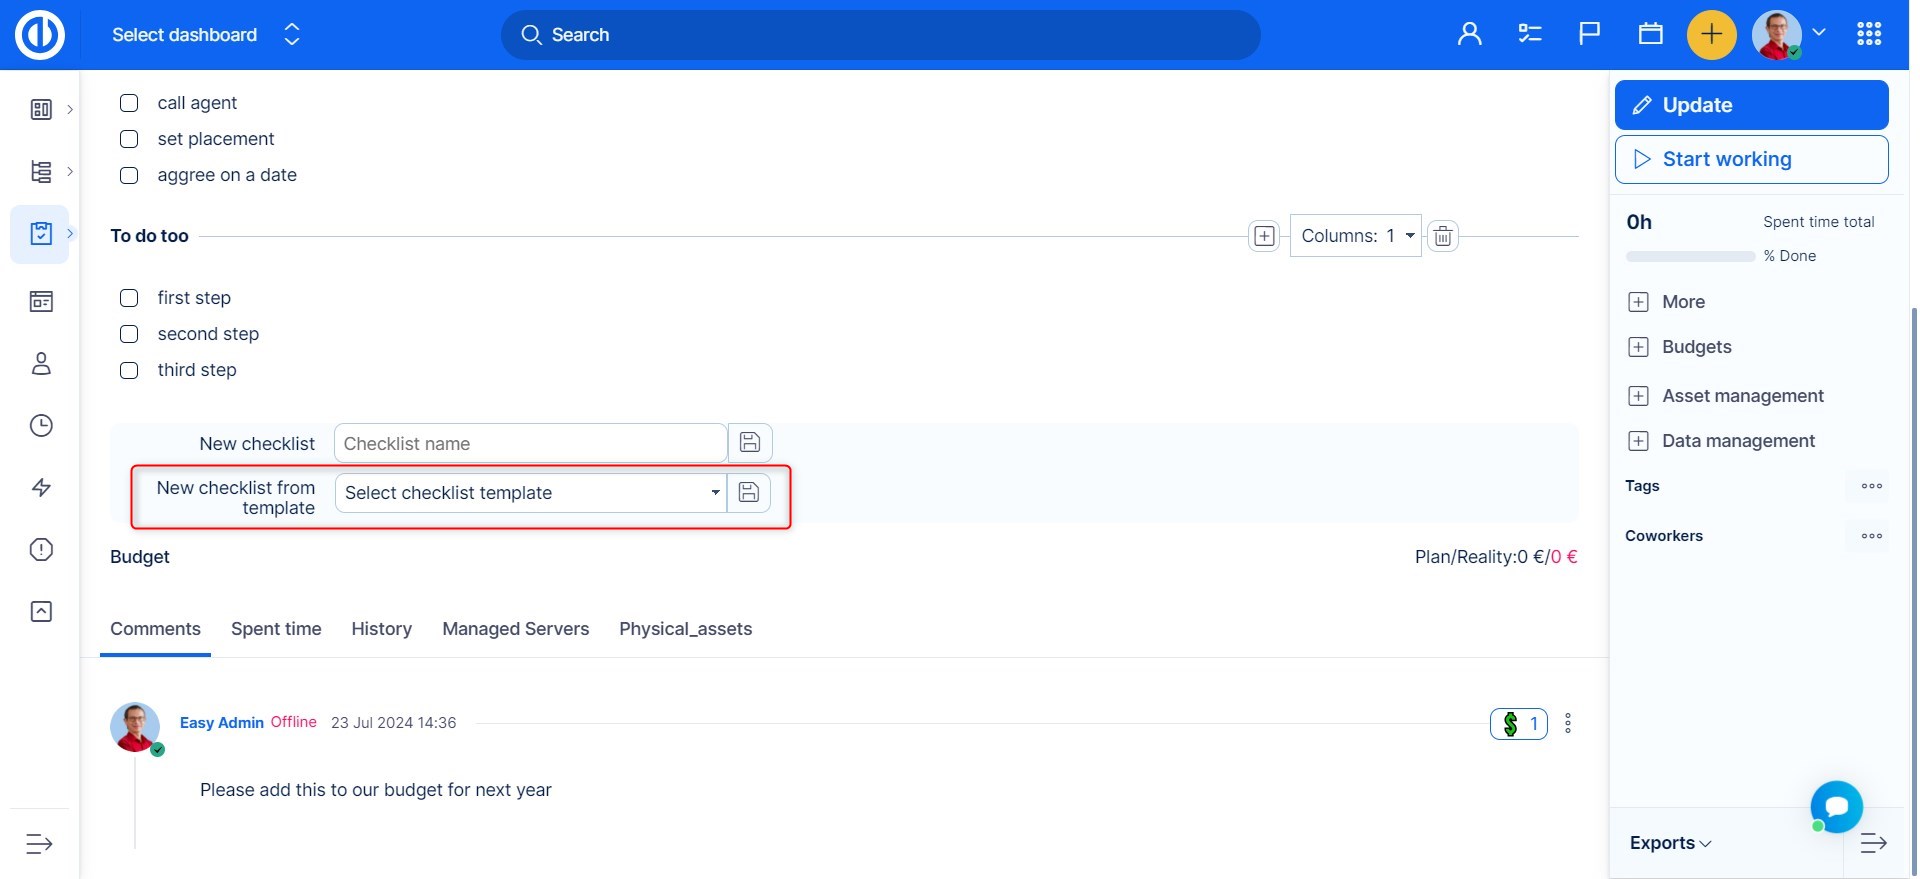
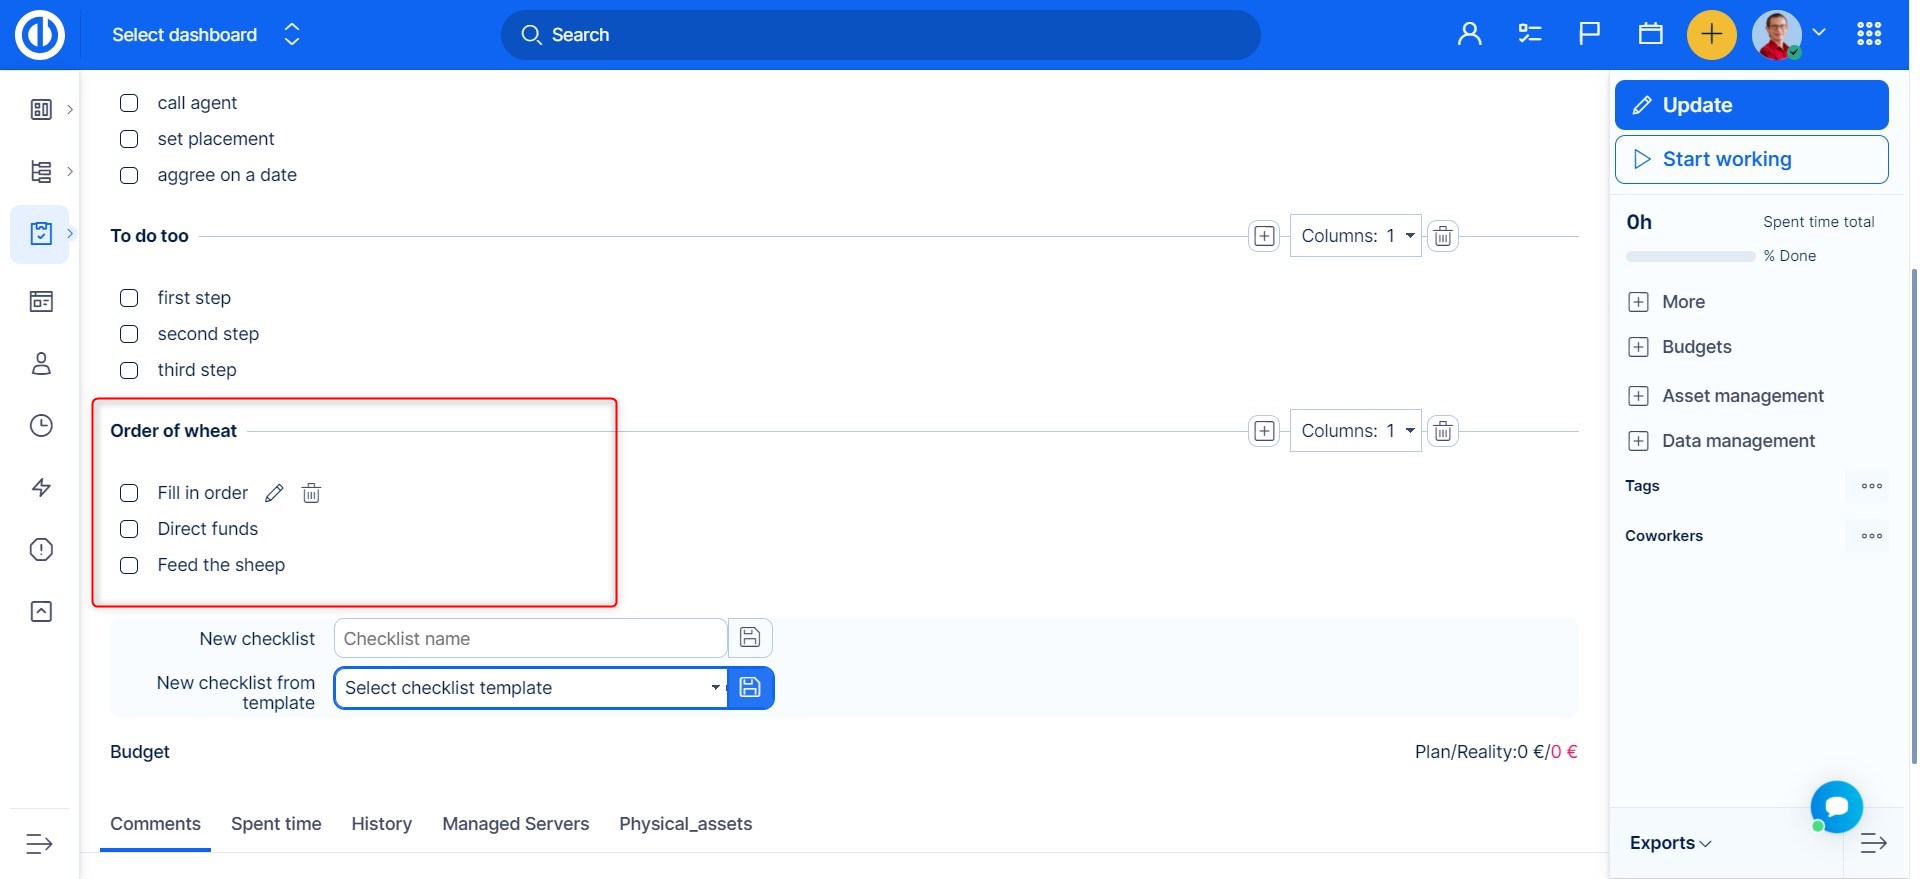
Once the template is created, you will find the option to select a checklist from template on the task:
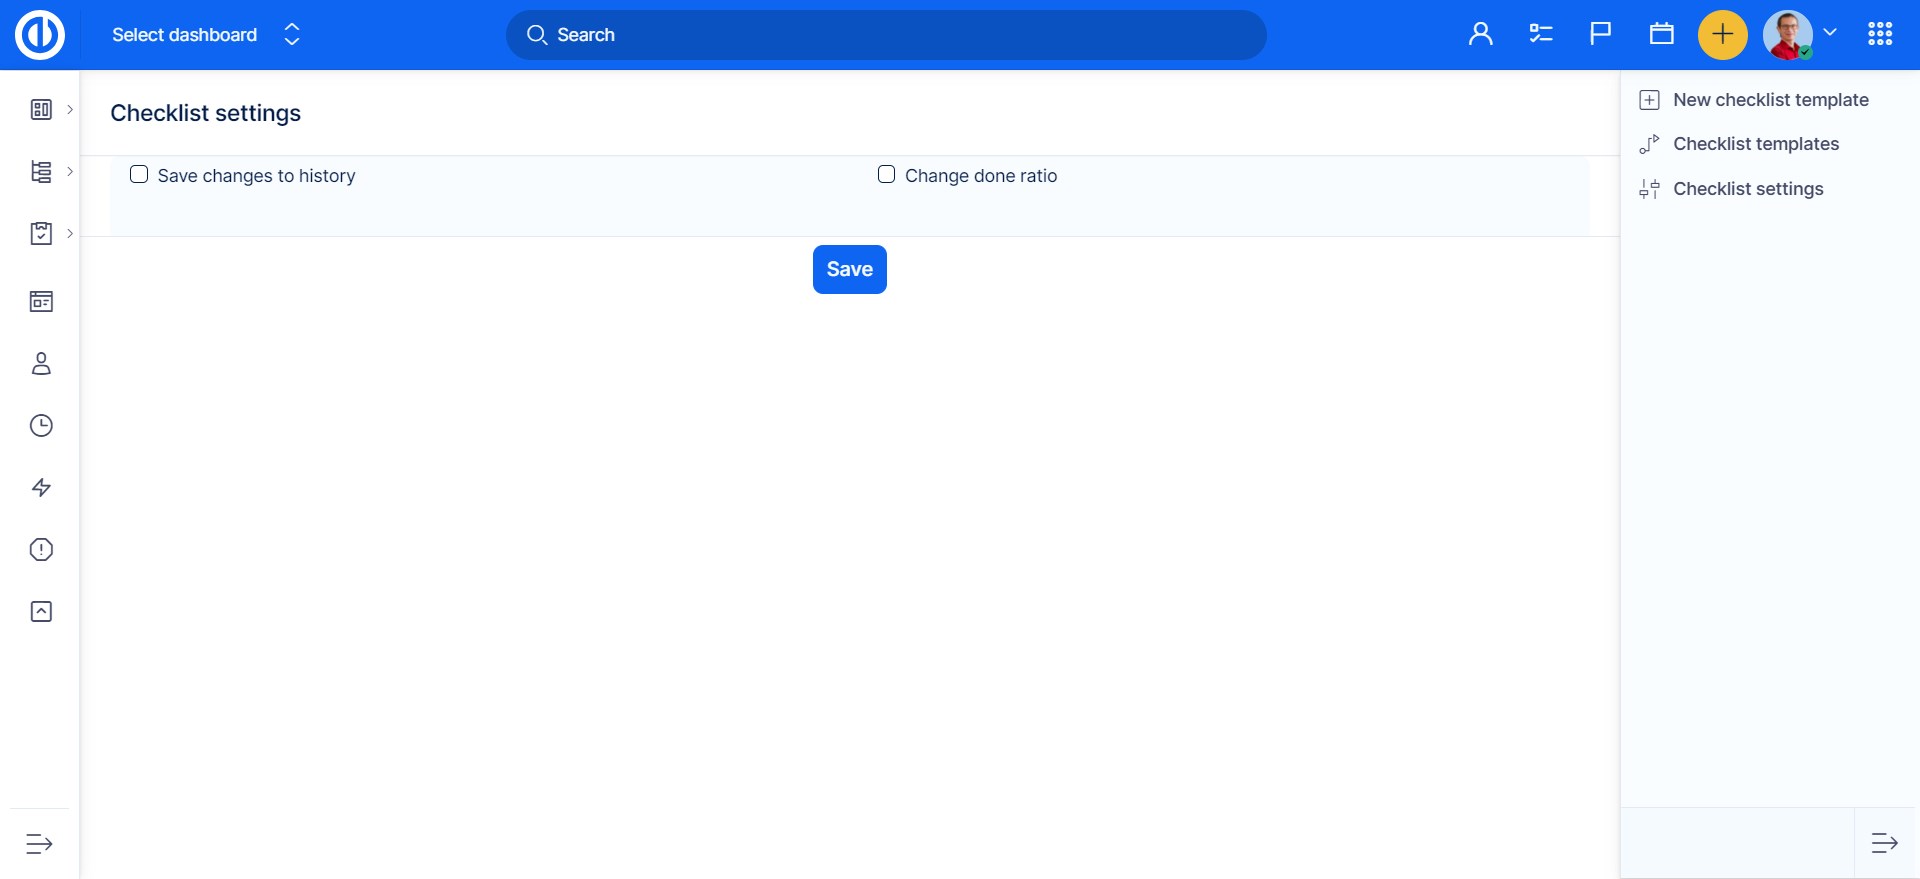
Moreover, in the right menu of Checklist templates, there is also a button called Checklist settings. In there, you can set up whether to save changes made on checklists to history (sends email notifications) as well as to change done ratio of a task based on the portion of checklist items done (ticked checkboxes).
Task templates
Task templates are designed to streamline your workflow by allowing you to create and reuse templates for repetitive tasks, saving you time and effort. With Task Templates, you can quickly generate standardized tasks with predefined settings, fields, and descriptions, ensuring consistency and efficiency across your projects.
Examples of usecases for tasks templates:
- Standardized “bug report” form
- Big deal approval
- Request to add new translation
- New service: Product Consultation
- New service: Data Import
Before we get into how to use this feature, make sure that your users have the correct permissions to view and/or manage Task Templates.

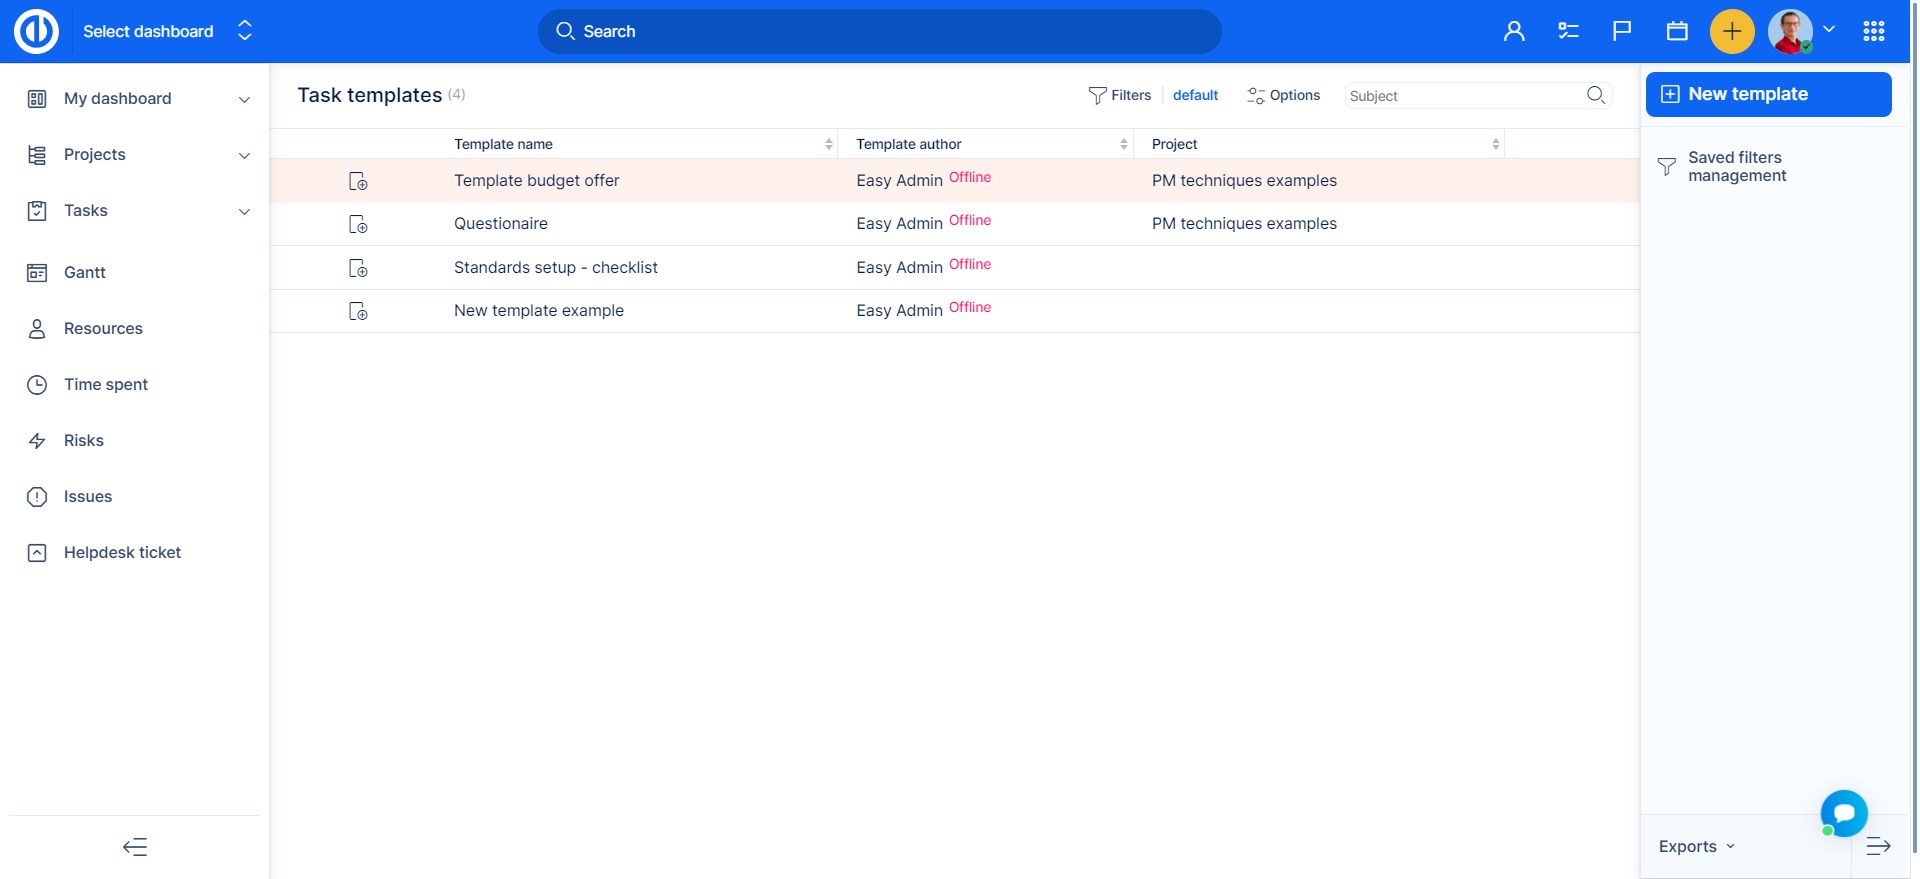
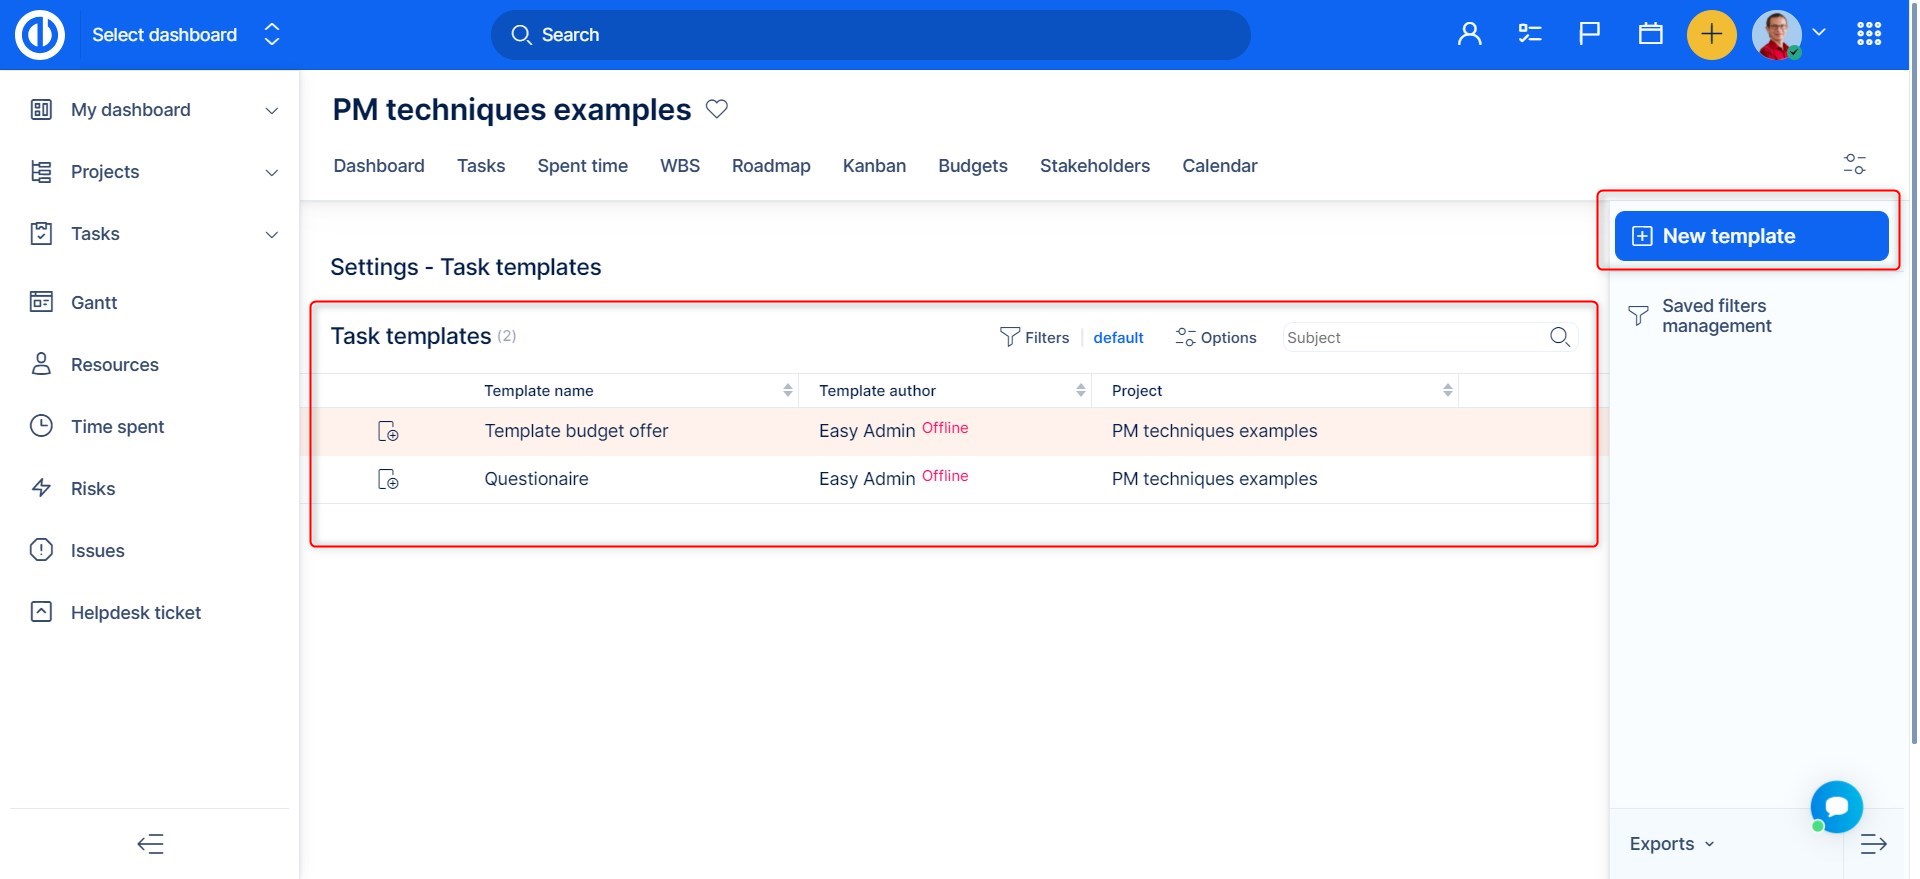
To find a list of all templates along with the option to create a template from scratch, open Global menu >> Task templates.
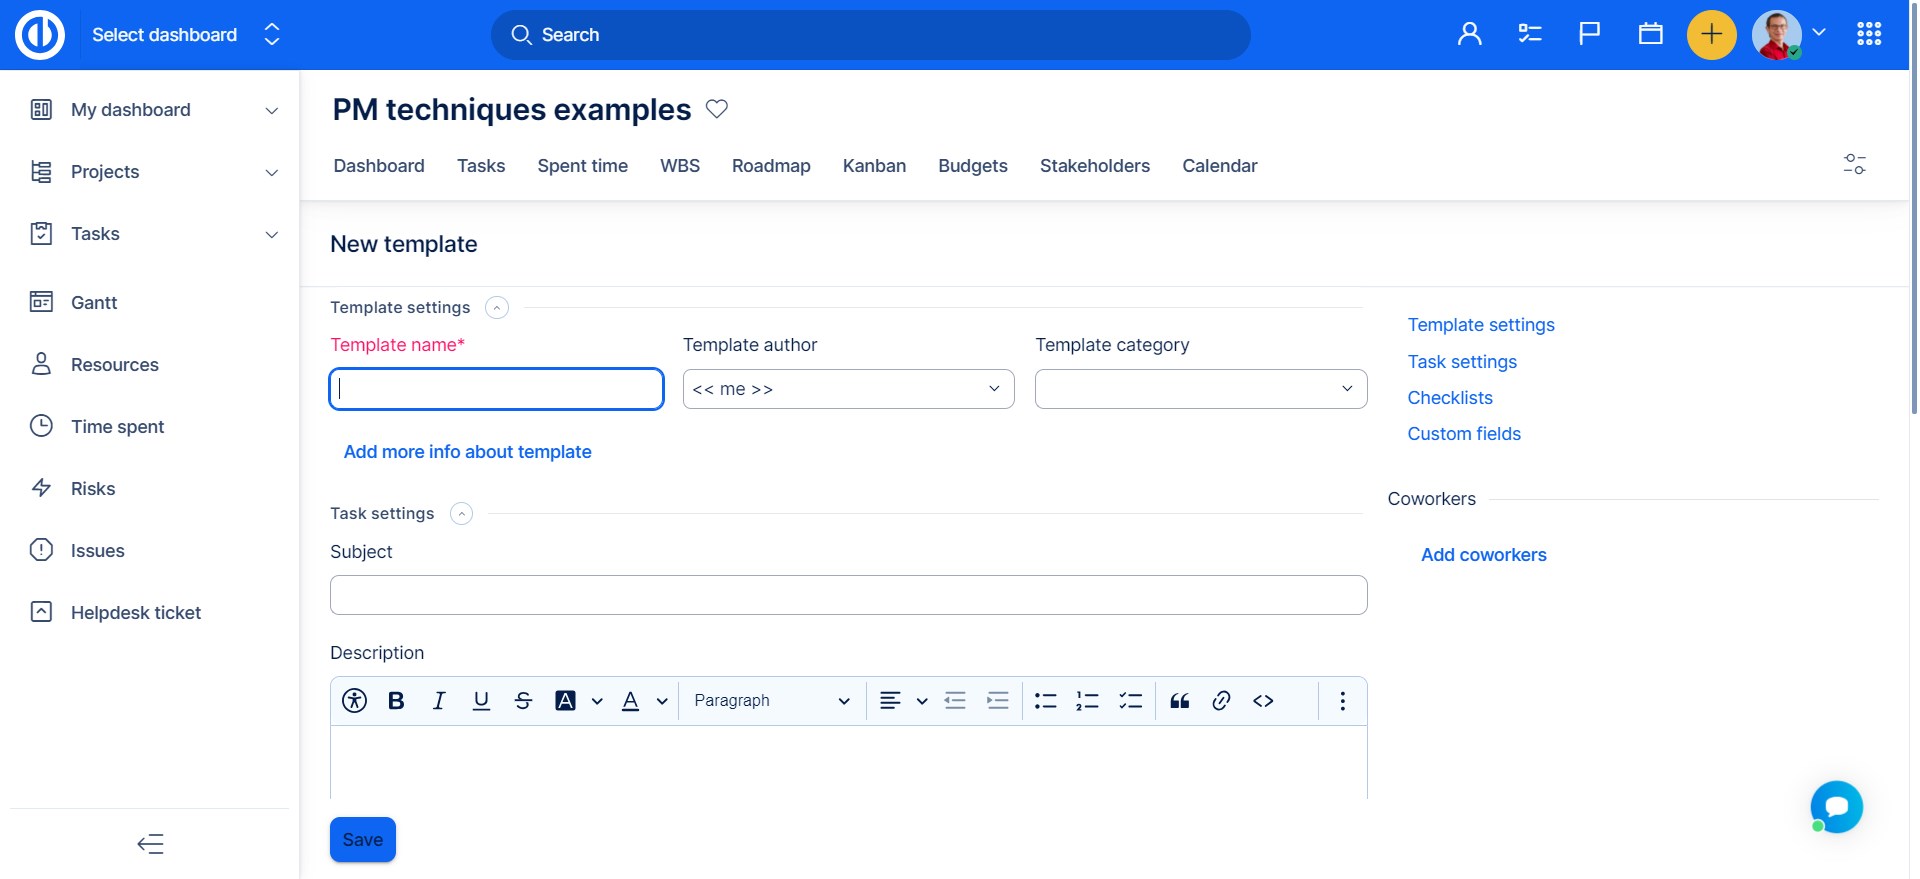
Creating task templates
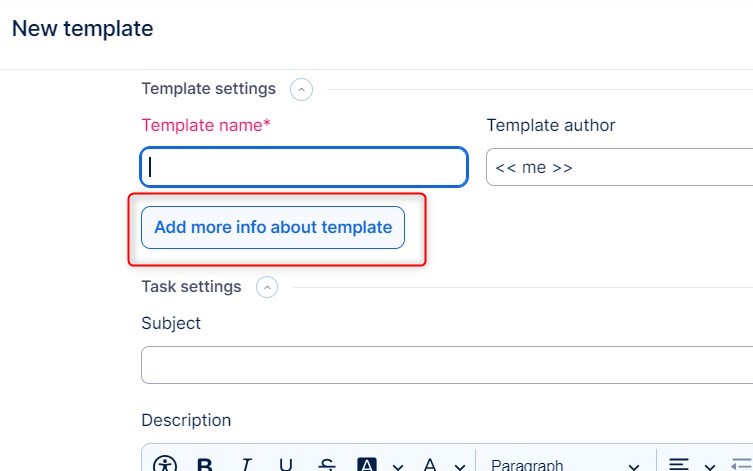
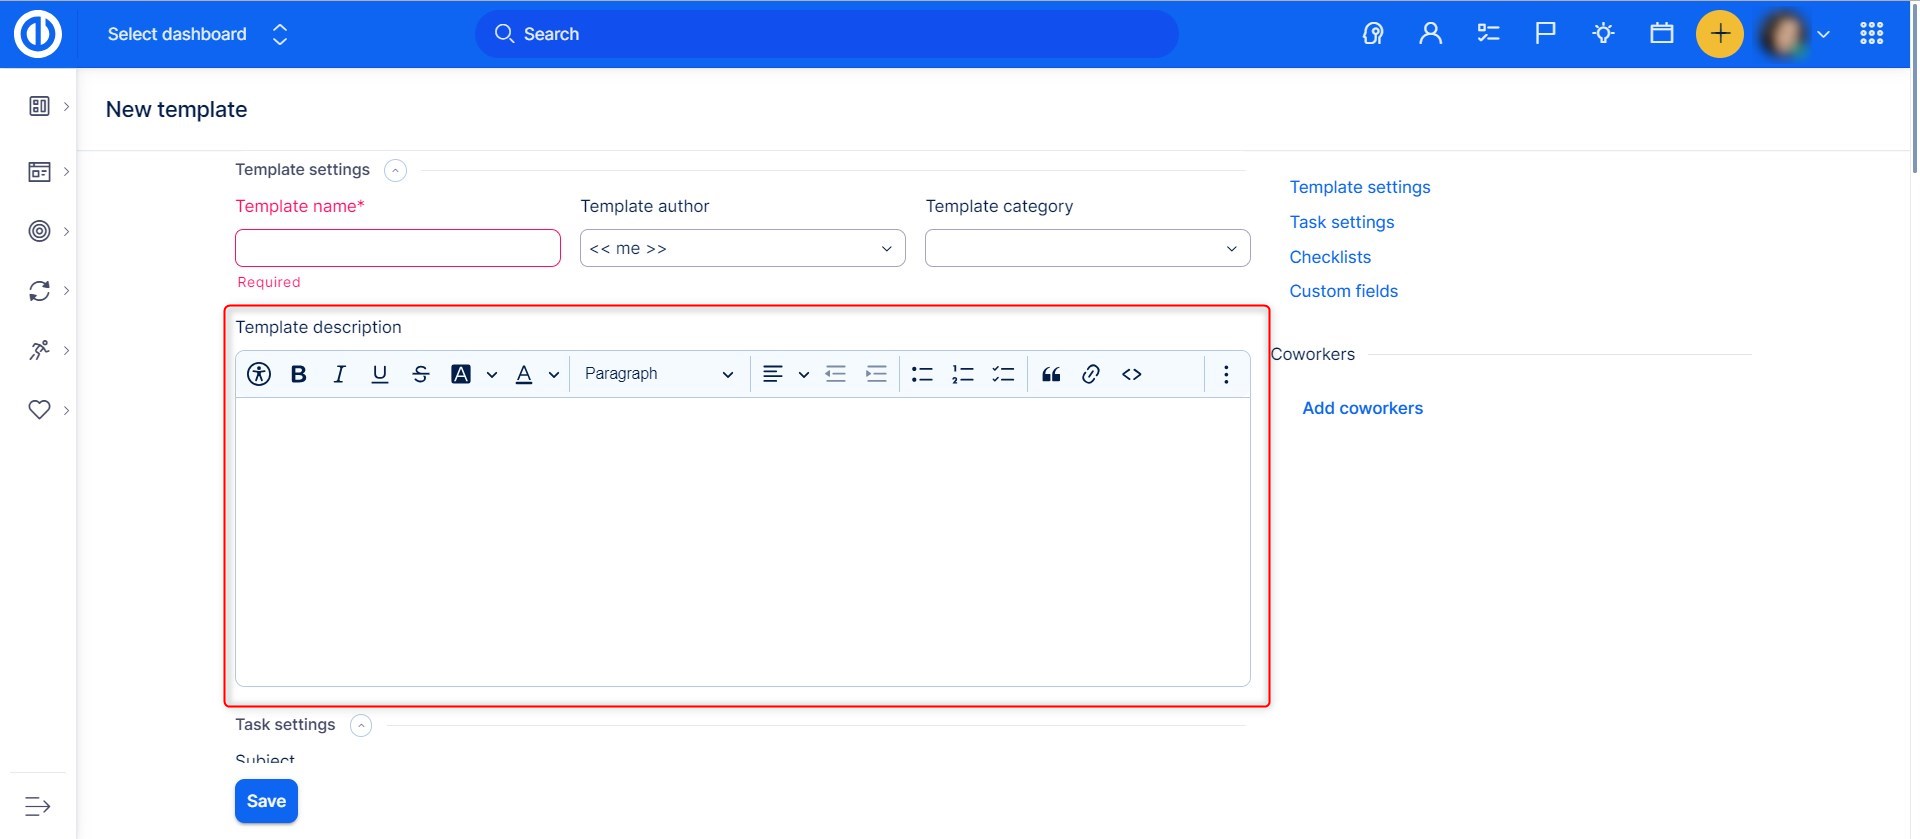
To create a new template, click the button " new template". On the screen you will find fields for the template name, author, category, and attributes that will apply to the created task, namely: Subject, Project, Description, Priority, Tracker, Assignee (Individual and Groups), Due Date period from task creation, Custom fields, Checklists, Coworkers, Tags . (Task Template categories can be managed in Administration >> Categories >> Others)
You can also add additional info where you can describe what this particular templates is to be used for:
Another way to create a template is to use and existing task. In the right side menu of the task, click on MORE and find the following option:
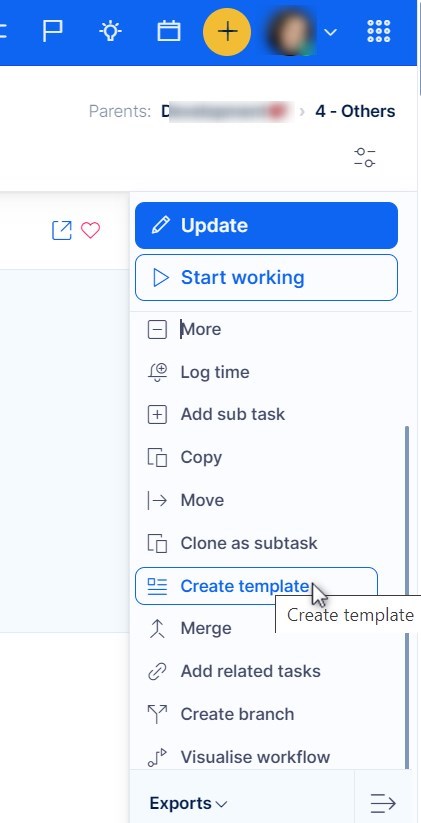
All the available data will be prefilled to the new template form. You have the option to edit any of the attributes still or just save the template as is. Only field that will need your attention here is the template name.
Using Task templates:
1, Once a template is created you will find it in the list mentioned above. From there you can go and create a new task from template:
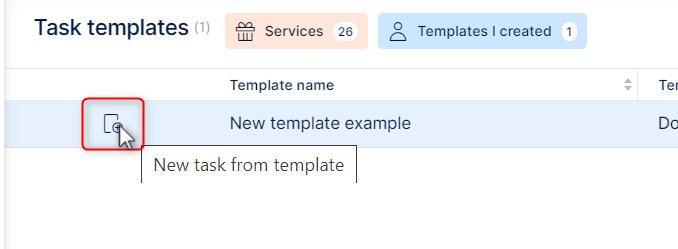
Once you click on the icon, a new task form will open up, with pre-filled data from the template:
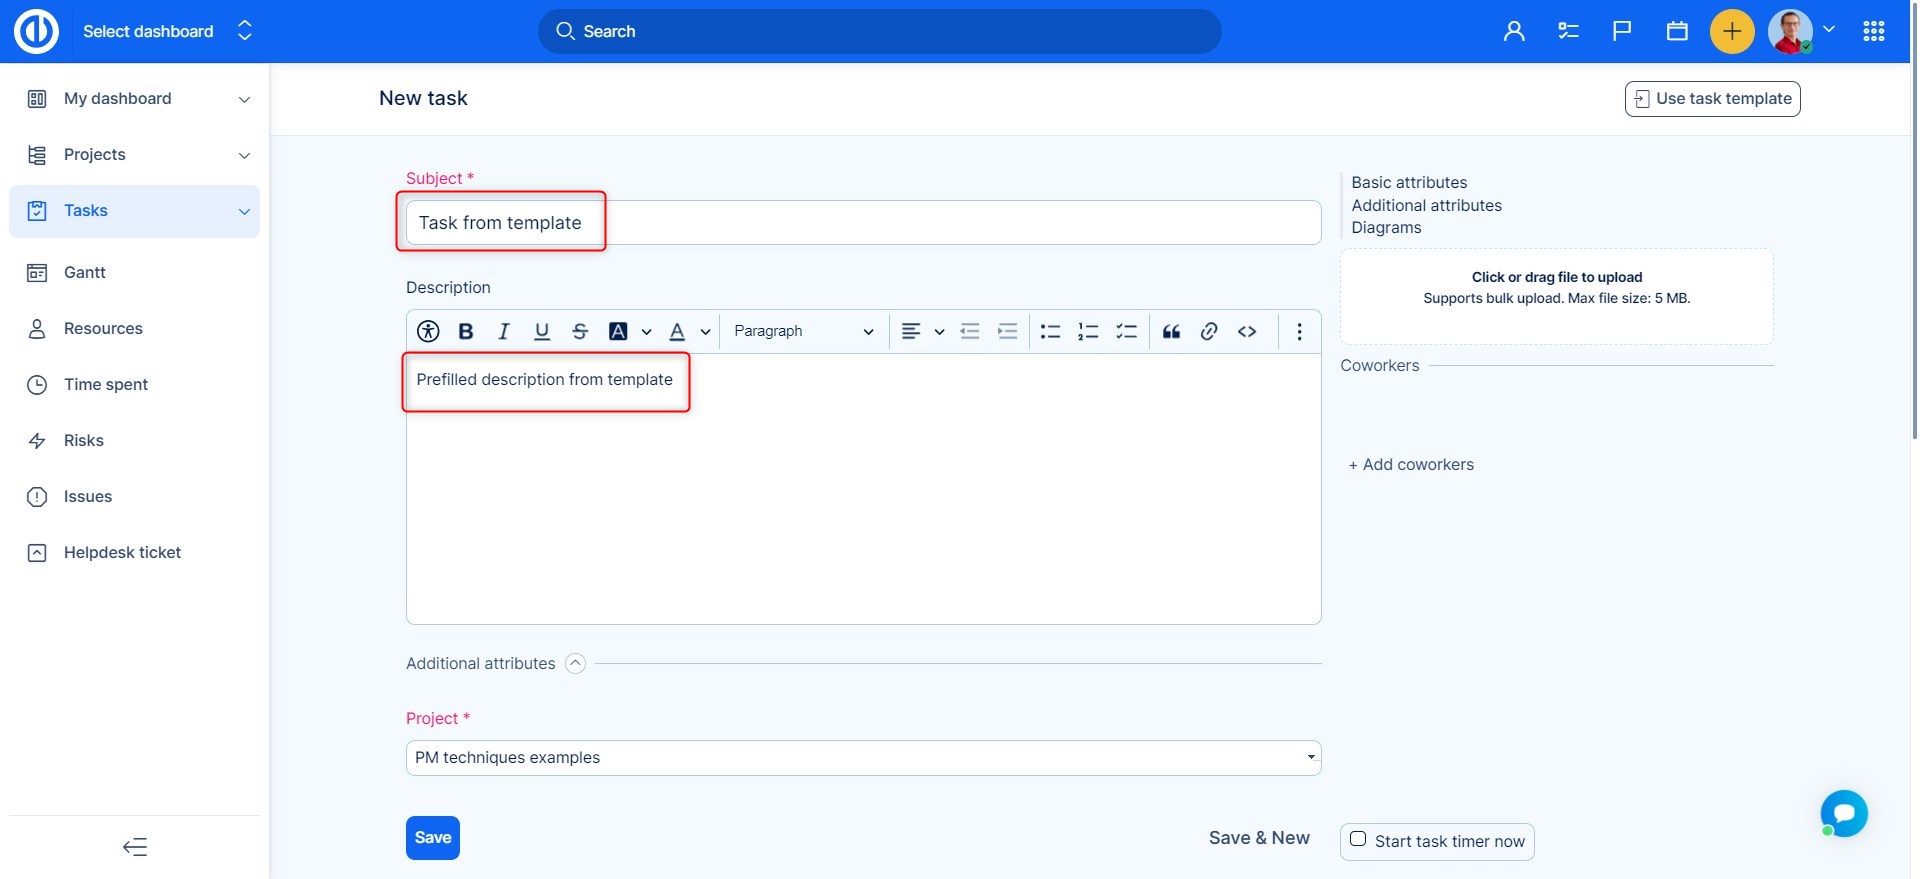
Here you still have the option to edit the fields , before you click on the save button below.
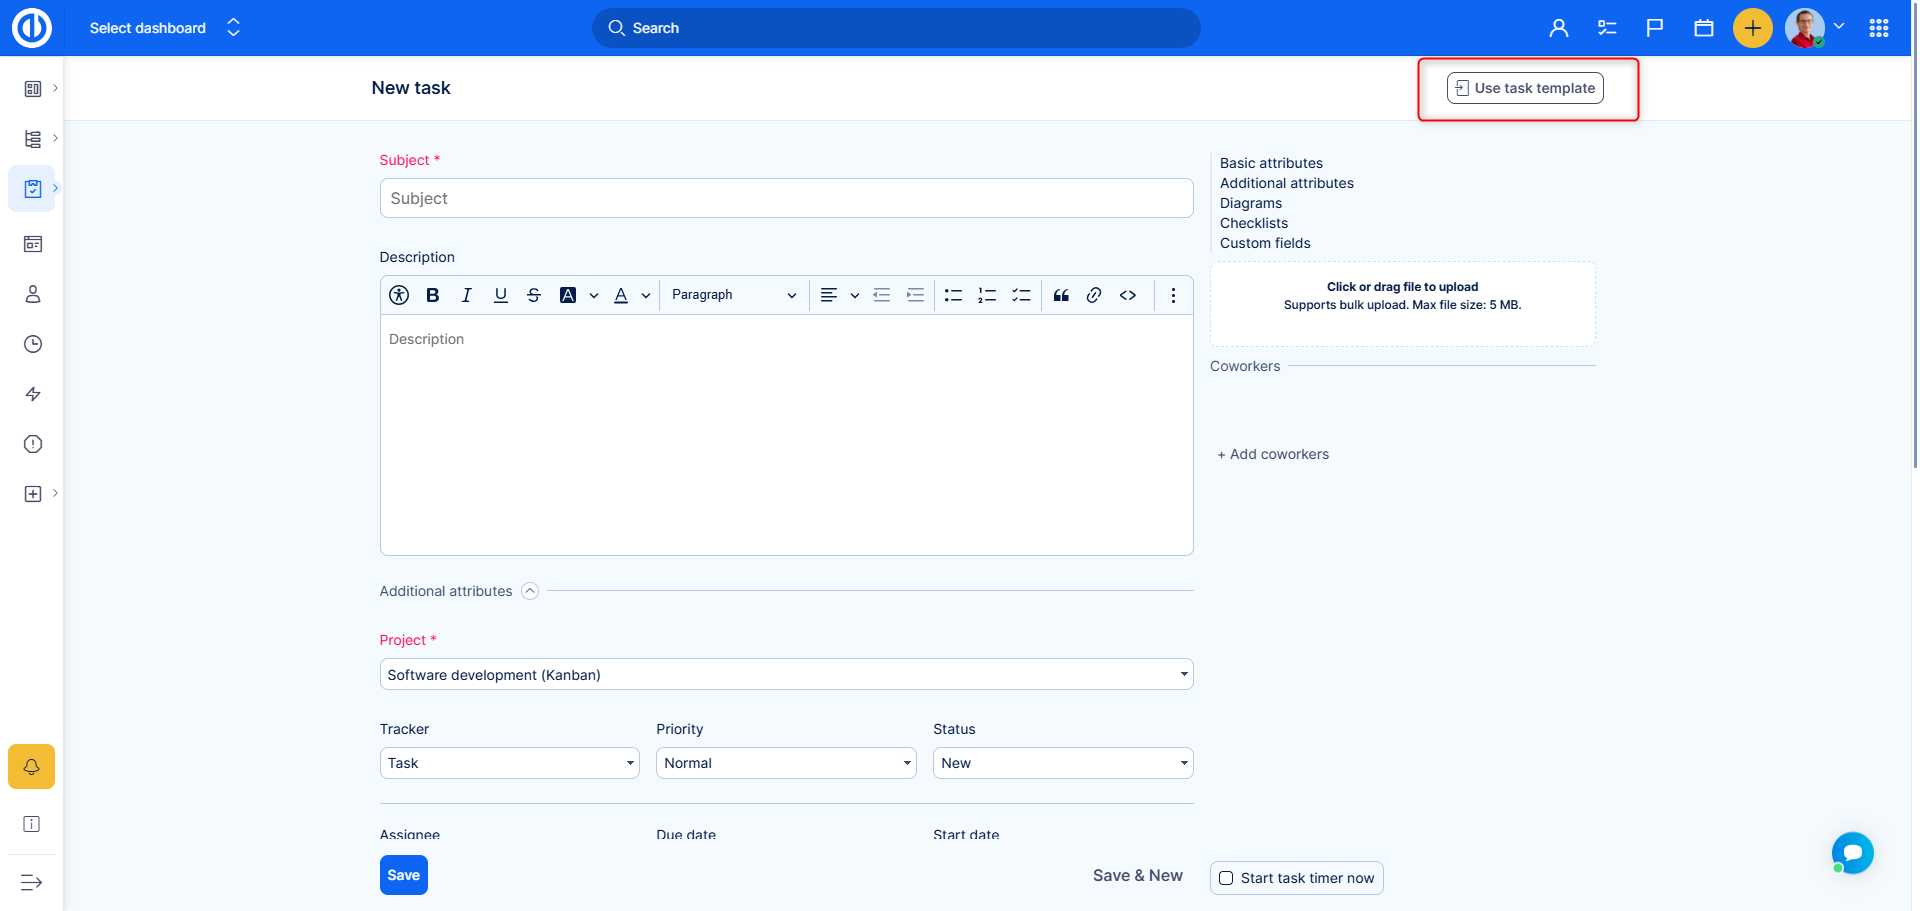
2, On a new task form, you will find the same icon to Use task template:
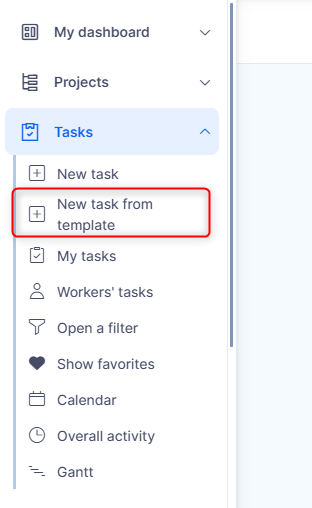
3, In right side menu, under tasks, there is a button New Task from template:
Task templates in the context of projects:
On each project, you are able to assign specific templates, so that only specific templates are visible for that specific project, which will ease your work further.
To find Templates on a project, open Project options:
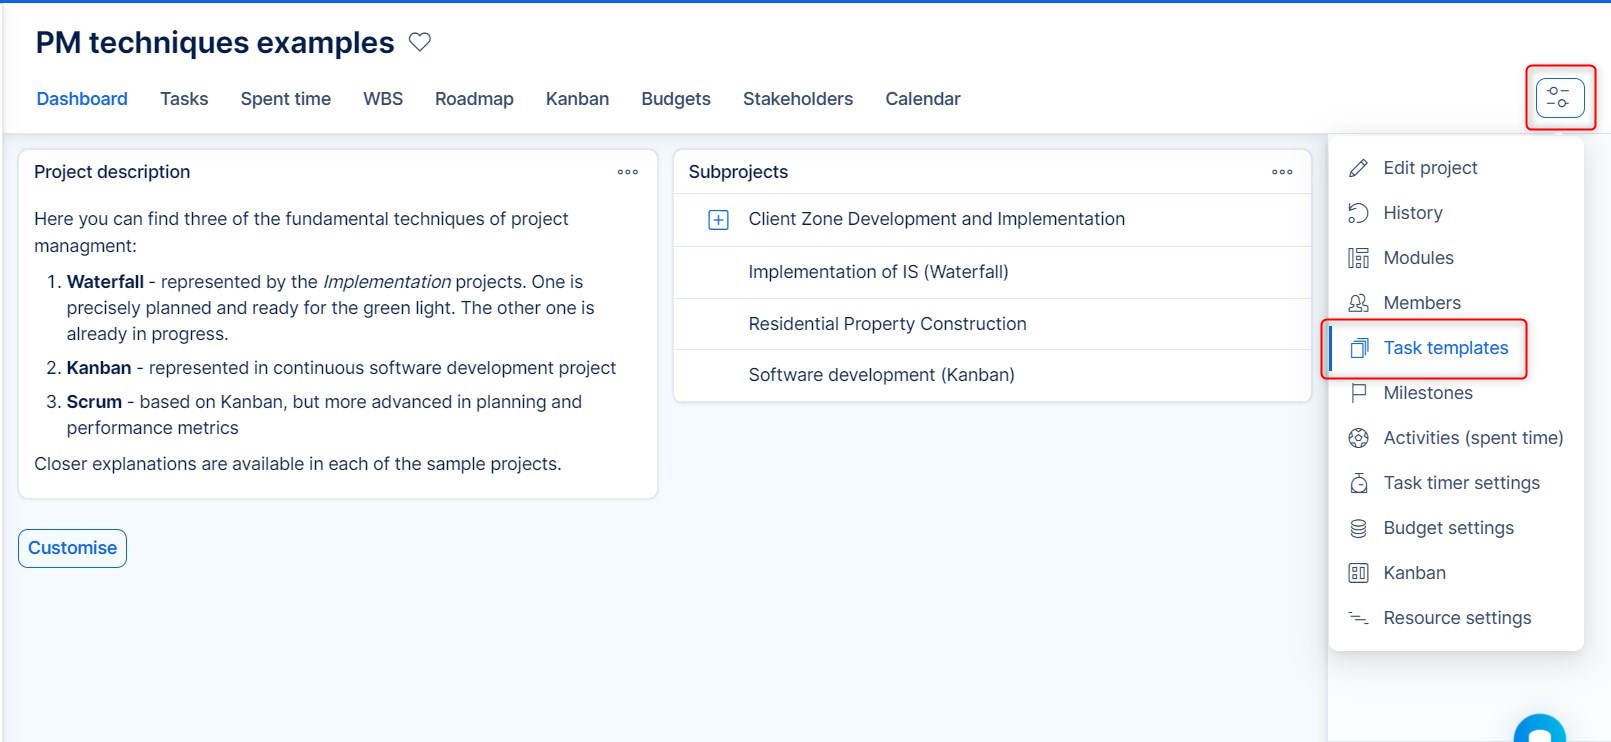
Here you will find existing templates for the current project as well as an option to create a new template.
Creating a task and creating a template works exactly the same. Except When you create a new template from here, the current project will be presellected in the new template form and therefore the new template will be automaticaly applied to the current project.
There is also another historic way which is much less user friendly, but you might find a use for nevethless.
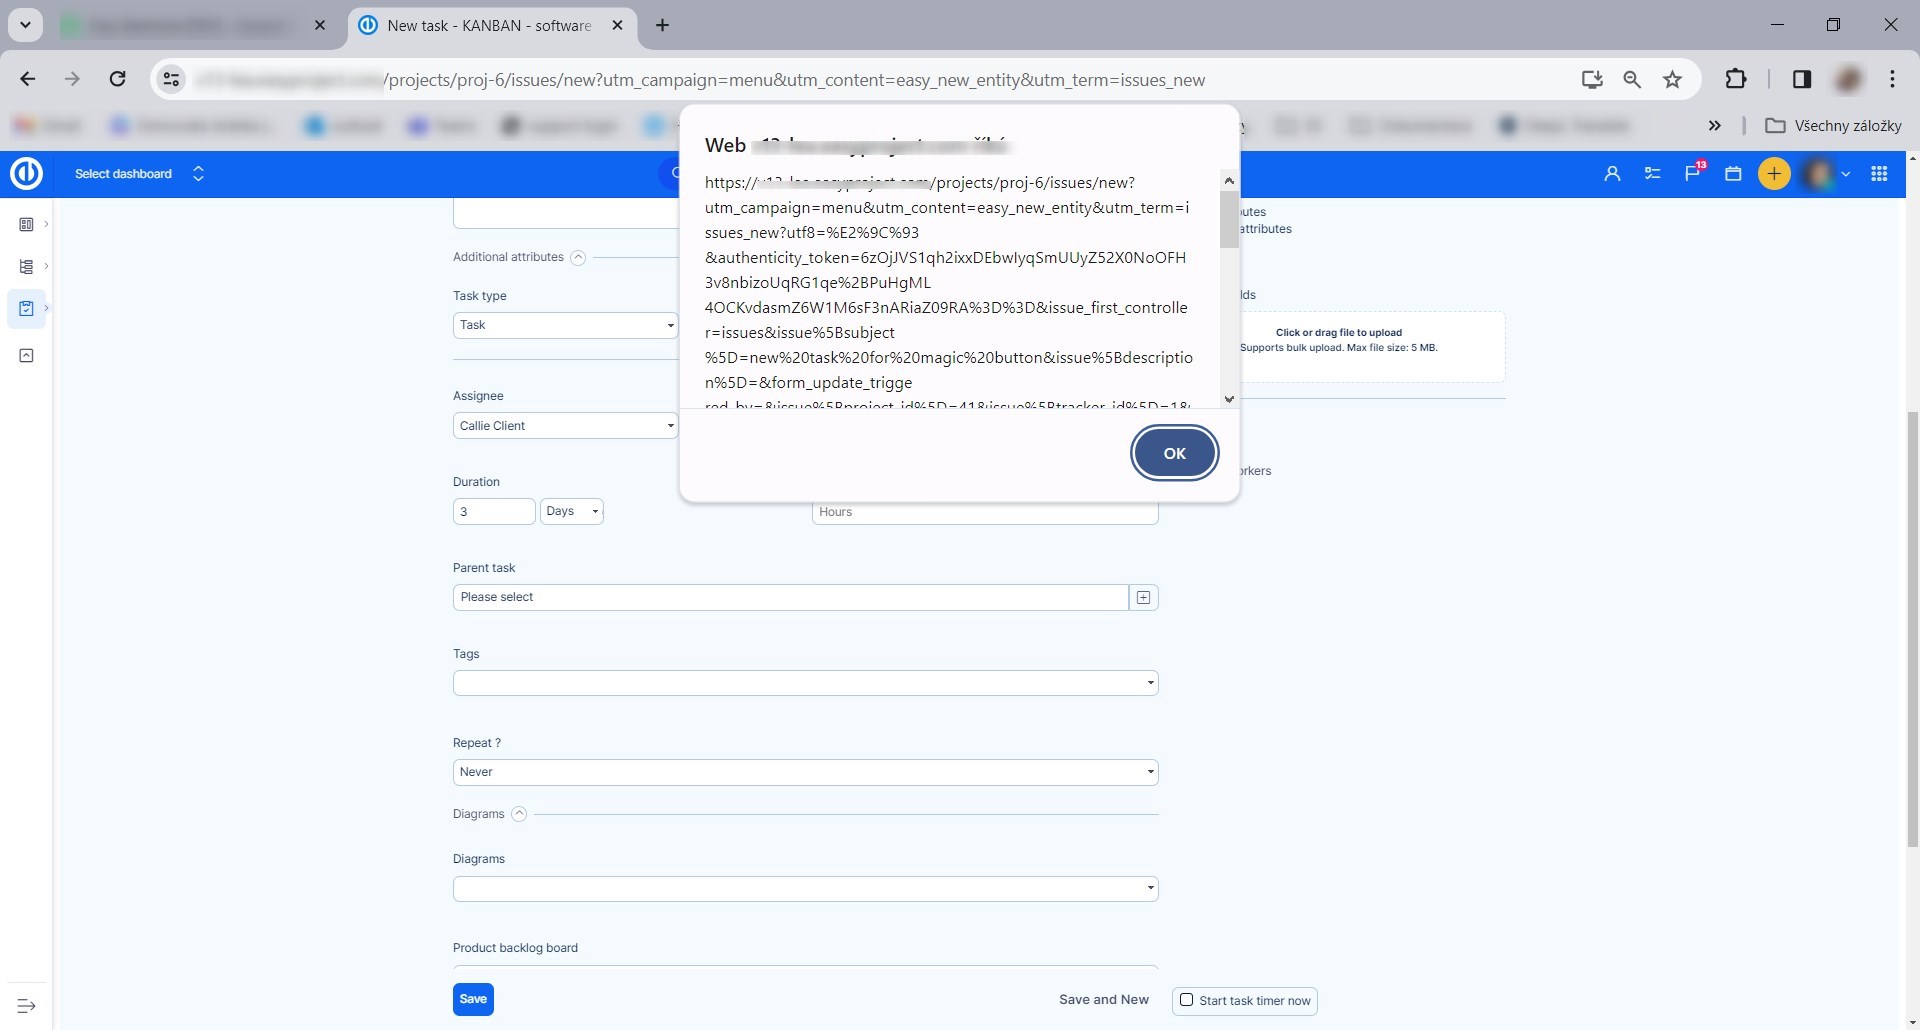
How to use the magic button for system admins and project managers:
- Save this link as a bookmark on your browser:
javascript:try{$('textarea[id=issue_description]').val(CKEDITOR.instances["issue_description"].getData());}catch(e){}s=$.param($('#issue-form*[name!=authenticity_token]').serializeArray());alert(location.href+"?"+s);
- or (for browser with non-editable alerts)
javascript:try{$('textarea[id=issue_description]').val(CKEDITOR.instances["issue_description"].getData());}catch(e){}s=$.param($('#issue-form*[name!=authenticity_token]').serializeArray());(location.href+"?"+s);
- Go to a new task form and fill in the desired attributes. Like in the image below, tracker, assignee, priority and coworkers are set
- Click on the bookmark you saved - magic button and you will get a link to the new task form with the prefilled attributes
- You can save this link to a noticeboard on a Project dashboard or My dashboard.
How to use magic button for worker or external user:
- Click on the prepared link and enter name and description of the task :)
How to show task ID in Task list and Tasks list widget on My dashboard
Each task has its ID - the identifier which enables you to quickly find a task as well as switch between tasks without entering the name. You can always find task ID in URL address of a particular task as shown on the picture below.

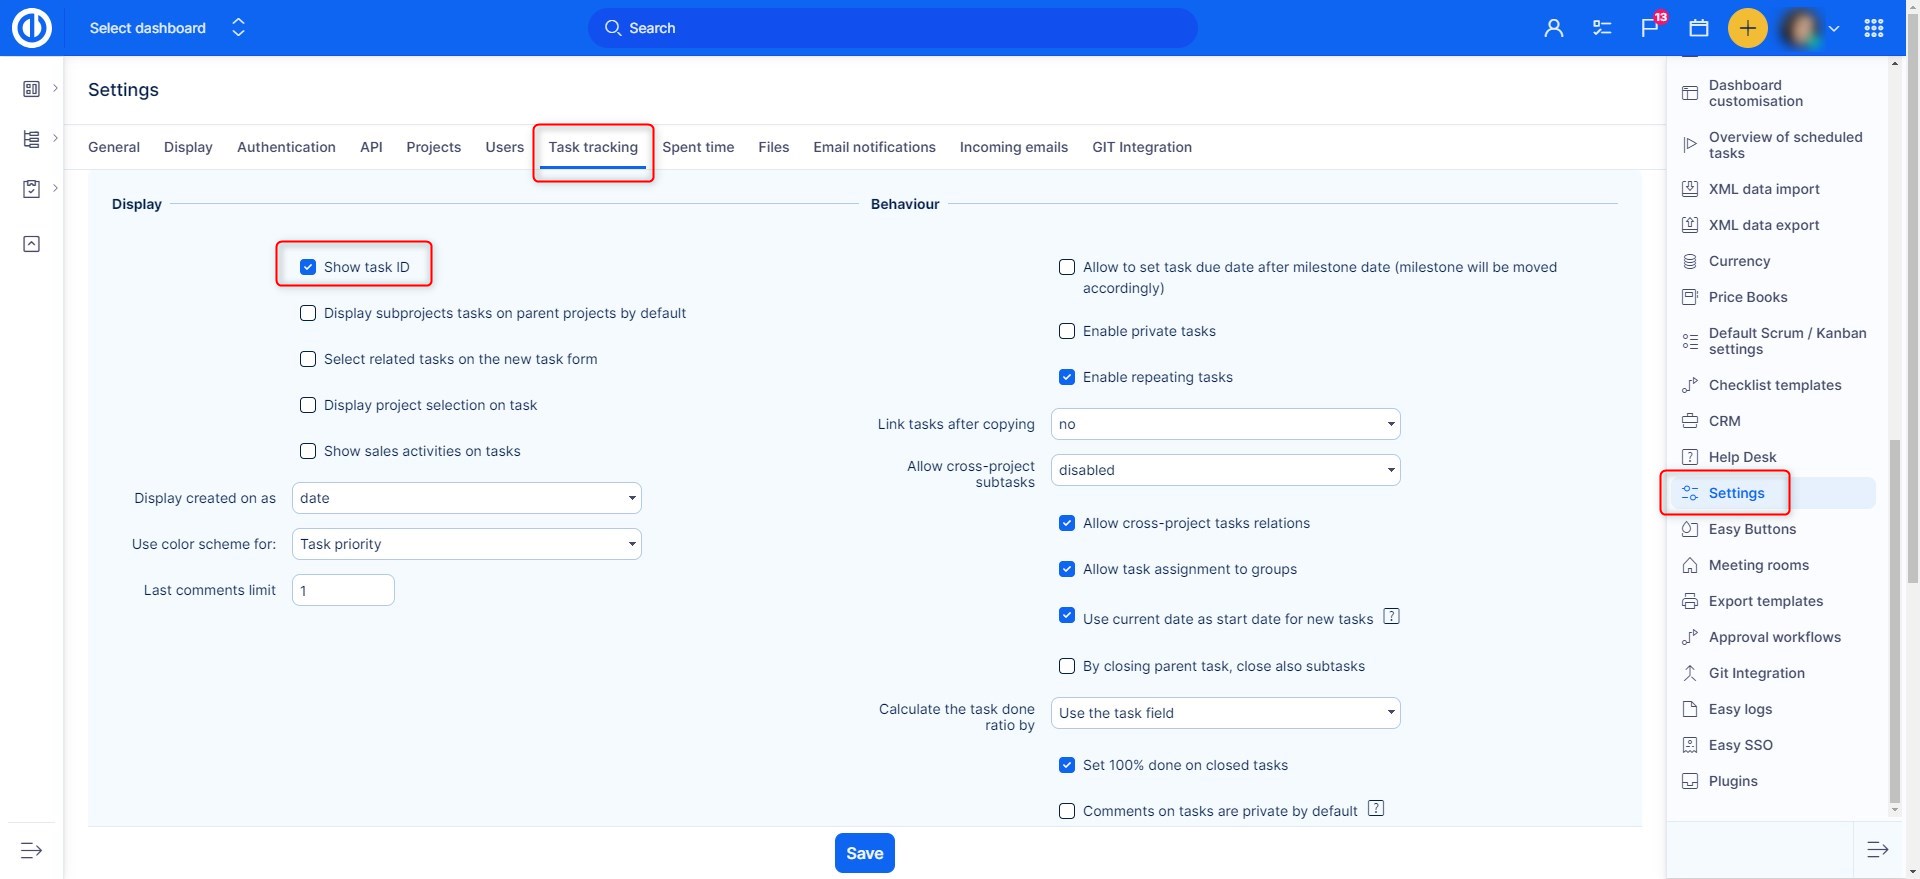
Sometimes you need to see the ID of one or more tasks together, even without opening every single one. Before you can make it, go to Global menu >> Administration >> Settings >> Task Tracking, tick the checkbox Show task ID as shown on the picture below and click Save.
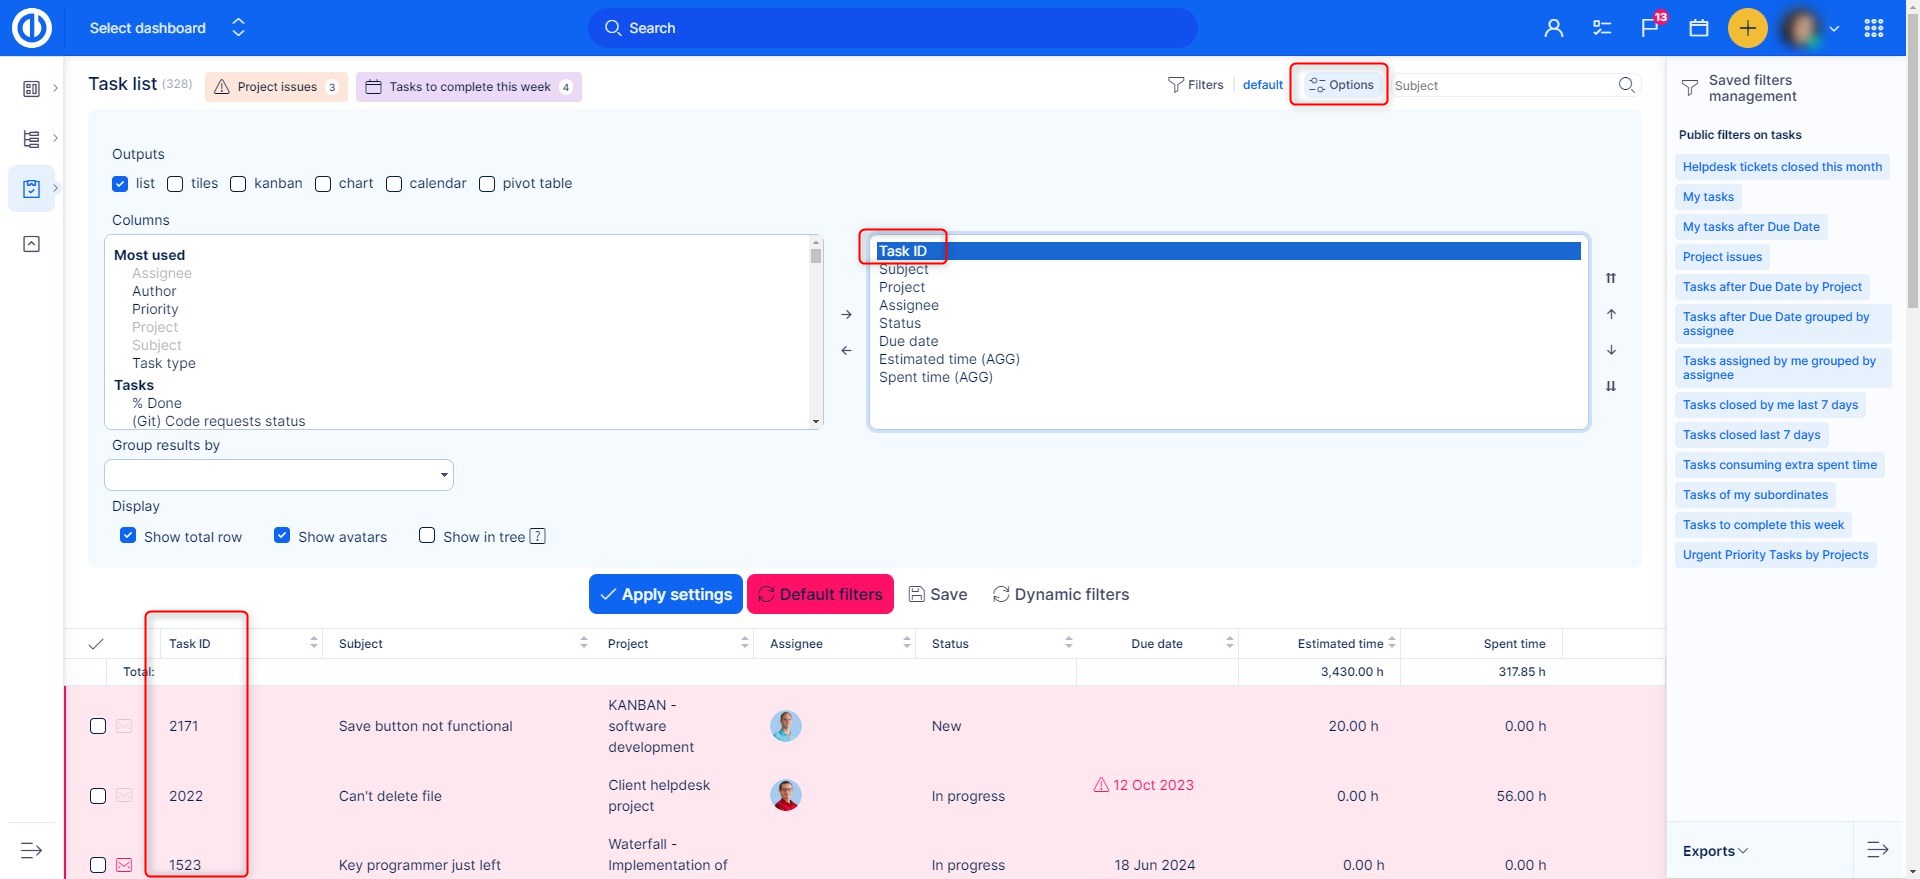
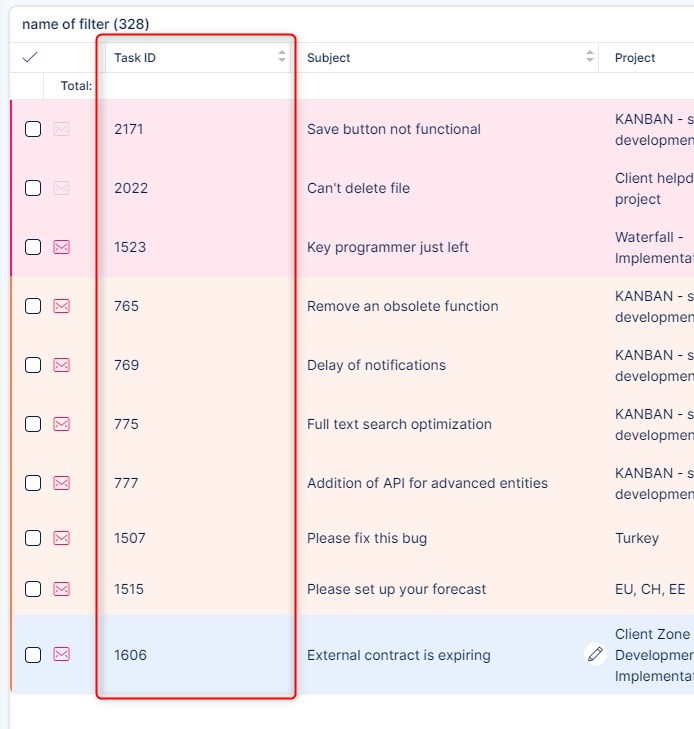
Now you are allowed to add ID column both on your Task list and Task list widget on My dashboard. When you are on a Task list, open Options and move "ID" column from left to right using the arrow button as shown on the picture below. After clicking on Apply settings, you will see the ID number of each task directly in the list.
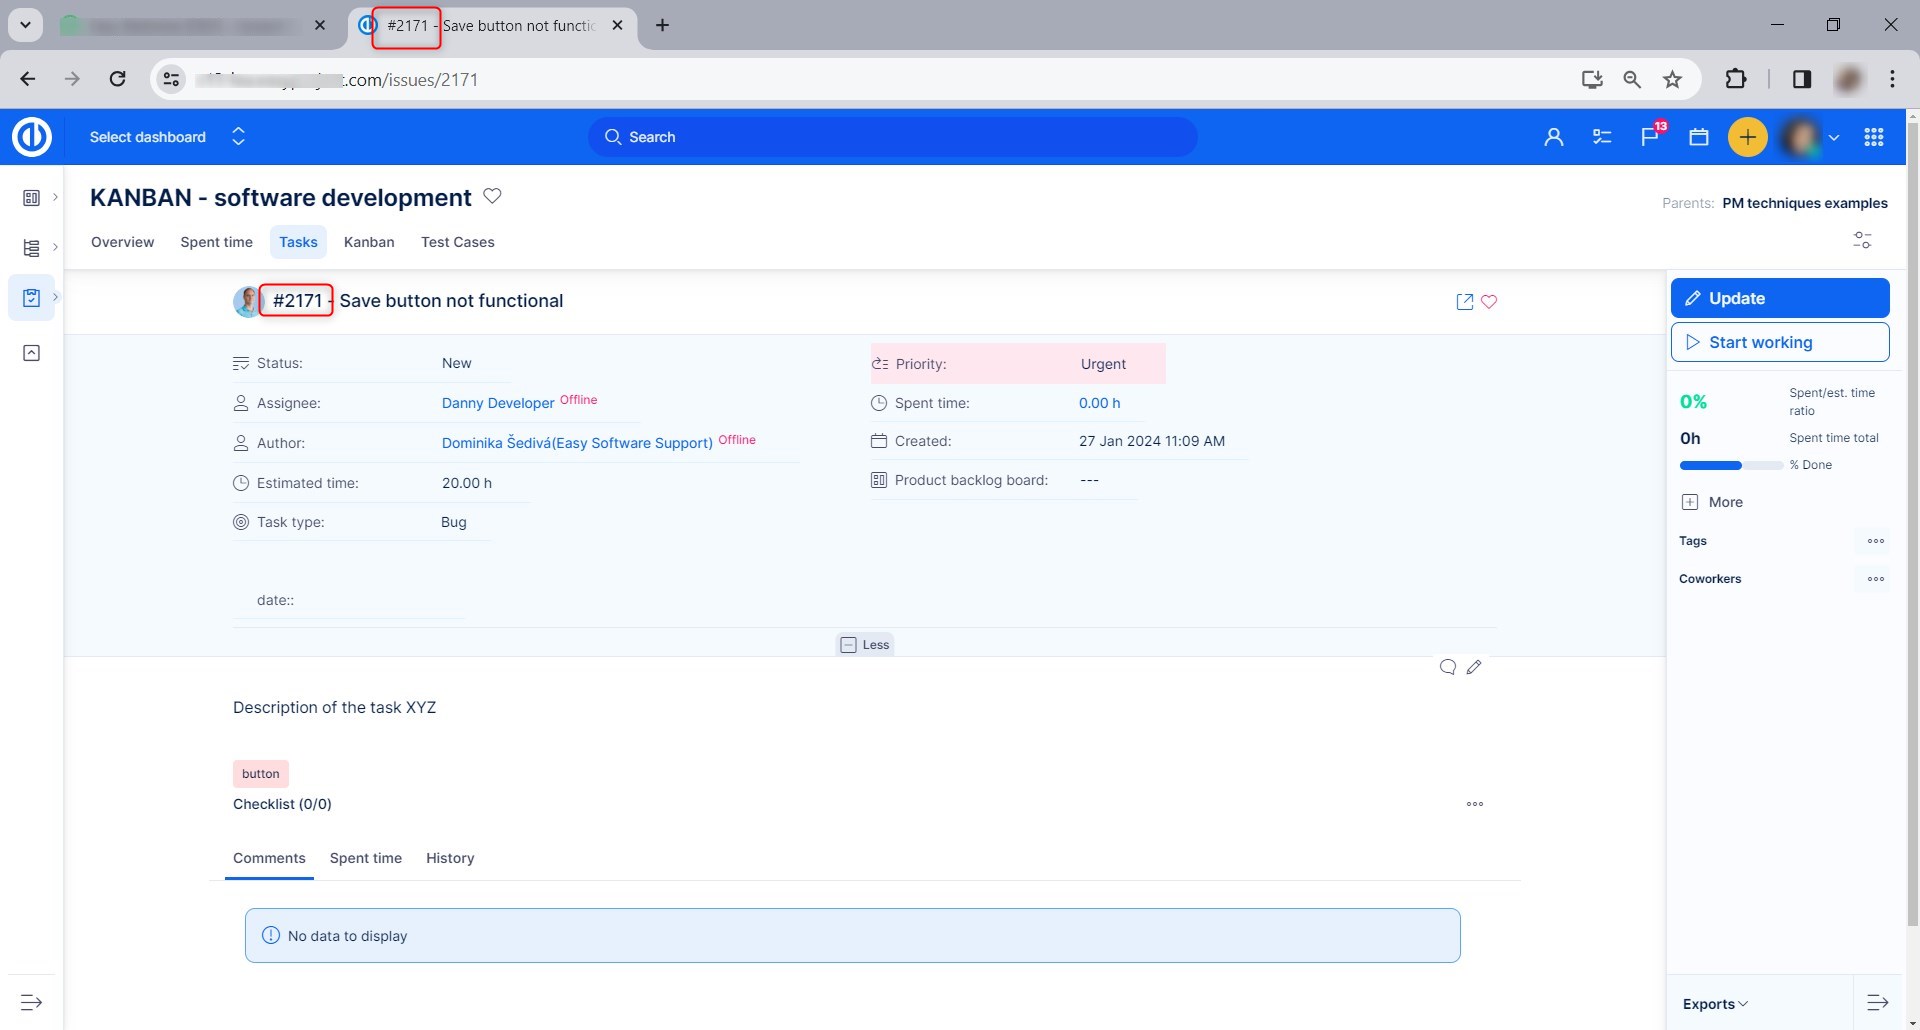
Moreover, when you open a task detail, you can see the ID has been added before the task name as well as in the header.
To make the same with your Tasks list widget on My dashboard, go to Personalize this page (the bottom button on My dashboard) >> Tasks from filter (or whatever name the widget has) >> List options >> Columns >> move "ID" column from left to right using the arrow button as shown on the picture below.
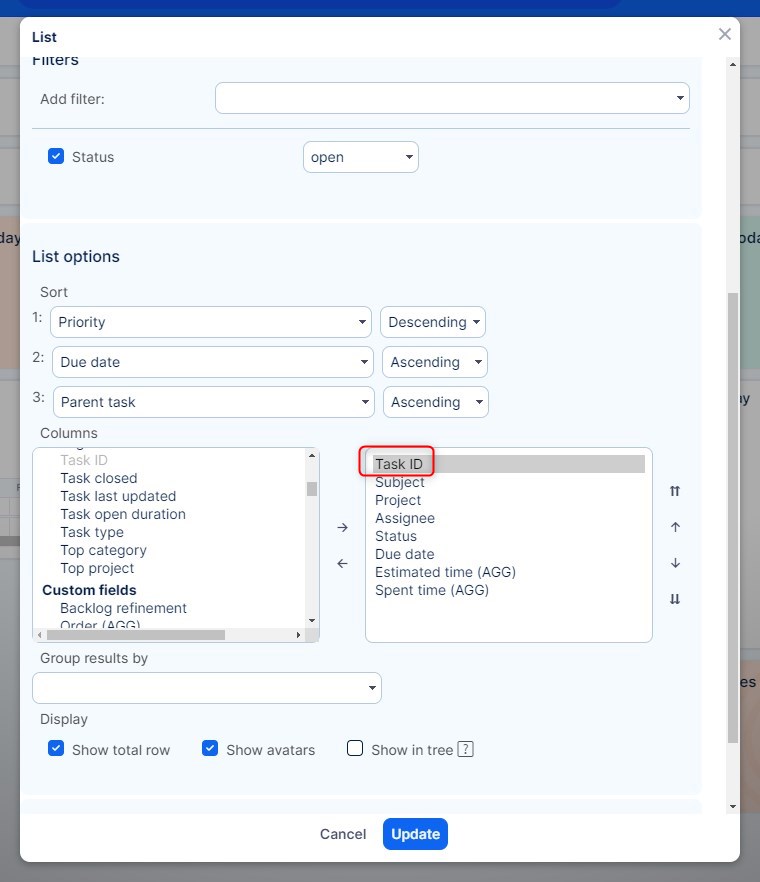
After saving it, the result will look this this.
Task categories
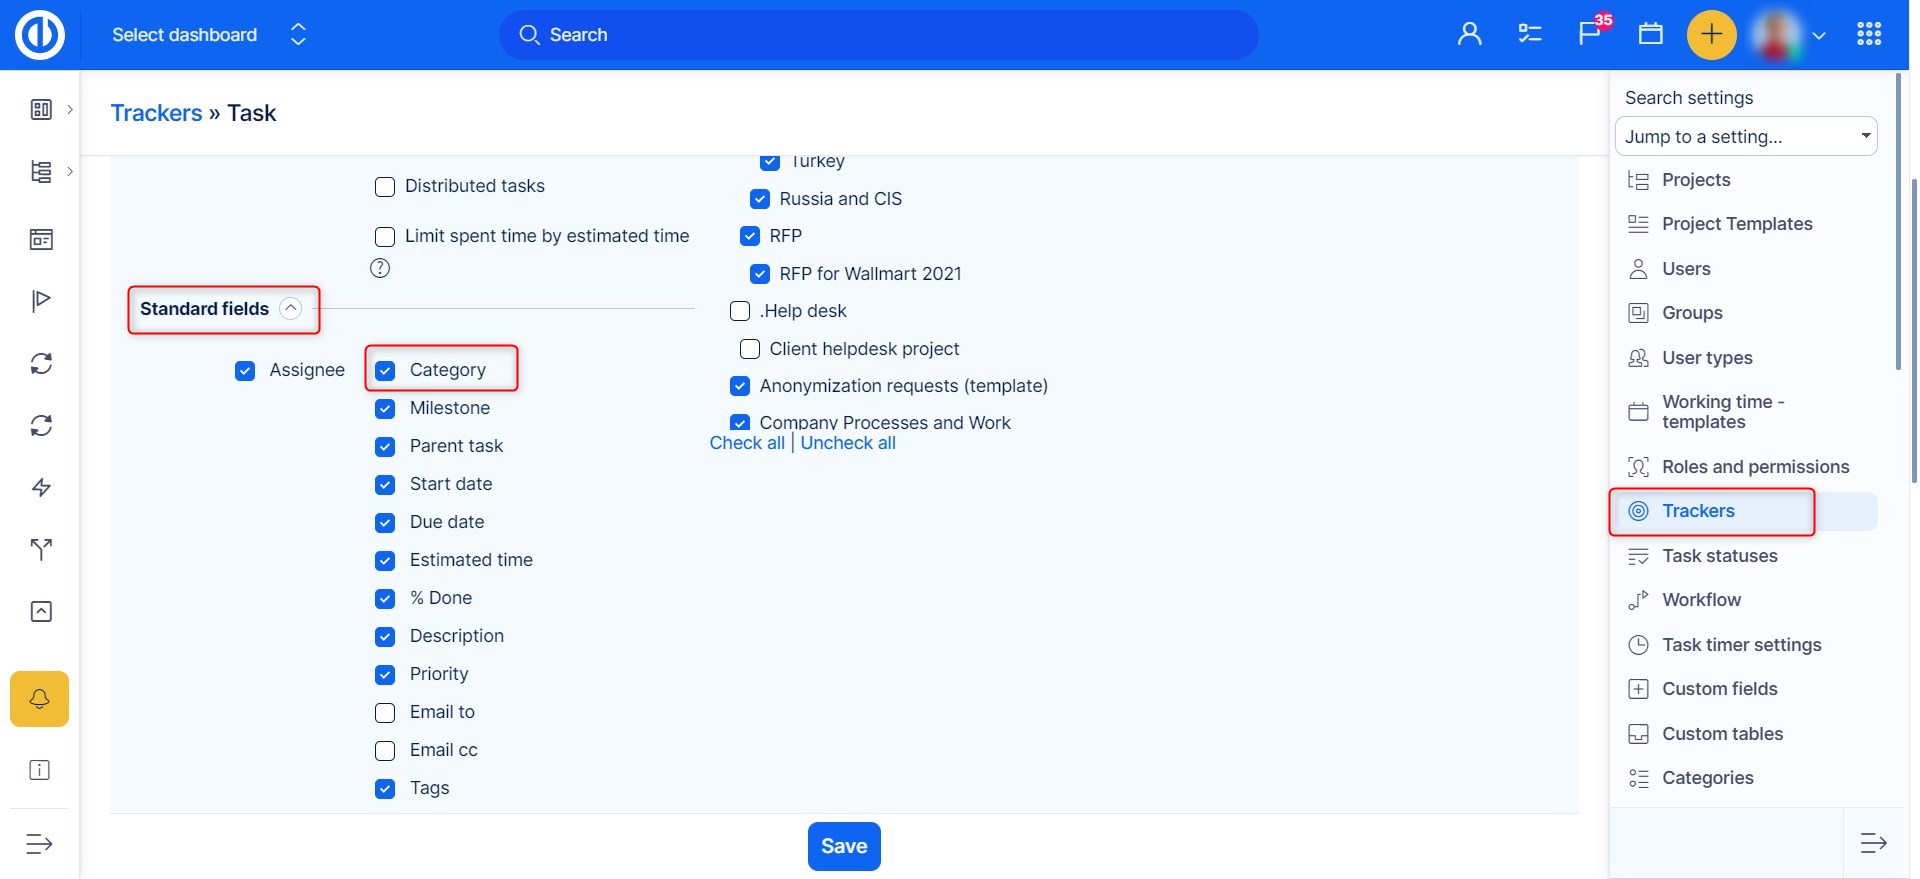
Task categories are like groups you can sort your tasks into. The main purpose is to ease the task structure and improve its ability to be found quickly. Like the tasks themselves, the task categories can have their hierarchy composed of parent categories and child categories. Above that, each task category may have an assignee, who is responsible for that category as a whole. If you want to use task categories on a project, the first step is to enable the standard field Category in a task tracker (Global menu >> Administration >> Trackers - select one >> Standard fields).
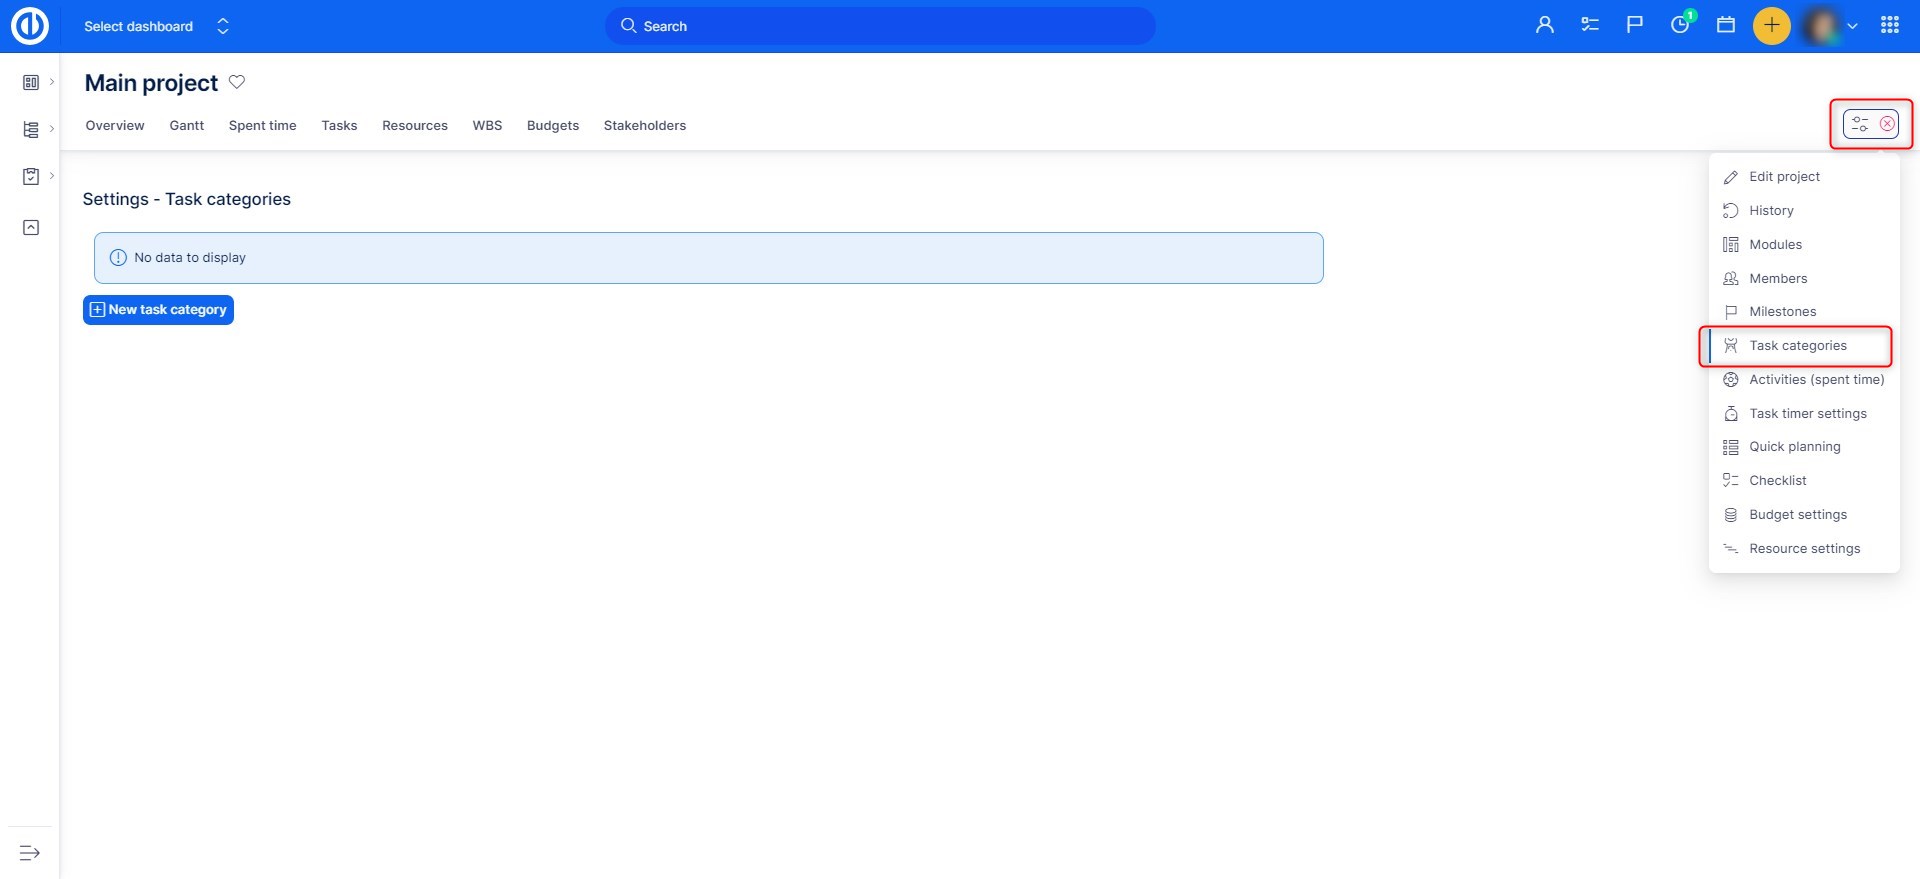
Then open any project that includes some tasks of that tracker. Navigate to the project settings, where you should see an item called Task categories. Here you find a button to create a new category.
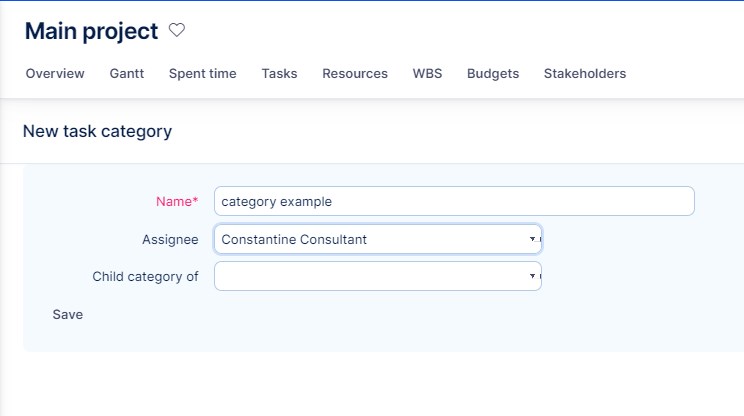
This how a new task category form looks like. Enter a name, and you can optionally add an assignee of this category and also select parent category if you want to create their hierarchy.
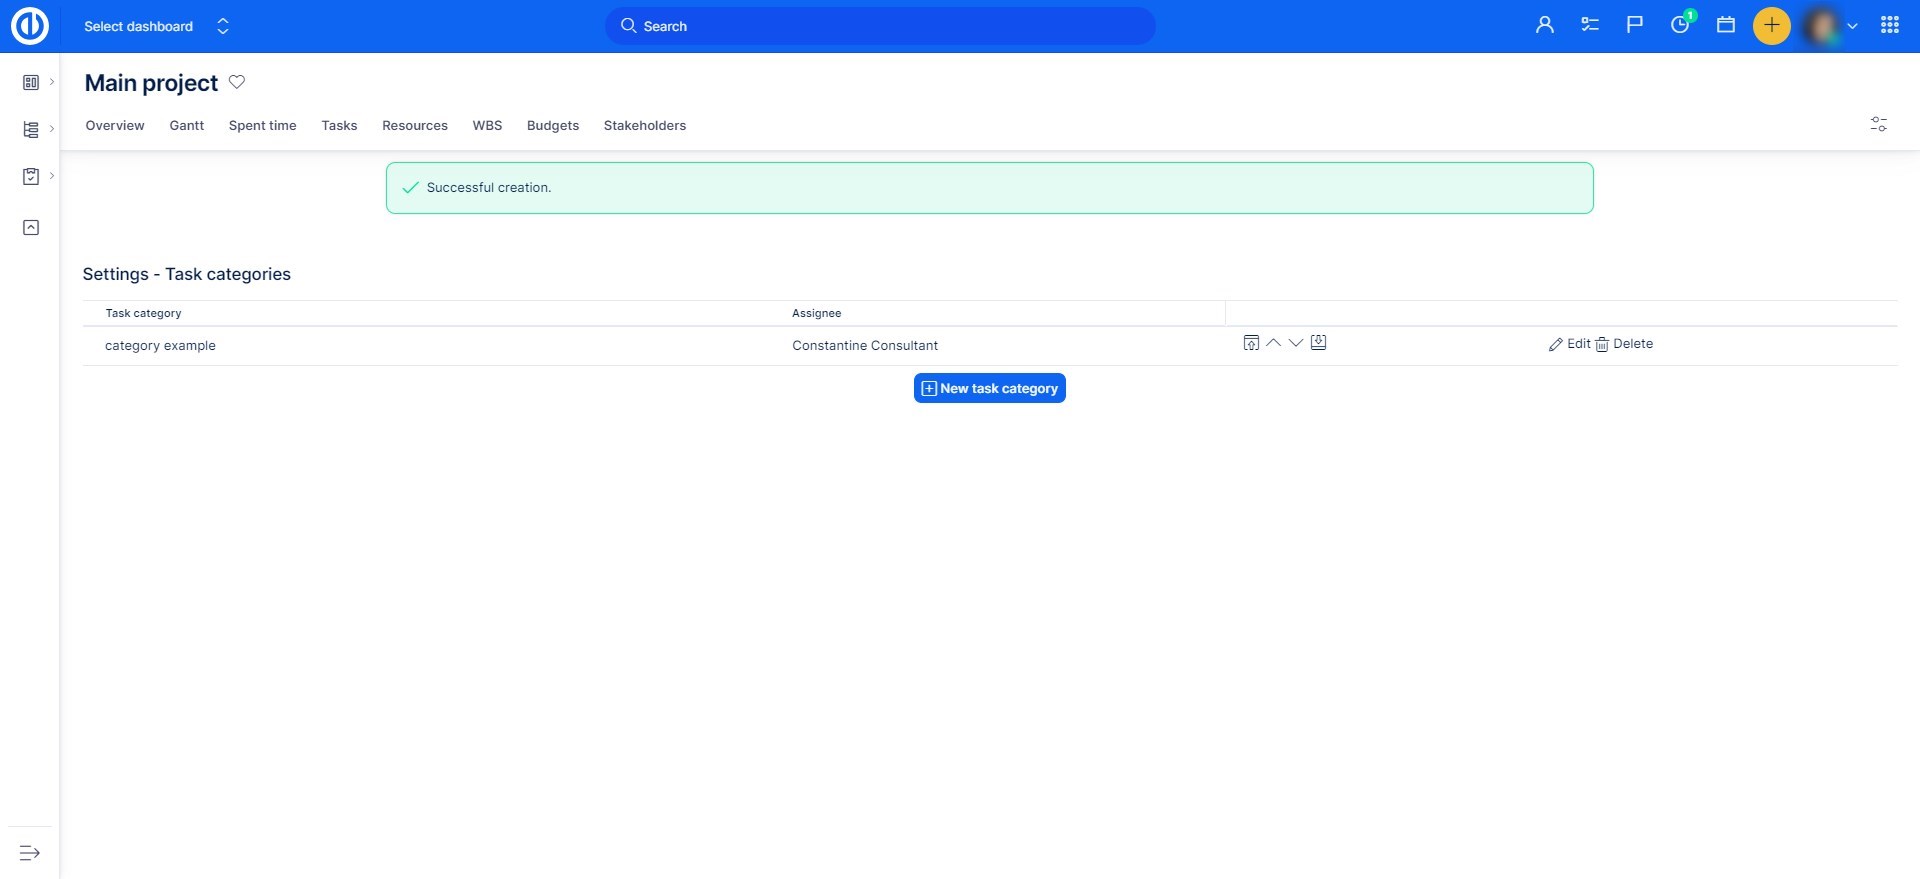
When the task category is created, you can find it in the list, edit it, or delete it. When more categories are created, use the arrow icons to adjust their order on the list. This order will be remembered in the drop-down menu Category on a task.
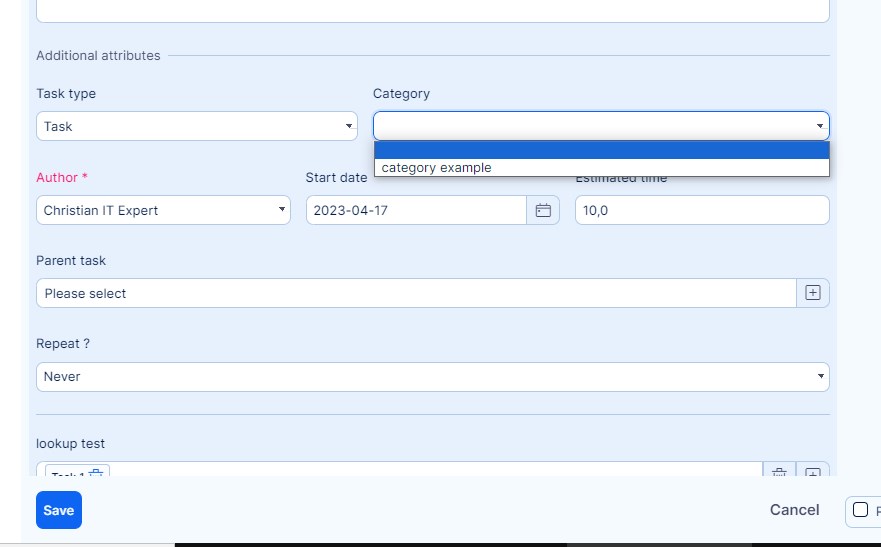
Finally, open any task of the project and under a tracker with enabled categories, you will find categories under additional attributes. Select one category when editing the task and save. From now on, you can filter your tasks based on their categories.
Corner situations
- When moving a task with a particular tracker into another project that does not allow this tracker in the project settings, the tracker of the task will be changed automatically to the first allowed one in the list.
- Task attribute called "Time in current status" is always calculated right away. On the other hand, task attributes called "Time in status XXX" are calculated via rake task "Compute tasks report", once a day by default. The value for a given status is calculated only when the status changes, otherwise, no data are shown in the column.
- HTML formatting in text fields (such as the task comment field) is not available in the mobile view. The text formatting toolbar is missing and paragraphs are not kept after saving. As a workaround, HTML formatting will be available again after switching to the desktop view in your mobile browser.
- If a new mandatory custom field is added to the task entity, existing tasks can still be edited without the need to fill in this mandatory field (unless we have already filled this field with a value and saved it). This behavior applies to editing tasks directly or via WBS or Easy Gantt.
- The situation when a task assignee is not a member of the project can occur in the following cases:
- the assignee was removed from the project but the tasks remain assigned to him,
- an automatic ticket updating process is set within the Helpdesk module in such a way that some tickets are automatically assigned to a former project member.
- Task duration field (which can be activated per task tracker) counts the value from Start date and Due date. However, the feature does not count with weekends, meaning that 1 week = 5-day duration and 1 month = 21-day duration.
- Task duration will be calculated only if the dates are less than 10 years apart.
- It may not be possible to export a large number of tasks with big attachments using the standard export tool as the server may not be adapted to such a workload. In case of a problem, the solution is to divide the export into smaller parts or use some other method of export. If necessary, we will be happy to prepare on your request a Dump database including files from where you can export tasks without any problem. However, it is not possible to say exactly how many tasks it is possible to export using the standard method of export as it depends on the server performance and its current load.
- If the % Done calculation method on tasks is changed (can be changed in Administration >> Settings >> Task tracking - Calculate the task done ratio by, resp. Parent tasks attributes) sorting and grouping of tasks by % Done are not automatically updated and remain at their original values. The reason is the time-consuming recalculation of sorting and grouping on all tasks in the system. Change in calculation method will appear on the task only if the task is updated in any way.
- % done can only be entered in tens, whatever number you enter will be rounded to the nearest multiple of ten
- A distributed task cannot be created when tracker of the distributed task include some "Required" fields as defined by "Task field permissions" settings in Workflow.
- A distributed task cannot be created when estimated time is not filled for all the assignees.
- A distributed task is a standard task with a "distributed" tracker, which creates subtasks in a tracker other than the "distributed" tracker itself. Otherwise, subtasks would also have the same "distributed" tracker, which is not possible in order to prevent infinite task distribution. Therefore, those subtasks must not be in a tracker that is marked as distributed. For that purpose, is automatically selected the first non-distributed tracker in the sorted list of trackers in Administration (see below).
- If there is no "non-distributed" tracker enabled on the project, you can not create any distributed tasks.
- A distributed task must always be created as a new task, you cannot create a distributed task by copying or cloning an already existing task (to prevent possible issues).
- It is recommended to not assign any assignee to distributed tasks because it is not beneficial and the assignee cannot be changed later. Therefore, we recommend disabling the assignee field on distributed trackers.
- Distributed tasks cannot be created in WBS.
- It's not allowed to add a relation between a parent task and its subtask
- Between two tasks can be no more than 2 relations (start-start, finish-finish)
- Any combinations of relations leading to a cyclic sequence of tasks (looping) are not allowed
- This includes attempting to create a relation with any task that has a parent
- Task repeat can only be set when creating/editing a task in a project. When creating a task "off-project" (for example, from the homepage), the repeat option is not displayed.
- When a task with enabled 'Use for repeating' option is somehow updated (such as a task field value is changed), the update will only propagate to the next records of this repeating task if they have not yet been created. If all the records were created before the task update was made, it would not be propagated to the next records of the repeating task.
- If the name of a repeated task changes using the inline editing (the pencil icon) or the quick task editor (the modal view), the next repeats of the task will get the original name regardless of the change made. However, if the name of a repeated task changes using the standard task editor with the checkbox "Use for repeating" ticked, the next repeats of the task will get the new name, without retroactively affecting already created repeats of that task.
- If you apply the repeating feature to a distributed task, that repeating is also applied to all subtasks of the distributed task.
- When the project field is set as "Read-only", you will not be able to move tasks because the project field on the task would need to change in such a case.
- When moving a task with a particular tracker into another project that does not allow this tracker in the project settings, the tracker of the task will be changed automatically to the first allowed one in the list.
- When having enabled the option "By closing parent task, close also subtasks" in Administration >> Settings >> Task tracking, then parent task's status is also applied to its subtask's status even when the status for the subtask is disabled by Workflow settings.
- If the project is not public then the User with Admin rights, who is NOT a member of the project, takes over "virtually" all other roles on that project and the workflow is then validated against them.
- If the project is not public and there are no members, then in that case the workflow is not being validated for the user with Admin right at all.
- XLSX export - option to export all columns is limitd to 200 columns.
- PDF export can have issues with display of languages, that use diacritical marks. Solution is trying using different PDF readers. This issue is combination of EasyRedmine and third party tools so it is not possible to fix for every single reader in existence.
- Bulk edit: Updating too many items becomes a demanding process for the application and especially the server, which is why bulk editing is limited to 500 items.

