


WBS – documentation
What is WBS - Work Breakdown Structure
Who does WBS help?
WBS activation on a project
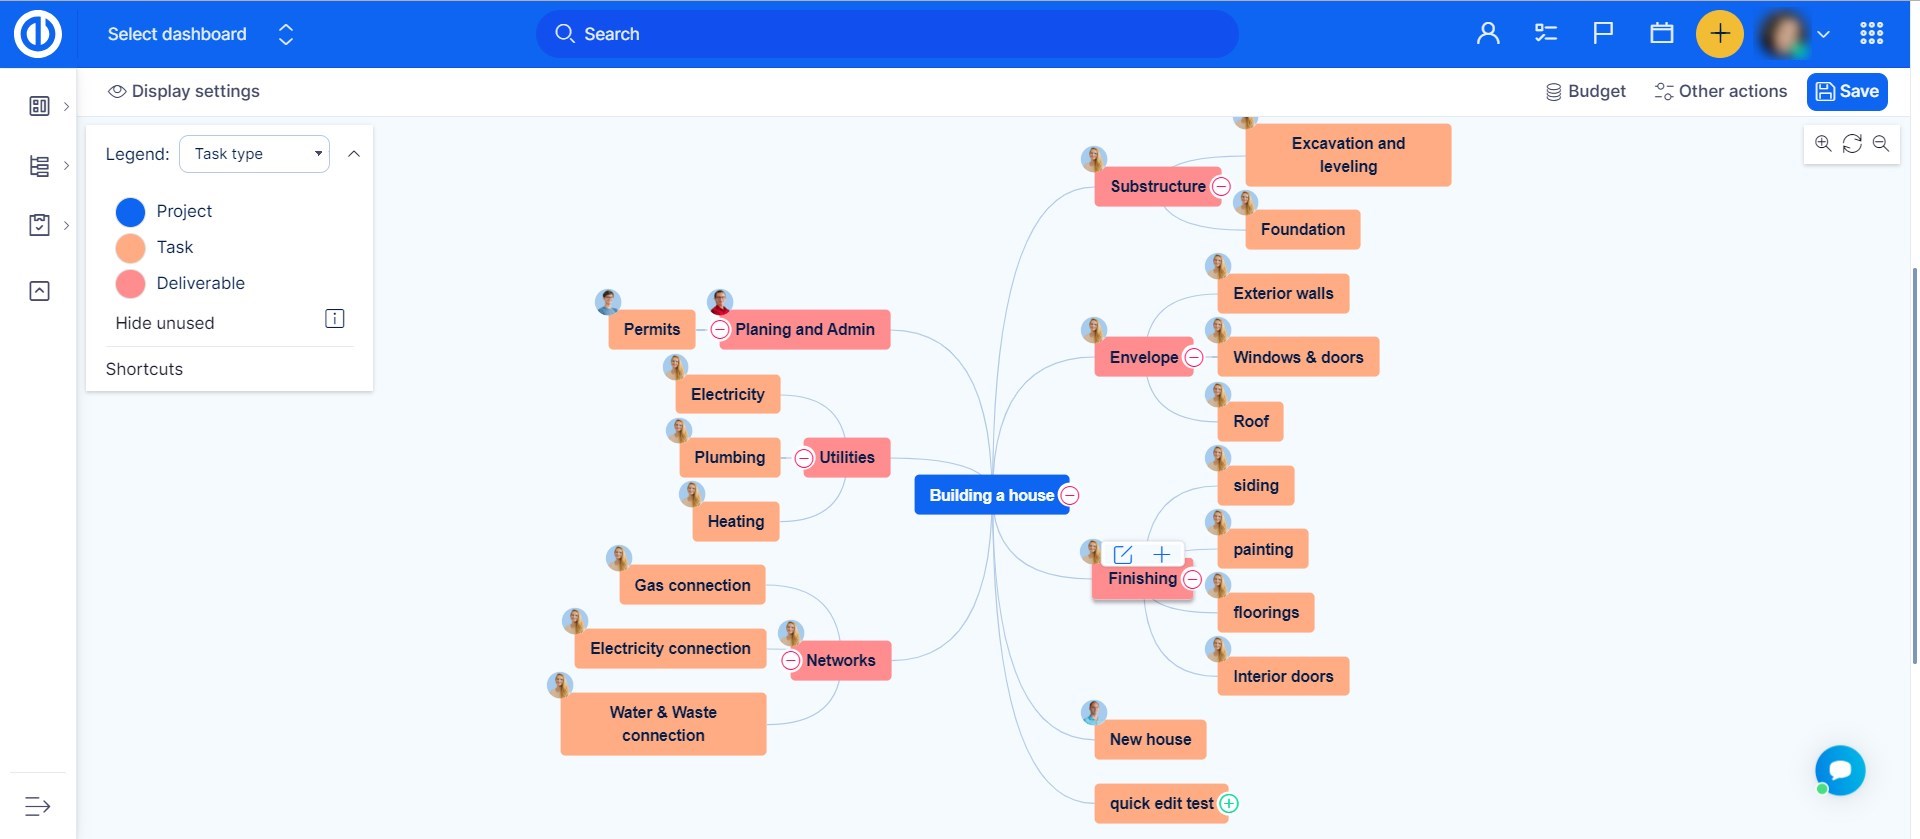
Mind maps like visualization of the projects, issues, and sub-issues
Drag & drop sorting of issues and projects
Update tasks with inline editing menu
Bulk edit of tasks
Creation of issues/tasks from the mind map
Visualize tasks using different properties
Highlight the tasks with particular attributes
How to display relations on the mind map
Transfer to PDF and print your WBS
Familiar keyboard shortcuts from other mind map tools
Quick task editor
Zoom-out and zoom-in
Cut, copy and paste
Step back button
Show/hide icons
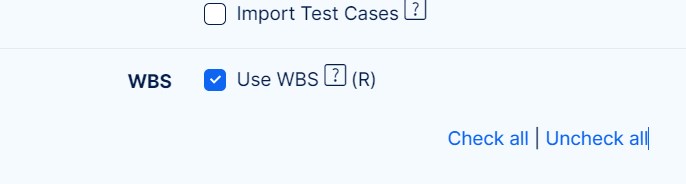
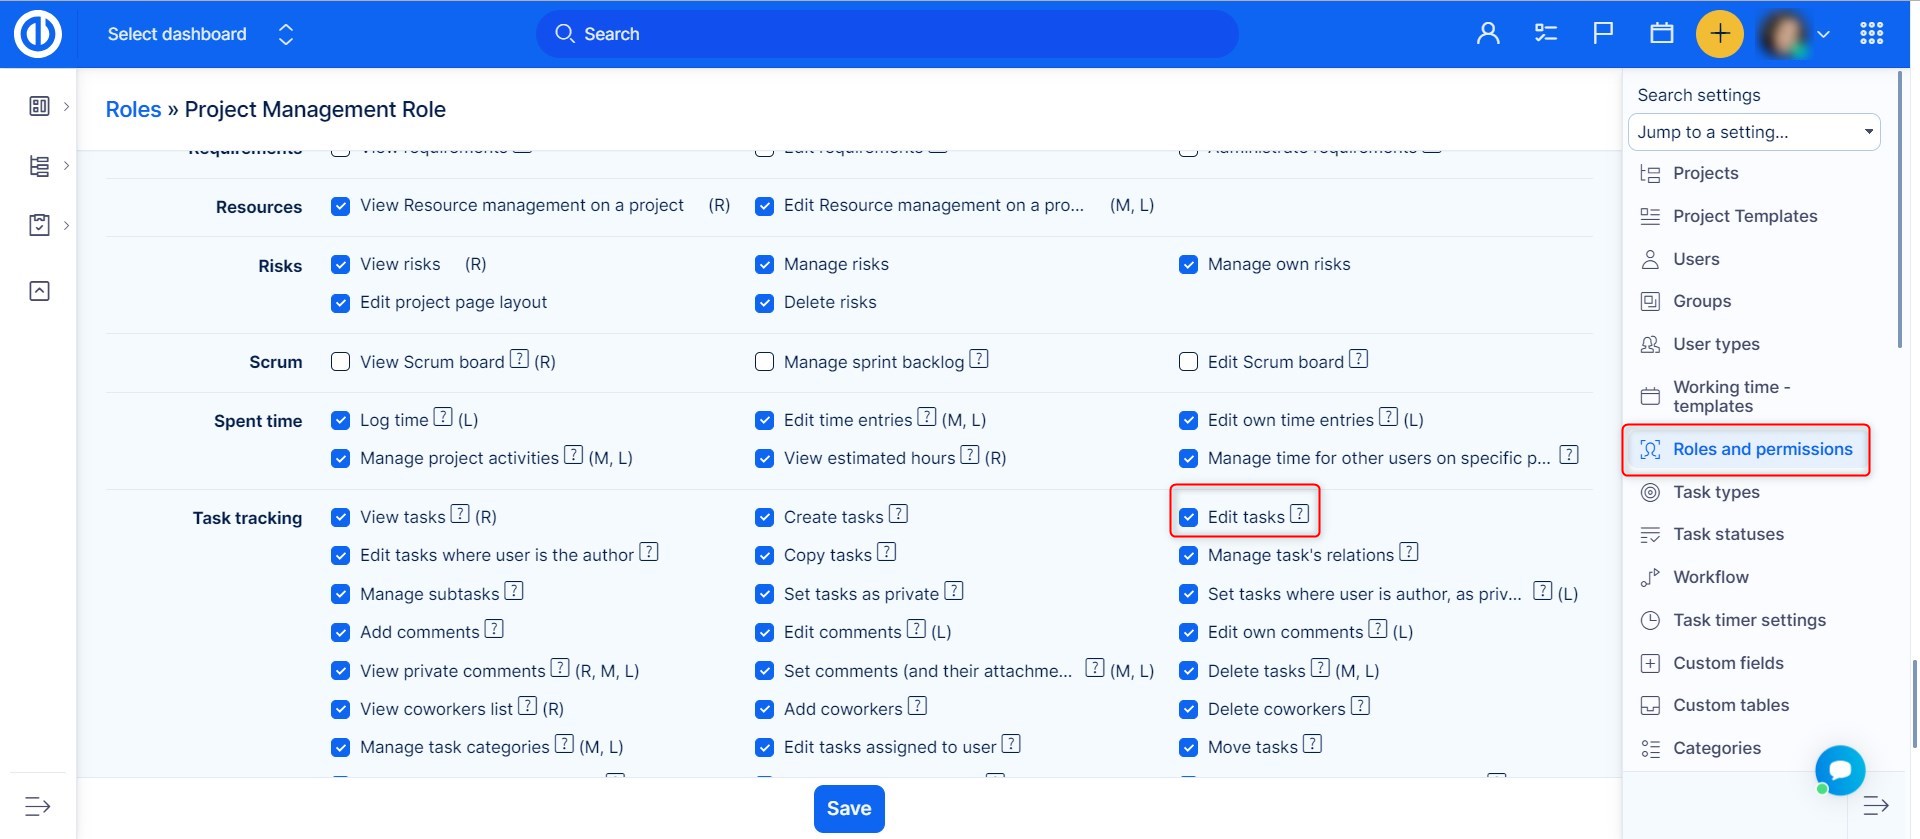
Roles and permissions
Autosave in WBS
Corner situations
What is WBS - Work Breakdown Structure
WBS - Work Breakdown Structure is a fundamental project management technique of decomposition of the project into deliverable parts (easily manageable components). Work Breakdown Structure visualizes projects, issues, and sub-issues in mind map-like view - showing decomposition of the work to be executed by the project team. WBS provides the necessary framework for detailed guidance for schedule development and control. It further enables you to manage projects and issues using easy drag & drop while having the clearest possible visualization of the whole project. In WBS you can create project tasks while seeing the structure of the whole project. To use CBS - Cost Breakdown Structure, you need to have installed both WBS and Budgets plugins and have them activated on a project.
Who does WBS help
WBS plugin brings an essential project management technique of project decomposition. All project managers can thus manage projects in smarter and more efficient way.
WBS is intended to be used mostly by:
- Project Managers
- Line Managers
- IT Managers
- Small Business Owners
- Project Portfolio Managers
- HR Managers
What are the main benefits of WBS technique and project visualization:
- effective project planning thanks to drag'n'drop features and clear visualization
- easier project management thanks to the visual user interface
- easier orientation thanks to the hierarchical structure of projects
- saves your time and much more
WBS activation on a project
To activate WBS plugin on a project, go to particular project and open Project controls >> Modules - Easy WBS - Save. Immediately after, WBS tab will appear in project modules.

After clicking on WBS tab, you can start working with work breakdown structure.
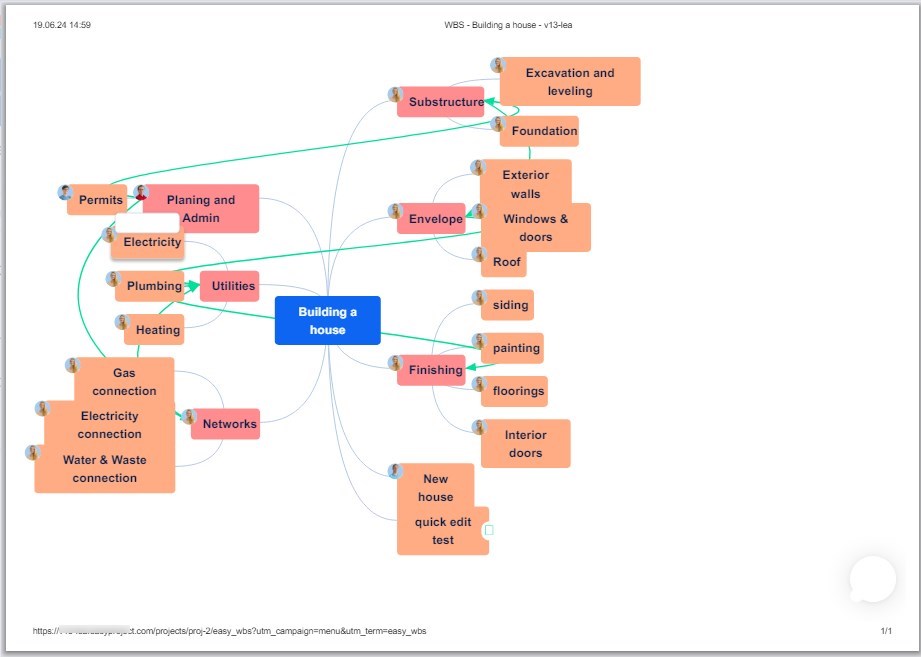
Mind maps like visualization of the projects, issues, and sub-issues
Work Breakdown Structure visualizes projects, issues, and sub-issues in mind map-like view - showing decomposition of the work to be executed by the project team.
[ 
Drag & drop sorting of issues and projects
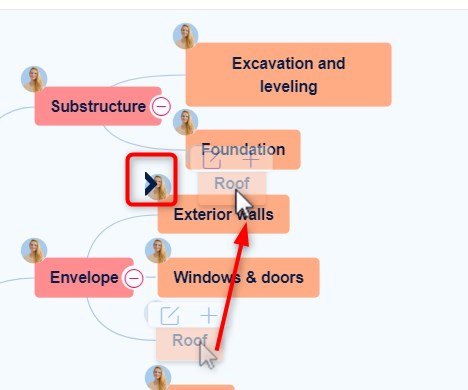
Drag an issue/task or project with your left mouse button and drop it wherever you need for a better clarity. Moreover, by clicking on One side option in the Display settings, the entire tree structure will move on the right side only. By clicking on it again, it will return back. Moreover, using drag'n'drop functionality you can easily move subtasks between parent tasks.
Thanks to an auto-positioning feature indicated by a black arrow when moving a task, the task neatly aligns between others in the branch so they all have the same spaces around and the mind map looks appealing and well organized.
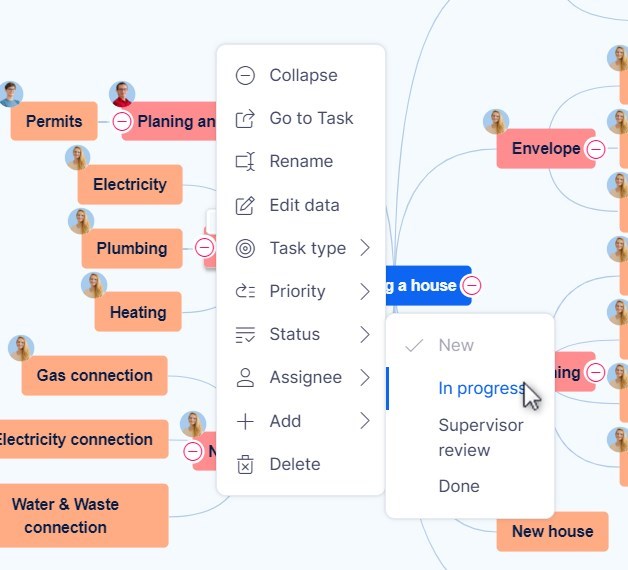
Update tasks with inline editing menu
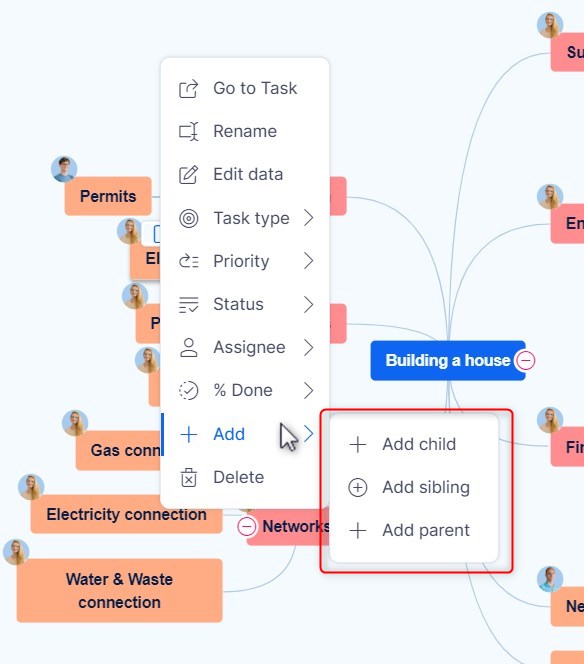
Would you like to quickly update tasks without leaving your WBS working space? Have all the task options available just one click away? Then Inline Editing Menu is for you. Just right-click on any project, task or sub-task and choose to change the tracker, priority, status etc. Using inline editing you can also easily expand the task, add a child, sibling or parent and delete the task. What's more, you can select multiple tasks at once (by pressing the CTRL button while clicking with the left mouse button) and edit them together via the inline menu.
Bulk edit of tasks
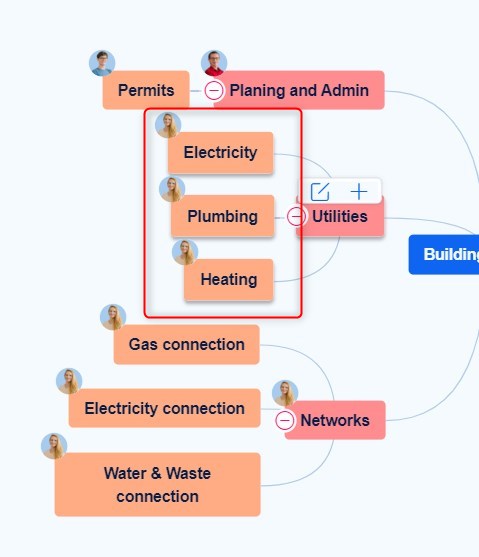
You can edit two or more entities in bulk just by holding the SHIFT/CTRL key + pressing the left mouse button to select all the entities you need to edit. While still holding the SHIFT/CTRL key, press the right mouse button on any selected entity and make the required edit from the inline menu that has appeared. If you don't hold the key while pressing the right mouse button to make the inline menu appear, the bulk selection disappears and all edits are made just on the single entity right-clicked.
Creation of issues/tasks from the mind map
To create a new issue/task, click on some existing issue/task with the right mouse button and add a new child, sibling or parent.
Visualize tasks using different properties
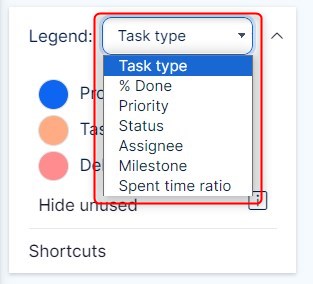
Would you like to open your WBS and instantly see which tasks require your attention? Or quickly know which tasks still need to be finished? That can be easily done with Easy WBS Pro coloring options according to a variety of Task properties. Visualize them according to priority and see which tasks require your attention or visualize them according to a user and see who is responsible for which tasks. Choose a color by Tracker, % Done, Priority, Status, Assignee, or Milestone in the top left menu.
Highlight the tasks with particular attributes
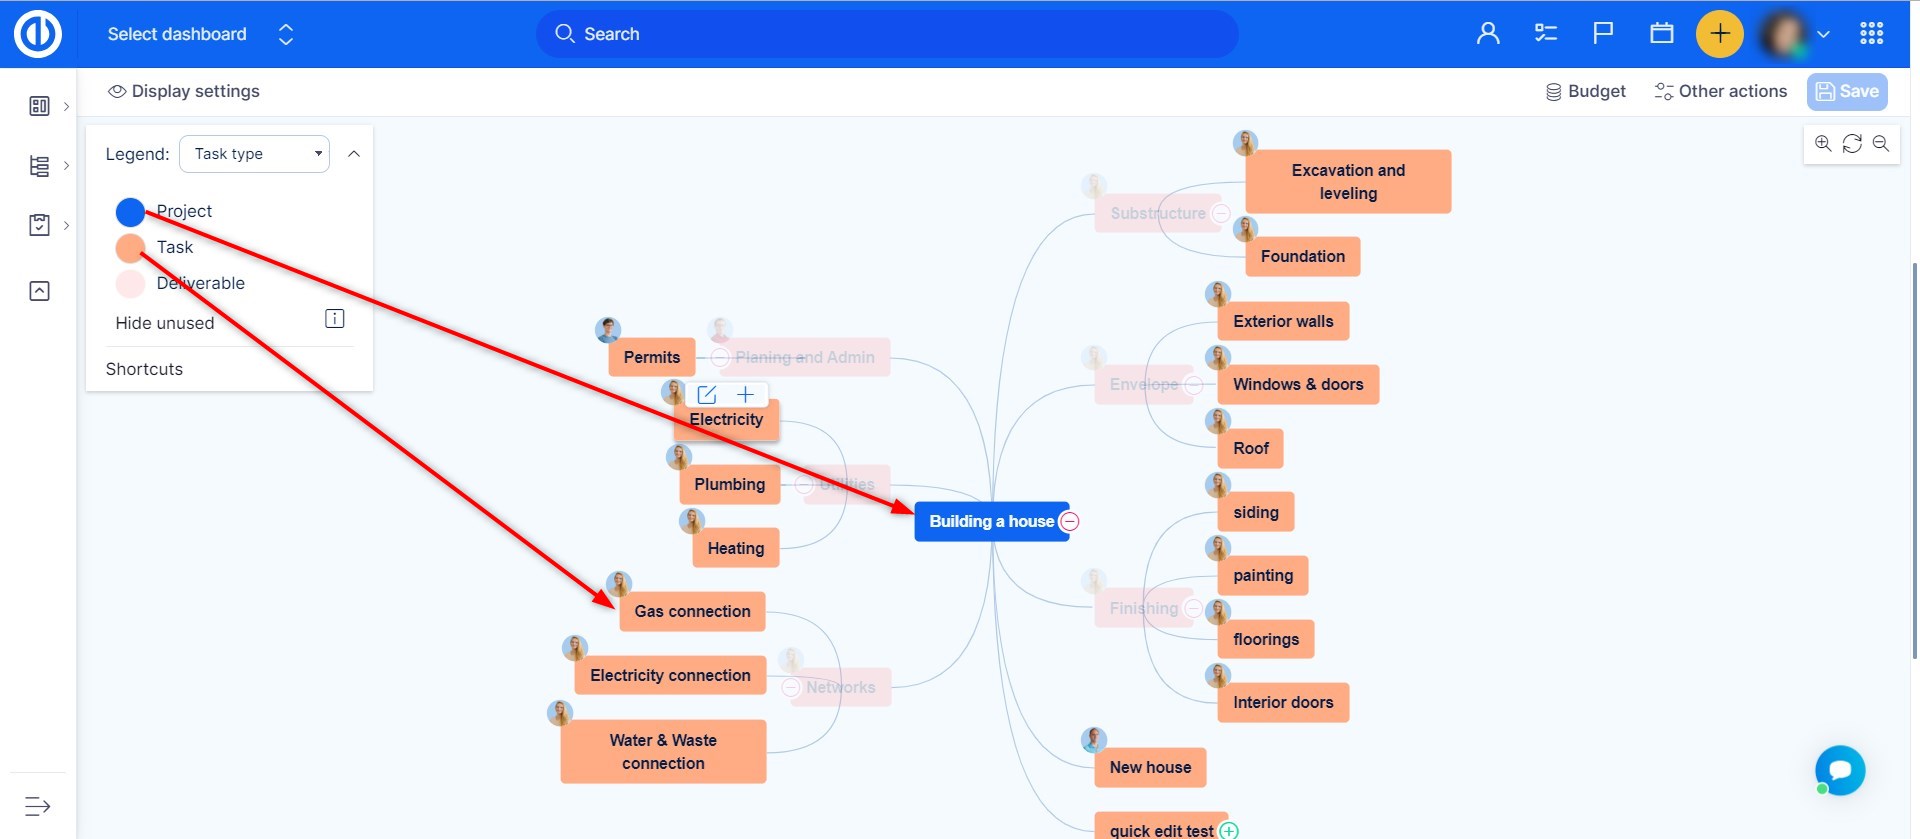
Are you tired of seeing all the tasks of a project at once? Then you appreciate the opportunity to highlight only those you currently need to work with. In the legend on the left side, you can select the particular attributes by clicking on them with the left mouse button, thus highlighting the respective tasks on the mind map. The other tasks fade away unless you highlight them by selecting their particular attributes too. In the below example, you see only the tasks with four selected trackers are highlighted. The same feature works with any other attribute such as % Done, Priority, Status, Assignee or Milestone.
How to display relations on the mind map
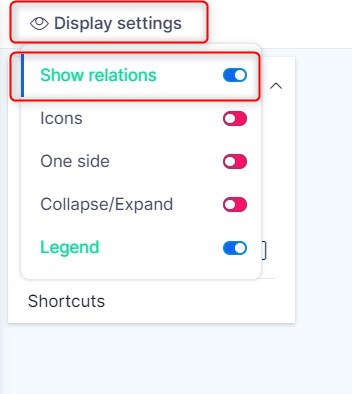
To show relations between nodes (tasks), click on the "Show relations" button among main controls. When pushed, relations are shown on the mind map as green lines between nodes.
Transfer to PDF and print your WBS
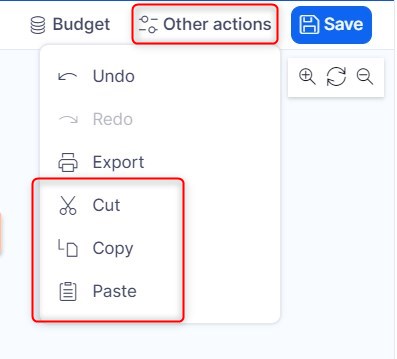
Would you like to print out your project WBS and share it with everyone? Have a hard copy to give out at the meeting and put it on your wall? With WBS, you can quickly export any WBS into PDF format and print it. Just press Ctrl+P or open Other actions in the upper right corner and select the "export" option.
Familiar keyboard shortcuts from other mind map tools
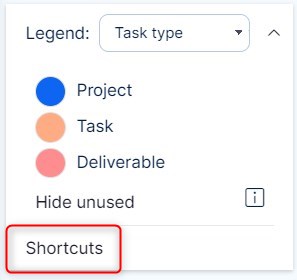
There is a complete list of keyboard shortcuts accessible by clicking on the Shortcuts button within the legend in the upper left corner (legend must be enabled).
Quick task editor
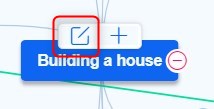
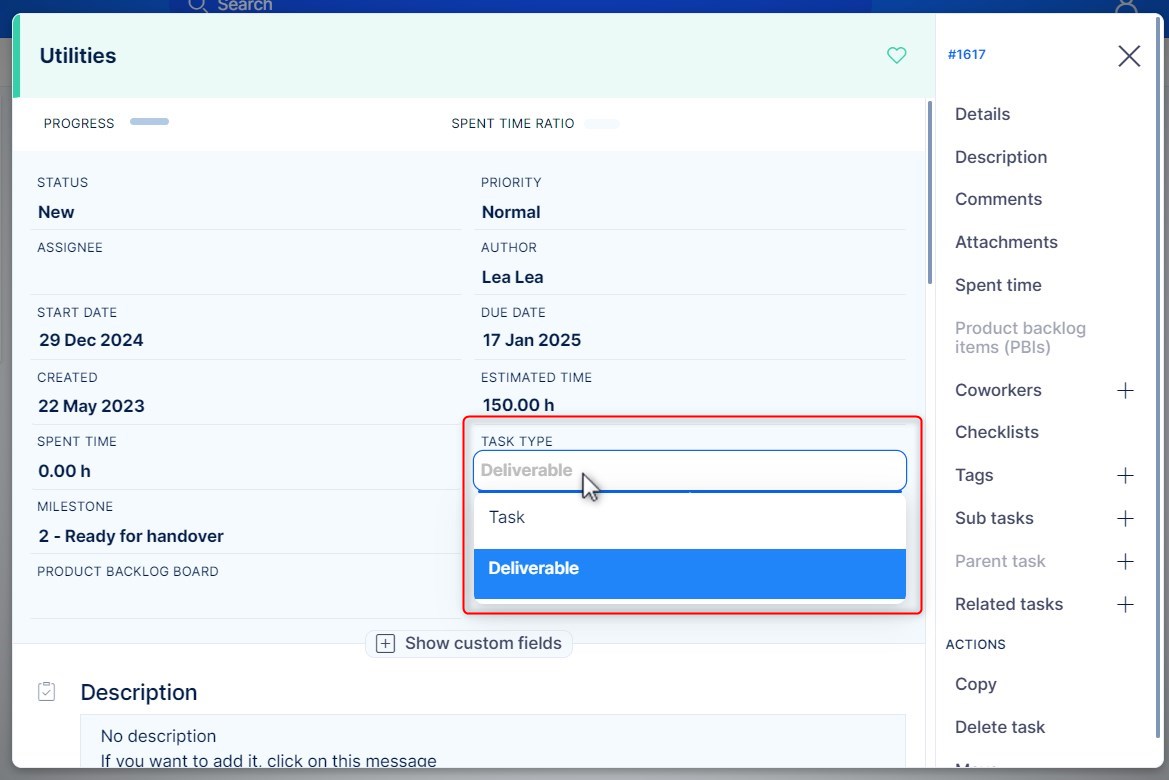
Quick task editor enables to see and/or edit all important data related to a specific task in a single-screen pop-up window, eliminating the need for opening the task in a separate tab. So, it is like a compact view of everything that can usually be found under various tabs, columns or buttons of the normal task view. Most importantly, Quick task editor is extremely fast and easy to use and its main purpose is saving time while doing standard task management. To open Quick task editor of a specific task from WBS, just click on any task in the mind map and select the following icon.
Below is how Quick task editor looks like. As you can see, the sidebar menu contains buttons for quick navigation to required task attributes you would like to check or edit, namely details, description, comments, attachments, spent time, coworkers, tags, subtasks, parent task, and related tasks.
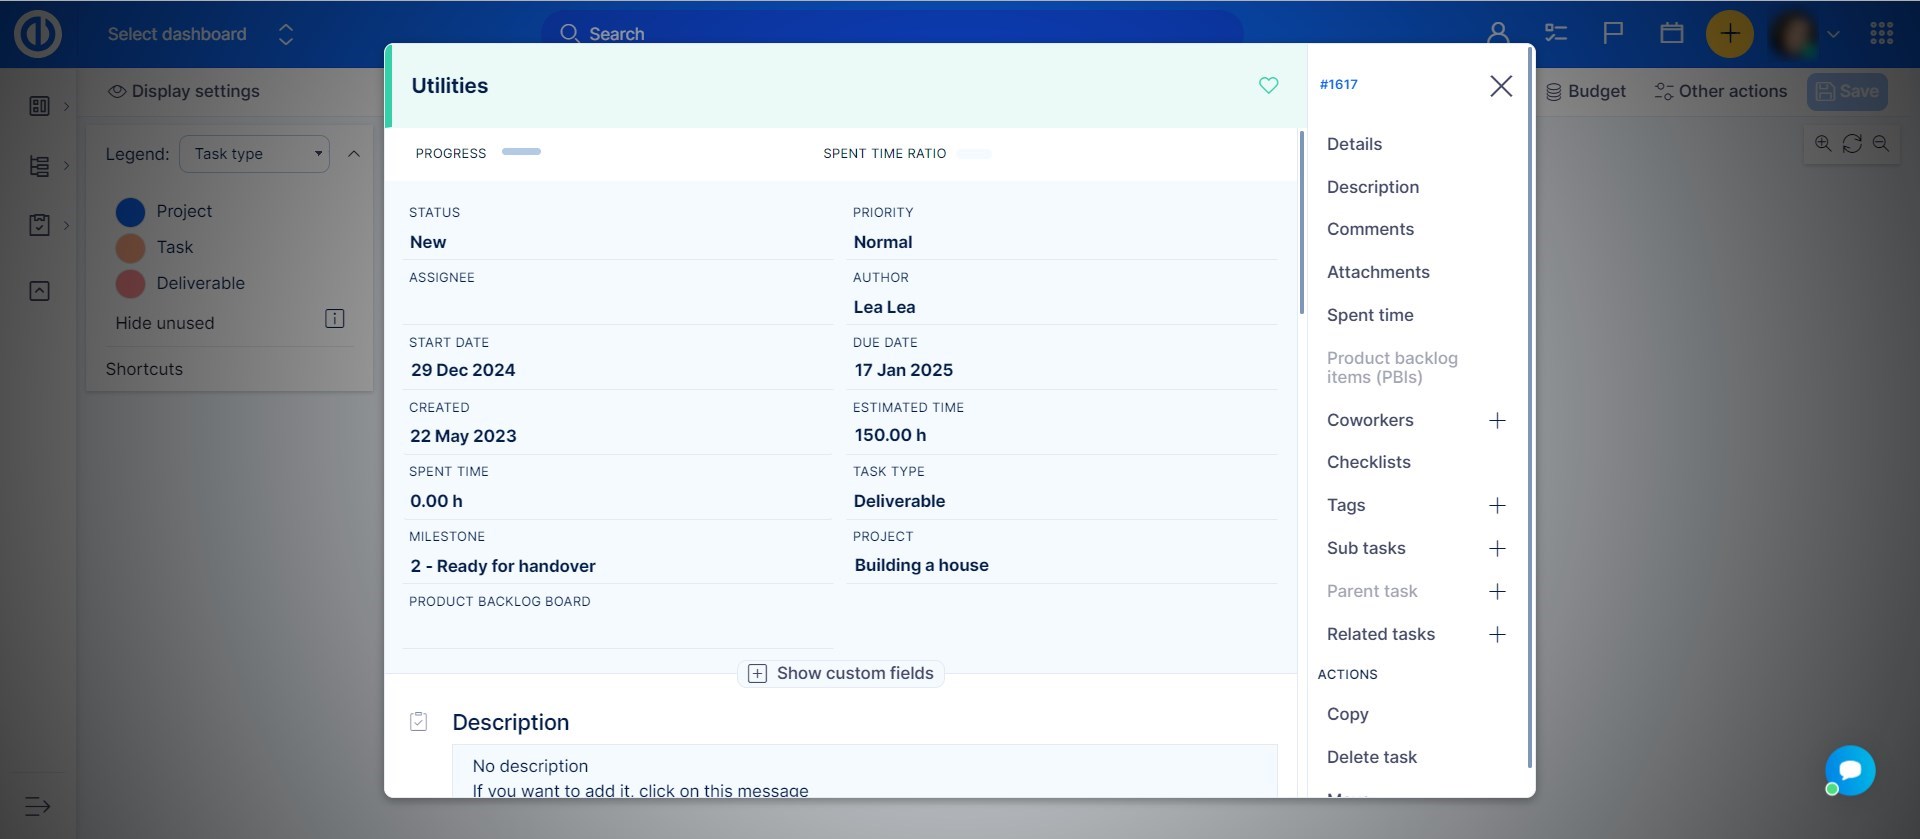
Of course, Quick task editor is definitely not a passive view but is fully interactive so you can quickly edit any of these visible task attributes or add missing text just by clicking to the respective area on the screen.
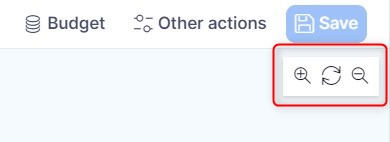
Zoom-out and zoom-in
Zoom in or zoom our your WBS using the magnifier icons in the upper right corner. The middle icon resets the zoom to the default level.
Cut, copy and paste
Cut, copy and paste are related to quick transferring of tasks on a mind map. The cut command (press the button or Ctrl + X) removes a selected task(s) including all its subtasks from its original position, while the copy command (press the button or Ctrl + C) creates a duplicate of a selected task(s) including all its subtasks; in both cases the selected task(s) is kept in a temporary place called the clipboard. The tasks(s) in the clipboard is later inserted in the position where the paste command (press the button or Ctrl + V) is issued. These options can be also found under Other actions in the upper right corner.
Step back button
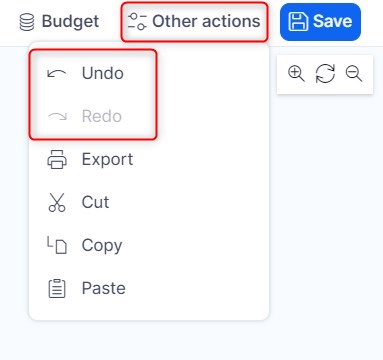
When you accidentally do anything wrong, simply take back the unlimited number of steps you have done just by clicking the "Undo" button which can be found under Other actions in the upper right corner. To go one step ahead, click on "Redo" button.
Show/hide icons
To show and hide icons on the mind map, just click on the "Icons" icon among Display settings at the top left.
Roles and permissions
In Global menu >> Administration >> Roles and permissions - WBS you can decide which user roles have the permissions to Use WBS.
To allow users edit tasks shown in WBS map, they need to have the permission called "Edit tasks", which can be found in the Task tracking section of Roles and permissions.
Autosave in WBS
The WBS autosave feature prevents accidental loss of unsaved data and is activated automatically when at least one of these 3 conditions is met:
- A user leaves the current browser tab and then returns back.
- Every 10 minutes after the last save.
- A user opens Quick task editor
Corner situations
- When using WBS in a project tree (showing subprojects), a user needs to be aware when moving tasks between projects - if you move a task into a project where module Task tracking is disabled, the task will not be reachable and will seemingly disappear.
- Undo button does not work for changes made from inline editing.
- If you want to move a task, you must not go out with a task outside the visible WBS map, otherwise, the move jumps back to its original position. If you need to attach a task to another task that is outside the visible WBS map, press CTRL key when holding the task to anchor the map to your mouse cursor and drag it over as you need.
- Cross-project parent-child relations are not recommended to use in WBS as it may cause some unwanted changes, such as spontaneous moving a task from one project to another.
- When moving a task with a particular tracker into another project that does not allow this tracker in the project settings, the tracker of the task will be changed automatically to the first allowed one in the list.
- When creating a task with a distributed tracker via WBS, it is not possible to save it. Application error: "Task could not be created: Assignee and estimated time of distributed tasks cannot be blank." If you need to create a task with a distributed tracker, just do so via "New task button", not in WBS. To find out what is a distributed tracker, check here.
- If any spent time is logged on a task, such a task cannot be deleted from the WBS environment. Similarly, the entire task tree cannot be deleted if the parental task contains spent time but its children do not. You can only delete tasks without logged spent time in WBS. To delete tasks with logged spent time, open the task detail or use task list.
- If a new mandatory custom field is added to the task entity, existing tasks can still be edited without the need to fill in this mandatory field (unless we have already filled this field with a value and saved it). This behavior applies to editing tasks directly or via WBS or Easy Gantt.
- Distributed tasks cannot be created in WBS.
- WBS will only save such changes a user made to the tasks that are permitted to edit by his user role. When the permission is missing for any task, no changes will be saved to that particular task (although "Successful updated" notice may appear on the screen). Due to the smoothness of WBS operation and speed of WBS loading, this particular case is left as is.
- The WBS legend always shows all the available task statuses regardless of whether they can be applied to a specific task shown in the mind map or not. Each task status can be applied depending on the current setting of the project, tracker, user role, and workflow. However, due to performance reasons, WBS does not monitor those settings at all. That's why some statuses cannot be applied to some tasks in WBS.
- If you copy tasks in WBS, their checklists, descriptions, start dates, due dates, duration, tags, basic fields, and some custom fields (if any) will not be copied. If you need to copy a task including all the data listed, just do so from the task details window, not in WBS.

