


CRM
Introduction
Typical use cases
How to use the feature on the project level
How to use the feature on the global level
Leads
Summary of basic operations (leads)
Opportunities
Creating a new quote on an opportunity
Generating a quotation
Making a sold opportunity
Summary of basic operations (opportunities)
Accounts
Summary of basic operations (accounts)
Personal Contacts
Summary of basic operations (personal contacts)
Partners
Summary of basic operations (partners)
Campaigns
Summary of basic operations (campaigns)
Contracts
Summary of basic operations (contracts)
Price books and products
Creating a new price book
Creating a new product
Creating a product bundle
Settings
Corner situations
Introduction
CRM was created with the vision to put the client into the center point of your operations. And that means not sales operations only but also delivery processes, projects, and continuous support. The module can be best utilized by B2B organizations with indirect or combined sales processes. The objective is simple – to manage your channel business efficiently through instant collaboration using a channel network. Technically, CRM is both a project-level and a global-level module (application-wide), which means it can provide you with both a detailed business insight of one project and a global overview of all your projects.
Typical use cases
Lead Management
Our new CRM will help you operate leads easily and efficiently. You may follow the route of any lead from the very beginning to the very end while having a clear overview of all sales activities.
Key features:
- Convert leads into business opportunities
- Follow the route of your lead and assign them to the right people using a lead splitter
- Track marketing campaigns and their results across all channels
- Track your sales activities to clarify what’s ahead of you
- Cooperate with your partners to achieve even better results
Lead Processor
Fast and well-prepared follow-up on leads is essential for any successful acquisition. Typically, a digital environment generates a large number of leads with varying relevance. Lead processor is helping to distribute, split and prioritize leads among your own sales team or your partner network.
Key features:
- Available endpoint for your marketing automation tool to send lead data
- All received data is converted into a lead record and as such be conditioned
- Based on its conditions, every lead is assigned to your team member or partner
- Conditions may prioritize leads
- Split leads based on percentage among salesmen
- Duplicity identification
Opportunity and Pipeline Management
Our CRM will manage your opportunities so you can stay connected to the people and information essential for every sale closure. From anywhere. Track all associated activities as they happen and receive updates when action is required. Send emails effortlessly using templates.
Key features:
- Quickly create immediate quotes
- Use Price Book to manage your products and services to clarify quotes and contracts
- Price Book allows an accurate understanding of your revenue source
- Streamline the whole sales process and have a detailed overview of your opportunities
- View critical details in a rich activity timeline of your customer's activity
- Keep your team informed with real-time updates
- Get a clear perspective over your performance and your quarterly targets
Partner Management
Our CRM provides a complex partner overview where you may track your top partners as well as their progress to the detail. Develop a network of partners across the world and sell your products faster and better.
Key features:
- Drive performance using territory modeling
- Let external account managers take care of your clients
- Create a partner ecosystem where you train partners to sell even better
- Allow your partners to work within CRM safely and with exact data visibility
- Partners' evidence and engagement in CRM goes from the acquisition (lead) to the continuous customer care operations
Account Management
Thanks to the integrated project management platform CRM provides a truly holistic view of your clients’ lifecycle. Besides traditional sales data, CRM brings an overview of delivery, projects, customer care in one system, everything on one page.
Key features:
- A complete overview of sales activities related to leads and opportunities for the entire history of the account
- Account collects all traditional sales information about business history, proposals, and similar
- Provides instant view on projects and their statuses
- Provides views on issues or help-desk tickets on the account allows understanding the state of customer service and alerting salespeople
- Allows sales and customer care teams to truly collaborate and share information
Role-Based Personal Dashboards and Dashboards
Within the new CRM, you will be updated with customized sales forecasting reports that you can build with ease. In our role-based scenarios, the sales director has a clear overview of revenues, the performance of sales managers, and the pipeline. See which reps are on track to beat their targets with real-time leaderboards.
Key features:
- Make critical decisions anywhere you want
- Get an accurate view of your entire business with comprehensive forecasts
- Track your top performers
- Get deep insights and intelligence on an accounts
- Stay ahead of your competition with easy-to-use and intuitive Personal Dashboards
Process and Project Support
Essential features of project management such as WBS, Gantt, or agile management are present to support various processes in the sales department or serve to deliver projects.
Key features:
- Invite delivery teams to collaborate or pre-sales and manage sold projects in one platform
- Manage large RFPs as waterfall projects
- Manage new hire or partner onboarding as a project
- Manage recruitment
- Use mind maps for your planning, strategic thinking, or just notes
Delivery E2E
In our CRM, you may manage what you sell. From the new lead, across the opportunity quotation to the last implementation. Manage every step along with your partners to get the most out of the deal. The customer does not have to do anything. They can just sit back, relax and watch their business grow with your product.
Key features:
- Seamless quotation and contract management
- Manage what you sell
- Provide your customers with great services and zero-effort business
- Customize the process for every customer with your best practice
- Get the best out of shared roles which will spend less time implementing and you will lower your costs
Continuous Integration
CRM and especially its „contracts” are designed to turn the CRM into a rock-solid source of data for systems managing the delivery of your products and services. The character of our PM platform is also ideal for building solutions on top of standard products.
Key features:
- Contracts = evidence of exactly sold items
- One time delivery or continuous delivery logic of contracts
- Contract update procedures implemented
- Contracted services or support contracts are passed on to delivery and support teams instantly
- Open Source, API, Custom fields, and flexible system settings make our PM platform an ideal tool to develop highly customized solutions to drive and automate your business
- Integration of our PM platform’s calendar services with Microsoft’s Office 365 (currently in development)
- Multiple pipelines (currently in development)
How to use the feature on the project level
First of all, make sure you are a member of the respective project and have all the necessary user role permissions related to managing the CRM feature on the project level (to configure permissions, see chapter „Settings“ below). In order to activate CRM on a particular project, you need to open the project modules settings (Project >> Modules) where you will find the CRM checkbox. Tick it and save the settings. Now you should see the CRM tab appear on your project's top menu. Click on the tab, which takes you to the default CRM overview page of the project.

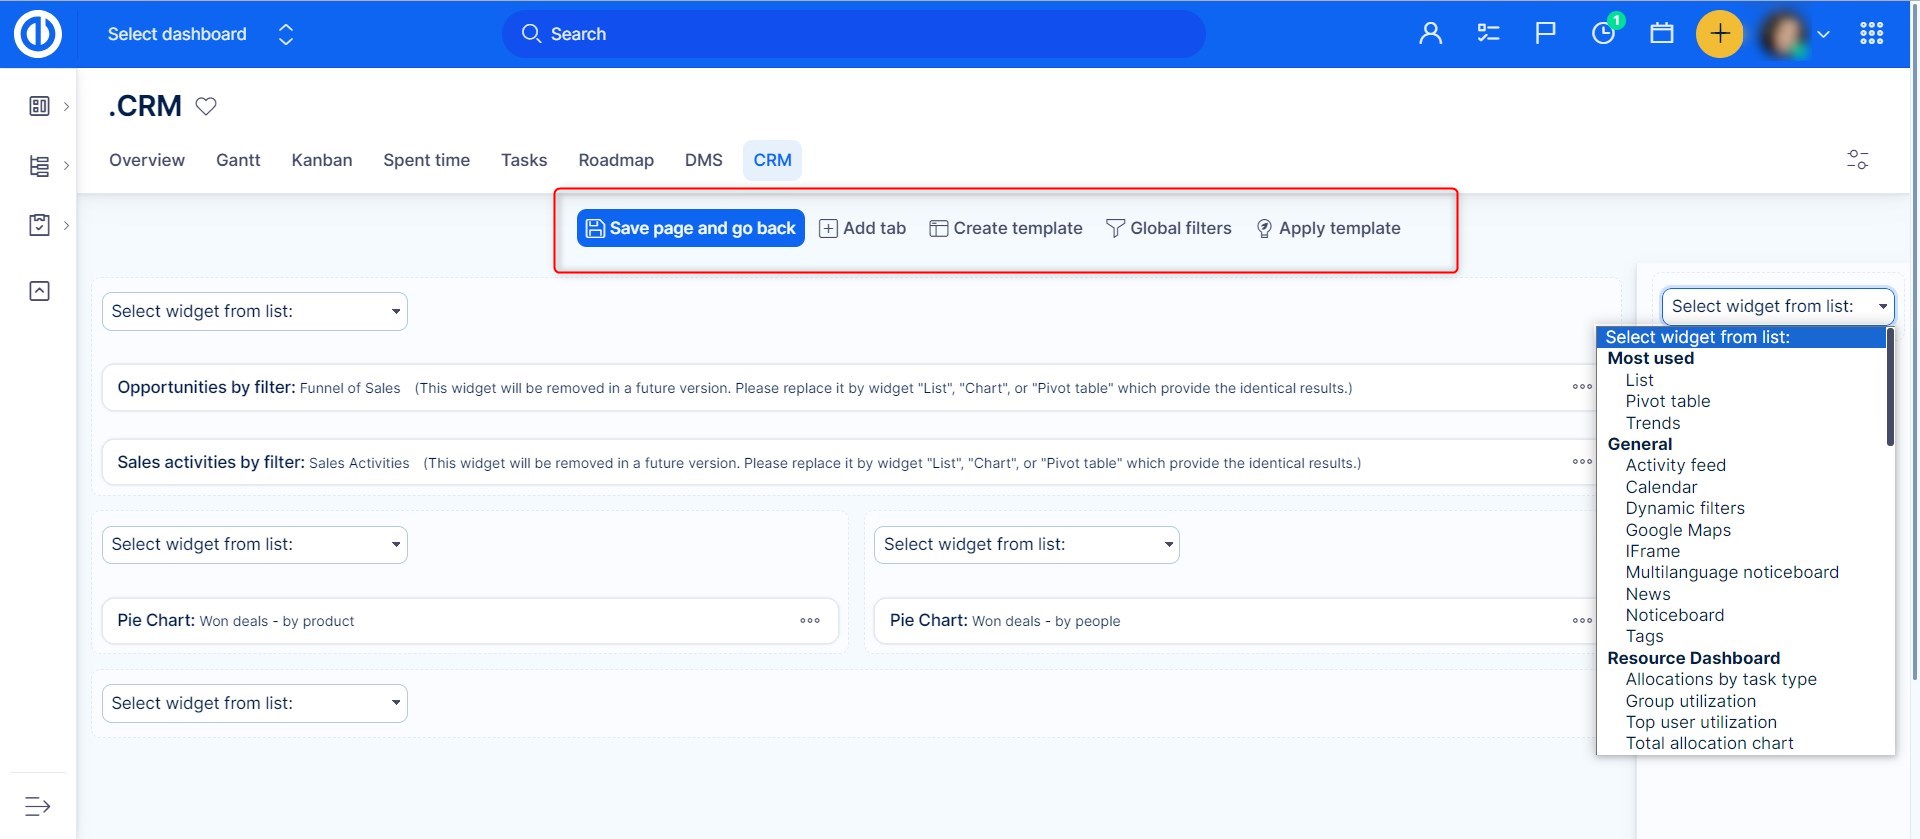
By default, this page is empty until you add some particular modules to it. These can include, for example, your sales funnel (opportunities), sales activities, or won deals (won opportunities) by product/people. To customize modules that appear on your default project-level CRM overview page, simply click the „Customise this page“ at the bottom of the page. Then select and insert the preferred modules and save. The changes can be seen immediately upon saving. You can also create a page template right from here, which can be later applied to the same page of any other project. Alternatively, you can use a pre-created project called CRM, which you will find in your project list and which already by default contains frequently used modules of the CRM page.
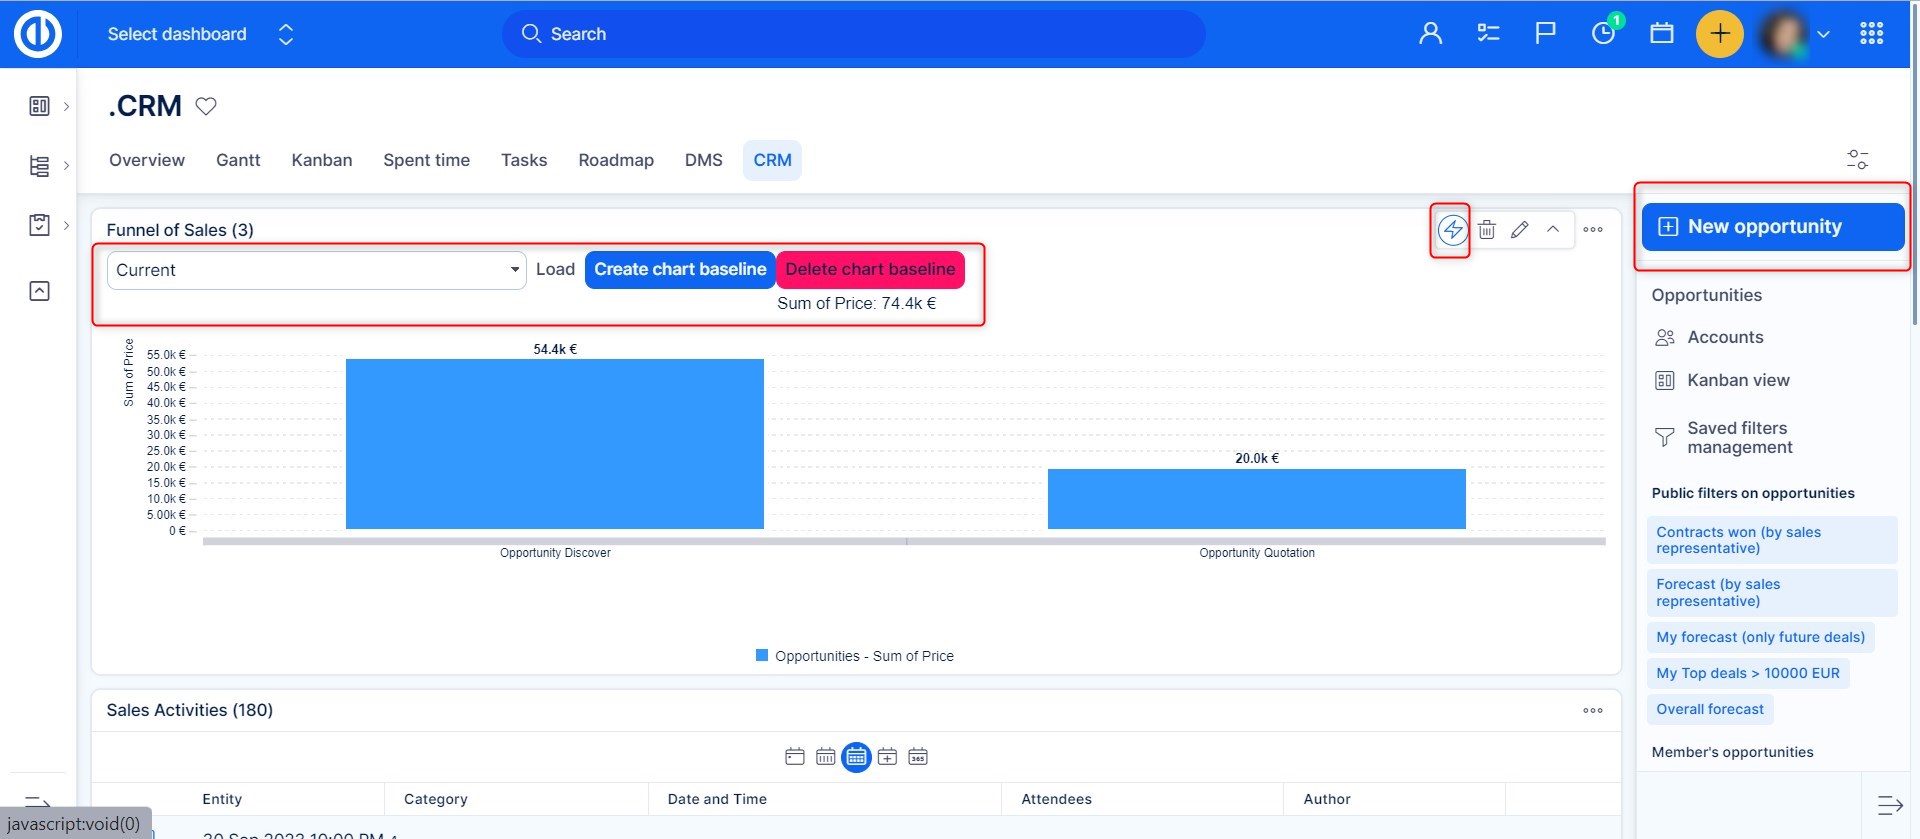
The page now contains the modules you have selected that you can work with. By switching the calendar icons and/or selecting a specific day in the calendar within the individual page modules, you can customize the displayed data for a certain time period. By clicking the module title, you get to the data on which the module is based (typically a detailed list of opportunities or activities). Each of the page modules has control icons using which you can edit (the pencil icon) or delete it (the trash icon), and all charts also have the option to create/delete a baseline (the lightning icon).

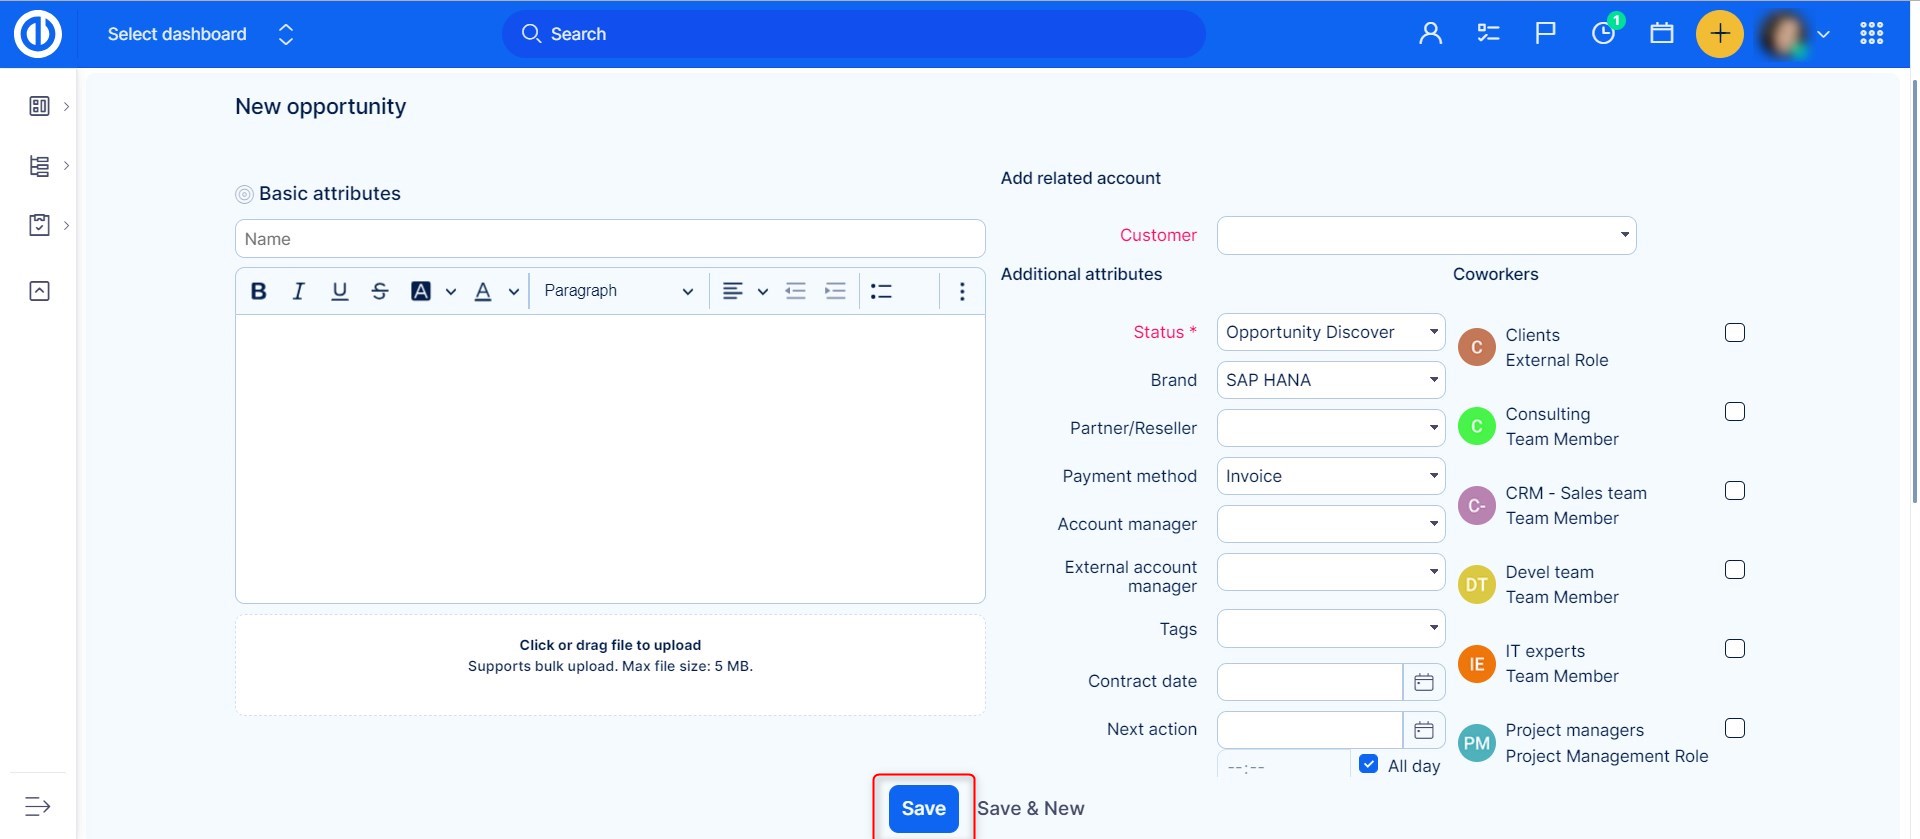
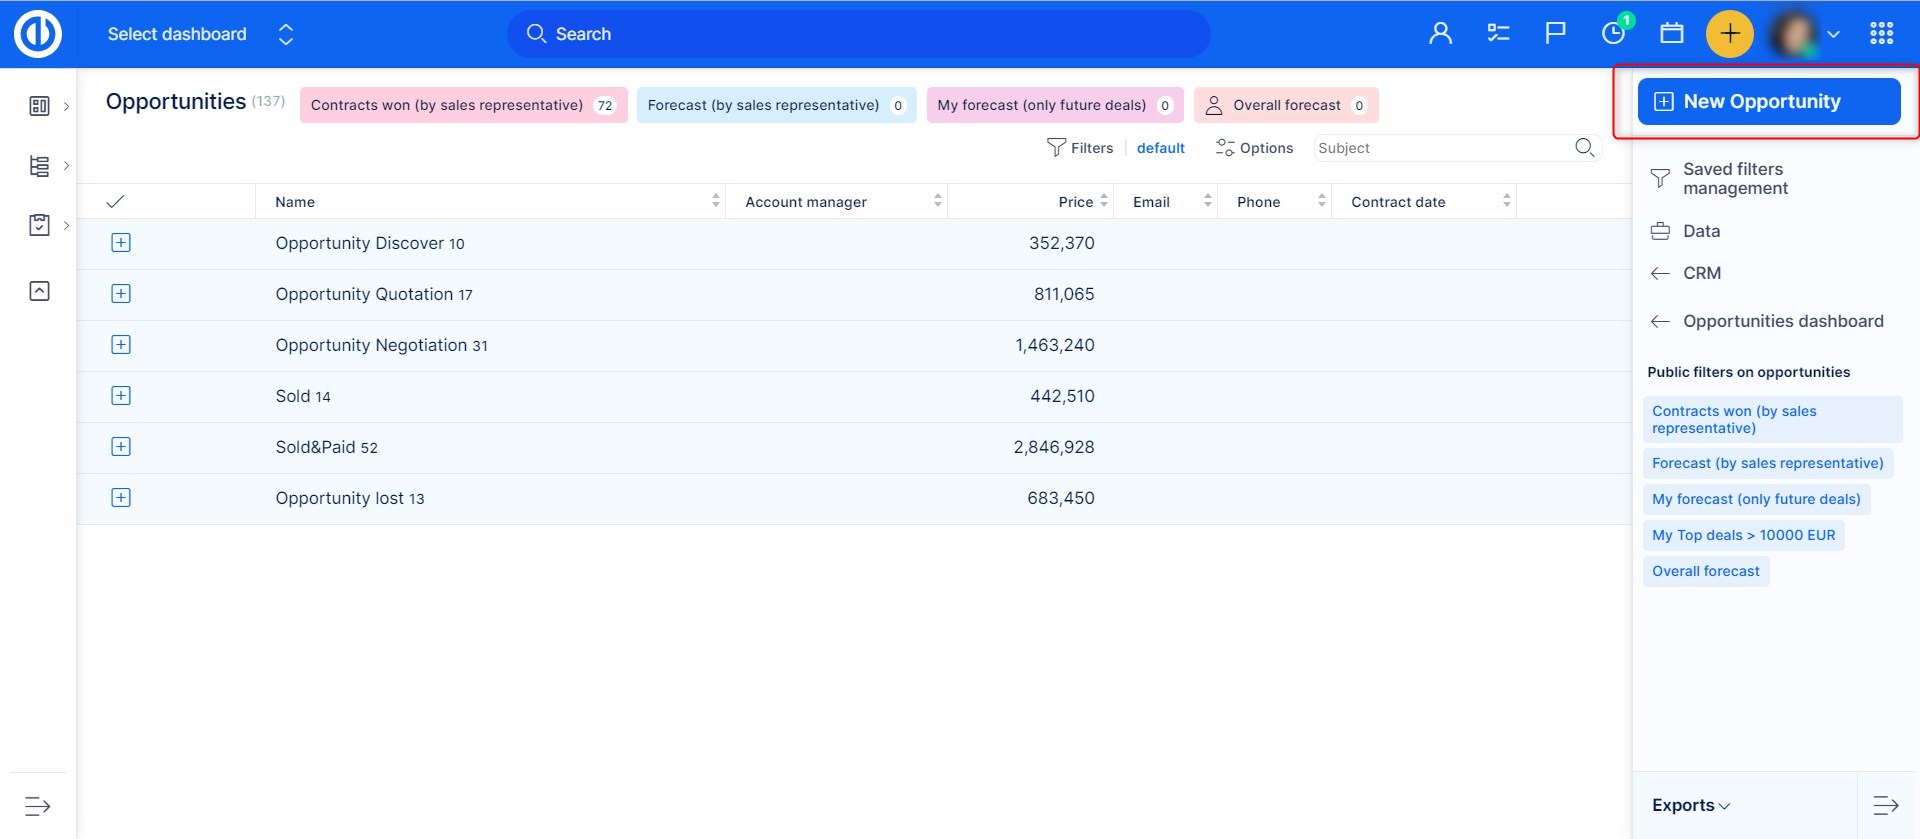
A baseline is the previous version of the chart, i.e. the data displayed in the chart. It does not change when the current data has changed, and you have the option to revert back to that version anytime. It allows you to create more baselines, which thus work as the snapshots of the project phases in time and represent an ideal basis for comparison. To create a new opportunity, just click on the „New Opportunity“ button in the top-right corner.
Fill up the required fields accordingly and click the „Save” button.
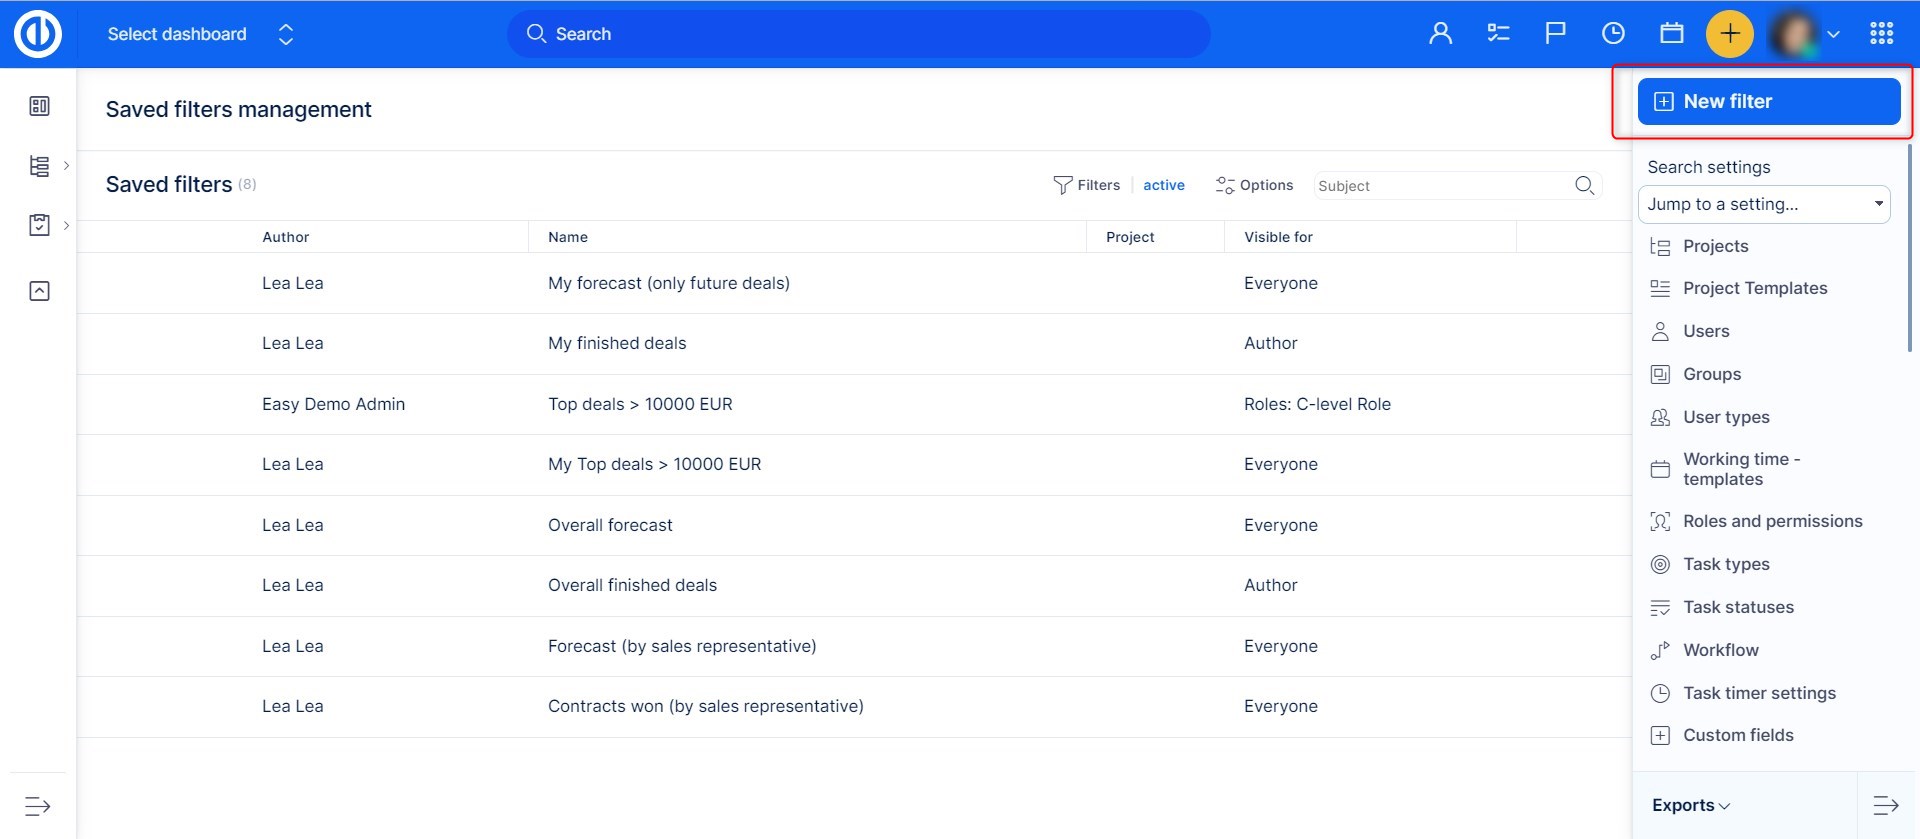
To see the list of existing opportunities, just click the „Opportunities“ button in the right sidebar menu. Here you can easily filter your opportunities using the color-differentiated tags at the top.
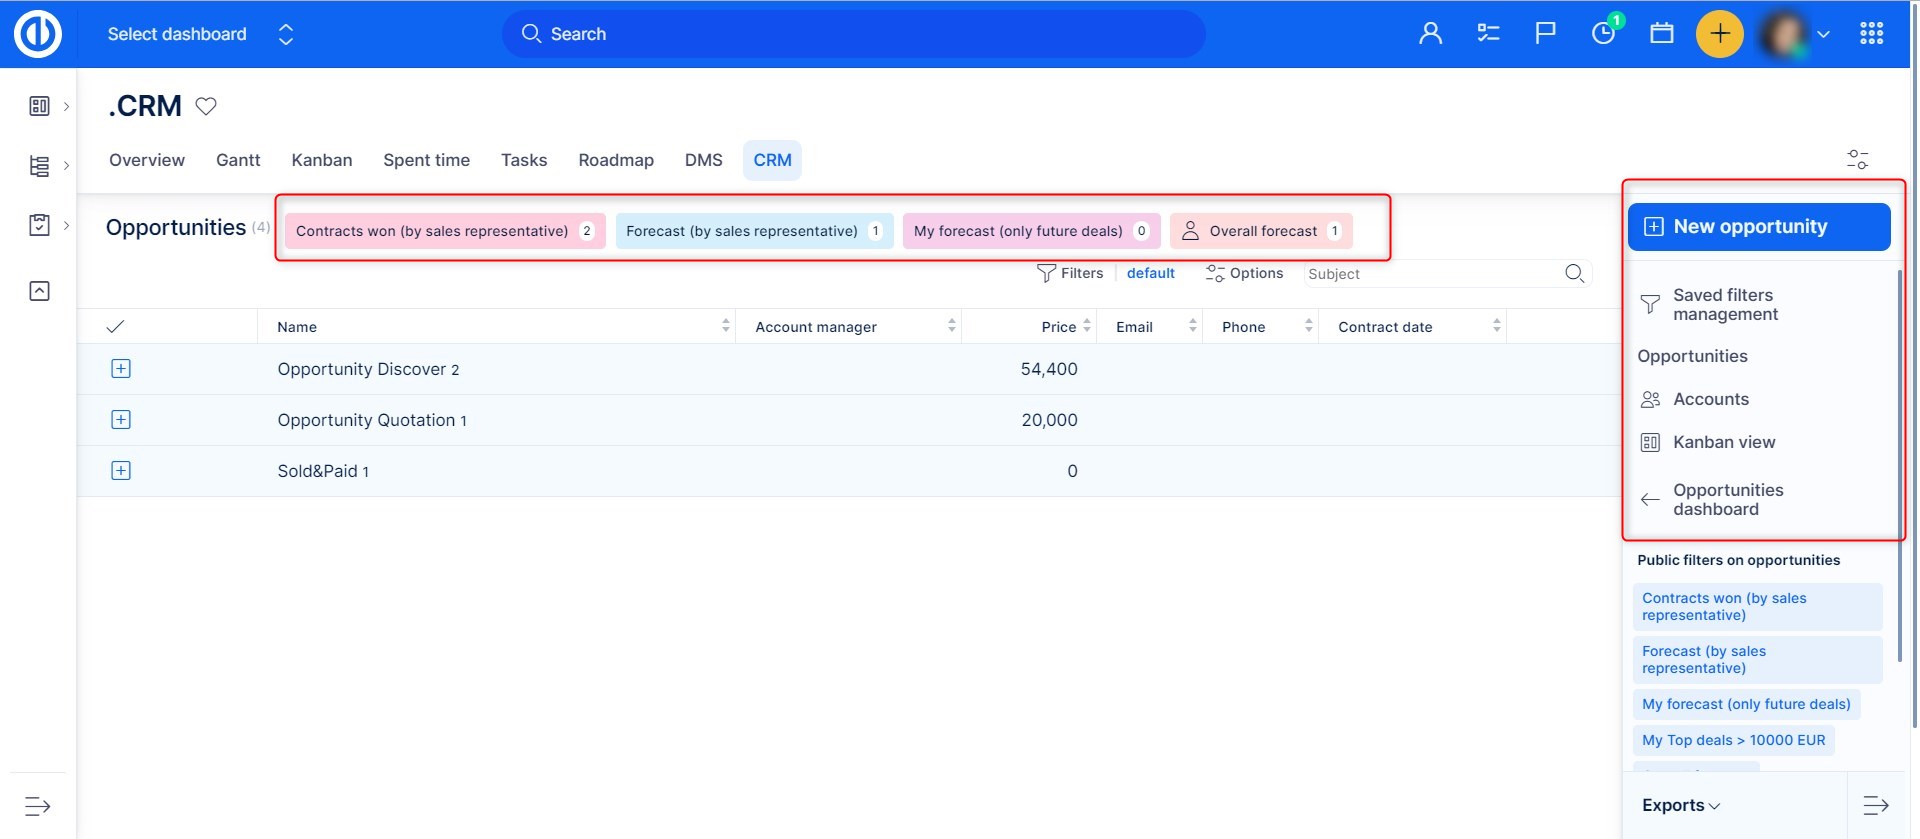
To customize your personal filters on the Opportunities page, use the „Saved filters management“ button. Here you can edit or delete existing filters, Create new ones.
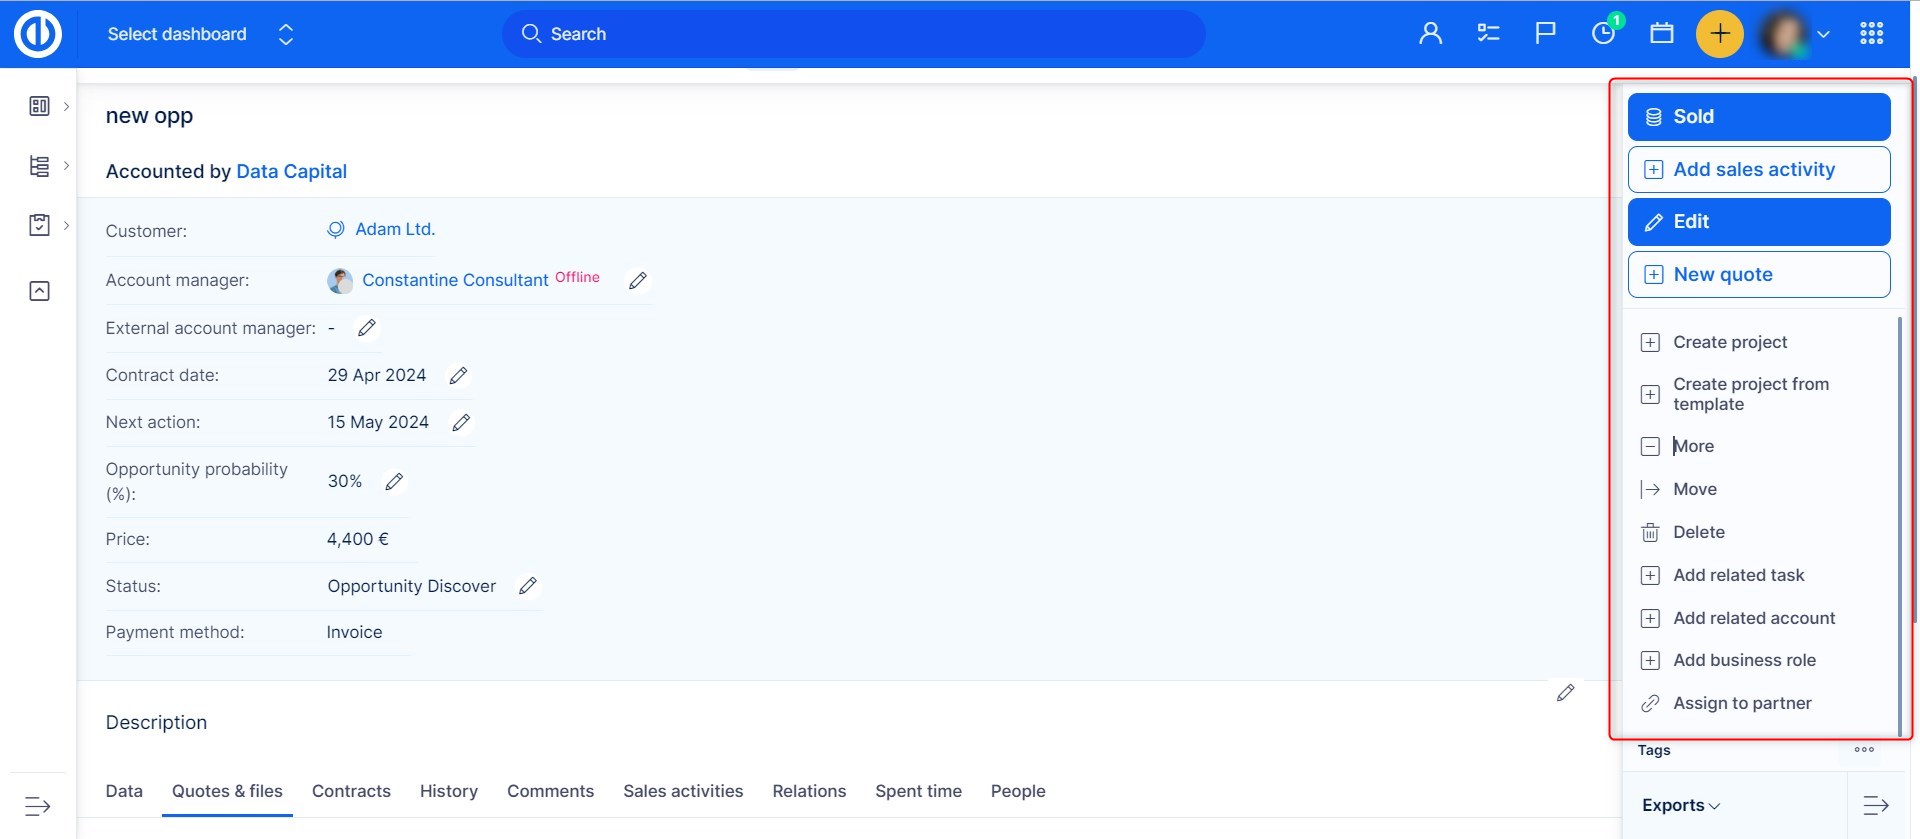
When viewing an opportunity in a detailed overview, you can use the options in the right sidebar menu to mark the opportunity as „Sold“, add a sales activity, edit the opportunity, create a new quote of the opportunity into a price book, move or delete the opportunity, add a related task, add a related account, add a business role, or assign the opportunity to a selected partner.
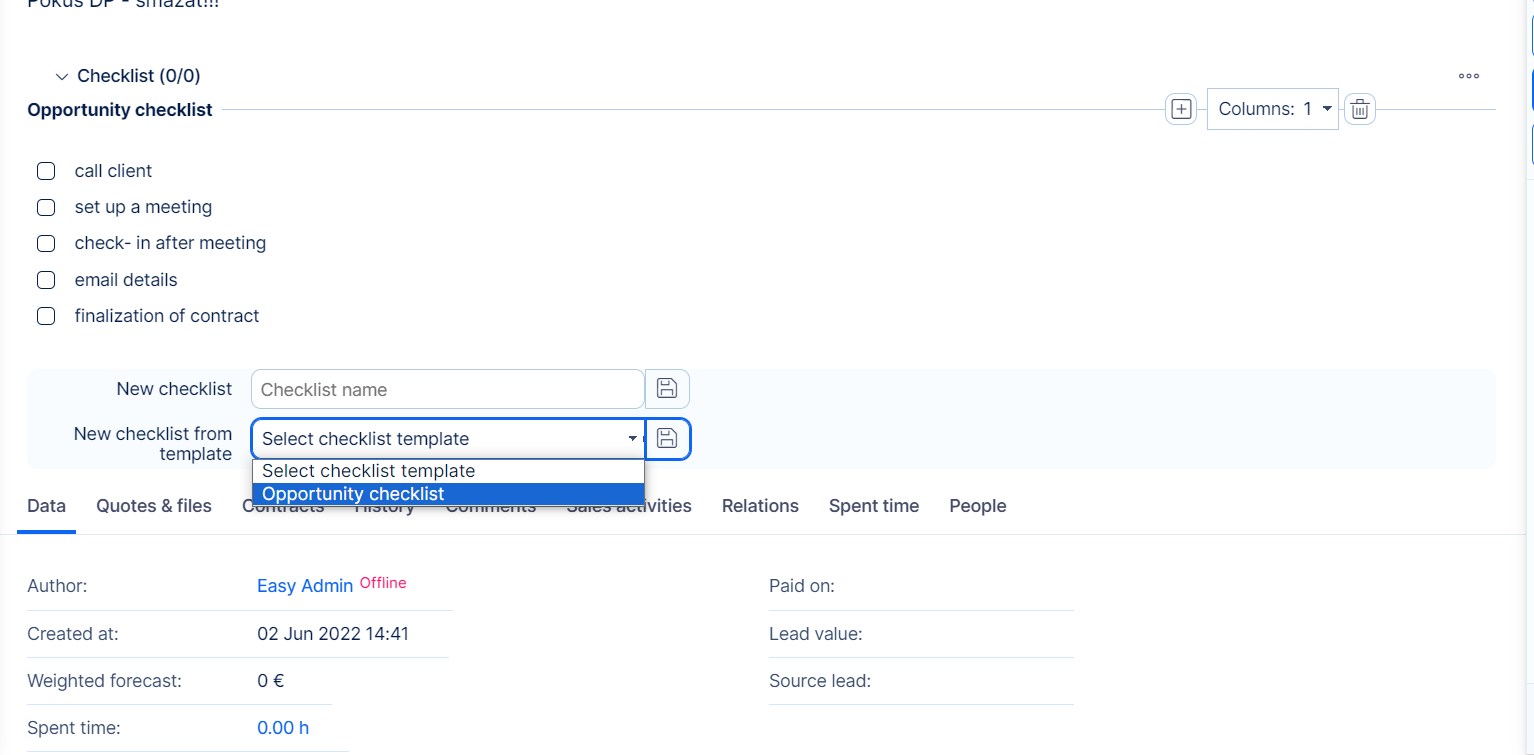
If checklists are enabled in the CRM project, you will see an option to create a checklist, or add checklist from template on each opportunity. This way you can add another level of workflow being in check, make sure nothing is forgotten. Find more about checklists and how to create checklist templates on the following link
How to use the feature on the global level
To open CRM on the global level, navigate to the Global menu >> CRM.
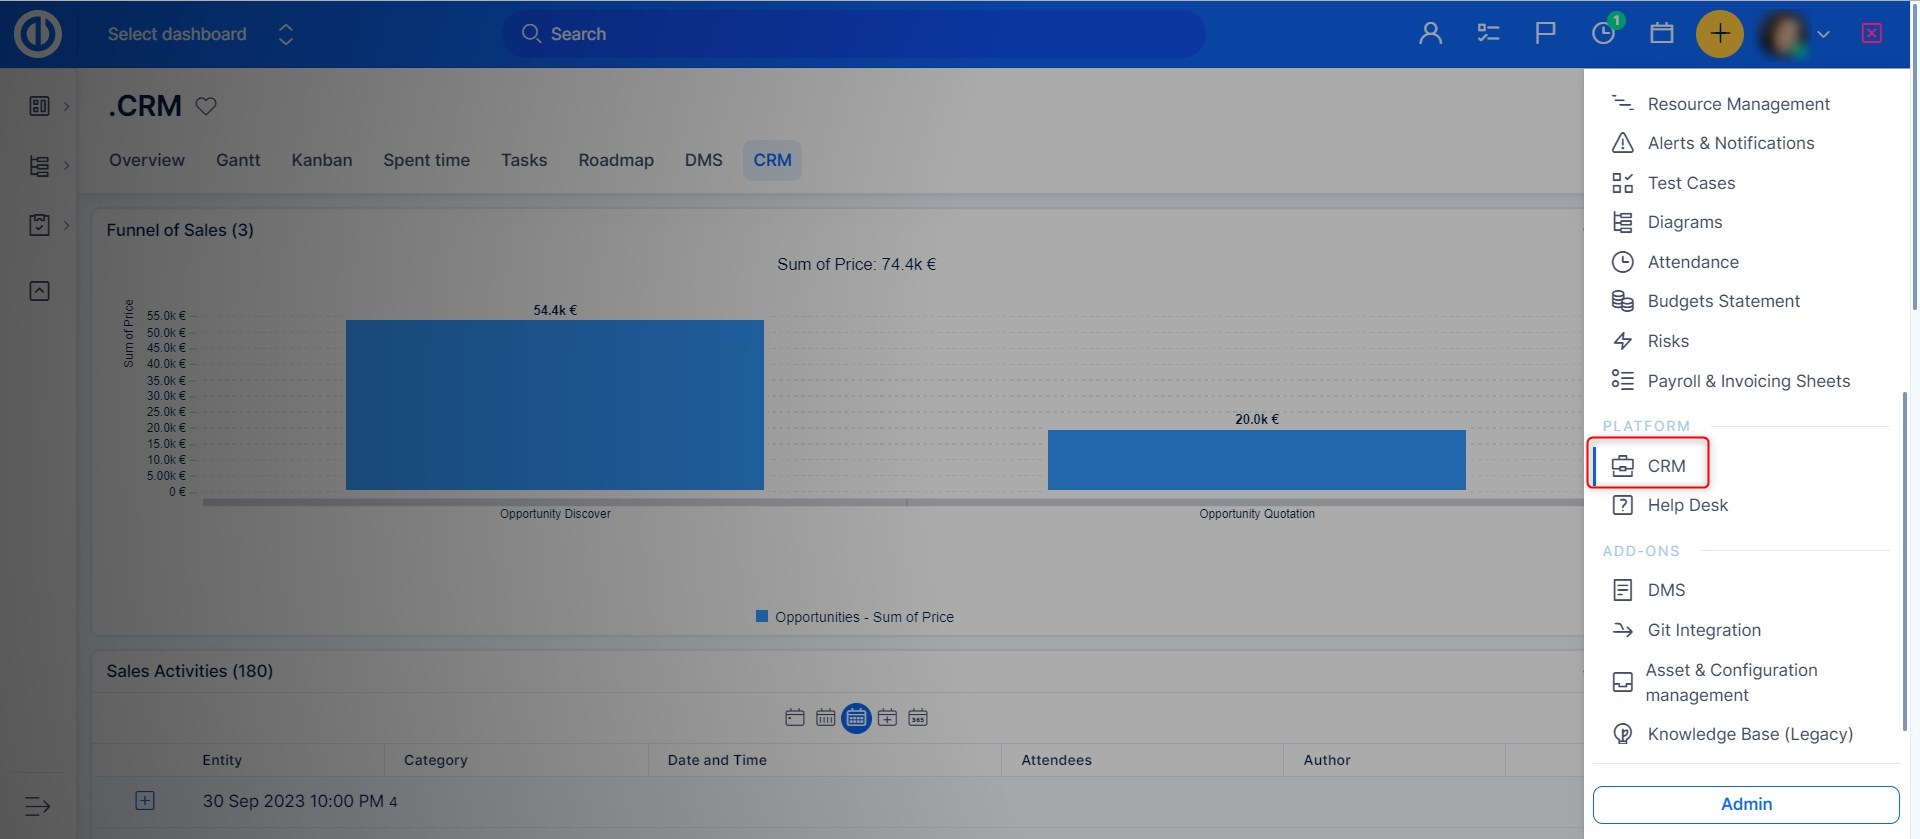
You get to the default global CRM overview page. Here you can typically check the most important business results like your revenues, team performance, top performers, or active contracts (subscriptions). Analogically to the project level, you can customize widgets just like add new pages or remove existing ones as per your preferences by clicking the „Customise this page“ button at the bottom of the page, and you can also customize the displayed data for a certain time period by switching the calendar icons and/or selecting a specific day in the calendar within the individual widgets. Using the top menu of the page, you can easily switch between various pages that you have created (such as results, statistics & data, pending payments, and product details). Using the sidebar menu, you can quickly navigate to your leads, opportunities, accounts, personal contacts, partners, campaigns, contracts, and the settings page.

Leads
On the Leads page, you can check your leads divided by sales activities performed on them (open leads, no-touch leads, incoming leads, call on leads, etc.). In the top menu, you can switch between intraday data, statistics, free pool, conversions, and splitter control. In the right sidebar, you can create a new lead or check your data, campaigns, and lead splitter filters.
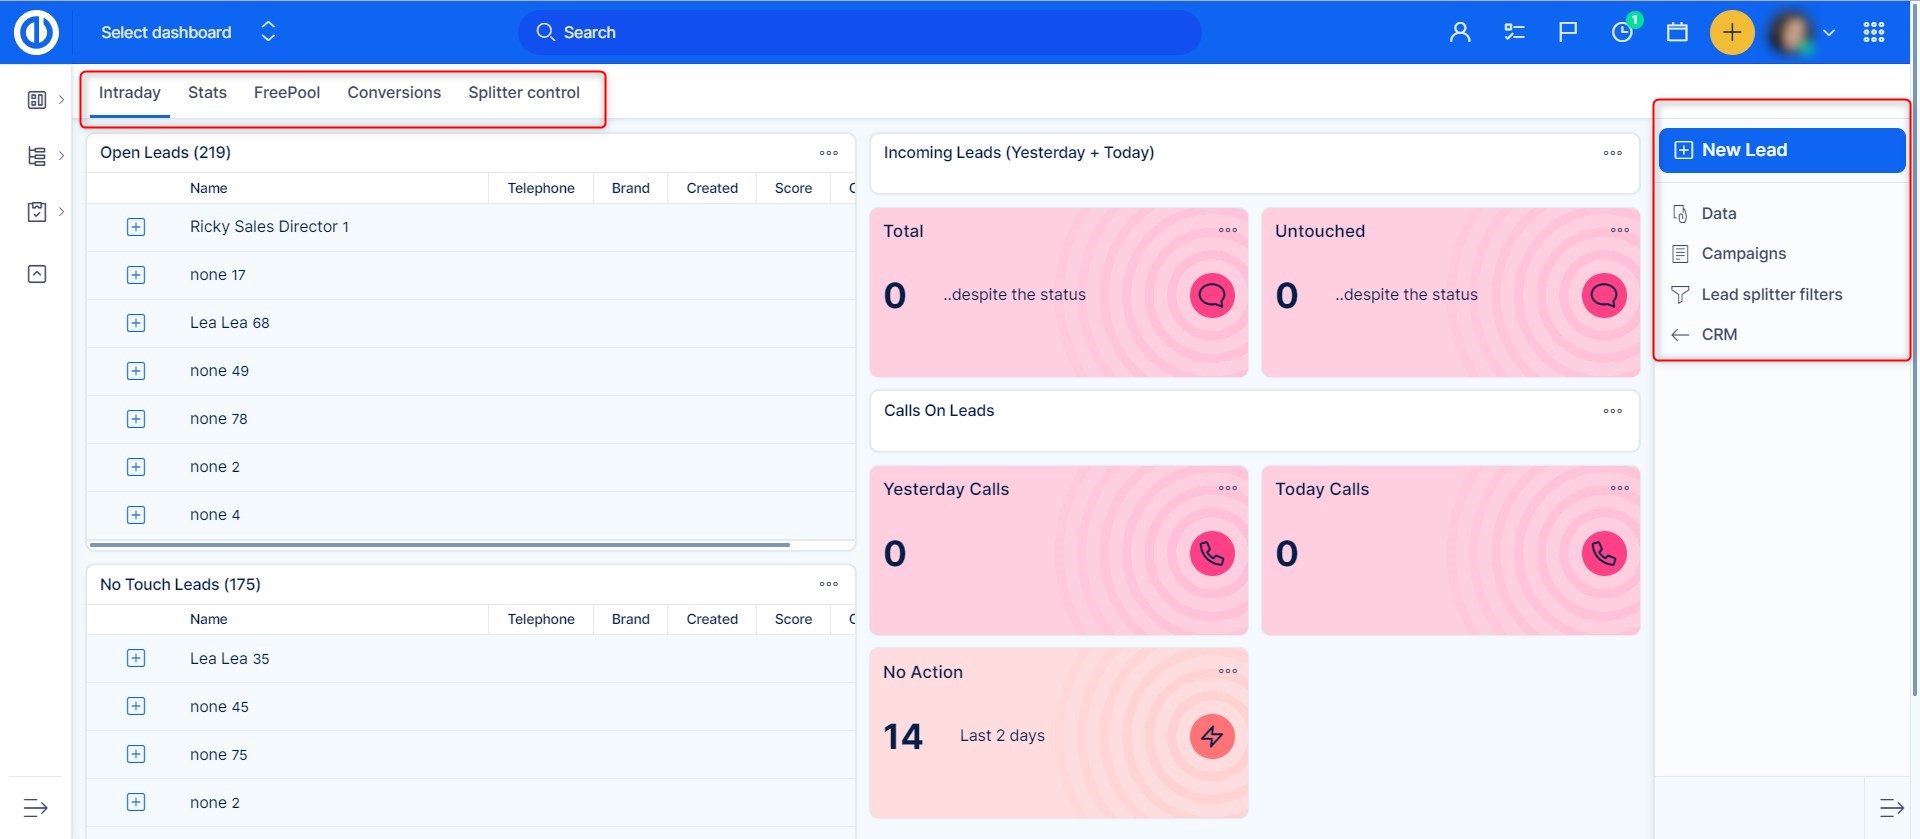
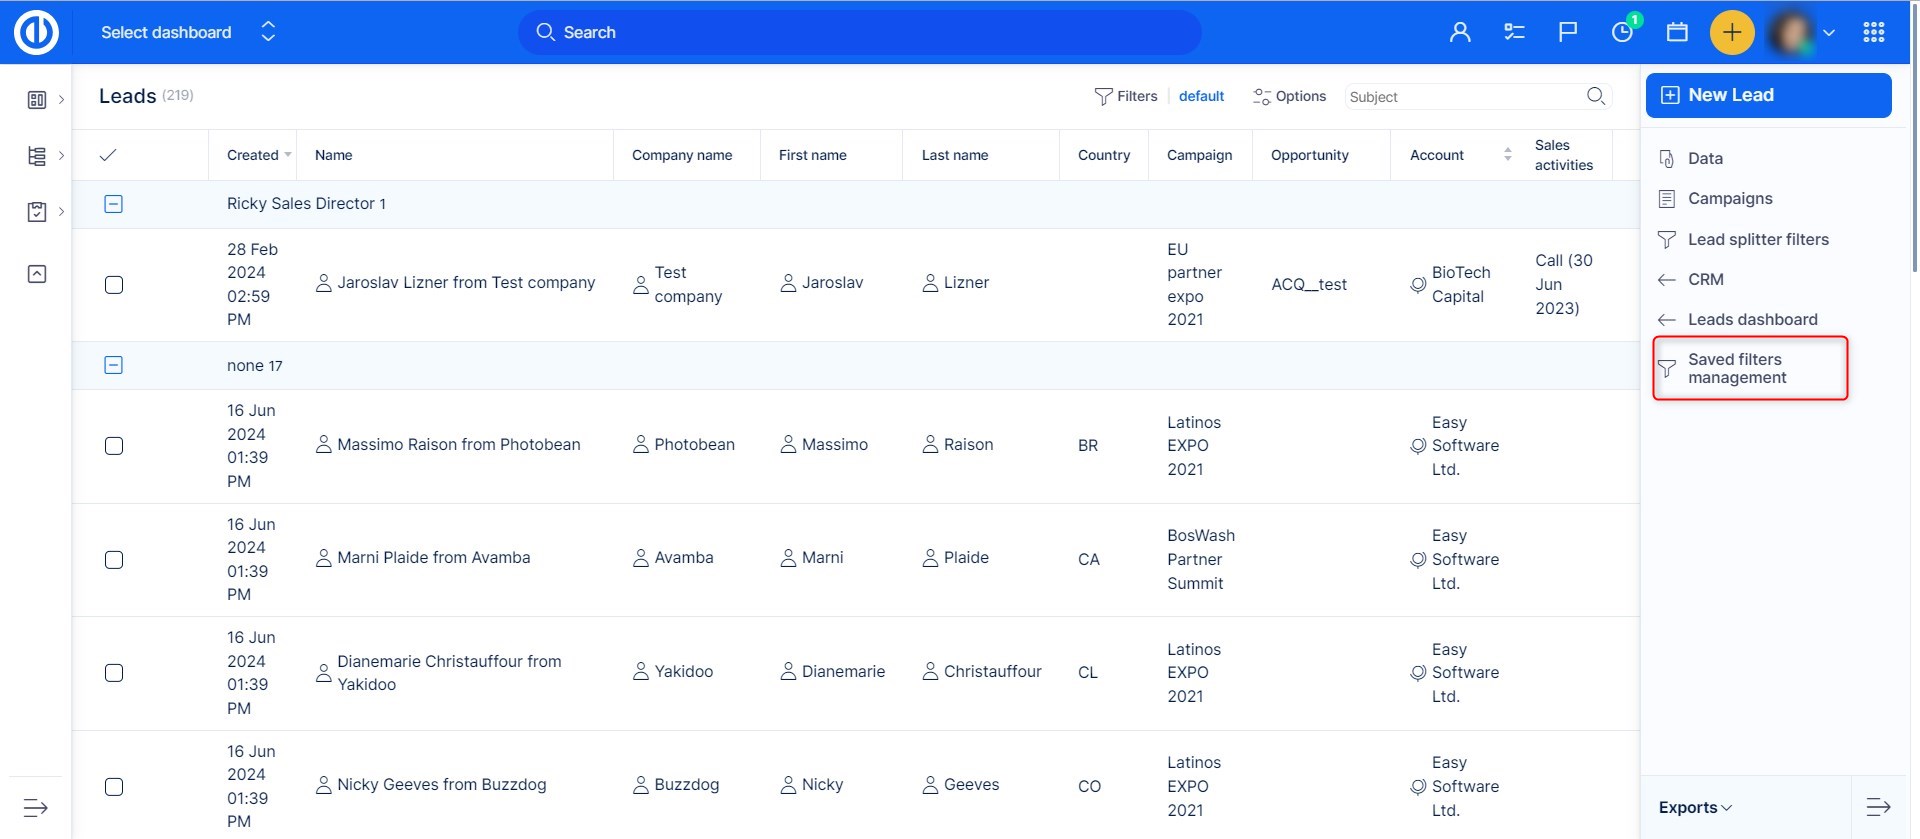
Under the "Data" option in the right sidebar menu, you can browse your leads or create and save filters for your leads' data using the „Saved filters management“ button.
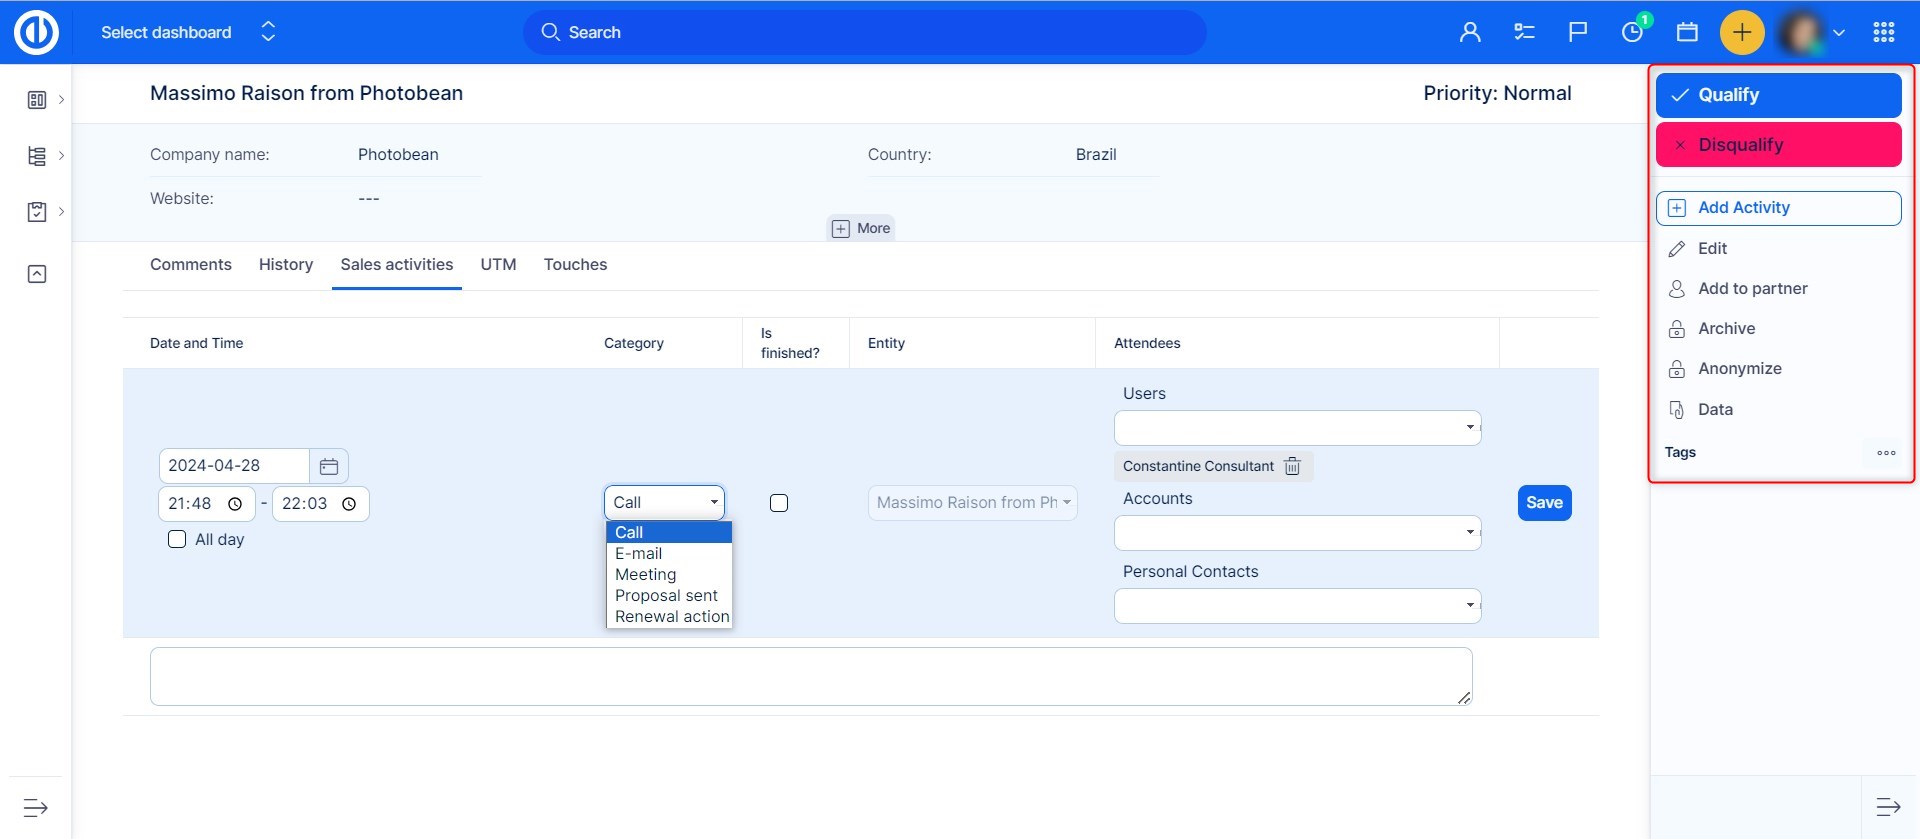
When viewing a lead in a detailed overview, you can use the options in the right sidebar menu to qualify or disqualify the lead, add a sales activity, edit the lead, add the lead to an account or a partner as well as archive or anonymize the lead.
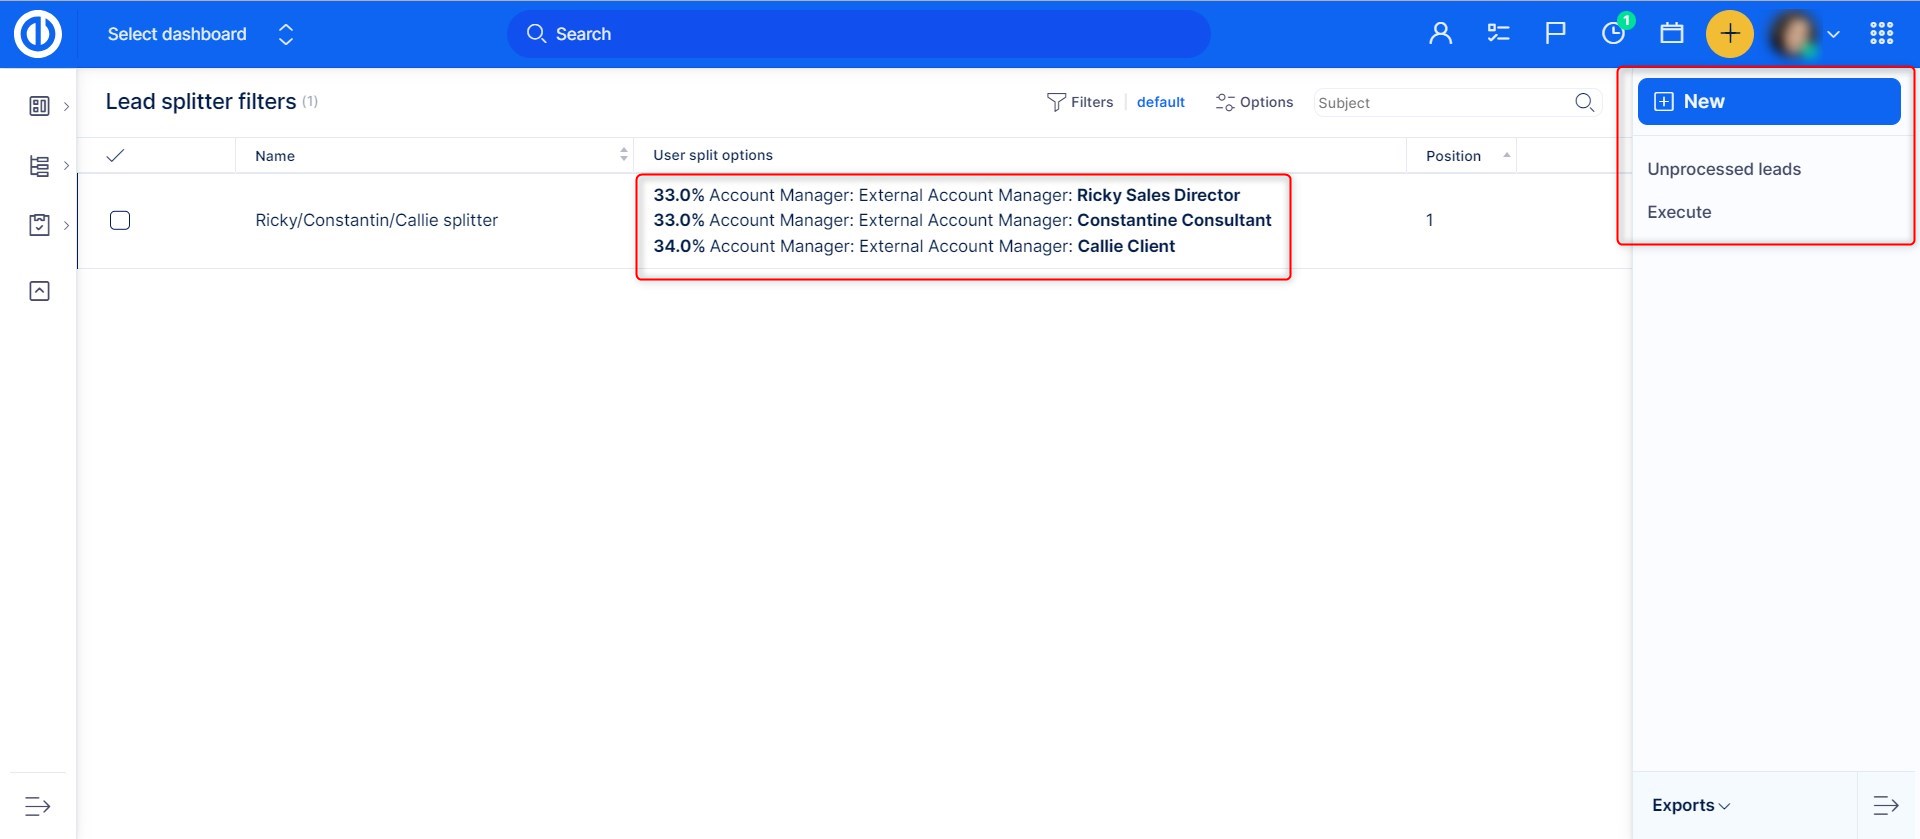
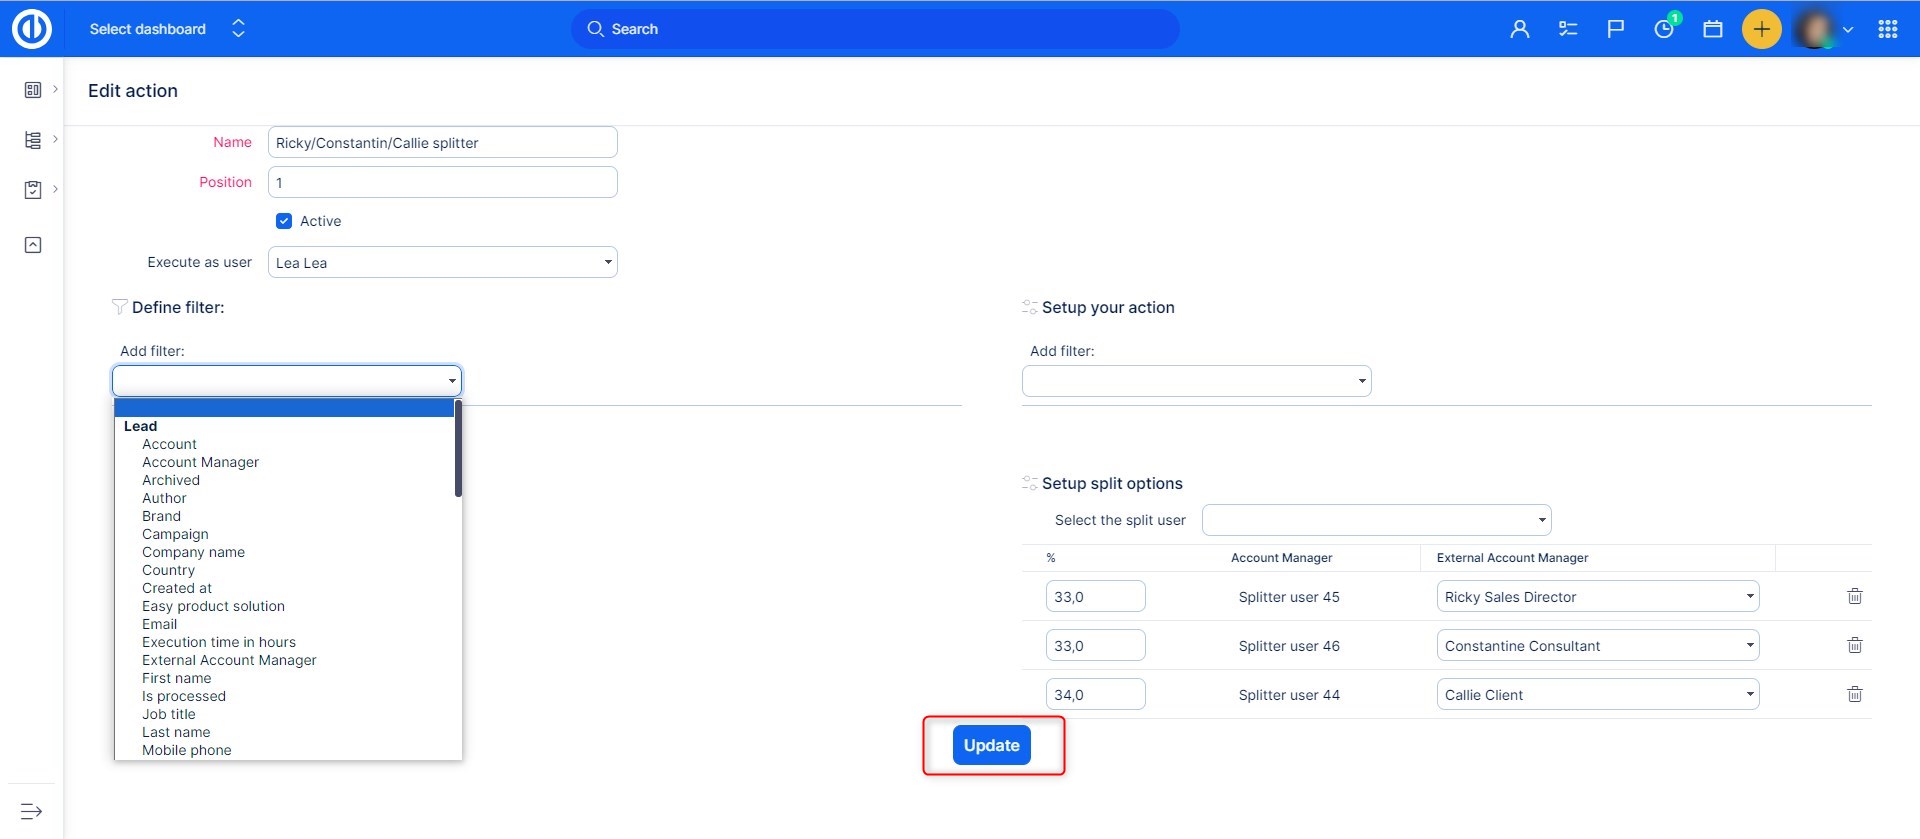
Lead splitter filters are such filters that split individual leads (usually bigger ones) among two or more users who work on them together (such as 33% per each of 3 assigned users). Those filters need to be created first by clicking the „New“ button in the top-right corner. When a lead splitter filter is created, you have to process the leads using the filter by clicking the „Execute“ button just below. To see the leads that failed to process, simply click the „Unprocessed leads“ button.
This is a form to create a new splitter filter.
Here is a summary of basic operations with leads:
Creation of a lead
1. Click on the Global menu in the top right corner.
2. Click on the „CRM“ menu option in the Platform category.
3. Click on the „LEADS” button in the right sidebar menu.
4. Click on the „NEW LEAD” button in the right sidebar menu.
5. Fill up fields accordingly and click the „SAVE” button.
Qualify a lead
1. Click on the „QUALIFY” button in the right sidebar menu.
2. On a New Opportunity page fill up all the required fields and click the „SAVE” button.
Disqualify a lead
1. Click on the „DISQUALIFY” button in the right sidebar menu.
2. Choose an option in the Status field and put a description in the Disqualification reason field if needed, before clicking on the „SAVE” button.
Edit a lead
1. Click on the „EDIT” button in the right sidebar menu.
2. On the Edit Lead page fill up all the required fields and click the „UPDATE“ button.
Add a sales activity to a lead
1. Click on the „ADD ACTIVITY“ button in the right sidebar menu or Click on the Sales activities tab.
2. Fill up fields accordingly and click the „SAVE“ button.
Edit a sales activity of a lead
1. Move the cursor to a sales activity you wish to edit.
2. Click on the pen button symbol on the right side of the sales activity.
3. Edit fields accordingly and click the „SAVE“ button.
Delete a sales activity of a lead
1. Move the cursor to a sales activity you wish to edit.
2. Click on the trash bin button symbol on the right side of the sales activity.
3. Click on the „OK“ button on the confirmation window that says „Are you sure?“.
Add a lead to an account
1. Click on the „ADD TO ACCOUNT” button in the right sidebar menu.
2. Type the name of the account you are looking for, or check in the list by scrolling down.
3. Click on the radio button on the left side of the account and click the „SAVE“ button.
Archive a lead
1. Click on the „ARCHIVE“ button in the right sidebar menu.
Unarchive a lead
1. Click on the „UNARCHIVE“ button in the right sidebar menu.
Anonymize a lead
1. Click on the „ANONYMIZE“ button in the right sidebar menu.
2. Click on the „OK“ button on the confirmation window that says „Are you sure you want to delete the contact's personal information?“.
Opportunities
On the Opportunities page, you can see your existing opportunities, forecasted opportunities, and key prospects. The create a new opportunity, click the „New opportunity“ button in the top-right corner. Or browse through your opportunity-related data by clicking the „Data“ button just below.

Under the "Data" option in the right sidebar menu, you can browse your opportunities or create and save filters for your opportunities using the „Saved filters management“ button.
Opportunity statuses
Opportunities have their statuses defined at Administration >> CRM >> Opportunity statuses
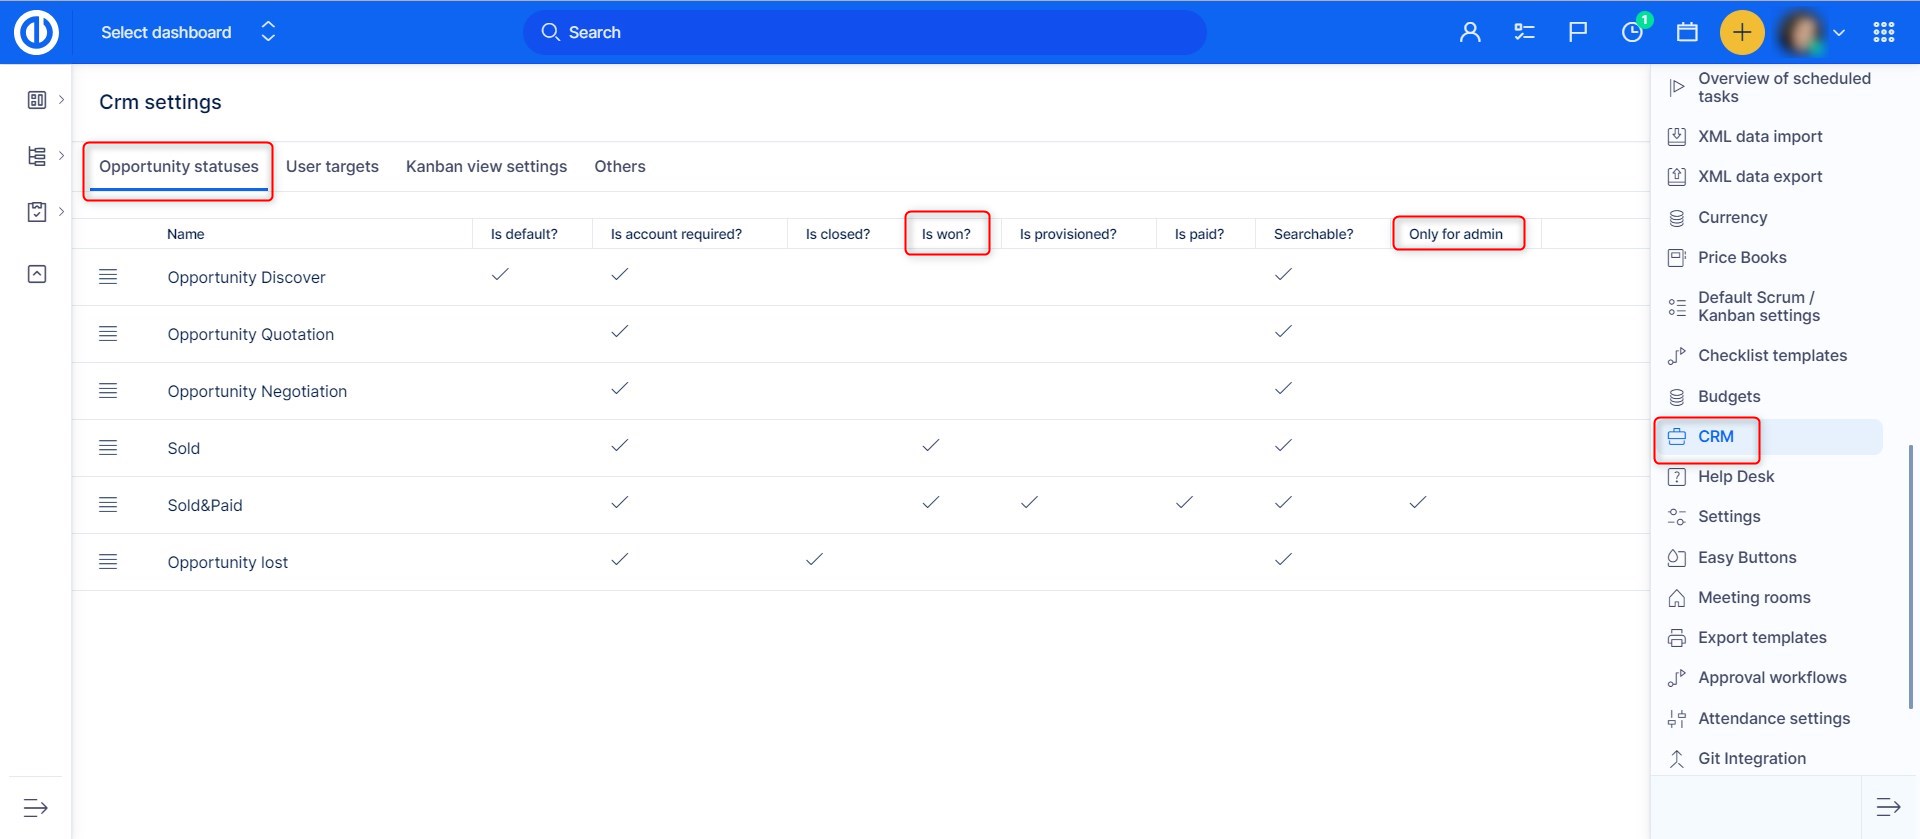
The Only for Admin attribute means that this status is visible to everyone (in filters, etc.), but only an Admin or Partial Admin with CRM rights can put the Opportunity under that status.
Attribute IS WON? "locks" the Opportunity. Only an Admin or Partial Admin with CRM rights can then take it to another state. So it is a kind of final status.
Creating a new quote on an opportunity
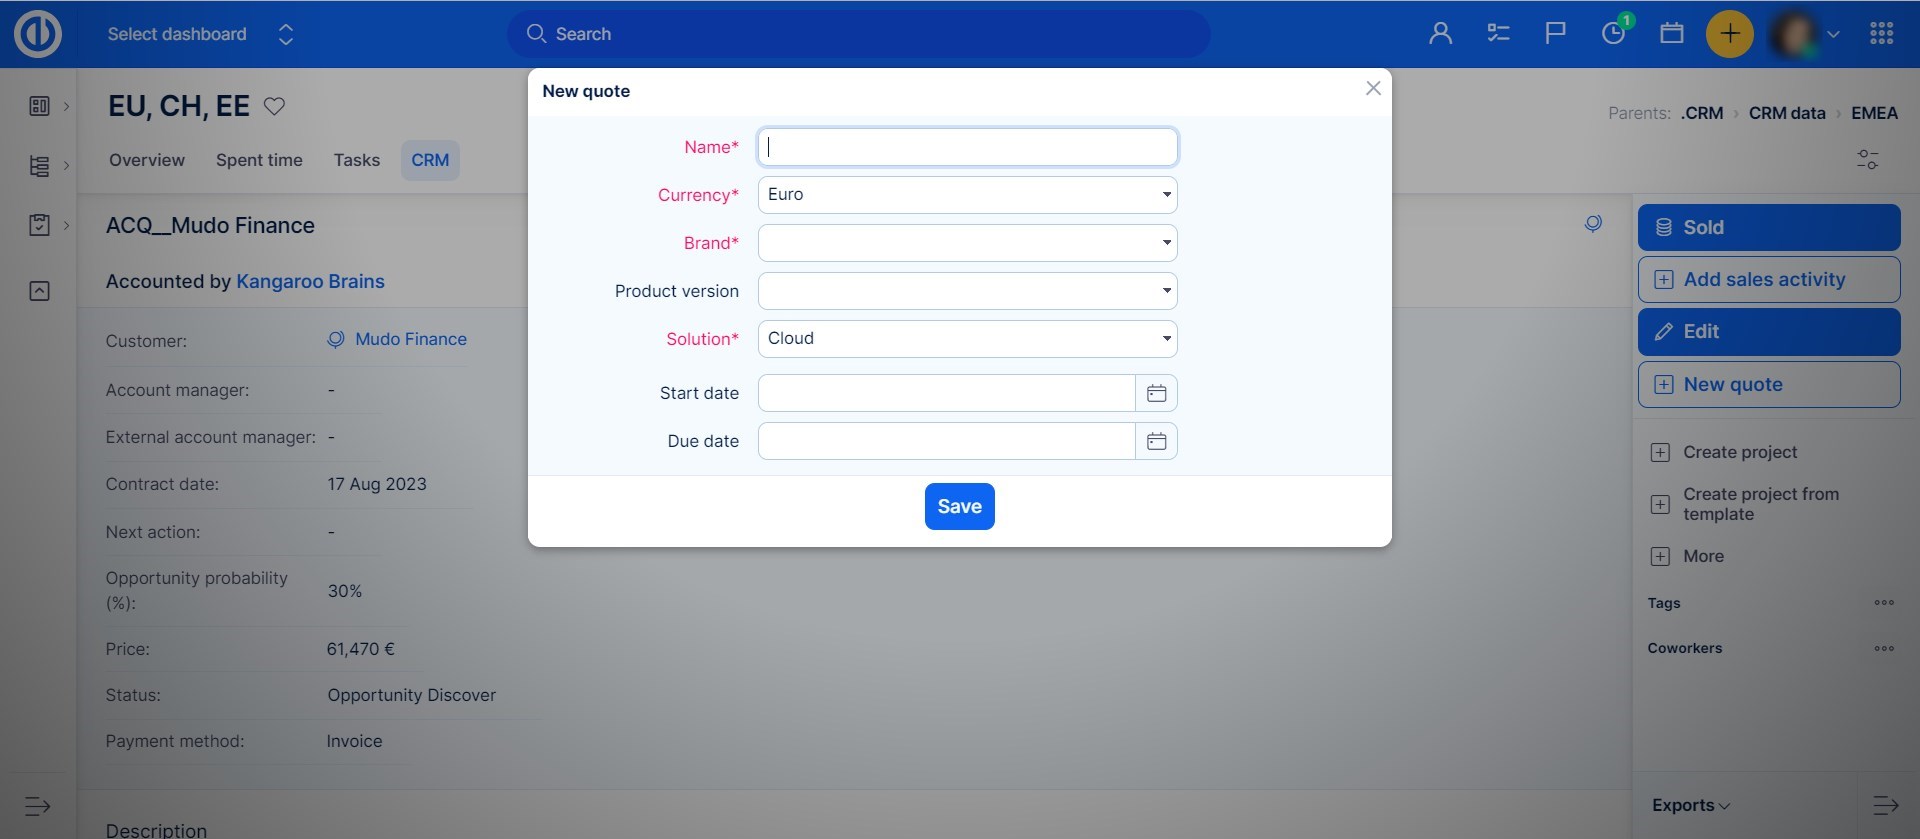
To create a new quote, open any opportunity and click the "New quote" button in the right sidebar menu.

Fill in the required fields in the form, i.e. name, currency, brand, and possibly other fields required by your price book settings, such as server/cloud solution like in the below example. Optionally, you may enter the product version, start date, and due date of the quote, which represent the start-end interval of its validity. When finished, click the "Save" button.
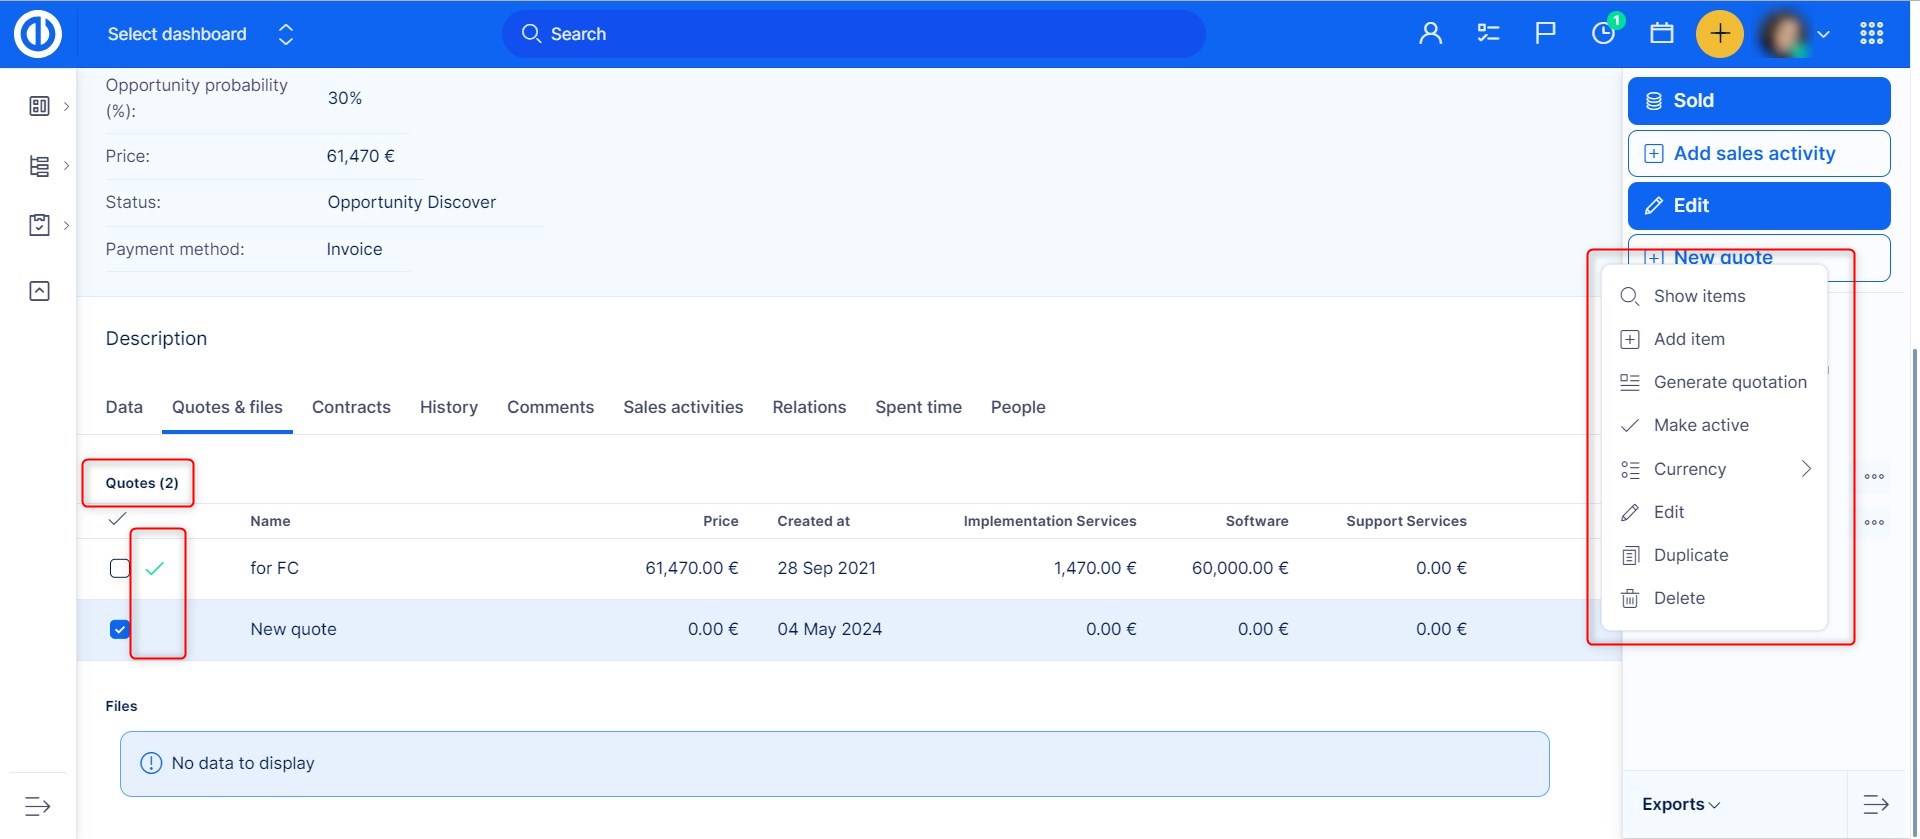
When a quote is created, you will find it in your opportunity just below the Attachments section. In the context menu (right-mouse click), you have several options:
- Show items – shows the list of products added into the quote
- Add item – add a product into the quote
- Generate quotation – generate a quotation from a quotation template with inserted dynamic tokens
- Make active – mark this quote as active or inactive, which can also be done by clicking the green ✔ symbol next to the quote name
- Currency – select the price currency of the quote
- Edit – click to edit the quote
- Duplicate – create a new quote from the copy of the current one
- Delete – remove an inactive quote from this opportunity (an active quote cannot be removed)
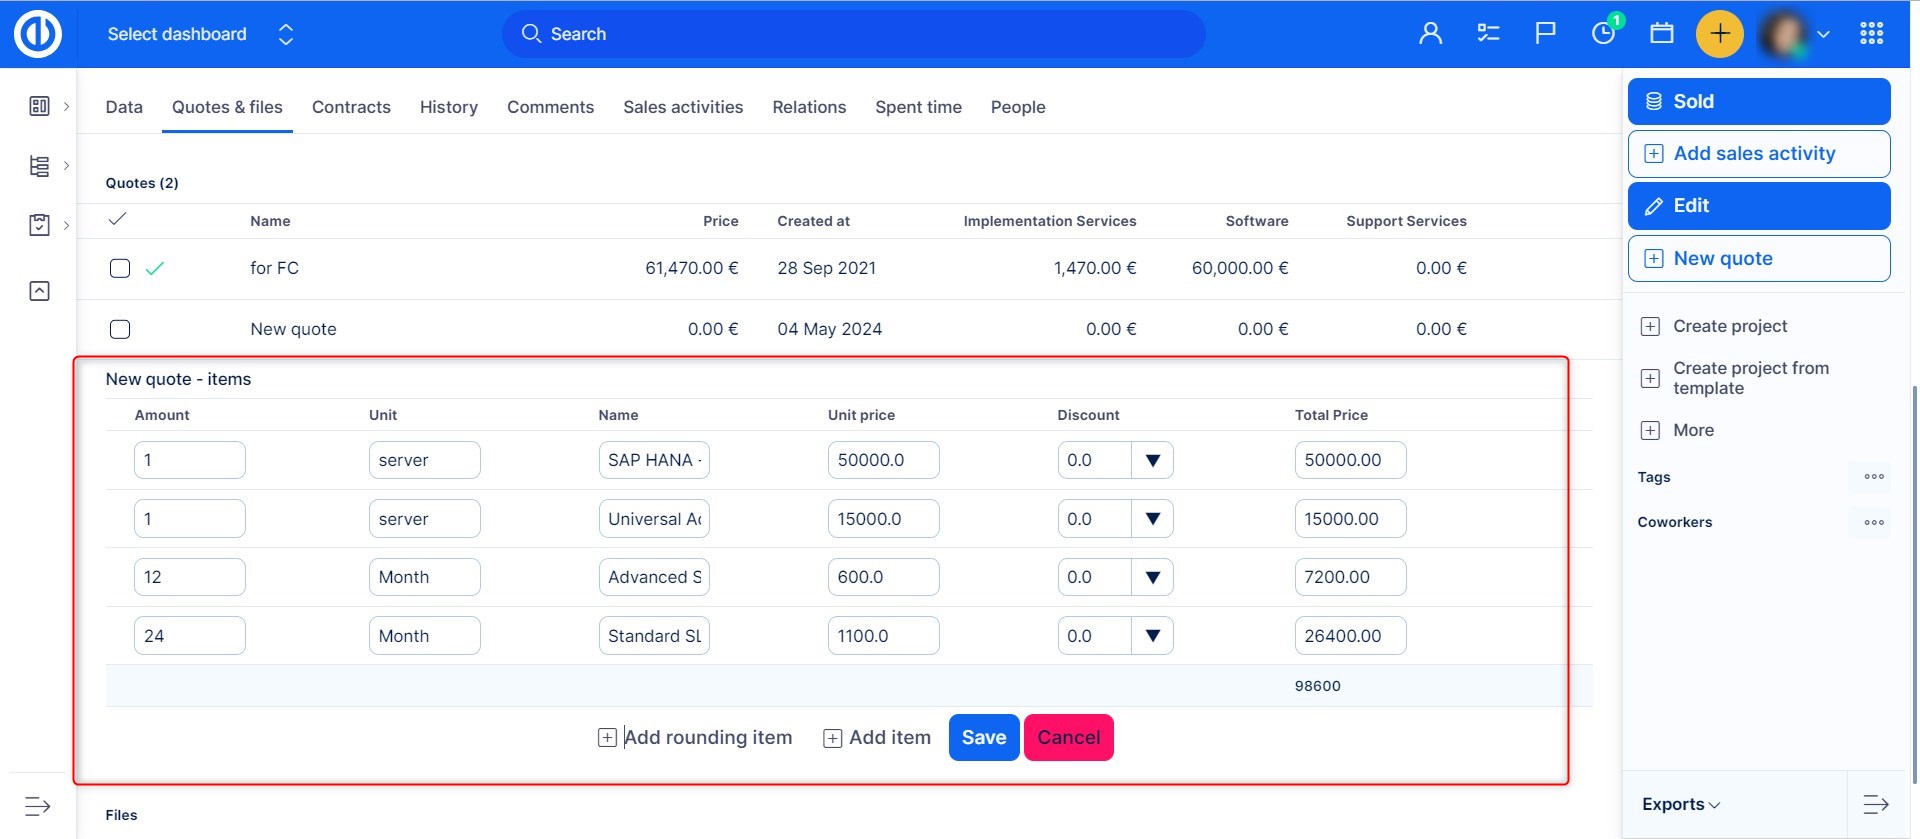
When adding items into a quote, you just have to select them from the modal window where you can just as easily switch between your price books. When finished, click the "Save" button.

When items are added into a quote, you will the list of them just below the Quotes section on the opportunity. For each item, you can see/edit its amount, unit, name, unit price, discount, total price, or remove the item by clicking the trash icon on the far right. Using the bottom controls, you can add a rounding item (only to round the price), add another item, save items, or cancel the changes.
Each list of items has the quote name included in its own name to distinguish where these items belong. To show items for a selected quote, simply click the magnifier icon when hovering the mouse cursor over the quote. Now, the quote is created and you can generate a quotation.
IMPORTANT: Please note the specific behaviour of currency selection based on usage of price book.
Quotation items from price book
Creating new quotation only provides products with prices with the defined currencies. In our example, if your opportunity has currency set to ¥, you will not see any available items because prices are only defined in € and $.
If you have an existing quotation in € and attempt to change currency to ¥, you will receive a warning message.
Quotation items without pricebook
If you are not using pricebooks at all => all items in the quotation are added manually, you can use whichever currency is available, these items will be recalculated based on the global application settings (exchange rates).
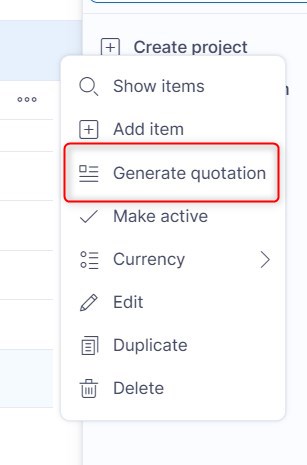
Generating a quotation
To generate a quotation, click the "Generate quotation" button in the context menu of a quote.
Select the quotation template and click the "Generate quotation" button.
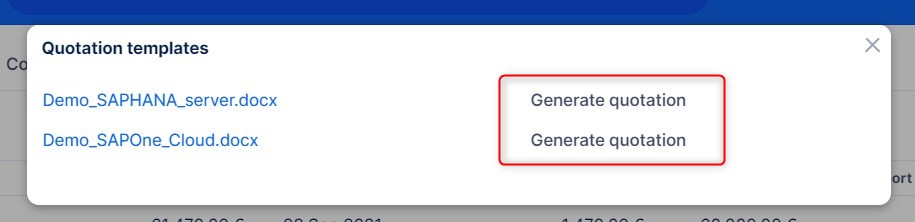
The quotation will be generated and attached to the respective opportunity (see the Attachments section).
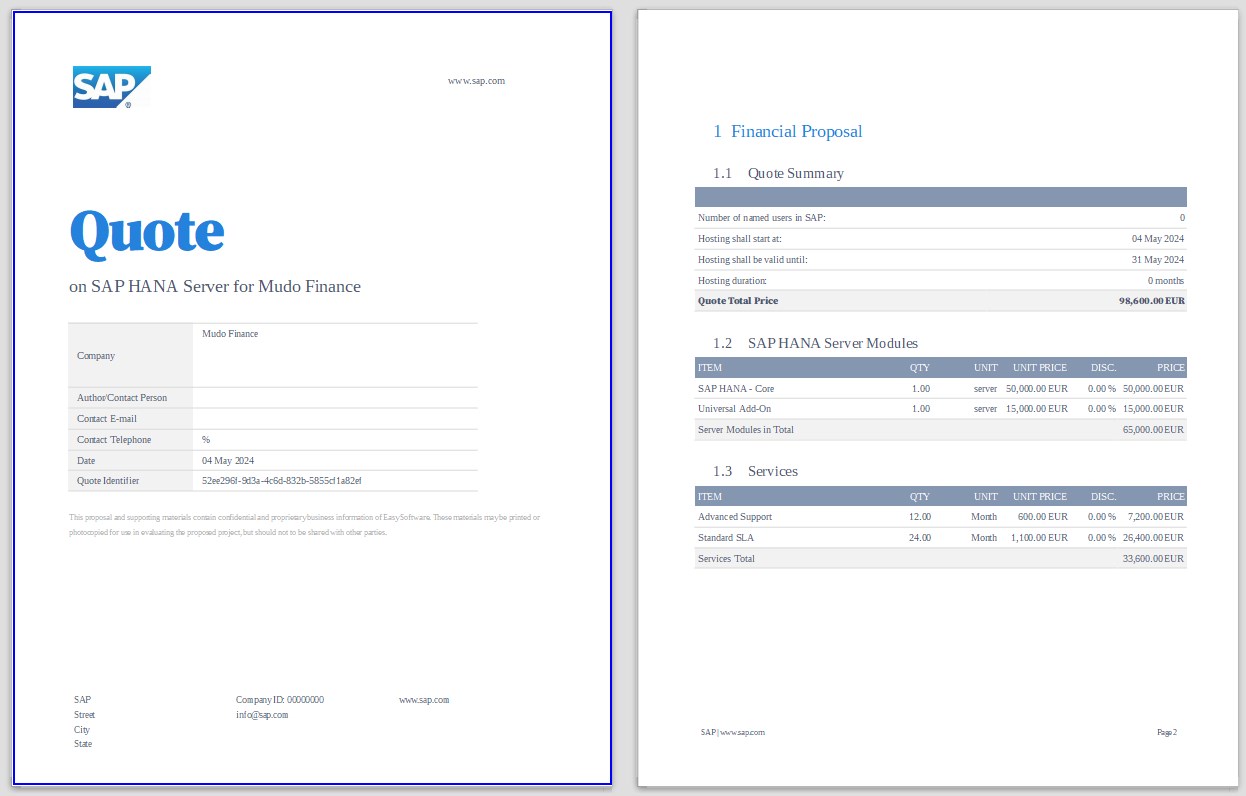
After the dynamic tokens in the quotation template are processed by our CRM, the result (quotation) might look like this. You can download the quotation from your attachments and send it to your client right away.
Making a sold opportunity
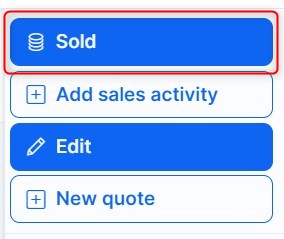
If the client accepts the quotation, you have just sold the opportunity. In such a case, simply click the "Sold" button in the top-right corner of your opportunity.
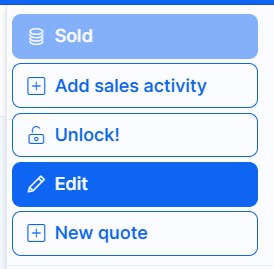
Your opportunity becomes won and locked so you cannot add more items or edit the quotes. All the sold items have been changed into time-based contracts (such as warranty periods and time-limited licenses) and one-time contracts (any product purchases such as a car), and you can find them just below your quotes. To unlock the opportunity, simply click the "Unlock" button in the right sidebar menu, so the opportunity is open again and you can expand it with more items, edit the current ones, and generate updated quotations.
Here is a summary of basic operations with opportunities:
Creation of an opportunity
1. Click on the Global menu in the top right corner.
2. Click on the „CRM“ menu option in the Platform category.
3. Click on the „OPPORTUNITIES” button in the right sidebar menu.
4. Click on the „NEW OPPORTUNITY” button in the right sidebar menu.
5. Fill up fields accordingly and click the „SAVE” button.
Edit an opportunity
1. Click on the „EDIT” button in the right sidebar menu.
2. Fill up all the necessary fields and click the „SAVE“ button.
Add a sales activity to an opportunity
1. Click on the „ADD ACTIVITY“ button in the right sidebar menu or Click on the Sales activities tab.
2. Fill up fields accordingly and click the „SAVE“ button.
Edit a sales activity of an opportunity
1. Move the cursor to a sales activity you wish to edit.
2. Click on the pen button symbol on the right side of the sales activity.
3. Edit fields accordingly and click the „SAVE“ button.
Delete a sales activity of an opportunity
1. Move the cursor to a sales activity you wish to delete.
2. Click on the trash bin button symbol on the right side of the sales activity.
3. Click on the „OK“ button on the confirmation window that says „Are you sure?“.
Create a new quote of an opportunity
1. Click on the „NEW QUOTE” button in the right sidebar menu.
2. Choose the product version by clicking on the corresponding radio button.
3. Fill in all the necessary fields and click the „Create a quote” button.
4. On the modal window with products, proceed to choose required products and click the „Next” button.
5. You will be moved to check the window with all the products chosen, you can click the „Submit” button to finish creating your quote or the „Back” button in case you made a mistake.
Show quote items of an opportunity
1. Move the cursor to the quote that you wish to see items on.
2. Click with the right mouse button on the chosen quote and click on the „Show items” option in the menu.
3. After you are finished, you may click the „Hide” button to hide items.
Add items to a quote of an opportunity
1. Move the cursor to the quote you wish to add items to.
2. Click with the right mouse button on the chosen quote and click on the „Add item” option in the menu.
3. On the modal window with products, proceed to choose required products and click the „Next” button.
4. You will be moved to check the window with all the products chosen, you can click the „Submit” button to finish creating your quote or the „Back” button in case you made a mistake.
Generate a quotation on an opportunity
1. Open the selected opportunity for which you need to generate a quotation.
2. Click the "Generate quotation" button in the context menu of a quote.
3. Select the quotation template and click the "Generate quotation" button.
4. The quotation is saved as a file attachment of the opportunity.
Change an active quote of an opportunity
1. Move the cursor to the quote you wish to make active.
2. Click with the right mouse button on the chosen quote and click on the „Make active” option in the menu.
3. Chosen quote is active now.
Change the currency on a quote of an opportunity
1. Move the cursor to the quote you wish to change the currency for.
2. Click with the right mouse button on the chosen quote and click on the „Currency” option in the menu.
3. Choose desired currency from the currency list.
Edit a quote of an opportunity
1. Move the cursor to the quote you wish to edit.
2. Click with the right mouse button on the chosen quote and click on the „Edit” option in the menu.
3. Edit fields accordingly and click the „SAVE“ button.
4. On the modal window with products, proceed to choose required products and click the „Next” button.
5. You will be moved to check the window with all the products chosen, you can click the „Submit” button to finish creating your quote or the „Back” button in case you made a mistake.
Duplicate a quote of an opportunity
1. Move the cursor to the quote you wish to duplicate.
2. Click with the right mouse button on the chosen quote and click on the „Duplicate” option in the menu.
Delete a quote of an opportunity
1. Move the cursor to the quote you wish to delete.
2. Click with the right mouse button on the chosen quote and click on the „Delete” option in the menu.
3. Click on the „OK“ button on the confirmation window that says „Are you sure?“.
Move an opportunity
1. Click on the „MORE" button in the right sidebar menu.
2. Click on the „MOVE” button in the right sidebar menu.
3. On the Bulk edit selected opportunities page fill up necessary fields accordingly and click the „MOVE AND FOLLOW“ button to remain on opportunity once the process of moving is finished.
Delete an opportunity
1. Click on the „MORE” button in the right sidebar menu.
2. Click on the „DELETE” button in the right sidebar menu.
3. Click on the „OK“ button on the confirmation window that says „Are you sure you want to delete the selected task(s)? You will not be able to restore it (them) again.“.
Add an existing related task to an opportunity
1. Click on the „MORE” button in the right sidebar menu.
2. Click on the „ADD RELATED TASK” button in the right sidebar menu.
3. On Add related task page put task name or id to find and then click the „ASSIGN TASK” button.
Add a new related task to an opportunity
1. Click on the „MORE” button in the right sidebar menu.
2. Click on the „ADD RELATED TASK” button in the right sidebar menu.
2. On Add related task page click the „Create a new TASK” button.
3. Fill up all the necessary fields and click the „SAVE“ button.
4. Click on the „MORE” button in the right sidebar menu.
5. Click on the „ADD RELATED TASK” button in the right sidebar menu.
Add an existing account to an opportunity
1. Click on the „MORE” button in the right sidebar menu.
2. Click on the „ADD RELATED ACCOUNT” button in the right sidebar menu.
3. On Add related account page put task name or id to find and then click the „ASSIGN ACCOUNT” button.
Add a new related account to an opportunity
1. Click on the „MORE” button in the right sidebar menu.
2. Click on the „ADD RELATED ACCOUNT” button in the right sidebar menu.
2. On Add related account page click the „Create a new ACCOUNT” button.
3. On the New account page fill up all the necessary fields and click the „SAVE“ button.
Add a business role to an opportunity
1. Click on the „MORE” button in the right sidebar menu.
2. Click on the „ADD BUSINESS ROLE” button in the right sidebar menu.
3. On the New business role page choose an option from the Personal Contact field and add a description if needed before clicking the „SAVE“ button.
Assign an opportunity to a partner
1. Click on the „MORE” button in the right sidebar menu.
2. Click on the „ASSIGN TO PARTNER” button in the right sidebar menu.
3. On the „Assign to partner” page put partner name or id to find and then click on the radio button on the left side of the partner and click the „SAVE“ button.
Making a sold opportunity
1. Click on the „SOLD” button in the right sidebar menu.
2. Confirm that all the required fields are correct and filled before clicking on the „Confirm deal and order service” button.
Unlocking a locked opportunity
1. Click on the „UNLOCK“ button in the right sidebar menu.
Accounts
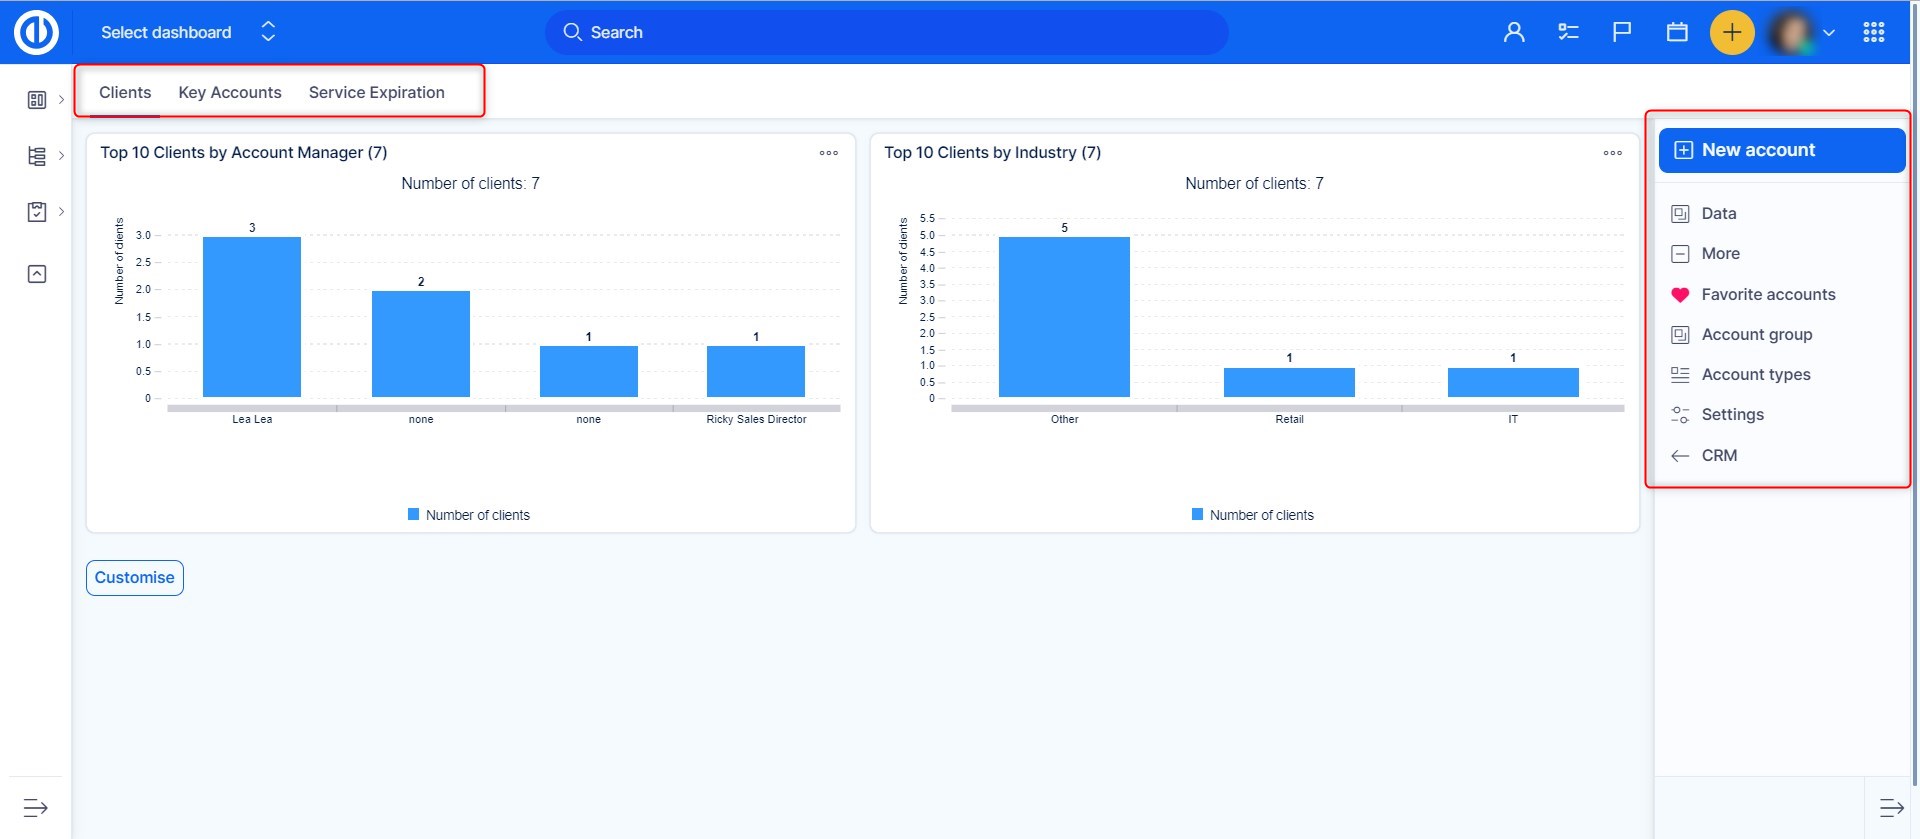
On the Accounts page, you can check your clients divided by account manager or industry, key account, and service expirations. In the right sidebar, you can create a new account or browse through your account-related data by clicking the „Data“ button just below. Under the More menu, you can find a more useful feature like favorite accounts (such as top 10 clients), account groups (such as per country or industry), import accounts (from a CSV file with defined structure), account types (typically a person or a company), VCard mapping settings (enables to map an Account entity to vCard attributes), and settings (account types, field settings). Moreover, you can create and save filters for your accounts' data using the „Saved filters management“ button.
After clicking the "New account" button, a form will open. It may look like this.
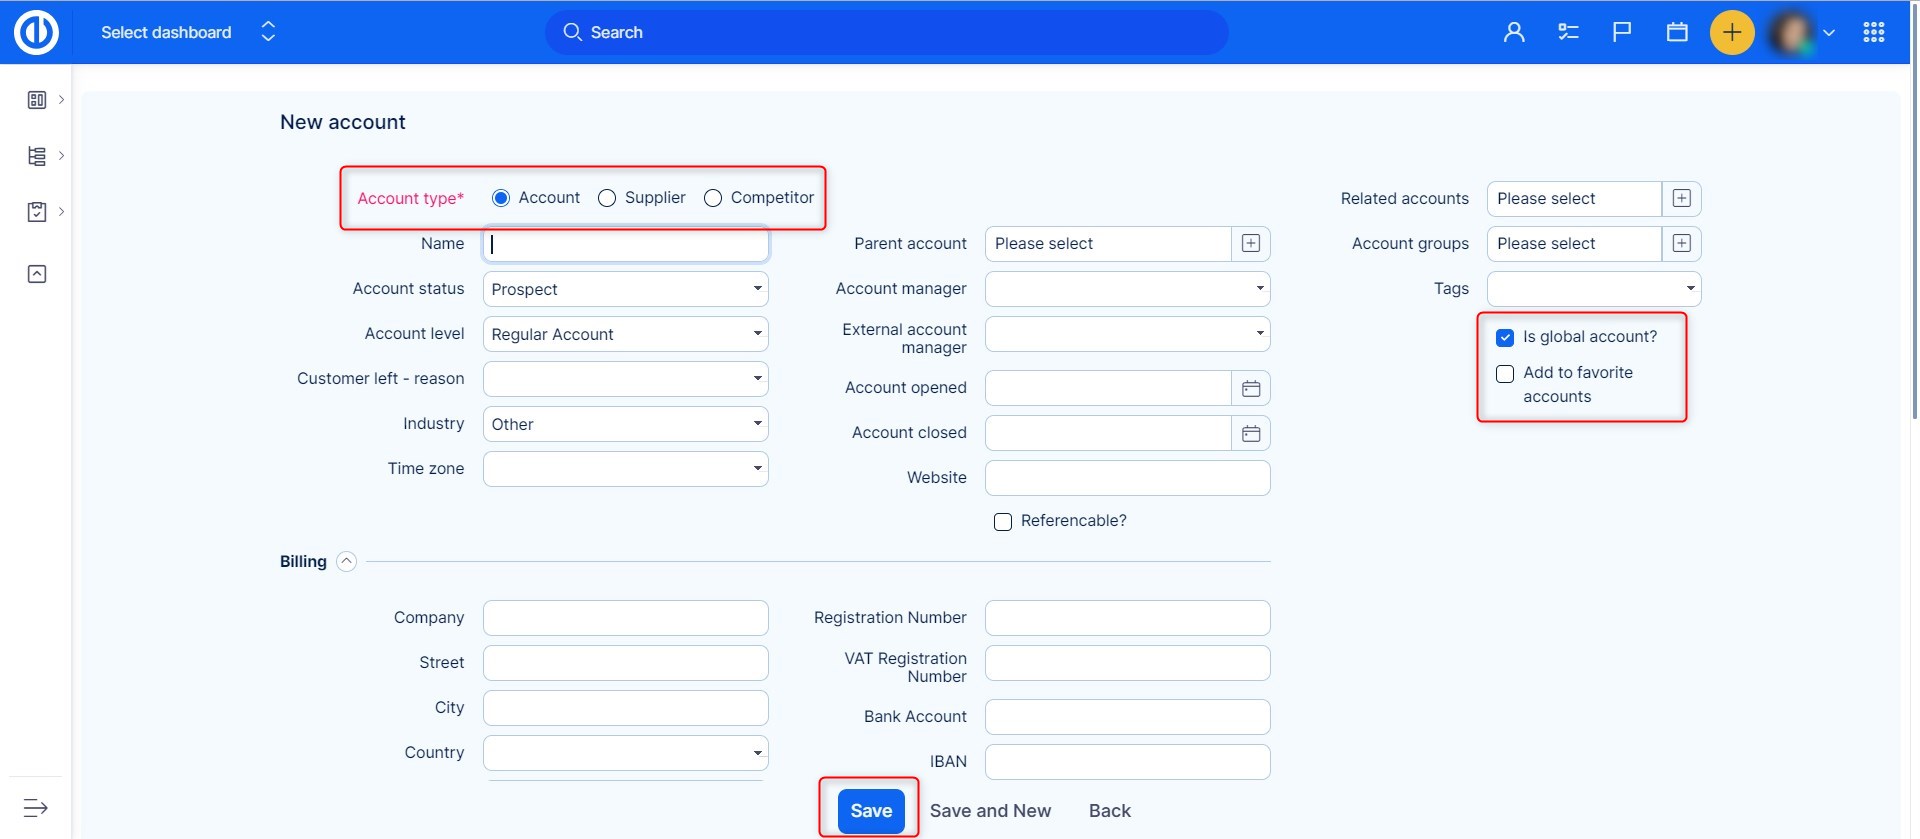
In the first step, you must select the type of account. By default, there are three account types in total:
- Personal – select for an account that contains personal details (e.g. name, e-mail address)
- Company – select for an account that contains basic information about your company
- Account – select for another type of account (e.g. e-shop)
Native fields include:
- First name and last name when creating a personal account. In other words, if the account type has enabled both First and Last name.
- Name when creating account or company account. If the account type has enabled only First name, it is called "Name"
- IMPORTANT – Do not disable both native fields on an account type. You will not be able to name the account.
Custom (voluntary) fields include:
- Organization
- Phone
- Street (this will allow showing the account in Google Maps)
- City
- Postal code
- Country
- Registration number (identification number)
- VAT registration number
- Add another attribute (your custom fields such as state, SWIFT, IBAN, BIC, variable symbol, etc. – they might be either optional or required)
- Groups (groups you want to add this account to)
- checkbox "Is global account?" (checking it will make the account visible for all users)
- checkbox "Private account" (checking it will only make the account visible for you. Not even administrator can search the account. You can only check this option if you created this account)
- checkbox "Add to my accounts" (checking it will add the account to your favorites)
- Comment (blank text box, where you can write your notes regarding the account)
- Attachments (files or documents you may attach to the account)
When you have filled up the form, click the "Save" button to create the account.
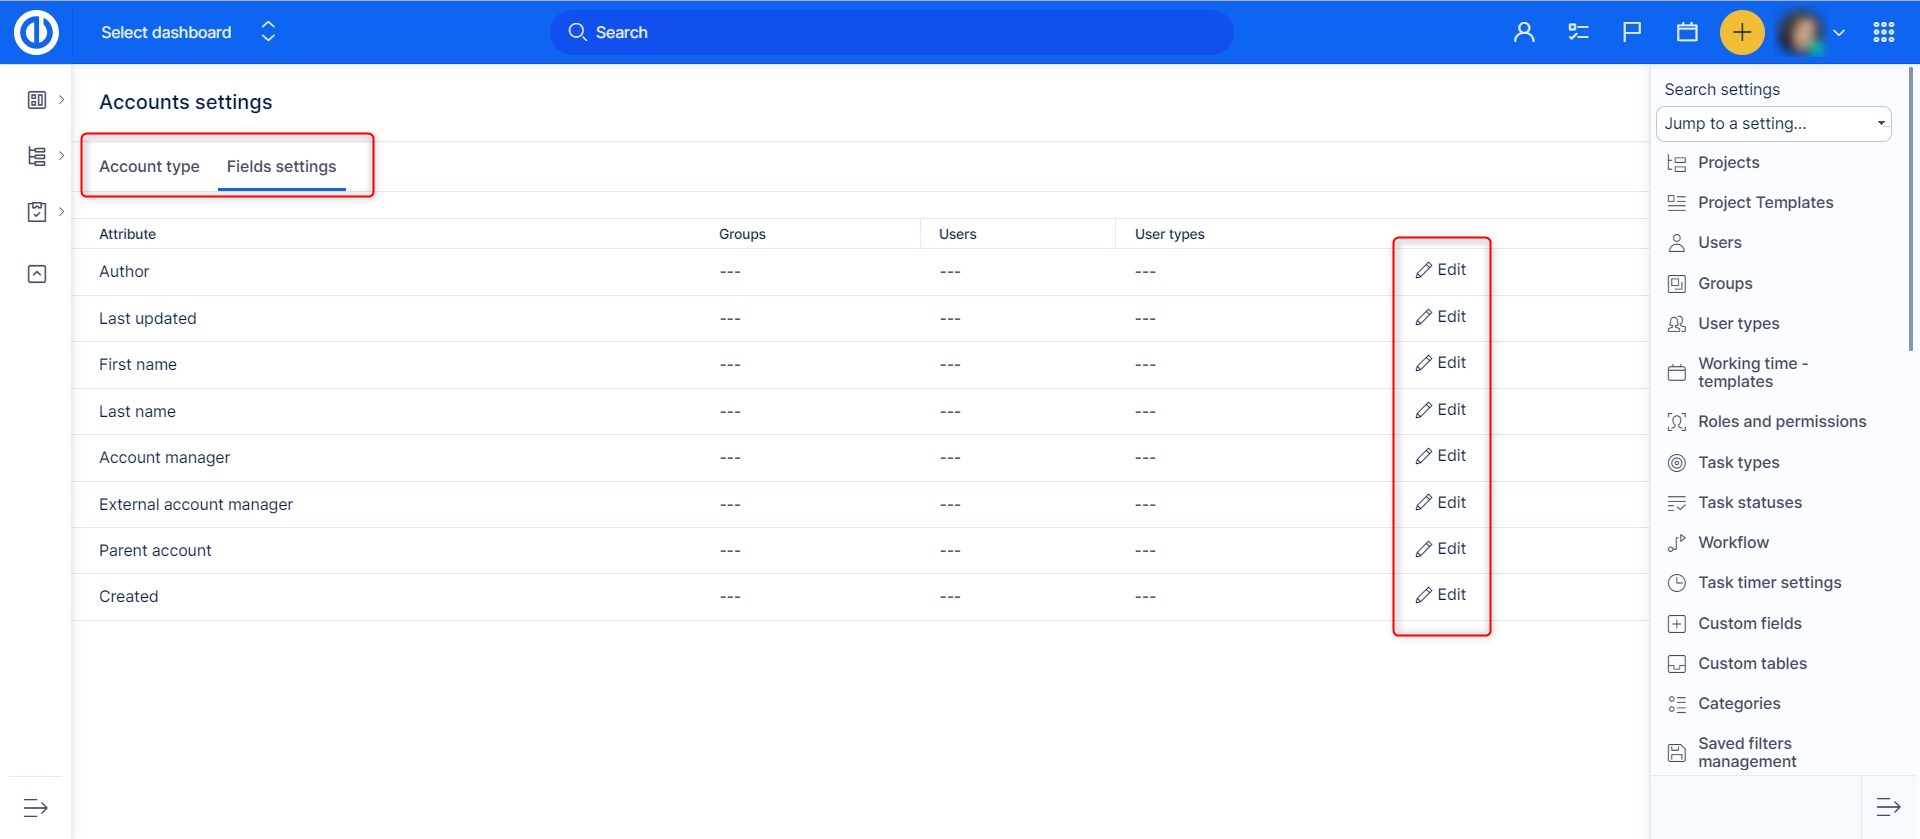
Custom fields are configured in Administration >> Custom fields >> Accounts. You can add, rename, enable/disable, add language mutations. If in your application, you see these fields in a different language than you expect, you need to change the name of the field.
In Accounts >> Settings >> Field settings, you can select groups, user types, or users to allow them to see specific CRM fields or leave the settings blank to disable special visibility.
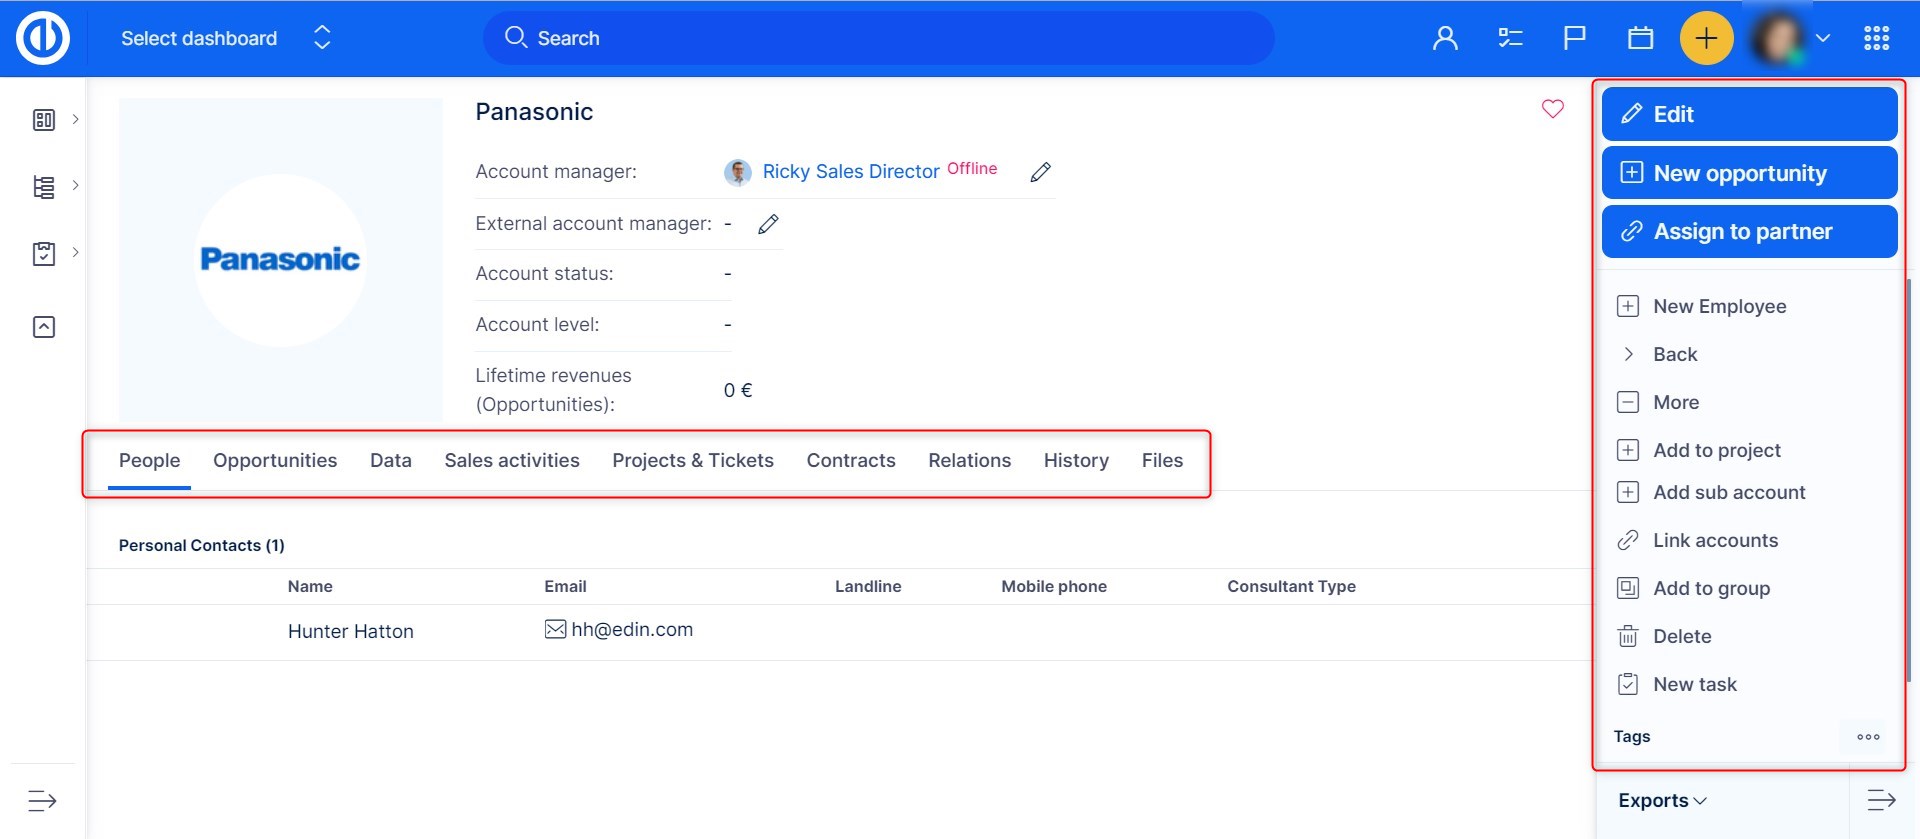
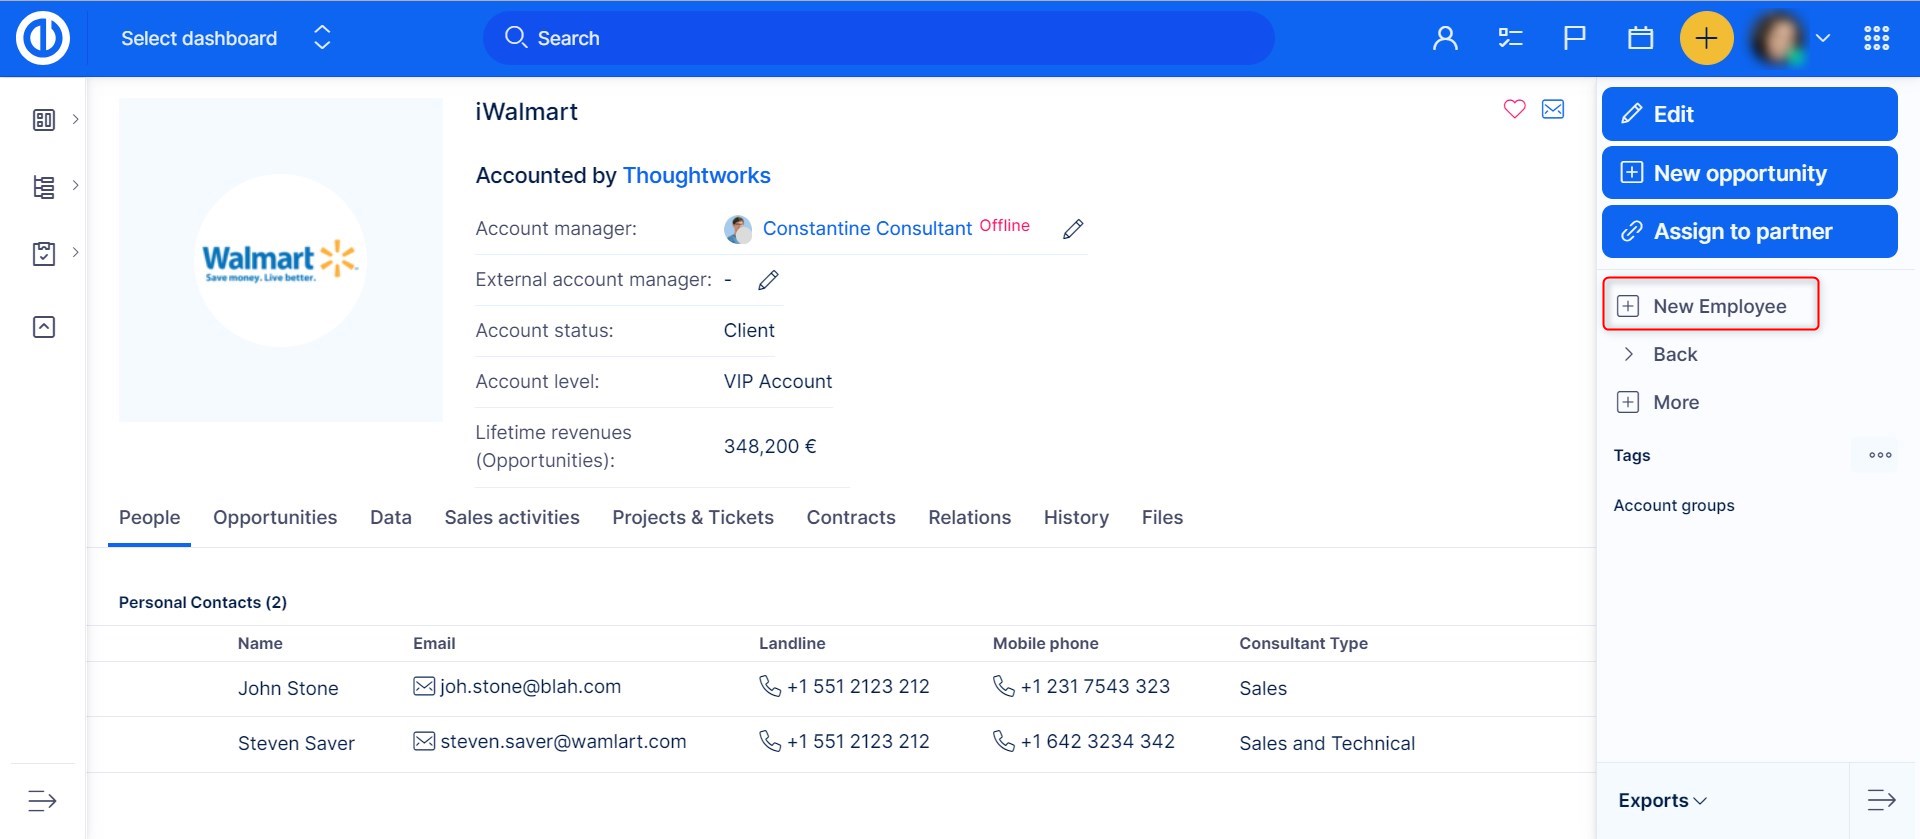
When viewing an account in a detailed overview, you can use the options in the right sidebar menu to edit the account, create a new opportunity related to the account, assign the account to a selected partner, add a new employee, add the account to a project, add a sub-account, link accounts, add the account to a group, show the account's address on the map, delete it, or add a new task related to the account.
Here is a summary of basic operations with accounts:
Create a new account
1. Click on the Global menu in the top right corner.
2. Click on the „CRM“ menu option in the Platform category.
3. Click on the „ACCOUNTS” button in the right sidebar menu.
4. Click on the „NEW ACCOUNT” button in the right sidebar menu.
5. Fill up fields accordingly and click the „SAVE” button.
Edit an account
1. Click on the „EDIT” button in the right sidebar menu.
2. Fill up all the necessary fields and click the „UPDATE“ button.
Create a new opportunity
1. Click on the „NEW OPPORTUNITY” button in the right sidebar menu.
2. On the New opportunity page fill up all the necessary fields and click the „SAVE“ button, or „SAVE AND NEW“ for creating multiple new opportunities.
Assign an account to a partner
1. Click on the „ASSIGN TO PARTNER” button in the right sidebar menu.
2. On the „Assign to partner” page put task name or id to find or scroll down the list and then click on the radio button on the left side of the partner, and click the „SAVE“ button.
Create a new employee
1. Click on the „NEW EMPLOYEE button in the right sidebar menu.
2. On the New Personal Contact page fill up all the necessary fields and click the „SAVE“ button.
Add an account to a project
1. Click on the „MORE” button in the right sidebar menu.
2. Click on the „ADD TO PROJECT” button in the right sidebar menu.
3. Click on the „ASSIGN TO PARTNER” button in the right sidebar menu.
4. On Add to project page input project name or id to find and then click on the radio button on the left side of the project and click the „SAVE“ button.
Add a sub-account to an account
1. Click on the „MORE” button in the right sidebar menu.
2. Click on the „ADD SUB-ACCOUNT“ button in the right sidebar menu.
3. On the New account page fill up all the necessary fields and click the „SAVE“ button.
Link an account to another account
1. Click on the „MORE” button in the right sidebar menu.
2. Click on the „LINK ACCOUNTS” button in the right sidebar menu.
3. On the „Link accounts” page put account name or id to find or scroll down the list and then click on the radio button on the left side of the account, and click the „SAVE“ button.
Add an account to a group
1. Click on the „MORE” button in the right sidebar menu.
2. Click on the „ADD TO GROUP” button in the right sidebar menu.
3. On Add to group page put a group name or id to find or scroll down the list and then click on the radio button on the left side of the group, and click the „SAVE“ button.
Delete an account
1. Click on the „MORE” button in the right sidebar menu.
2. Click on the „DELETE” button in the right sidebar menu.
3. Click on the „OK“ button on the confirmation window that says „Are you sure?“.
Create a new related task
1. Click on the „MORE” button in the right sidebar menu.
2. Click on the „NEW TASK“ button in the right sidebar menu.
3. On the New task page fill up all the necessary fields and click the „SAVE“ button.
Recalculate the account's custom fields
1. Click on the „MORE” button in the right sidebar menu.
2. Click on the „RECALCULATE CUSTOM FIELDS” button in the right sidebar menu.
Show account's address on Google Map
1. Click on the „MORE” button in the right sidebar menu.
2. Click on the „SHOW ON MAP” button in the right sidebar menu.
Editing employees on an account
1. Click on the „People” category button on the account category bar.
2. Scroll to an employee you wish to edit and click on their name to continue editing from there.
Editing opportunities on an account
1. Click on the „Opportunities” category button on the account category bar.
2. Scroll to the opportunity you wish to edit and use pencil buttons to quickly edit attributes or Click on the opportunity name to continue editing from there.
Account's details
1. Click on the „Data” category button on the account category bar to view and edit the account’s details.
Account's invoice and billing details
1. Click on the „Invoices & Billing” category button on the account category bar to view the account's invoice and billing details.
Creating a new sales activity on an account
1. Click on the „Sales activities” category button on the account category bar.
2. Fill up fields accordingly and click the „SAVE“ button.
Edit a sales activity on an account
1. Click on the „Sales activities” category button on the account category bar.
2. Move the cursor to a sales activity you wish to edit.
3. Click on the pen button symbol on the right side of the sales activity.
4. Edit fields accordingly and click the „SAVE“ button.
Delete a sales activity on an account
1. Click on the „Sales activities” category button on the account category bar.
2. Move the cursor to a sales activity you wish to delete.
3. Click on the trash bin button symbol on the right side of the sales activity.
4. Click on the „OK“ button on the confirmation window that says „Are you sure?“.
View projects and tickets on an account
1. Click on the „Projects & Tickets” category button on the account category bar.
2. Scroll to the project or ticket you wish to view and click on their name to continue editing from there.
View contracts on an account
1. Click on the „Contracts” category button on the account category bar.
2. Scroll to the contract you wish to view and click on its name.
Edit sub-accounts of an account
1. Click on the „Relations” category button on the account category bar.
2. Scroll to the sub-account you wish to edit and click on the pen button symbol on the right side of a sub-account to edit it.
Making related accounts
1. Click on the „Relations” category button on the account category bar.
2. Scroll to the accounts you wish to view and click on the account name to continue editing from there.
Making related opportunities on an account
1. Click on the „Relations” category button on the account category bar.
2. Scroll to the related opportunity you wish to edit and use pencil buttons to quickly edit attributes or Click on the opportunity name to continue editing from there.
View history of changes on an account
1. Click on the „History” category button on the account category bar to see the history of changes on an account.
View/edit files on an account
1. Click on the „Files” category button on the account category bar to view and edit your attachments.
Primary account
Accounts can be linked to tasks, most often Help desk tickets.
The first account related to the ticket automatically becomes primary. Based on data from primary account it is possible to make various reports above tickets.
Primary account is highlighted in bold on the ticket detail.
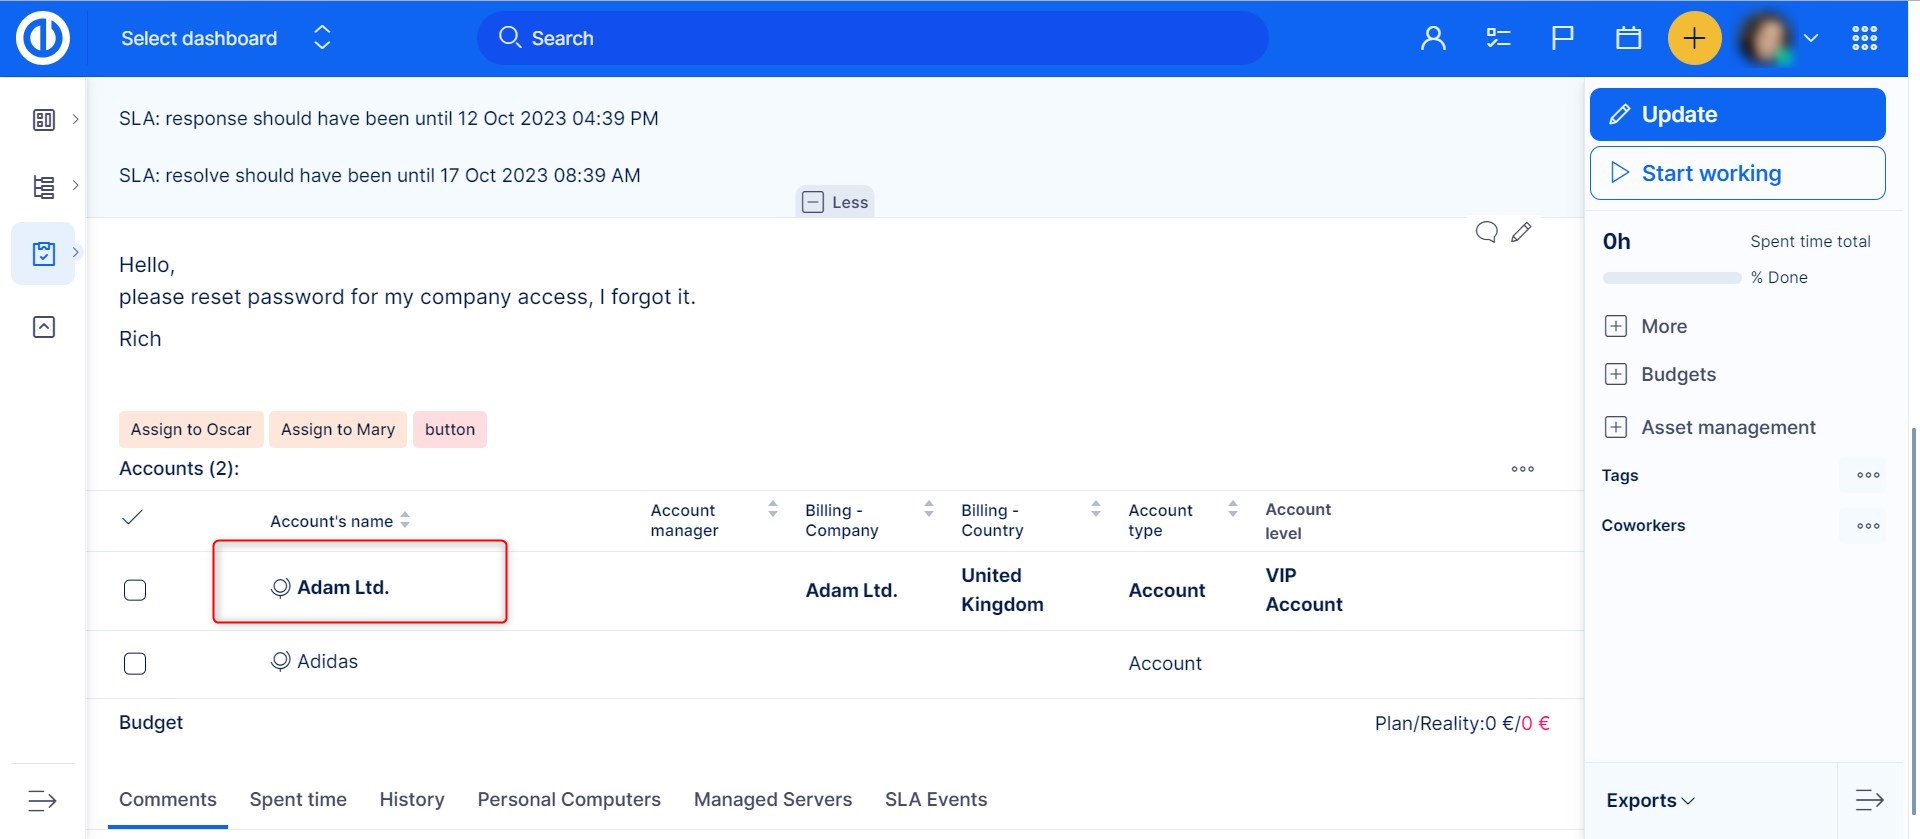
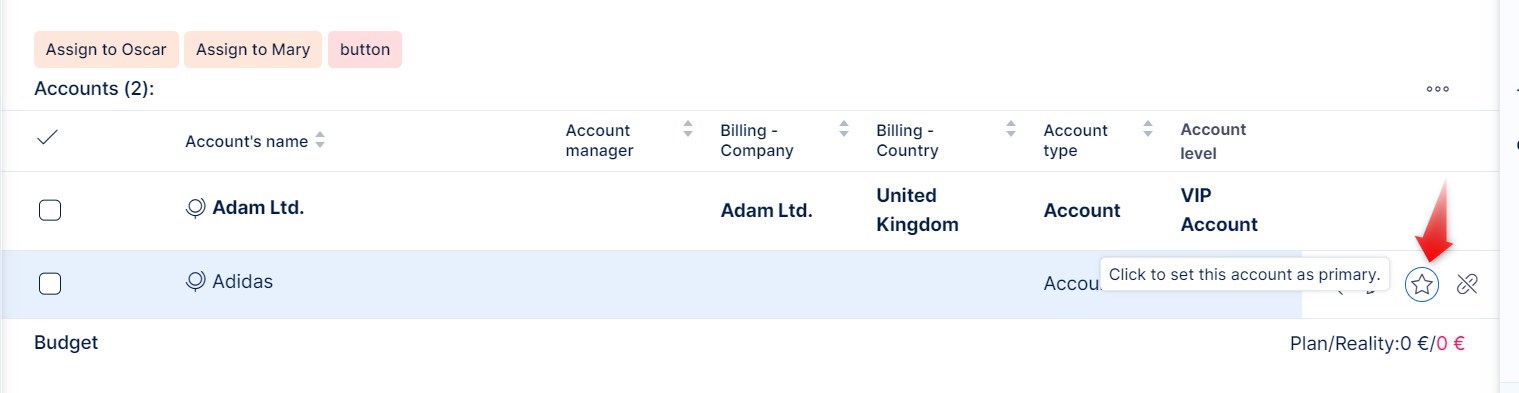
You can manually change set any other related account as primary by clicking the star.
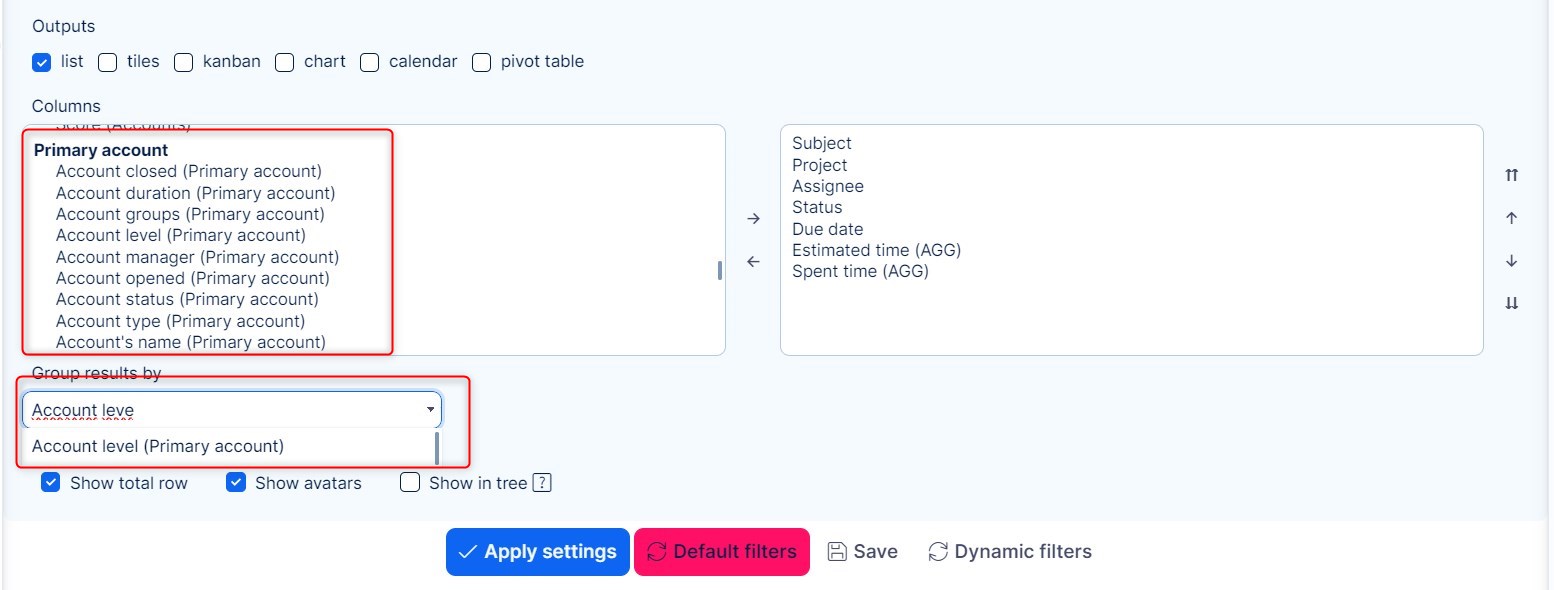
On task list, you are able to view columns and group by data from the primary account.
Personal Contacts
On the Personal Contacts page, you can manage any kind of personal contacts (such as e-mail addresses, phone numbers, Skype, etc.) to internal and external employees of yours or your partners.
Under the "Data" option in the right sidebar menu, you can browse your personal contacts or create and save filters for your personal contacts using the „Saved filters management“ button.

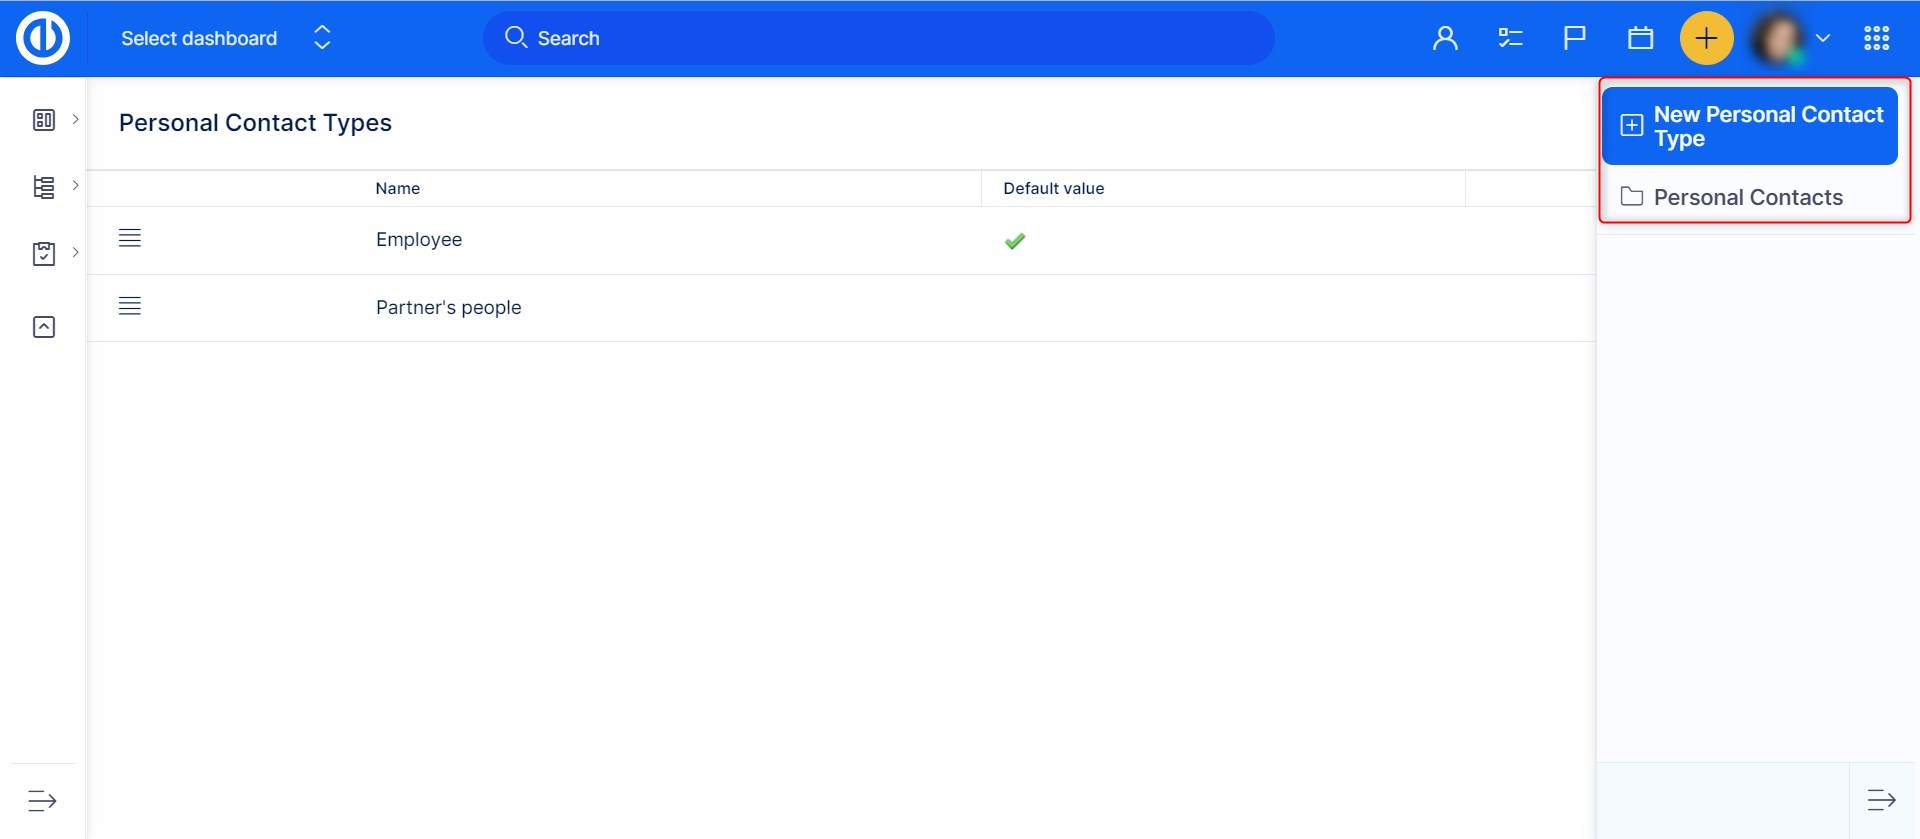
Or you can add/remove contact types under the „Personal Contact Types“ button.
If you want to create a new personal contact, you have 2 ways to do it – as a new employee or a new consultant. You can create a new employee on the detail of any account from the right sidebar menu ("New employee" button).
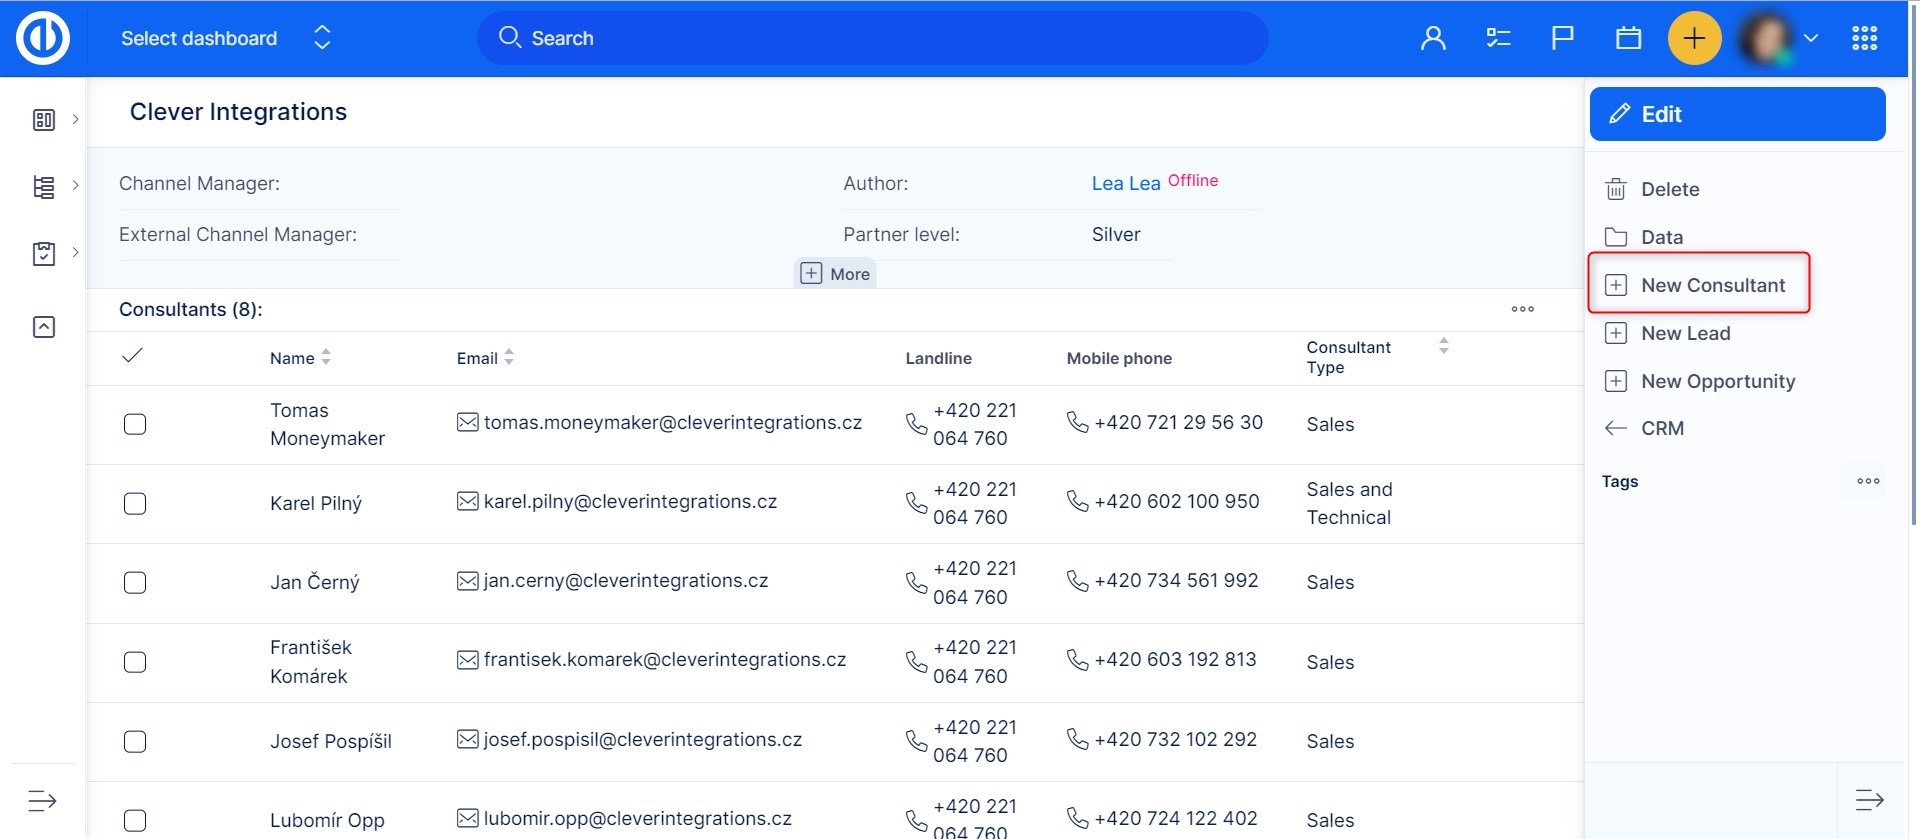
You can create a new consultant on the detail of any partner from the right sidebar menu ("New consultant" button).
To create a personal contact, just fill in all the required fields in the form and click the "Save" button.
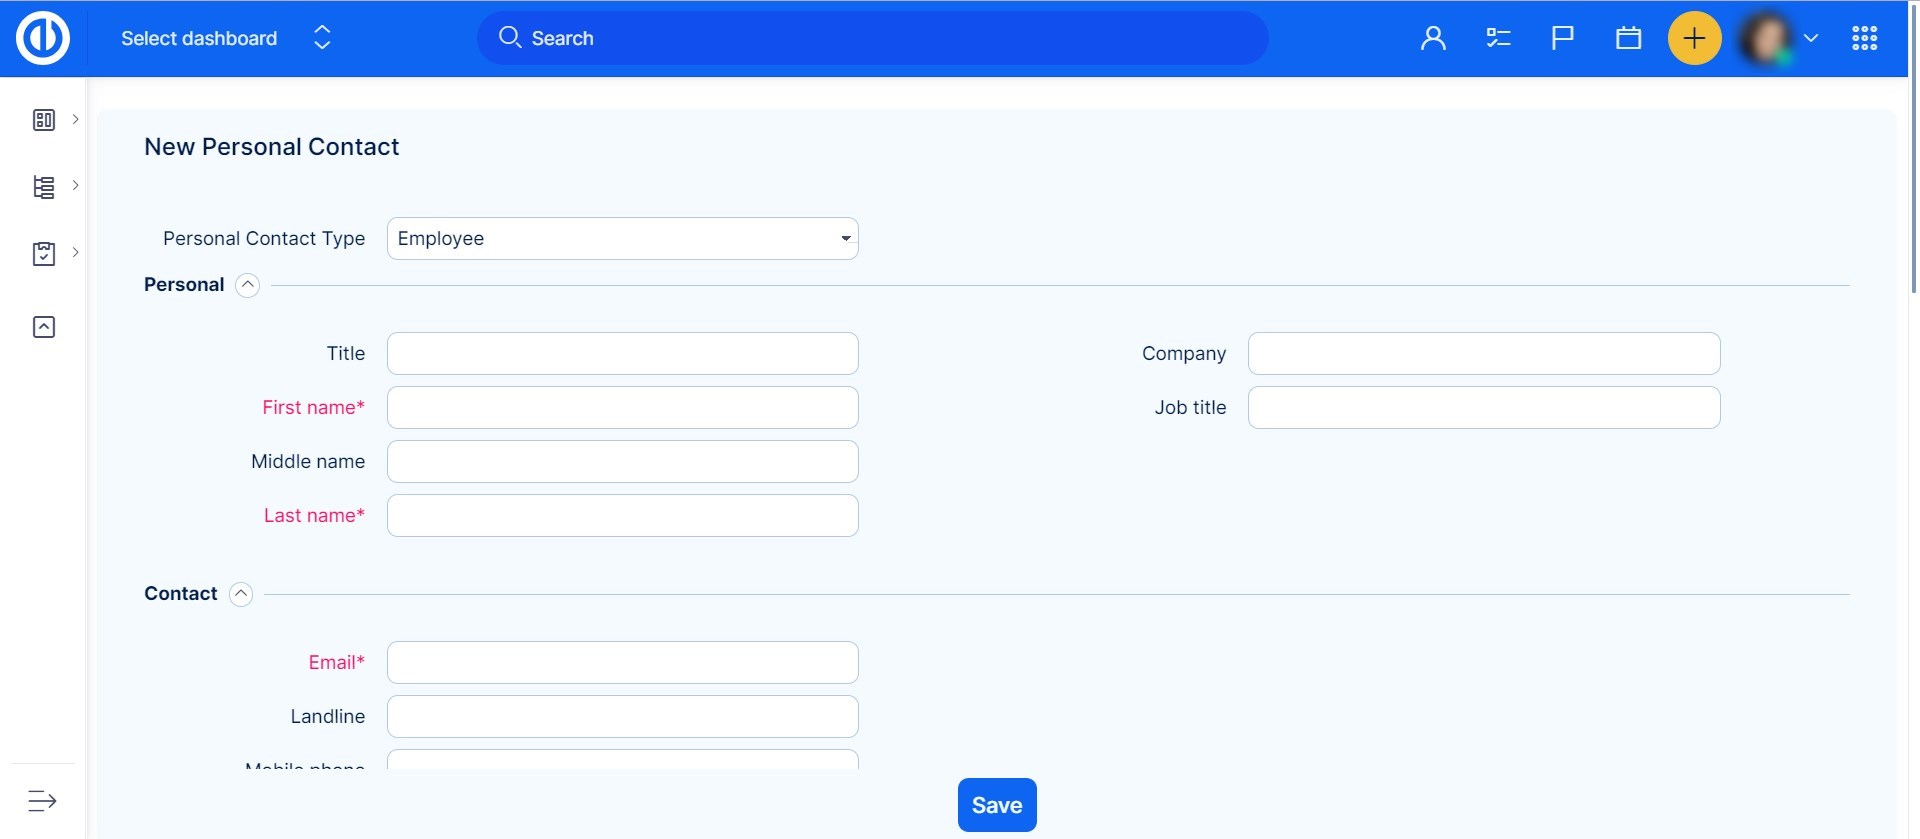
When viewing a personal contact in a detailed overview, you can use the options in the right sidebar menu to edit, delete or anonymize the contact or add a new task related to the contact.
Here is a summary of basic operations with personal contacts:
Create a new personal contact type
1. Click on the Global menu in the top right corner.
2. Click on the „CRM“ menu option in the Platform category.
3. Click on the „PERSONAL CONTACTS” button in the right sidebar menu.
4. Click on the „PERSONAL CONTACT TYPES” button in the right sidebar menu.
5. Click on the „NEW PERSONAL CONTACT TYPE” button in the right sidebar menu.
6. Fill up fields accordingly and click the „SAVE” button.
Partners
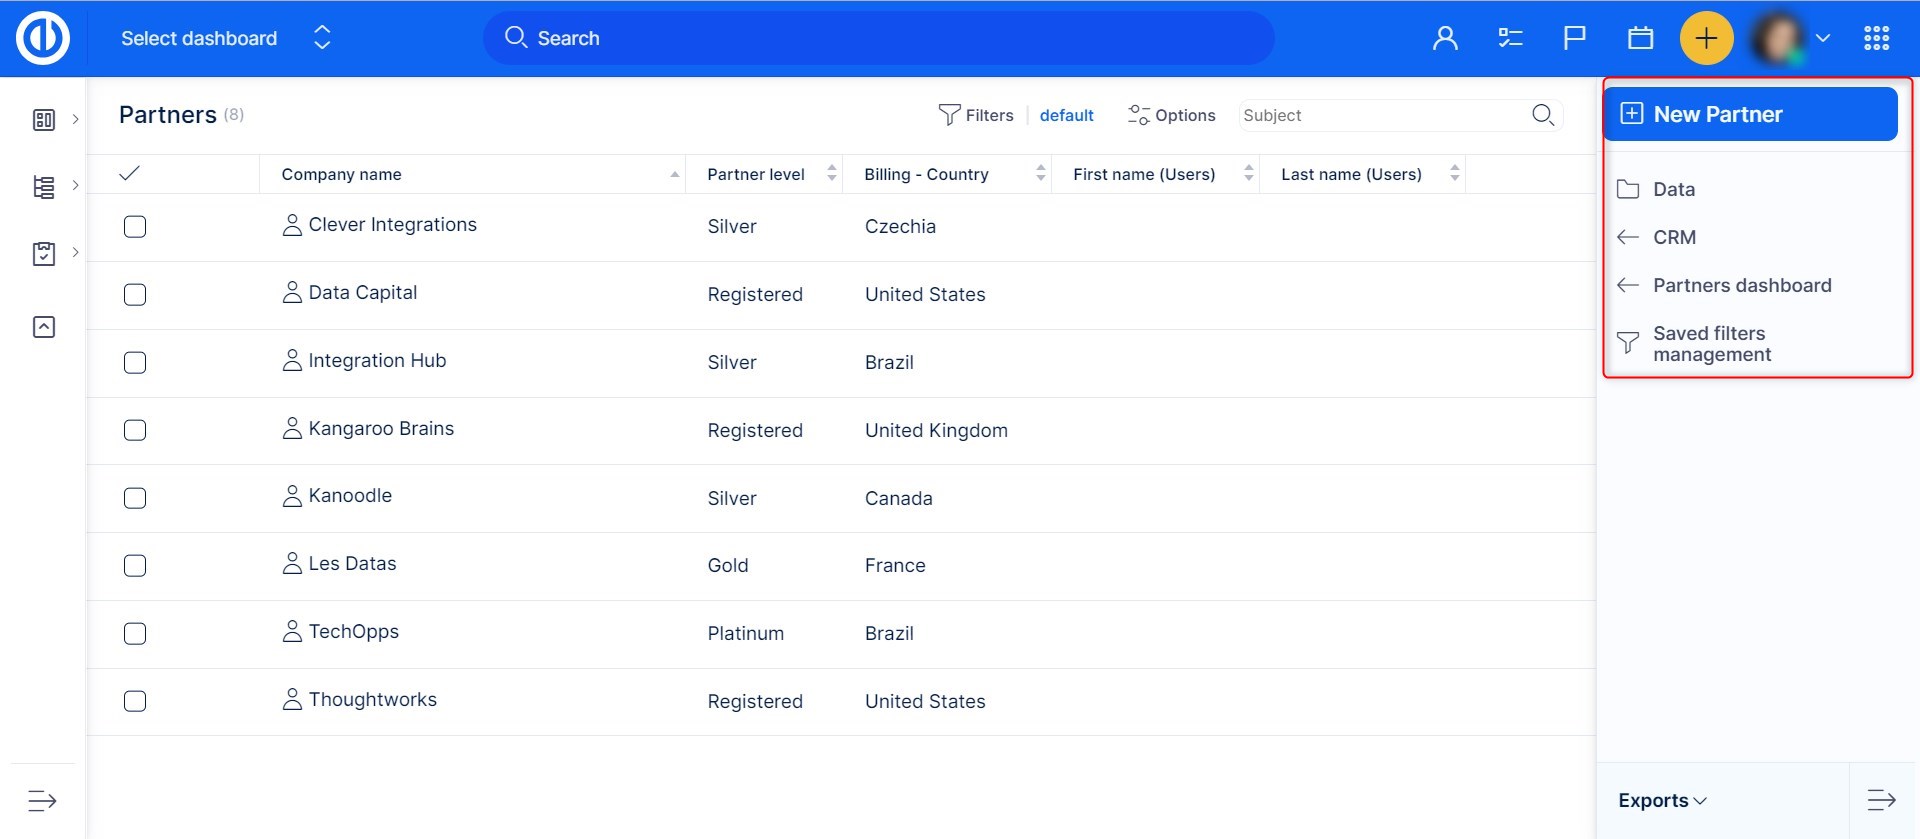
On the Partners page, you can manage your partner's network, results, and forecasts. In the right sidebar, you can create a new partner.
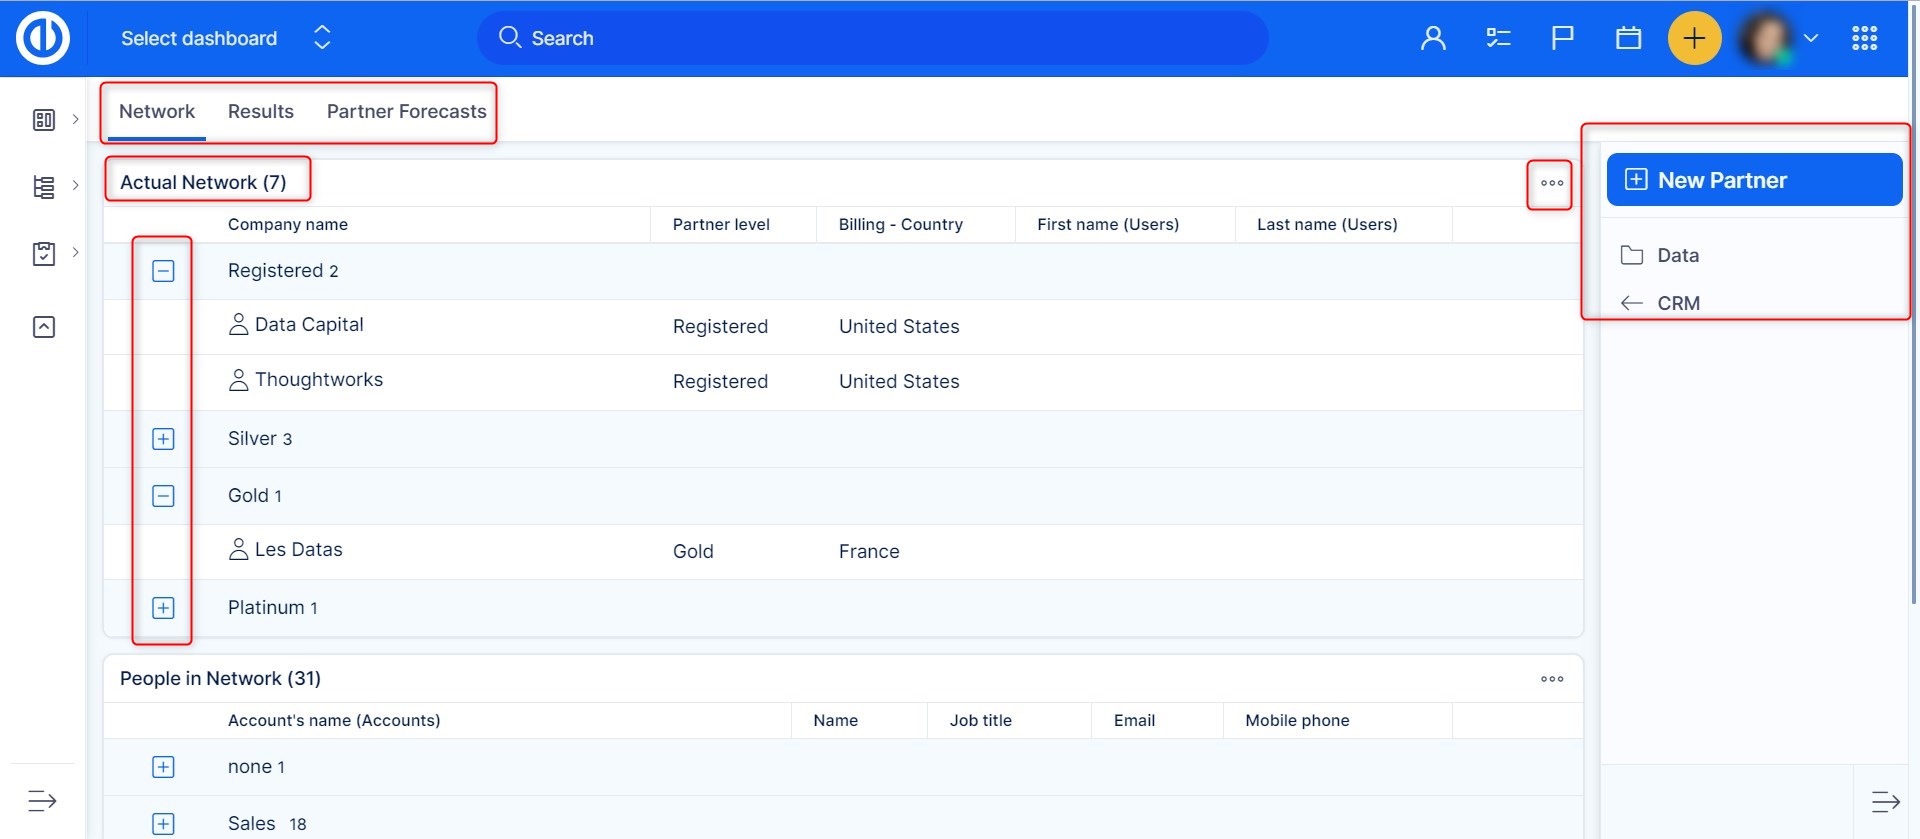
Under the "Data" option in the right sidebar menu, you can browse your partners or create and save filters for your partners using the „Saved filters management“ button.
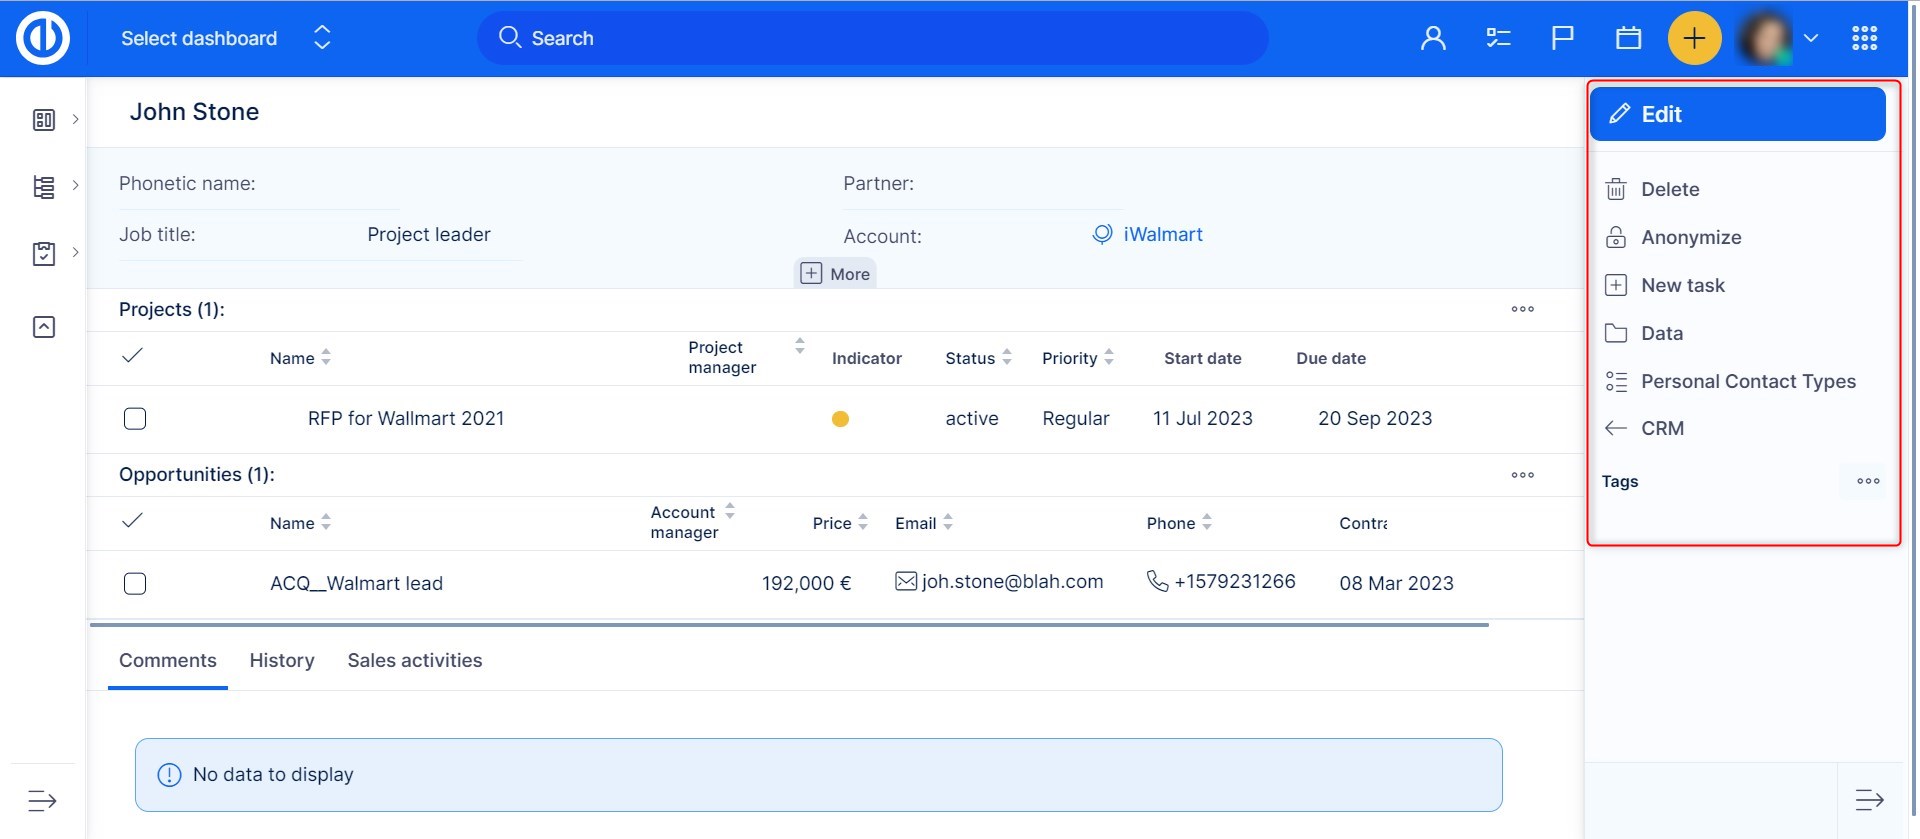
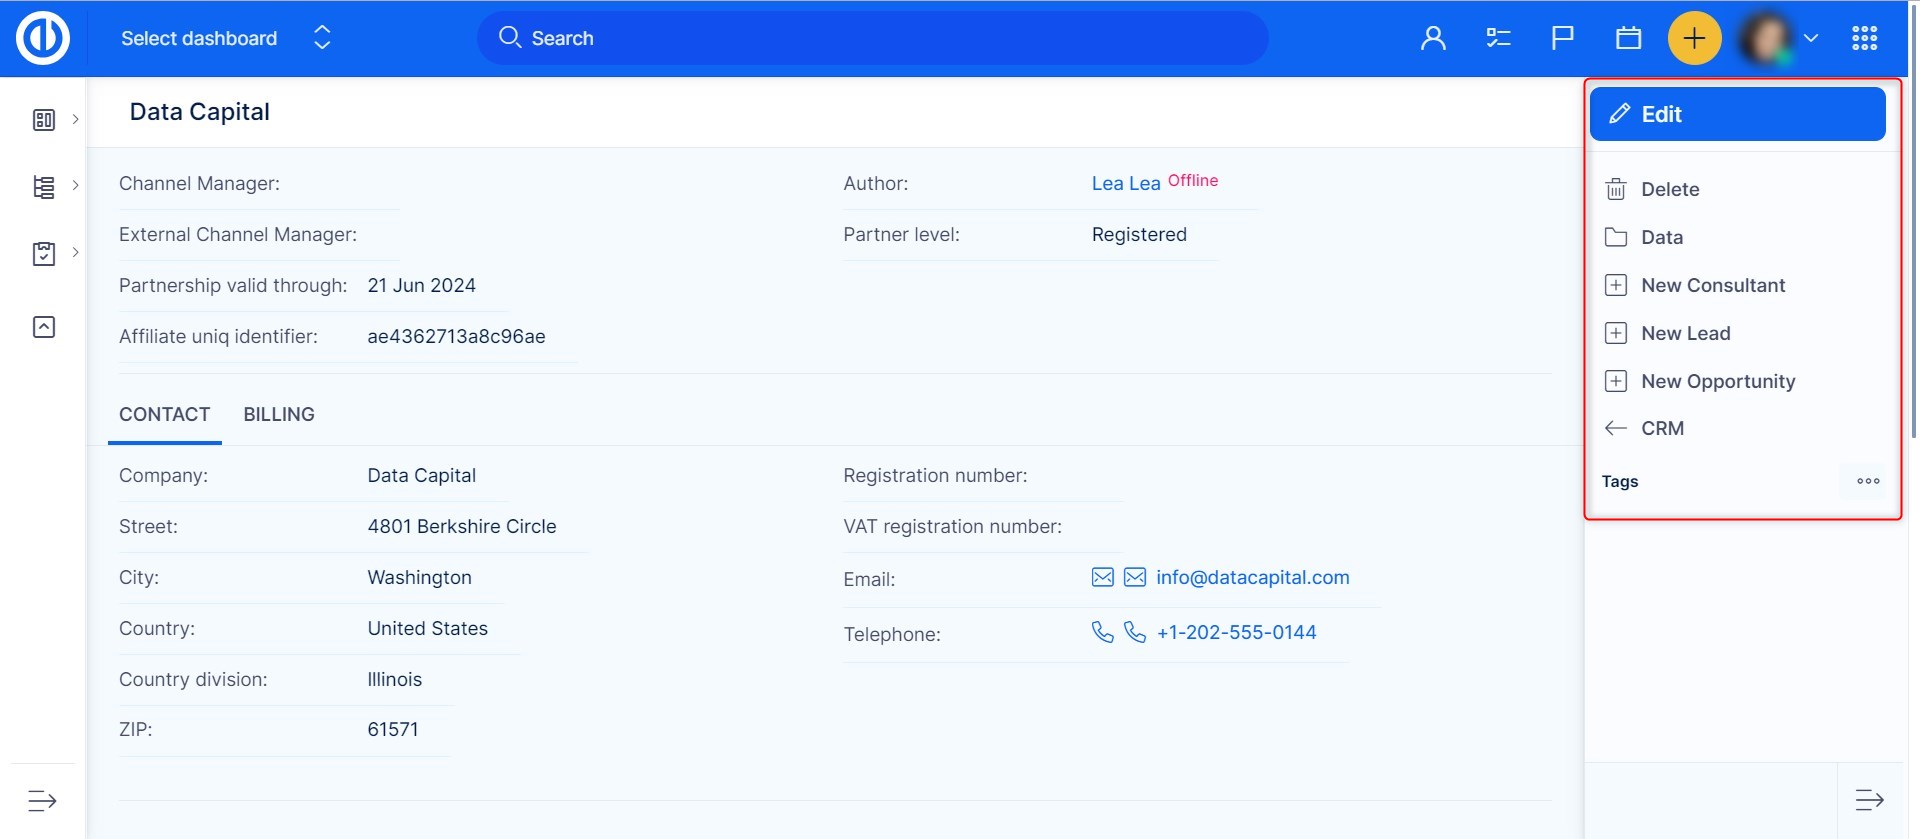
If you open a detailed overview of a specific partner, you can find here the list of consultants related to that partner as well as managed account and CRM cases. Moreover, you can see the comments, history, and sales activities of that partner.
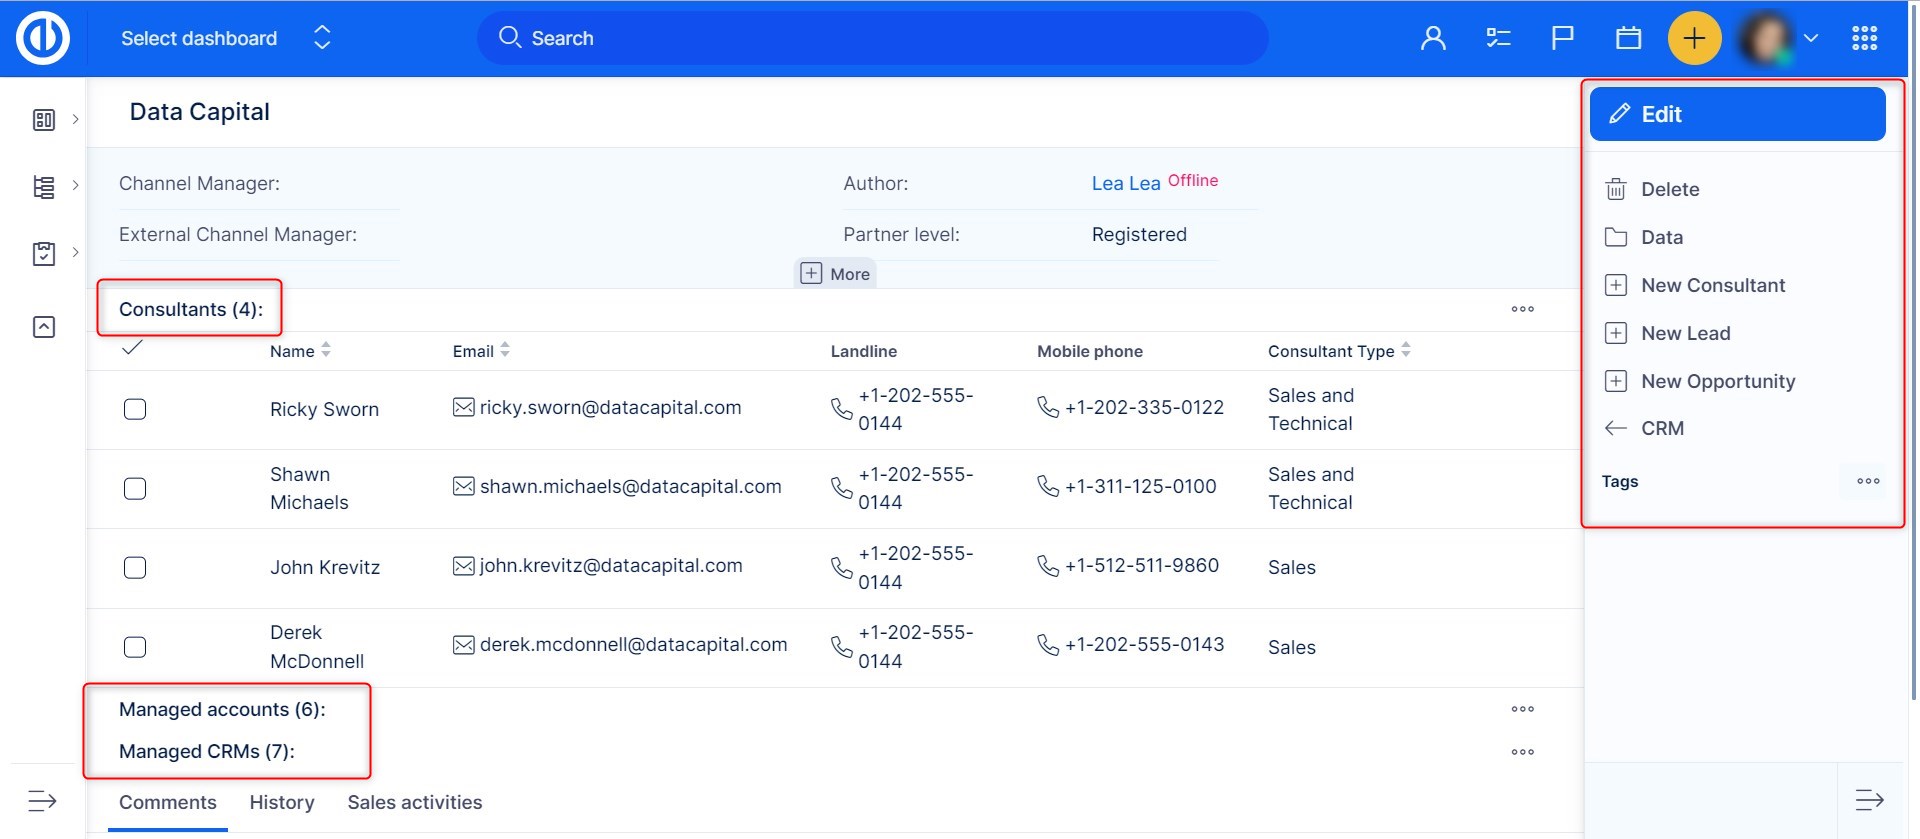
When viewing a partner in a detailed overview, you can use the options in the right sidebar menu to edit or delete the partner just like add a new consultant, lead, or opportunity.
Here is a summary of basic operations with partners:
Create a new partner
1. Click on the Global menu in the top right corner.
2. Click on the „CRM“ menu option in the Platform category.
3. Click on the „PARTNERS” button in the right sidebar menu.
4. Click on the „NEW PARTNER” button in the right sidebar menu.
5. Fill up fields accordingly and click the „SAVE” button.
Edit a partner
1. Click on the „EDIT” button in the right sidebar menu.
2. Fill up all the necessary fields and click the „UPDATE“ button.
View partners
1. Click on the „DATA” button in the right sidebar menu to view all partners.
Create a new consultant
1. Click on the „NEW CONSULTANT” button in the right sidebar menu.
2. On a New Personal Contact page fill up all the required fields and click the „SAVE” button.
Create a new lead to a partner
1. Click on the „NEW LEAD” button in the right sidebar menu.
2. On a New Lead page fill up all the required fields and click the „SAVE” button.
Create a new opportunity for a partner
1. Click on the „NEW OPPORTUNITY” button in the right sidebar menu.
2. On a New opportunity page fill up all the required fields and click the „SAVE” button.
Return to CRM menu
1. Click on the „CRM” button in the right sidebar menu to return to the CRM menu.
Add a sales activity on a partner
1. Click on the Sales activities tab.
2. Fill up fields accordingly and click the „SAVE“ button.
Edit a sales activity on a partner
1. Move the cursor to a sales activity you wish to edit.
2. Click on the pen button symbol on the right side of the sales activity.
3. Edit fields accordingly and click the „SAVE“ button.
Delete a sales activity on a partner
1. Move the cursor to a sales activity you wish to edit.
2. Click on the trash bin button symbol on the right side of the sales activity.
3. Click on the „OK“ button on the confirmation window that says „Are you sure?“.
Campaigns
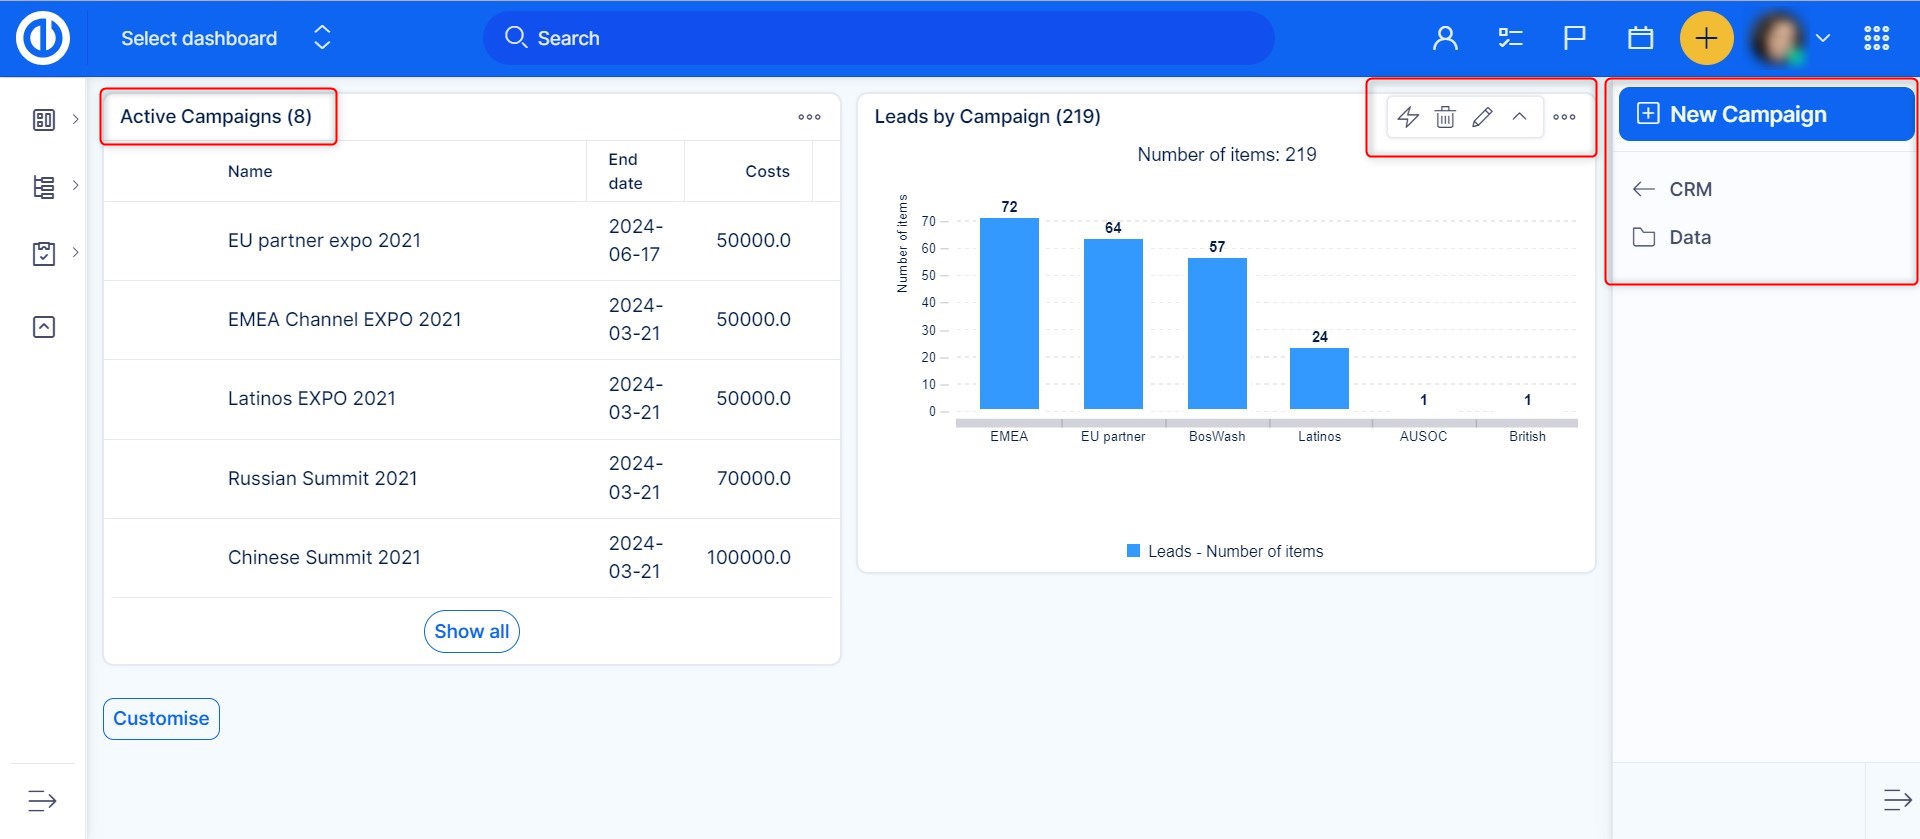
On the Campaigns page, you can manage all your existing campaigns, see active campaigns, or check out leads by campaigns. In the right sidebar, you can create a new campaign.
To create a new campaign, you will need at least one active campaign status, which can be set in Global menu >> Administration >> Categories >> CRM >> Campaign status. By default, use Active status for an active campaign and Archived status for an archived campaign.
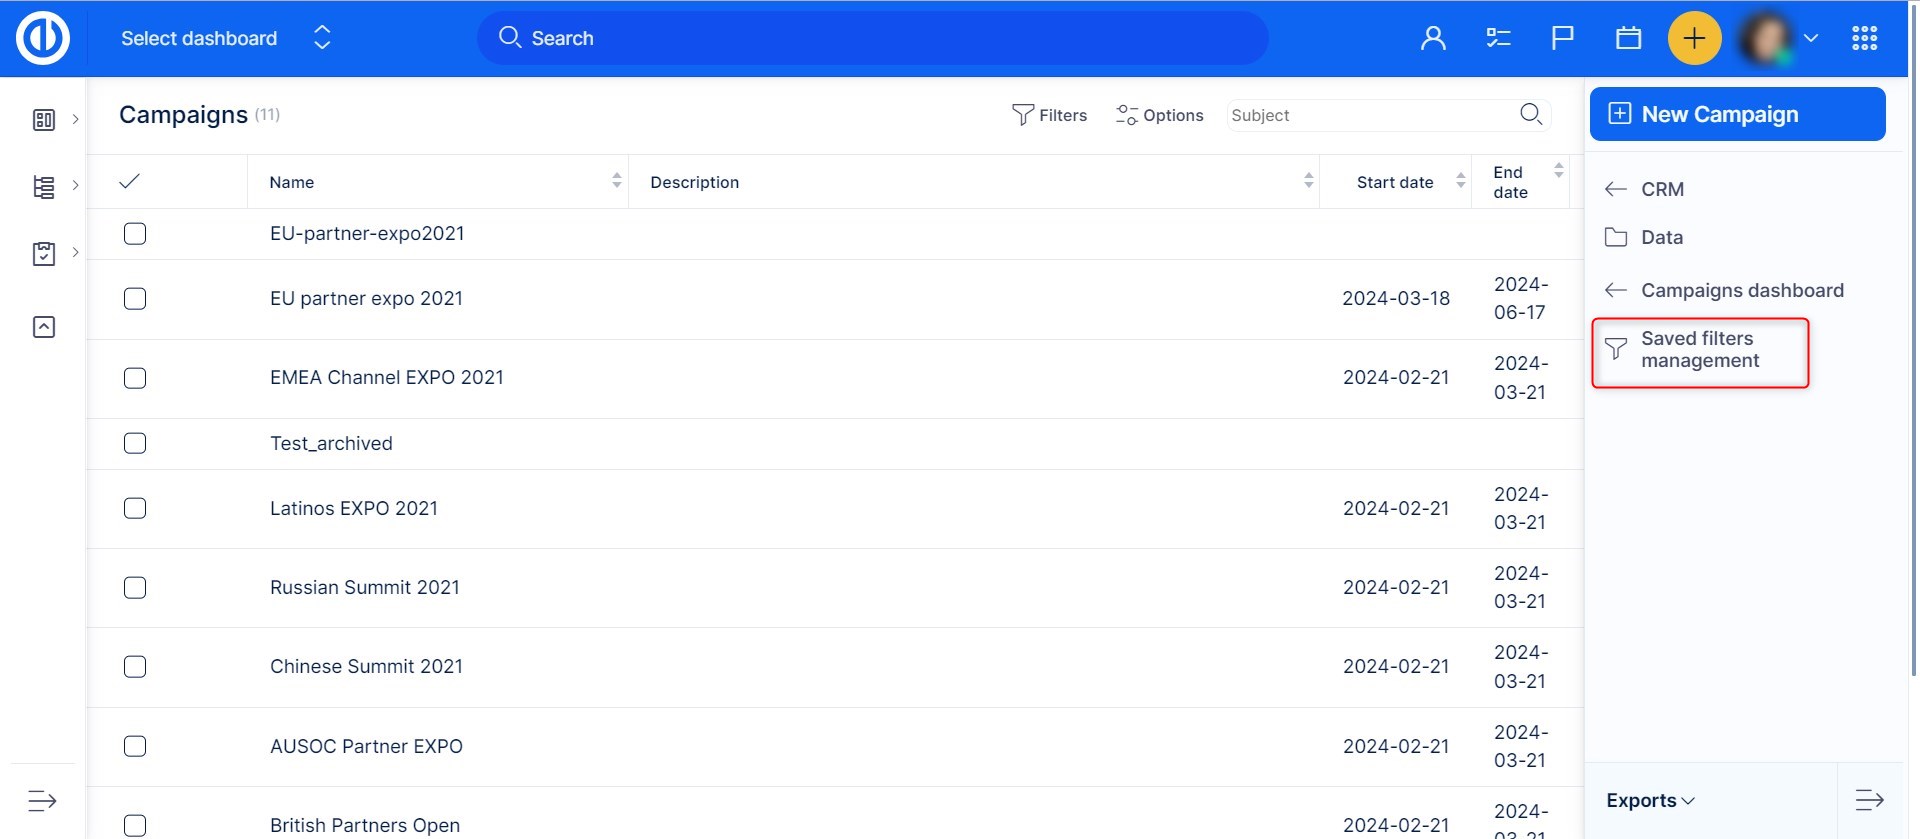
Under the "Data" option in the right sidebar menu, you can browse your campaigns or create and save filters for your campaigns using the „Saved filters management“ button.
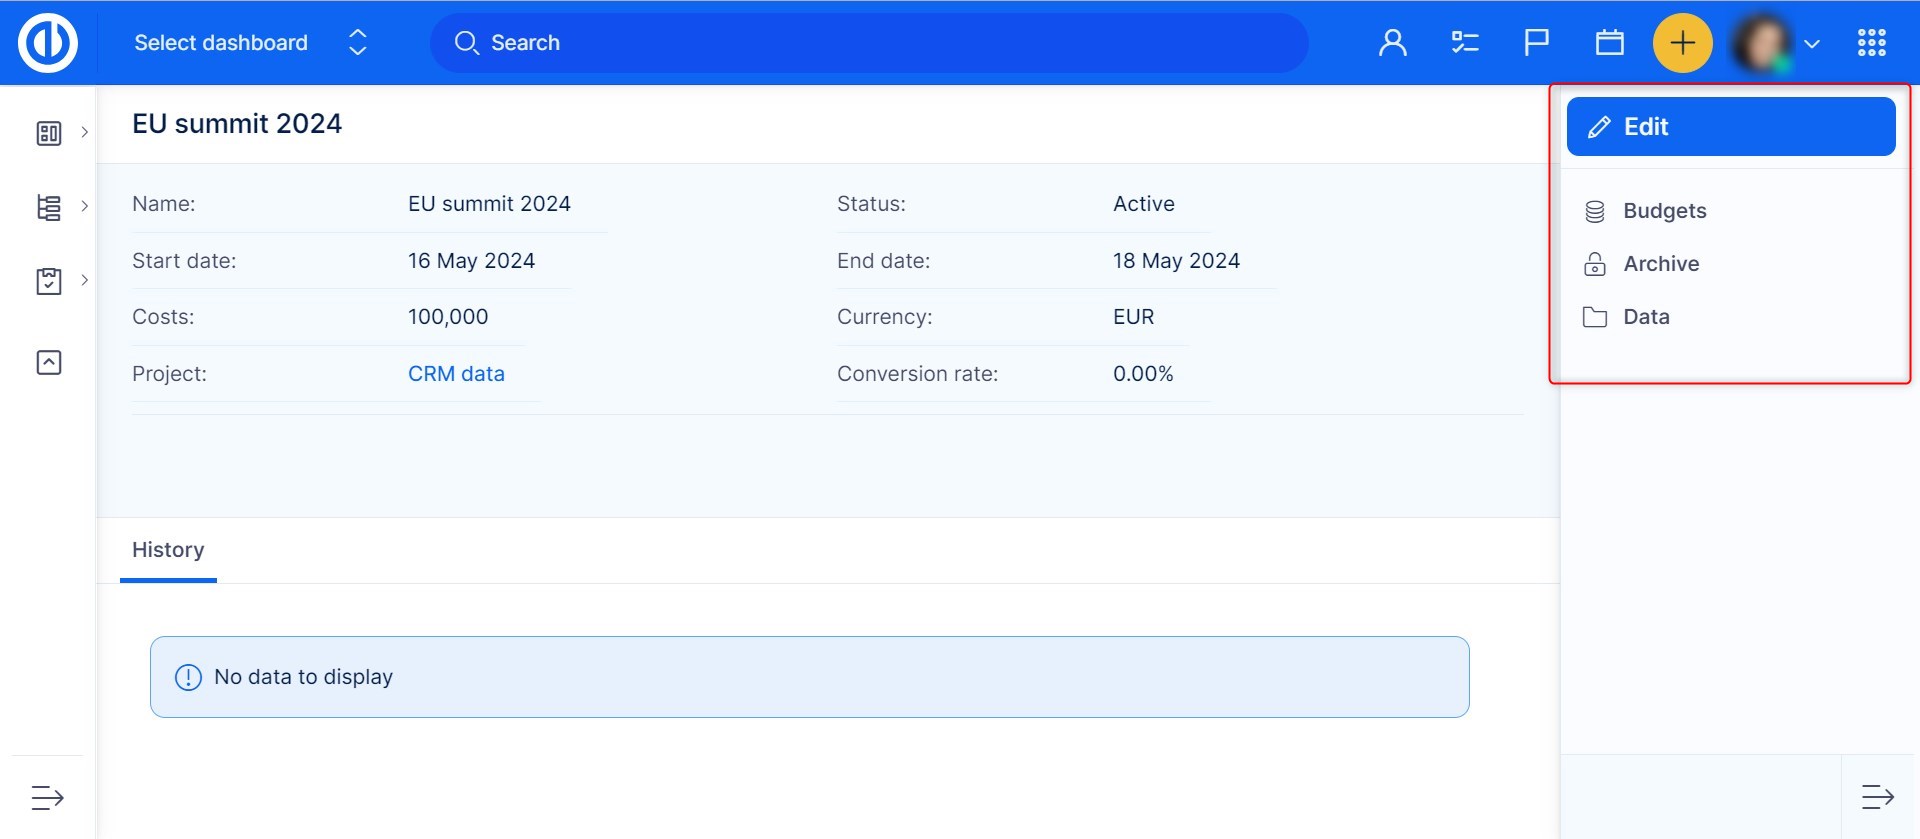
When viewing a campaign in a detailed overview, you can use the options in the right sidebar menu to edit the campaign, open the project budget settings to which the campaign is assigned, or archive the campaign. The information about costs for the campaign in question can be set/changed in the "Costs" field while editing the campaign.
Here is a summary of basic operations with campaigns:
Create a new campaign
1. Click on the Global menu in the top right corner.
2. Click on the „CRM“ menu option in the Platform category.
3. Click on the „CAMPAIGNS” button in the right sidebar menu.
4. Click on the „NEW CAMPAIGN” button in the right sidebar menu.
5. Fill up fields accordingly and click the „SAVE” button.
Edit a campaign
1. Click on the „EDIT” button in the right sidebar menu.
2. Fill up all the necessary fields and click the „UPDATE“ button.
Budgets settings on a project
1. Click on the „BUDGETS” button in the right sidebar menu.
2. Click on the „BUDGET SETTINGS” button in the right sidebar menu to go to the campaign's project budget settings.
Archive a campaign
1. Click on the „ARCHIVE” button in the right sidebar menu.
2. Choose an option in Edit Campaign and choose a status in the Easy campaign status field, before clicking on the „SAVE” button.
Unarchive a campaign
1. Click on the „UNARCHIVE” button in the right sidebar menu.
2. Choose an option in Edit Campaign and choose a status in the Easy campaign status field, before clicking on the „SAVE” button.
View all open leads belonging to a campaign
1. Click on the „Open leads” button.
View all opportunities belonging to a campaign
1. Click on the „Opportunities” button.
View all disqualified leads belonging to a campaign
1. Click on the „Disqualified leads” button.
View open leads
1. Click on the plus button symbol on the right side of the „Open leads” button to view all open leads.
2. Move the cursor to the lead you wish to view.
3. Click on the magnifying glass button symbol on the right side of the lead you wish to view.
View opportunities
1. Click on the plus button symbol on the right side of the „Opportunities” button to view all open leads.
2. Move the cursor to the opportunity you wish to view.
3. Click on the magnifying glass button symbol on the right side of the opportunity you wish to view.
View disqualified leads
1. Click on the plus button symbol on the right side of the „Disqualified leads” button to view all open leads.
2. Move the cursor to the disqualified lead you wish to view.
3. Click on the magnifying glass button symbol on the right side of the disqualified lead you wish to view.
Contracts
On the Contracts page, you can manage all your existing contracts. A contract is an entity for evidence of closed businesses. Contracts are related to the product category where each product category defines one type of contracts such as implementation services, software, and support services (see the right sidebar menu). Contracts hold categorized and itemized evidence of delivery. The logic of contracts may be suitable for time-period service delivery (such as a subscription). Contracts typically serve for continuous integration as central evidence of deliverables. Typically you may integrate contracts to cloud automation, order management, BPM, or similar. Continuous integration is also possible, e.g. creating a project from a template or creating a specific task upon contract creation are typical subjects of a customized solution. For each type of contract, you can browse through your contract-related data by clicking the „Data“ button. Moreover, you can create and save filters for your contract's data using the „Saved filters management“ button.
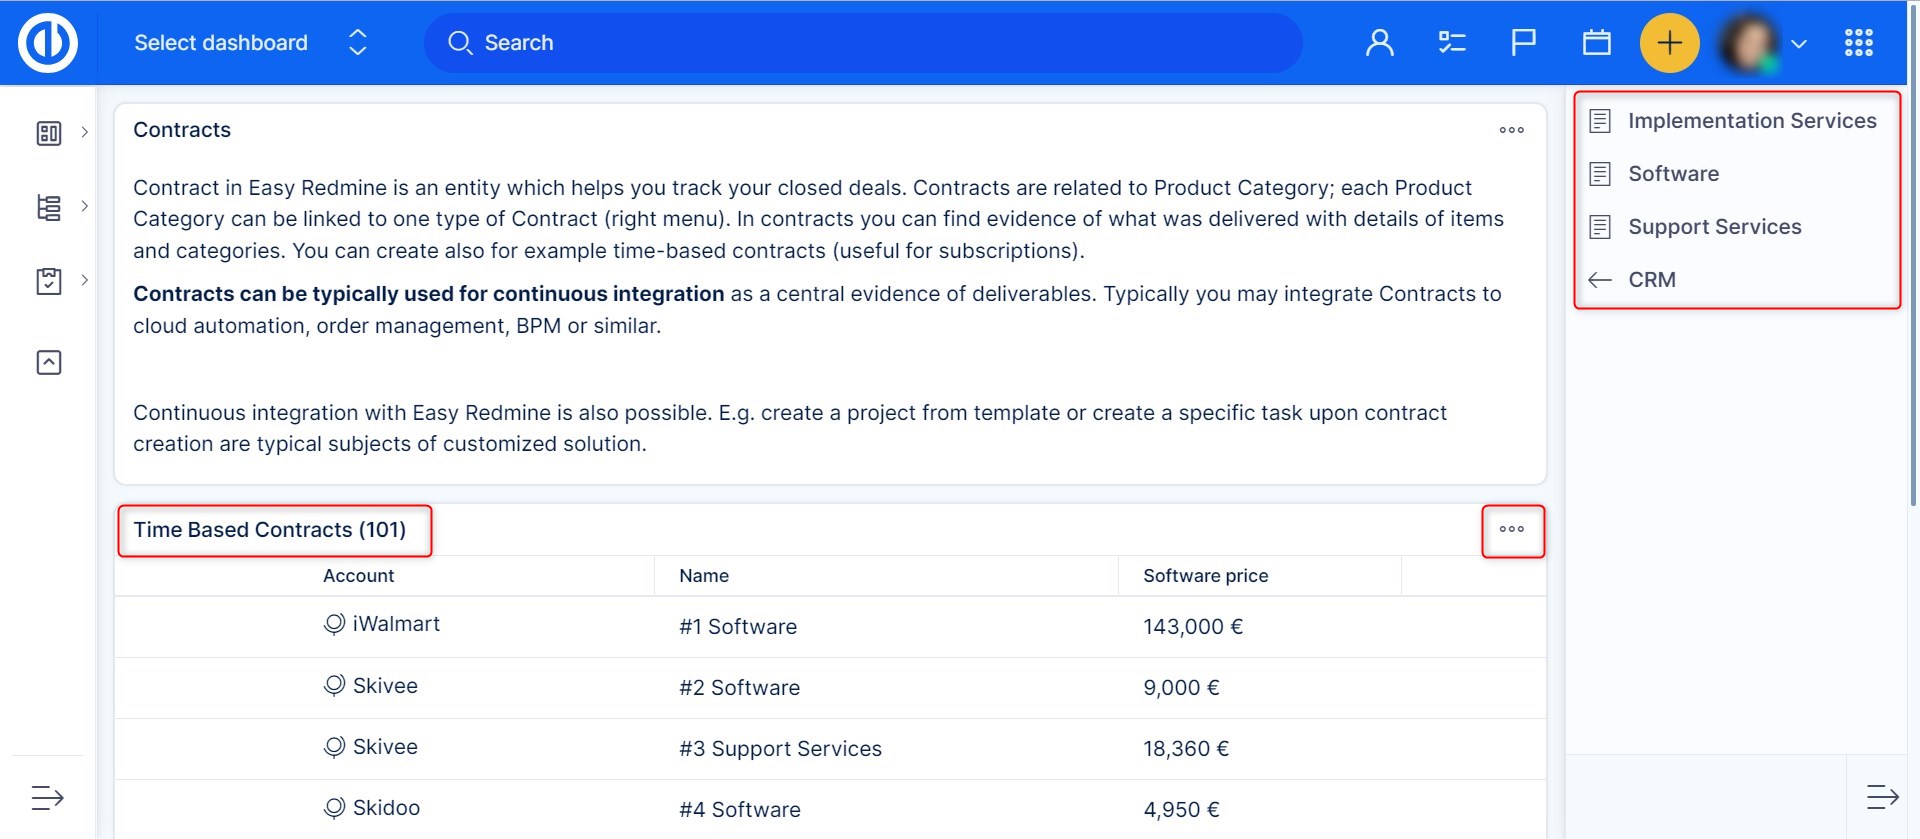
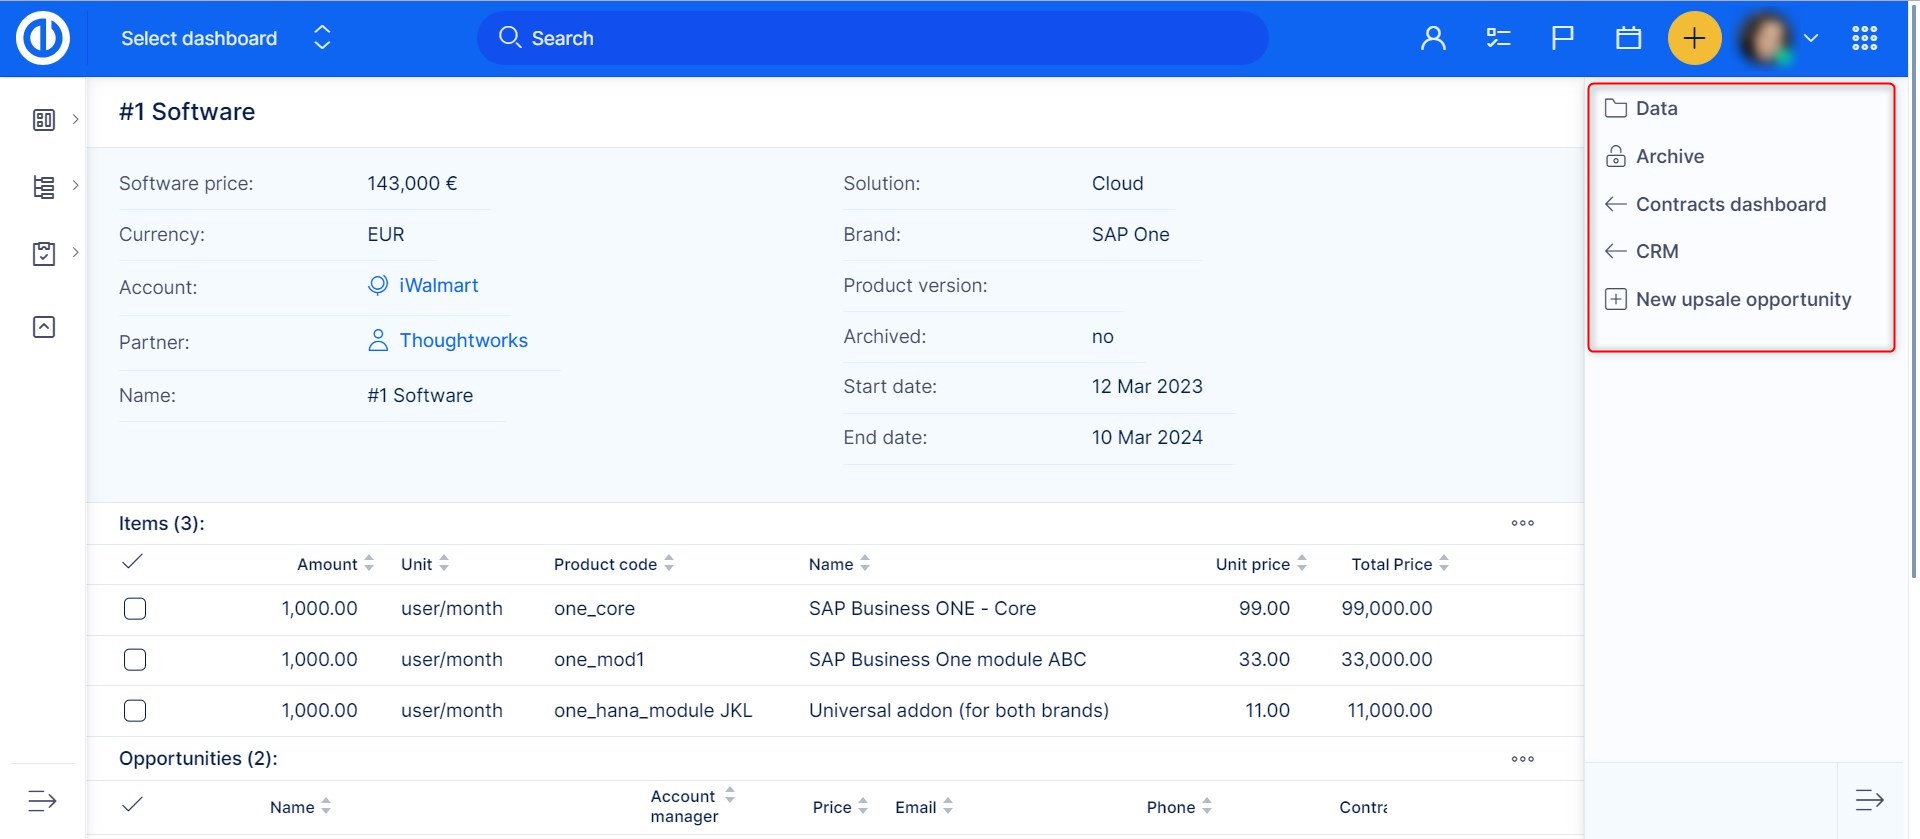
When viewing a contract in a detailed overview, you can use the options in the right sidebar menu to create a new upsale opportunity (only in the case of the time-based type of contracts)
Here is a summary of basic operations with contracts:
View software contracts
1. Click on the Global menu in the top right corner.
2. Click on the „CRM“ menu option in the Platform category.
3. Click on the „CONTRACTS” button in the right sidebar menu.
4. Click on the „SOFTWARE CONTRACTS” button in the right sidebar menu.
5. Move the cursor to the software contract you wish to view and click on its name to go to the detail.
View implementation contracts
1. Click on the Global menu in the top right corner.
2. Click on the „CRM“ menu option in the Platform category.
3. Click on the „CONTRACTS” button in the right sidebar menu.
4. Click on the „IMPLEMENTATION CONTRACTS” button in the right sidebar menu.
5. Move the cursor to the software contract you wish to view and click on its account to go to the detail.
View modification contracts
1. Click on the Global menu in the top right corner.
2. Click on the „CRM“ menu option in the Platform category.
3. Click on the „CONTRACTS” button in the right sidebar menu.
4. Click on the „MODIFICATION CONTRACTS” button in the right sidebar menu.
5. Move the cursor to the software contract you wish to view and click on its account to go to the detail.
View private cloud contracts
1. Click on the Global menu in the top right corner.
2. Click on the „CRM“ menu option in the Platform category.
3. Click on the „CONTRACTS” button in the right sidebar menu.
4. Click on the „PRIVATE CLOUD CONTRACTS” button in the right sidebar menu.
5. Move the cursor to the software contract you wish to view and click on its account to go to the detail.
View easy support contracts
1. Click on the Global menu in the top right corner.
2. Click on the „CRM“ menu option in the Platform category.
3. Click on the „CONTRACTS” button in the right sidebar menu.
4. Click on the „EASY SUPPORT CONTRACTS” button in the right sidebar menu.
5. Move the cursor to the software contract you wish to view and click on its account to go to the detail.
Price books and products
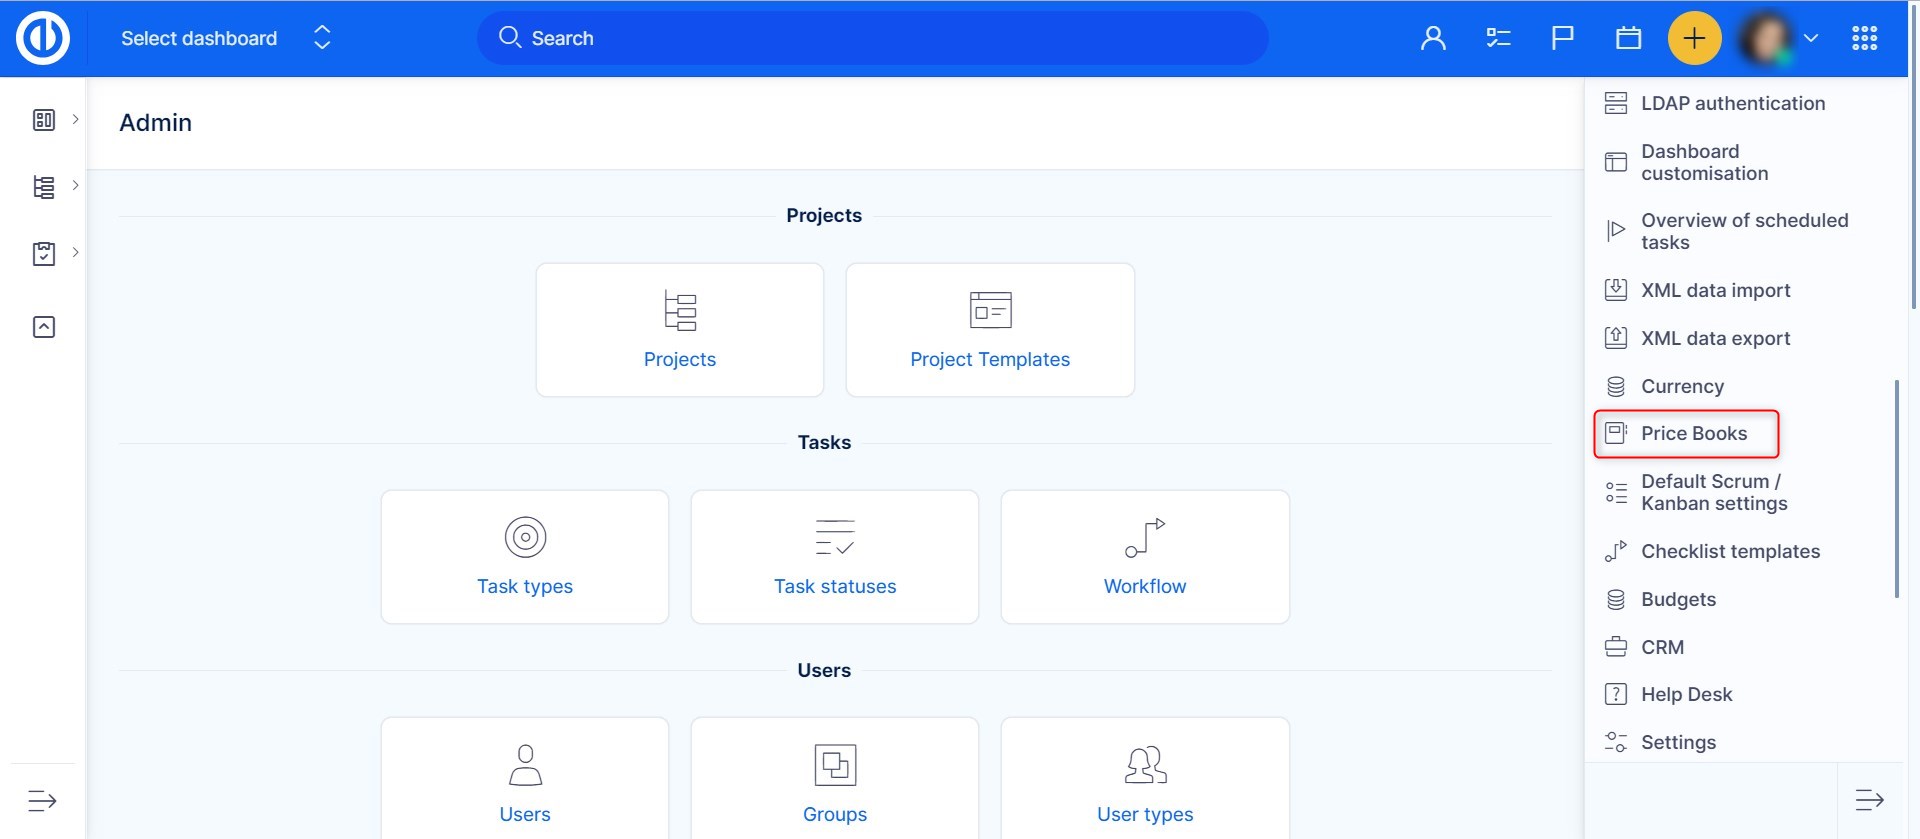
Price books are used for selling products at different prices, based on the agreement terms with a particular type of customer. For each customer, you can sell the same product at different prices. To enter Price books, navigate to Administration » Price books or /easy_price_book).
This will open an empty default price book overview page, which is fully customizable using the "Customise this page" button. In the right sidebar menu, you have options to open price books, products, and a global price overview.
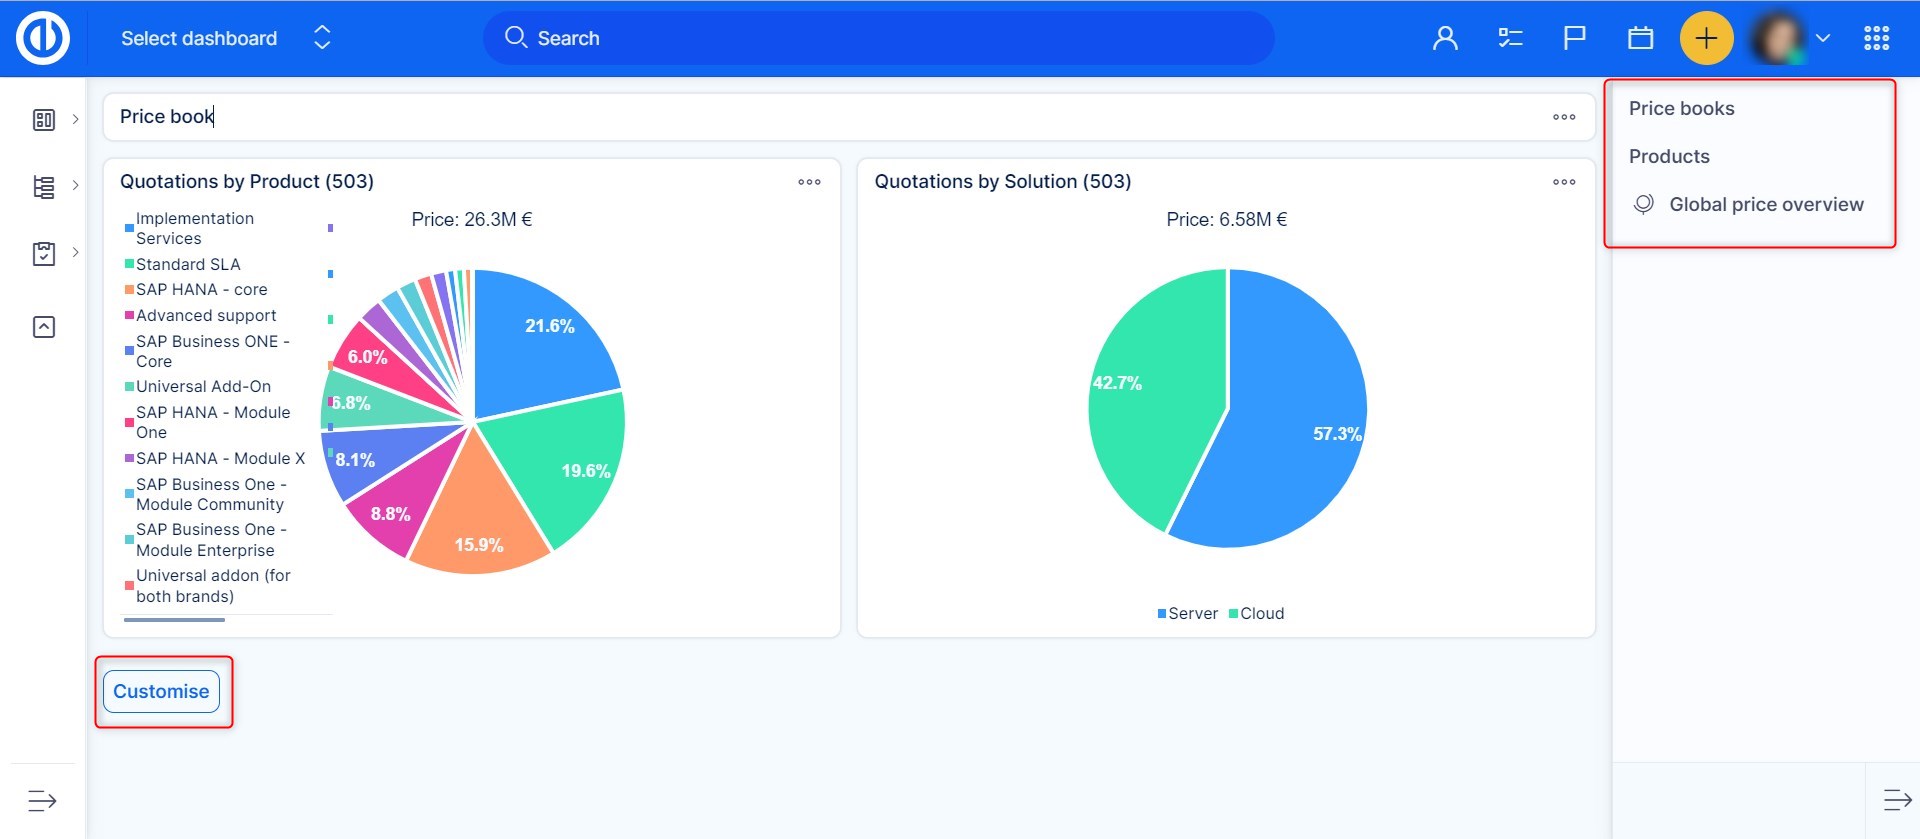
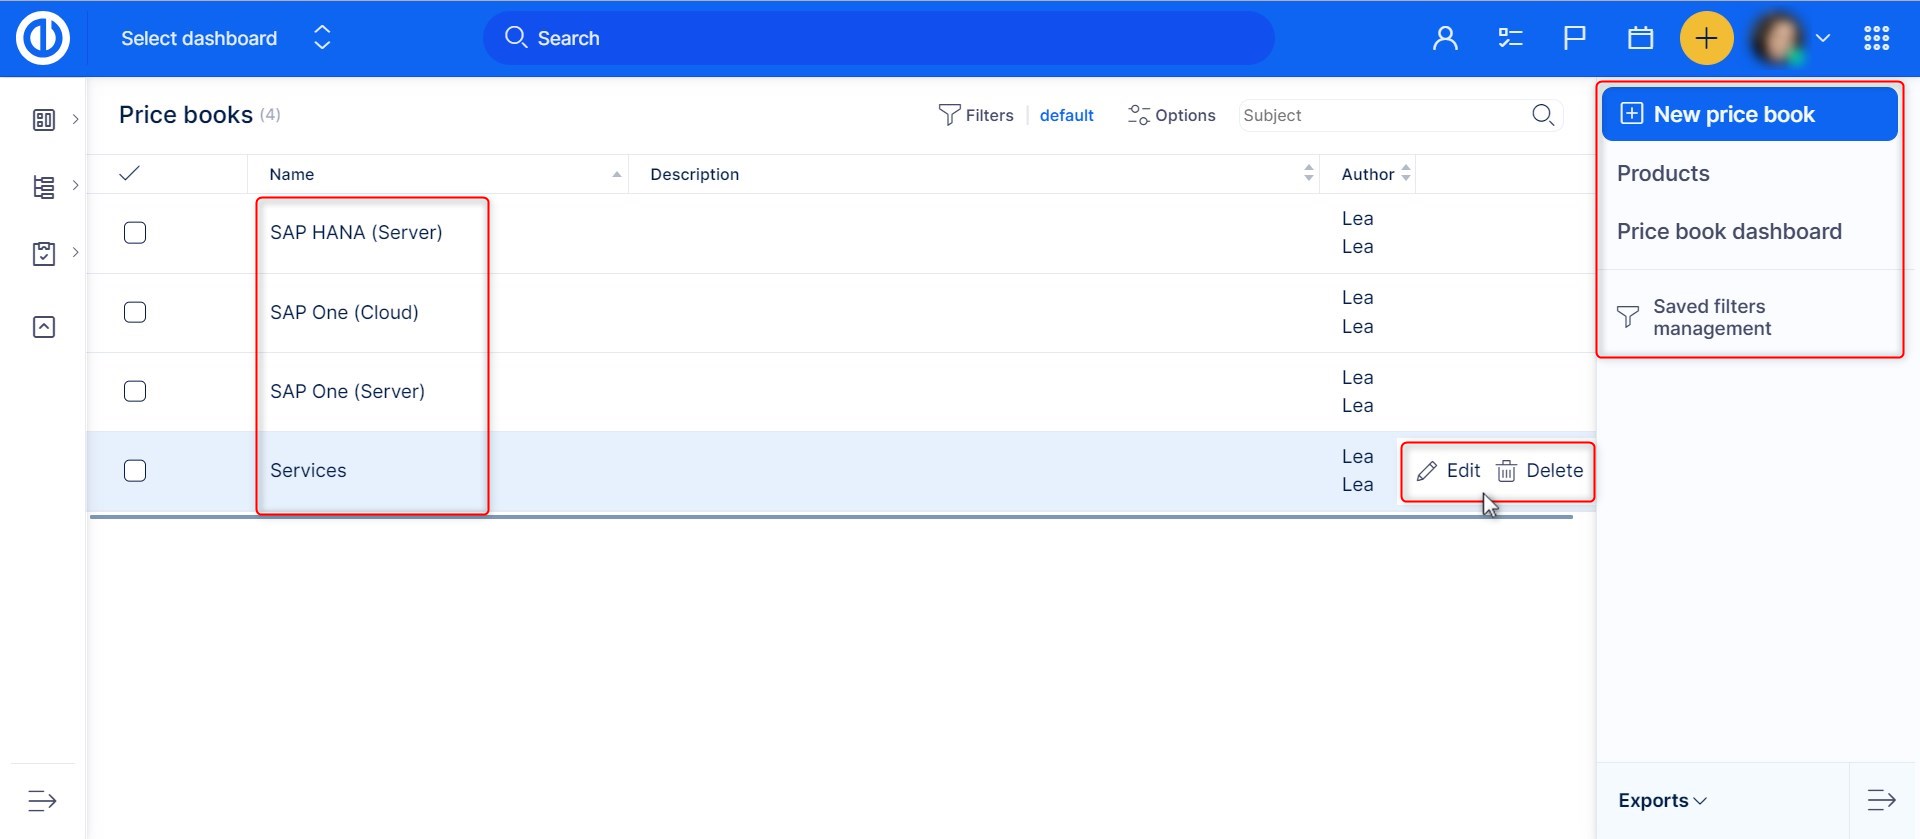
Let's start with price books. Click the "Price books" button, which takes you to a page with the list of existing price books. By hovering the mouse cursor on any particular price book, you see the option to edit or delete it. In the right sidebar menu, you have the option to create a new price book as well as to open products, the price book overview page, and saved filters management.
Creating a new price book
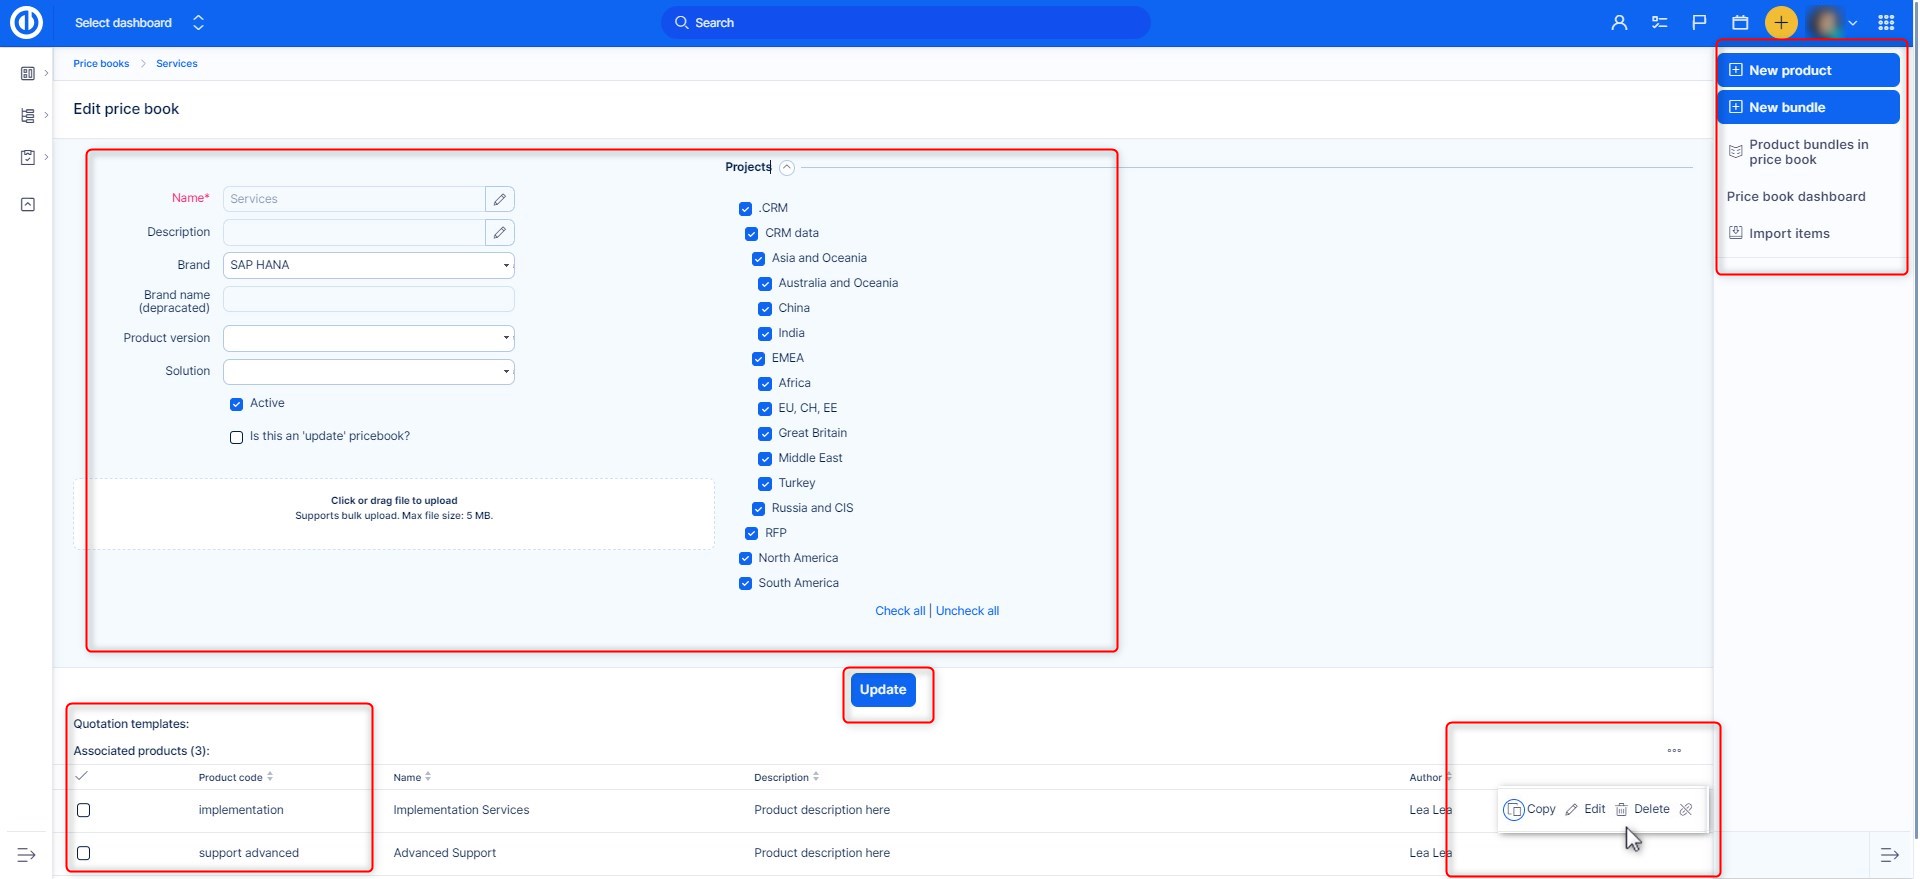
When creating or editing a price book, you see a form like this. Here you can add/change the name of the price book, description, brand, product version, set it as "active", set it as an 'update' price book (this checkbox should only be ticked when you create a new version of a previous price book), or add files as an attachment. The brand selection is important as one price book may contain several brands, where each brand means different prices. Therefore, when creating a new quote on an opportunity, the brand must be also selected there. The same logic applies to the selection of product versions.
Then you select the project(s) to which the price book is assigned, which means you can create a new quote based on this price book on an opportunity under that project(s). There is already a predefined project "CRM" with various geographical regions represented as its subprojects. It's up to you whether you take advantage of this predefined default structure or make your own project structure instead. We recommend staying with the geographical structure as salespersons usually also have their responsibilities divided by regions.
At the bottom part, you see file attachments and their file management tools on the right side, associated products, and the history of the price book. The options in the right sidebar menu are only available when editing an already created price book and include the possibility to create a new product or a new bundle (see chapter "Creating a product bundle"), view the list of existing bundles in the price book, go back to the price book overview page, or import items. When you are done with creating or editing a price book, click the "Save/Update" button.
Once a new price book is created, it's empty because it does not contain any quotation template to which the products, services, and prices could be written. The quotation template can be an MS Office-compatible document that contains dynamic tokens according to our list of supported dynamic tokens. A dynamic token is a predefined string of characters that our CRM can recognize and automatically replace that string with the relevant data, such as an address, phone number, product, or price. Here is an example of how such a quotation template may look like (this is a Word document). We recommend a quotation template to always be saved as a file attachment of the respective price book.

When uploading a second or later version of any document, you can use the version management tool to see how many versions were uploaded and revert back to any of these previous versions anytime. Or use the other file management tools to manipulate with the document just like with any other file attachment.

Creating a new product
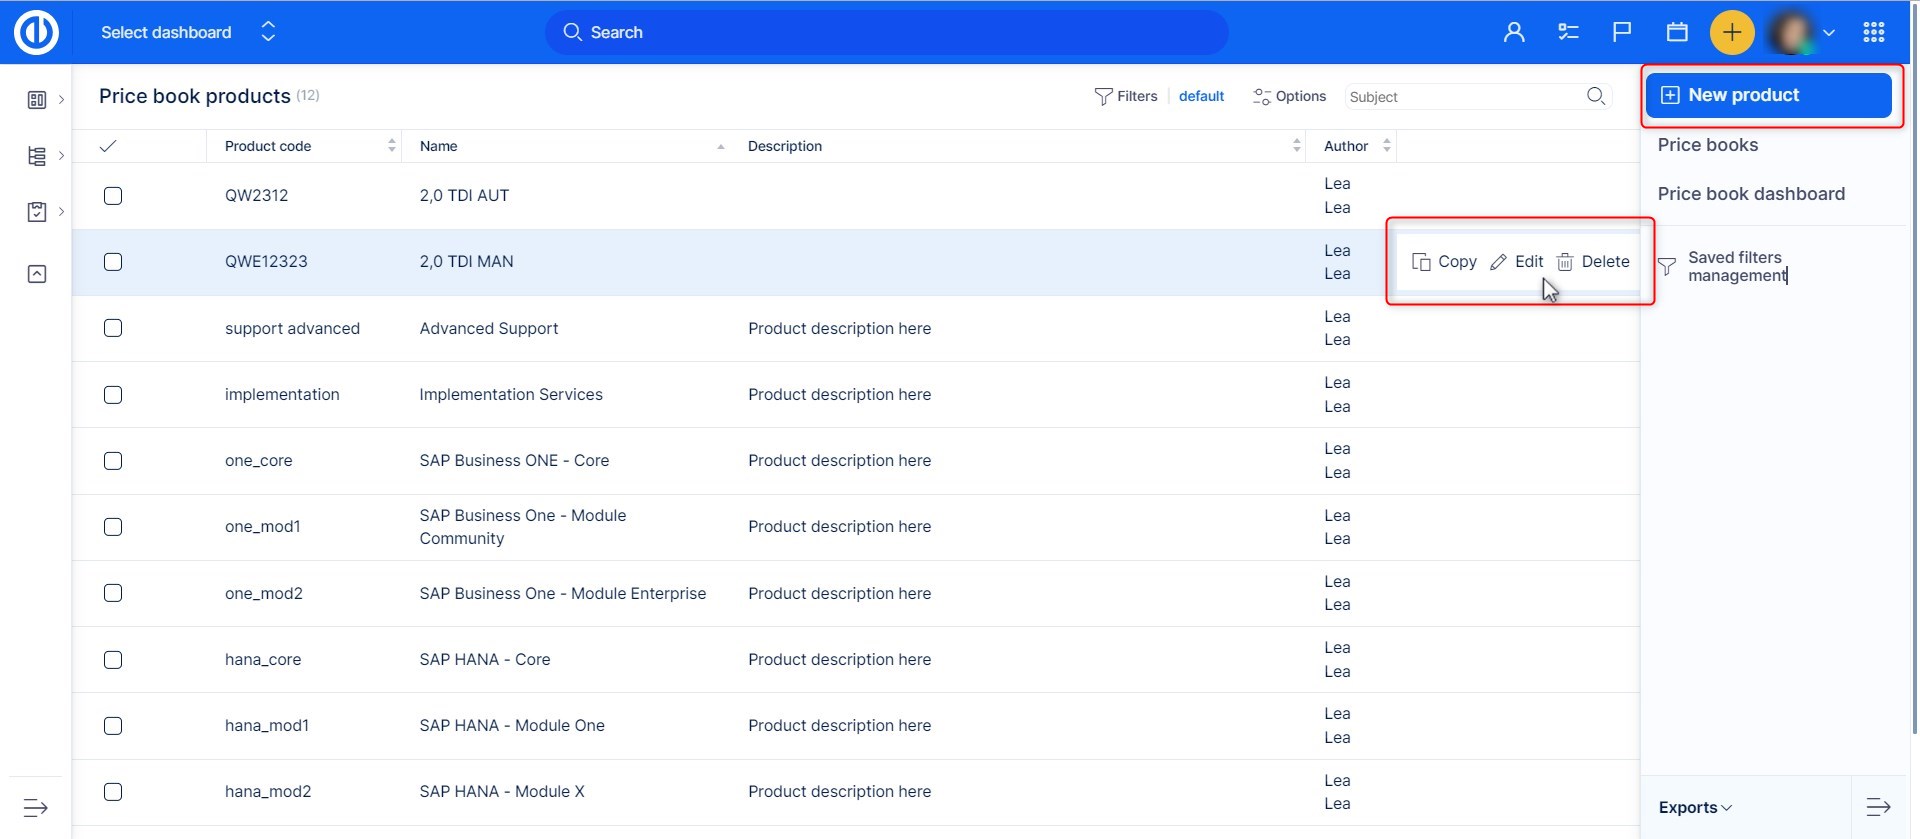
You can either create a new product from the price book edit page or the list of products by clicking the "New product" button in the right sidebar. Another option is to click the "Copy" button on any of the existing products to make a new product from the copy of the selected one. Just as easily, you can edit or delete any of the existing products using the context menu (hover the mouse cursor over the product).
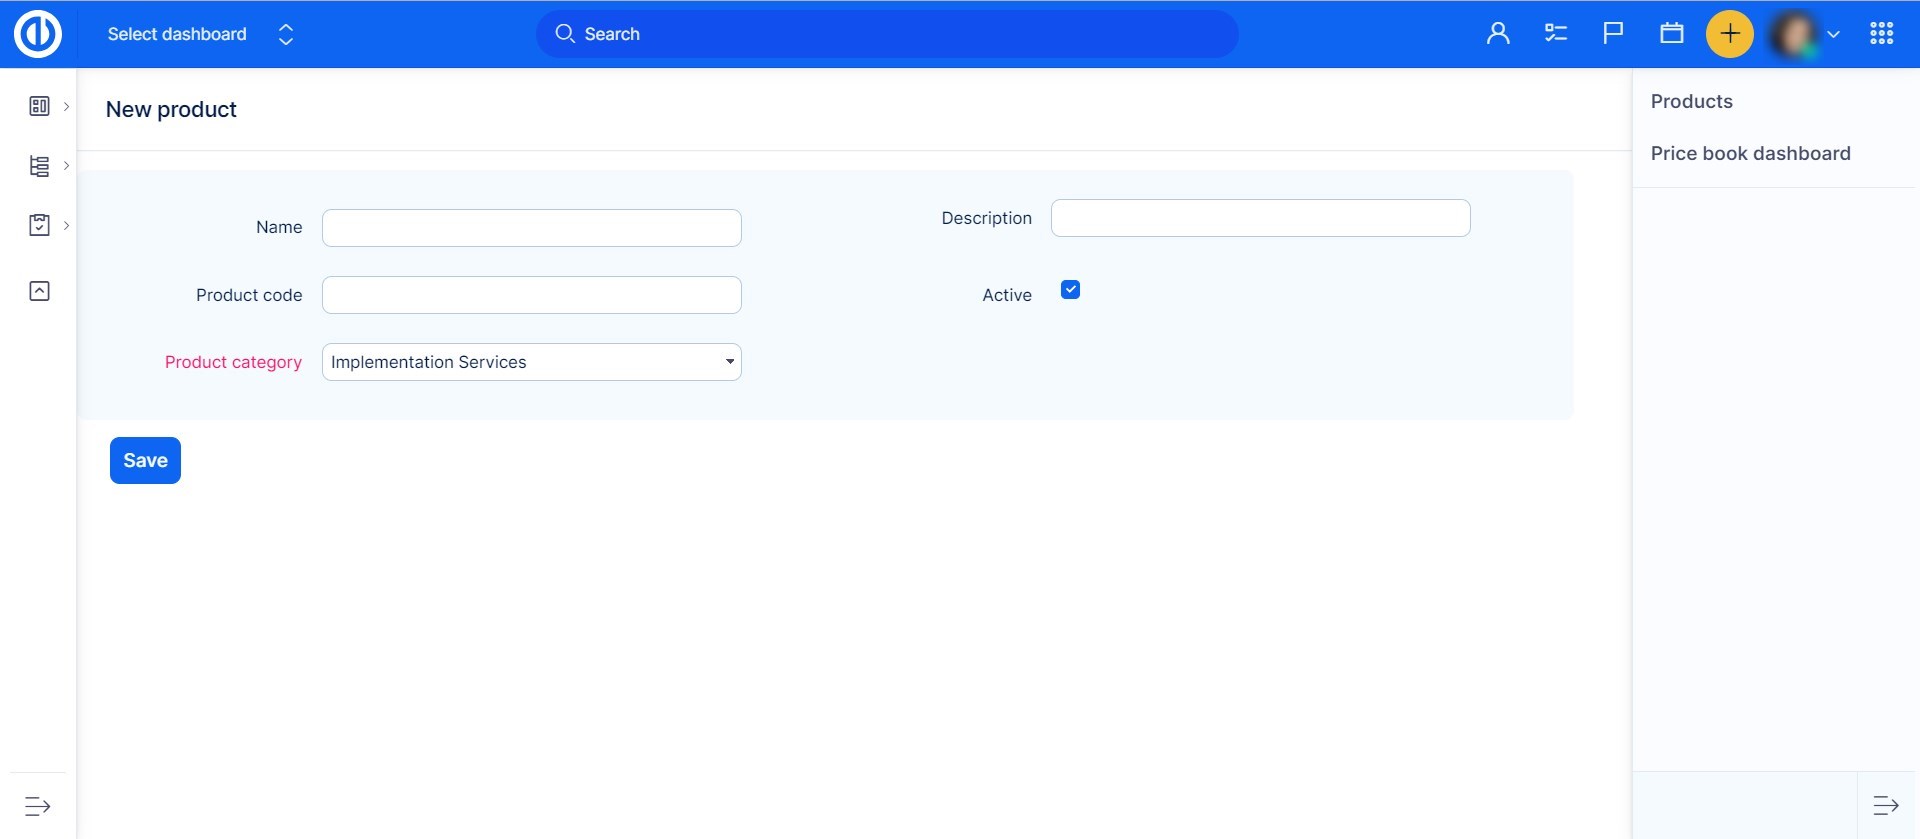
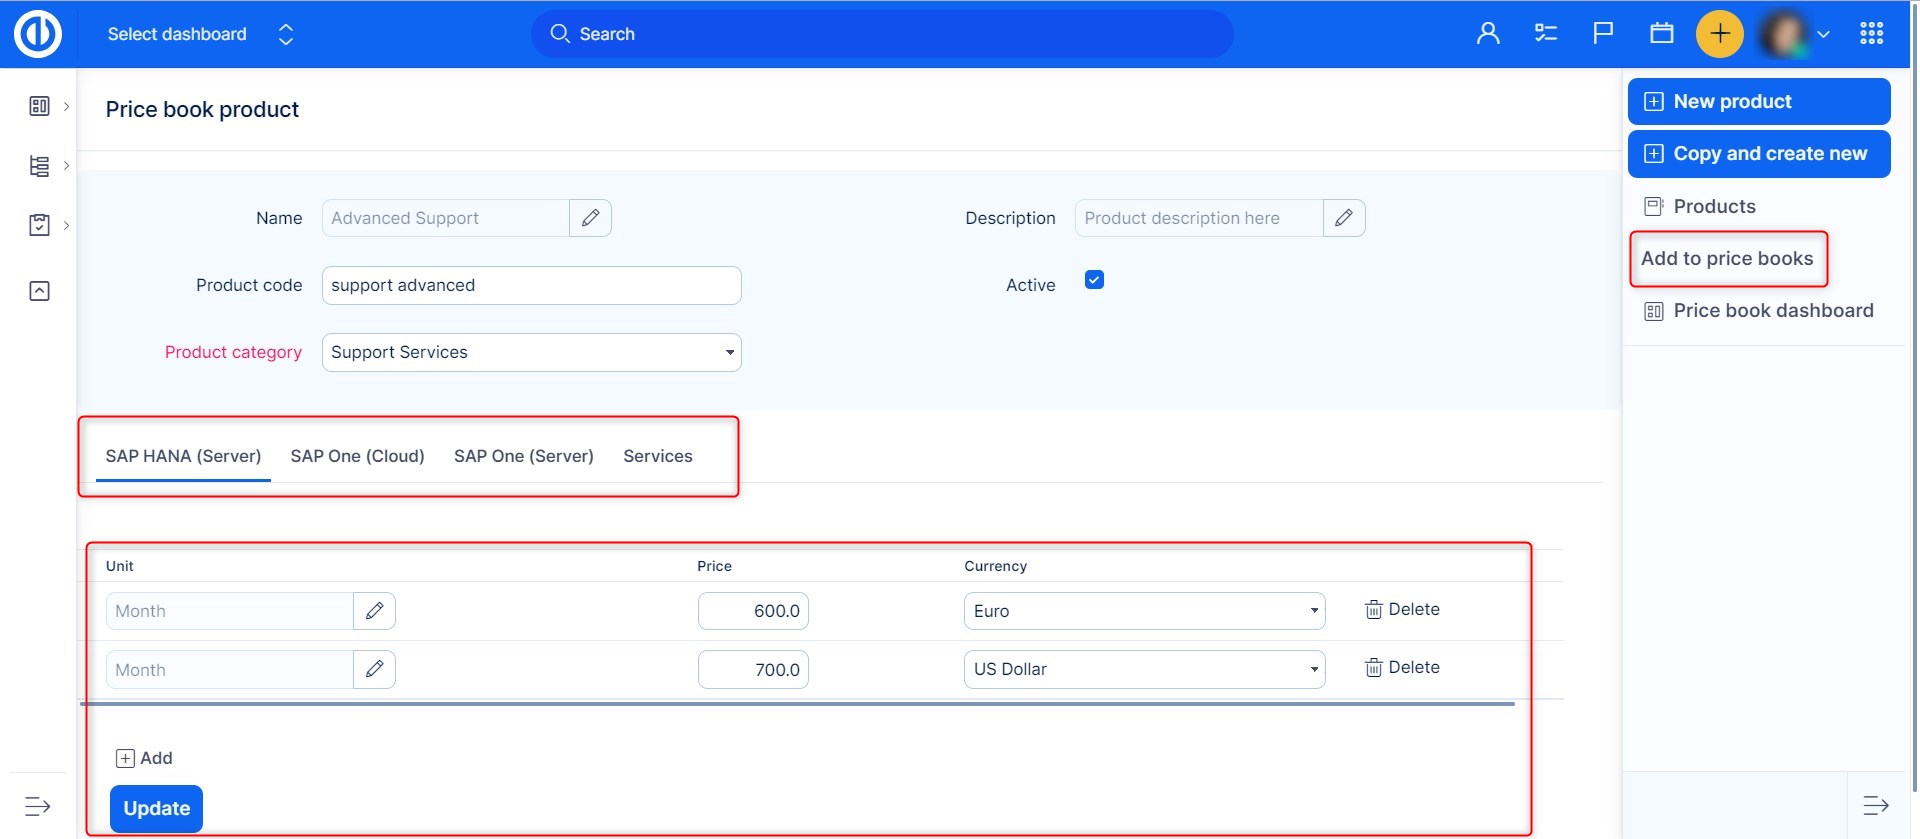
On the product creation page, fill in the name of the product, description, product code, set it as active, select the product category (i.e. implementation services, software, or support services), and click the "Save" button. The product is now created and you can find it in the list of products.
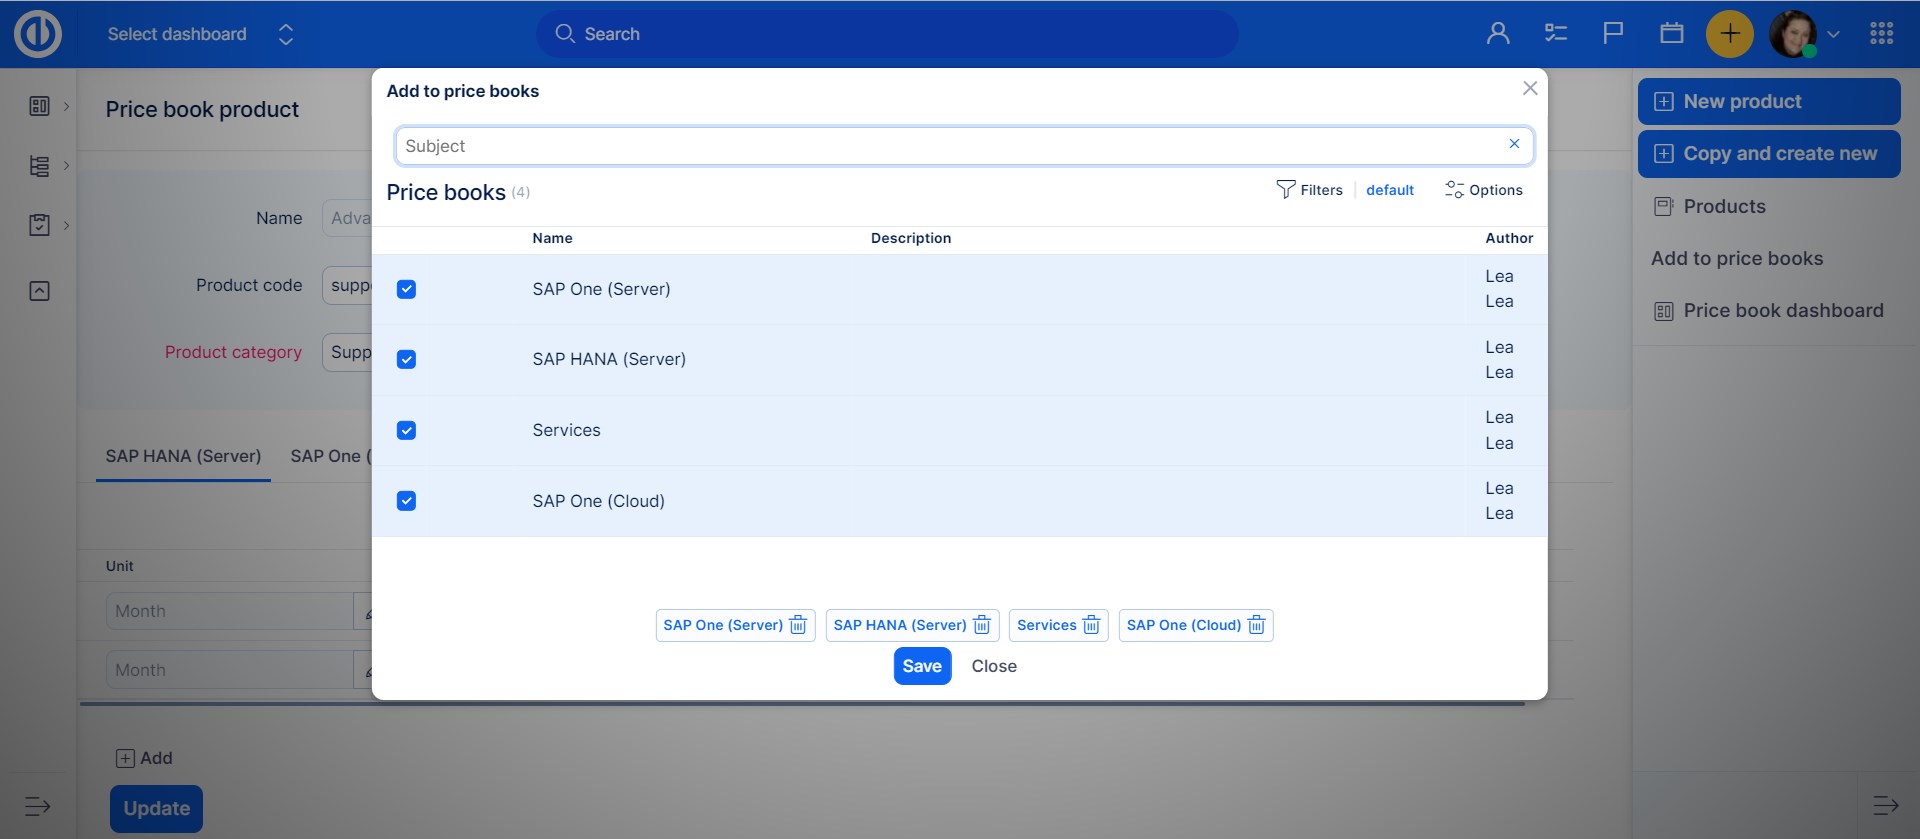
When the product is saved, you can add it to one or more price books using the "Add to price books" button in the right sidebar. The added price books will then appear in the product menu and you can easily switch between them to add different units, prices, and currencies for different price books. The units represent standardized product deliverables for a defined price in a defined currency. To add a new unit, simply click the "Add" button below the list of units. The unit will be added to the currently selected price book. When finished, click the green "Update" button to save the changes.
As you may see, adding a product to price books is pretty simple. Just select them in the modal window and click the "Save" button.
The product creation is now finished and added to a price book.
Creating a product bundle
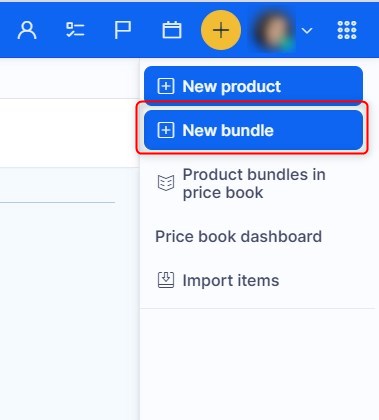
You can add two or more products into a single bundle for purpose of easier handling multiple products at once. To do so, click the "New bundle" button in the right sidebar while editing a selected pricebook.
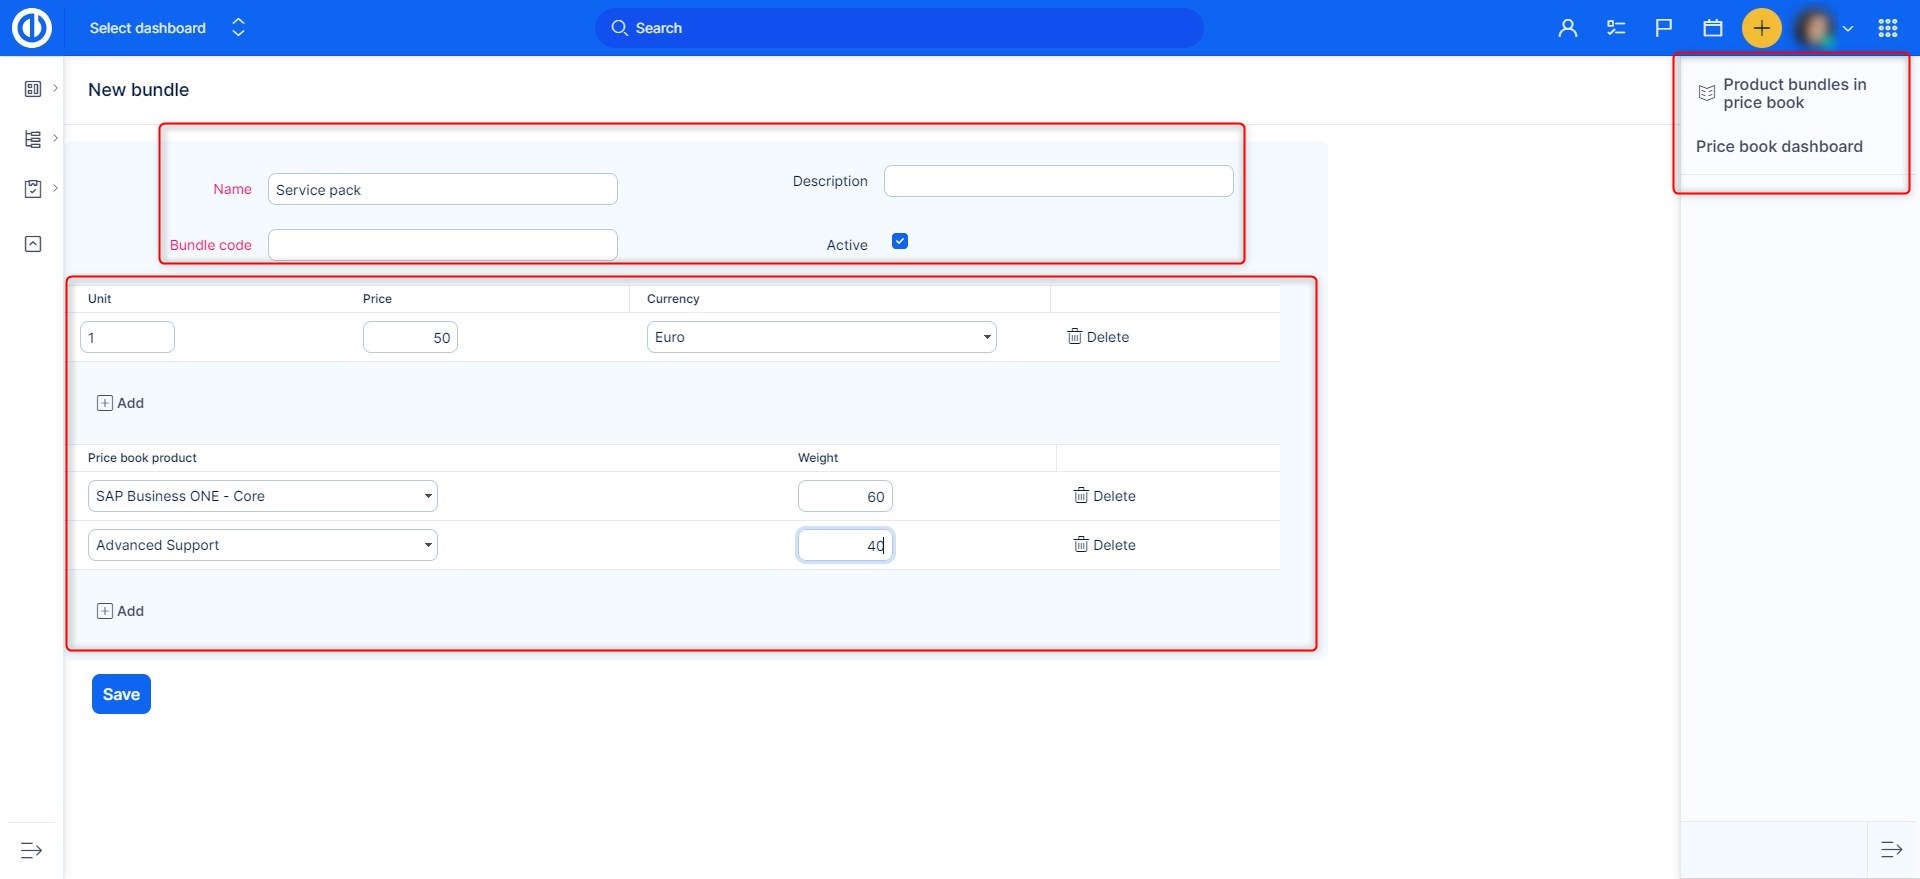
Just enter the name of the product bundle, description, bundle code, and set it as active. Then you may add new units and/or price book products into the bundle. For each added product, there is a "weight" parameter, which defines the share of the particular product in the whole product bundle, such as 50:50 in a bundle of 2 products with equal share. In the right sidebar menu, you can view product bundles in the price book or get back to the price book overview page. When finished, click the "Save" button.
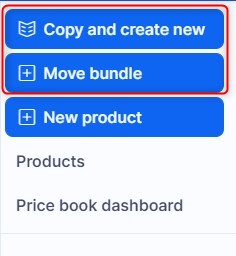
When a product bundle is saved, you have 2 new options in the right sidebar menu: "Copy and create new" and "Move bundle". The first one allows creating a new bundle from the copy of the existing one. The latter option allows moving the product bundle from the current price book to another one.
Settings
The setting related to activating the CRM module on a particular project was already described in chapter „How to use the feature on the project level“. However, there are many more setting options.
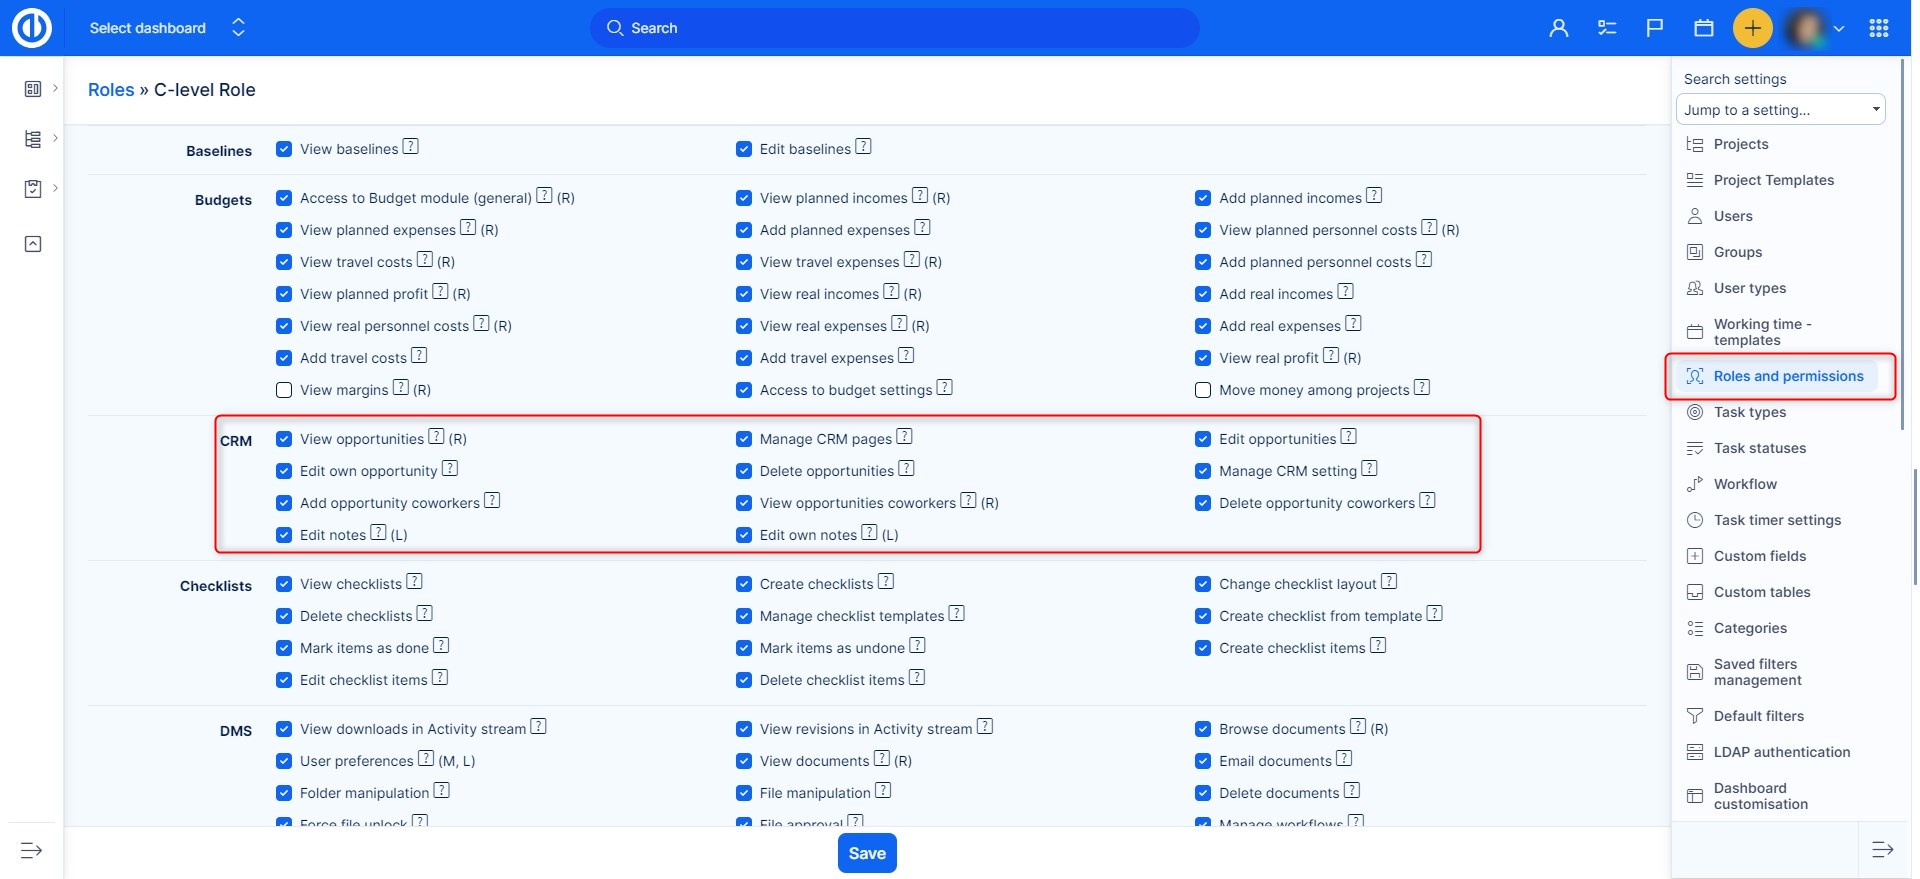
The user role's permissions related to CRM on the project level can be managed in Administration >> Roles and permissions >> Project permissions >> CRM. It allows you to do everything related to CRM data (accounts, opportunities, leads, partners, personal contacts): view, add, edit, delete. Administrators have all permissions by default.
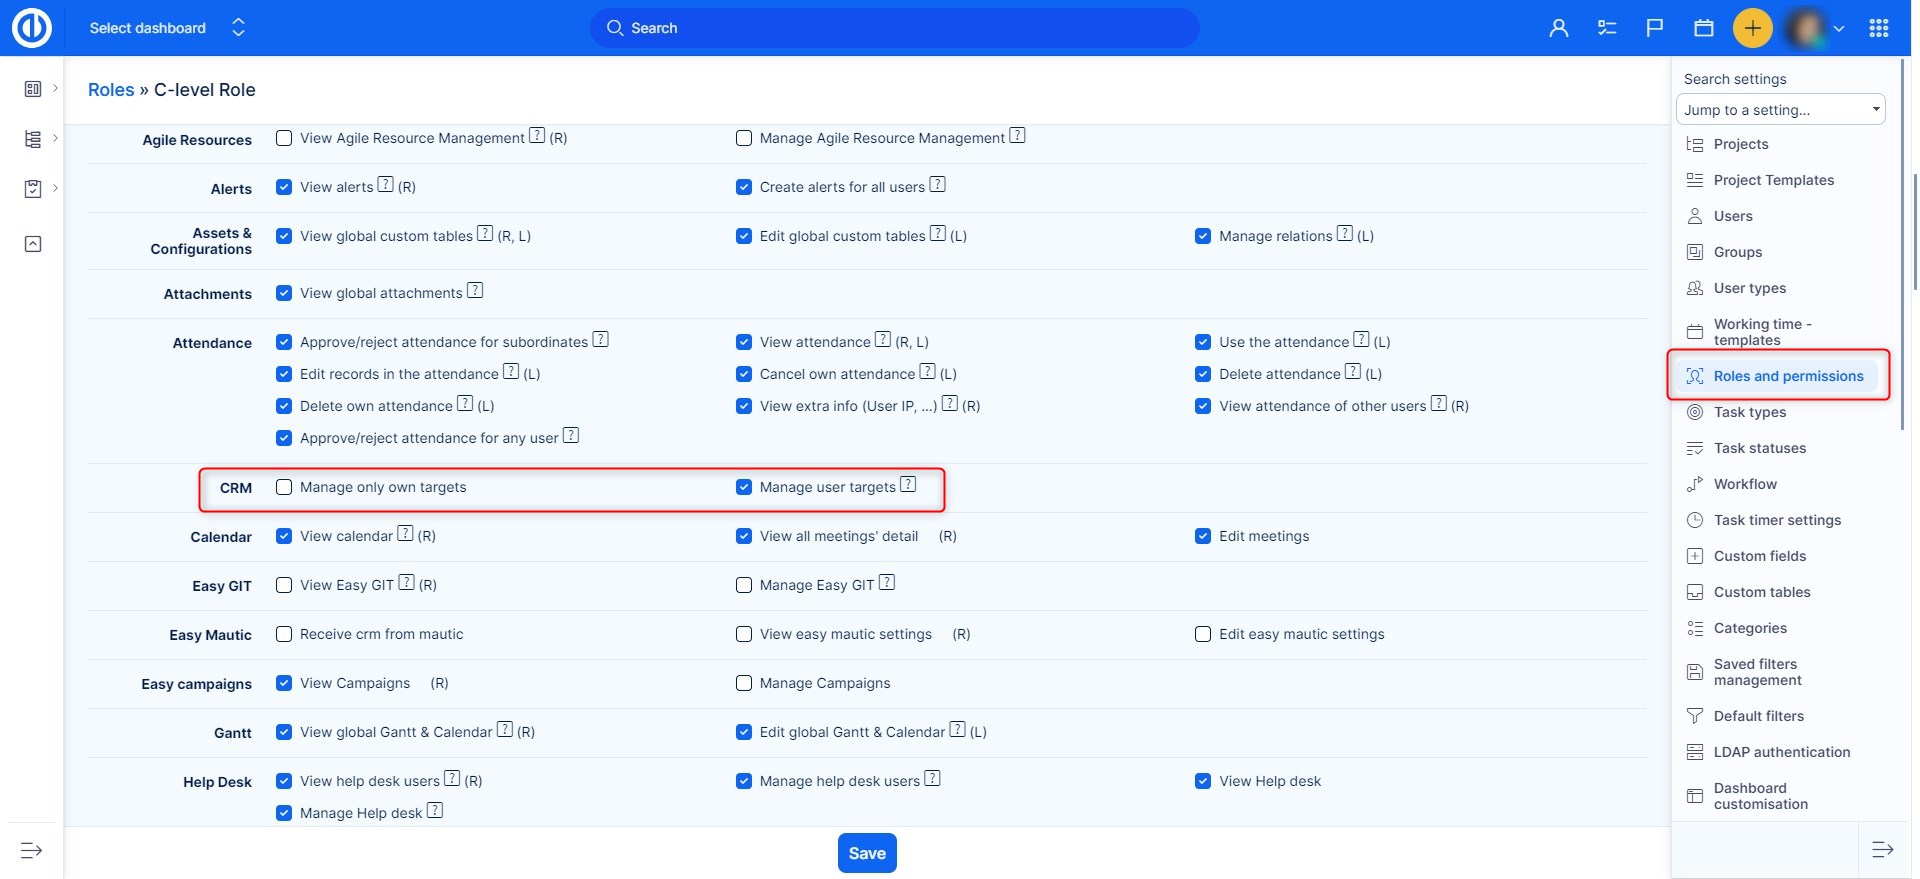
The user role's permissions related to CRM on the global level can be managed in Administration >> Roles and permissions >> Global permissions >> CRM. It allows you to manage user targets. Administrators have all permissions by default.
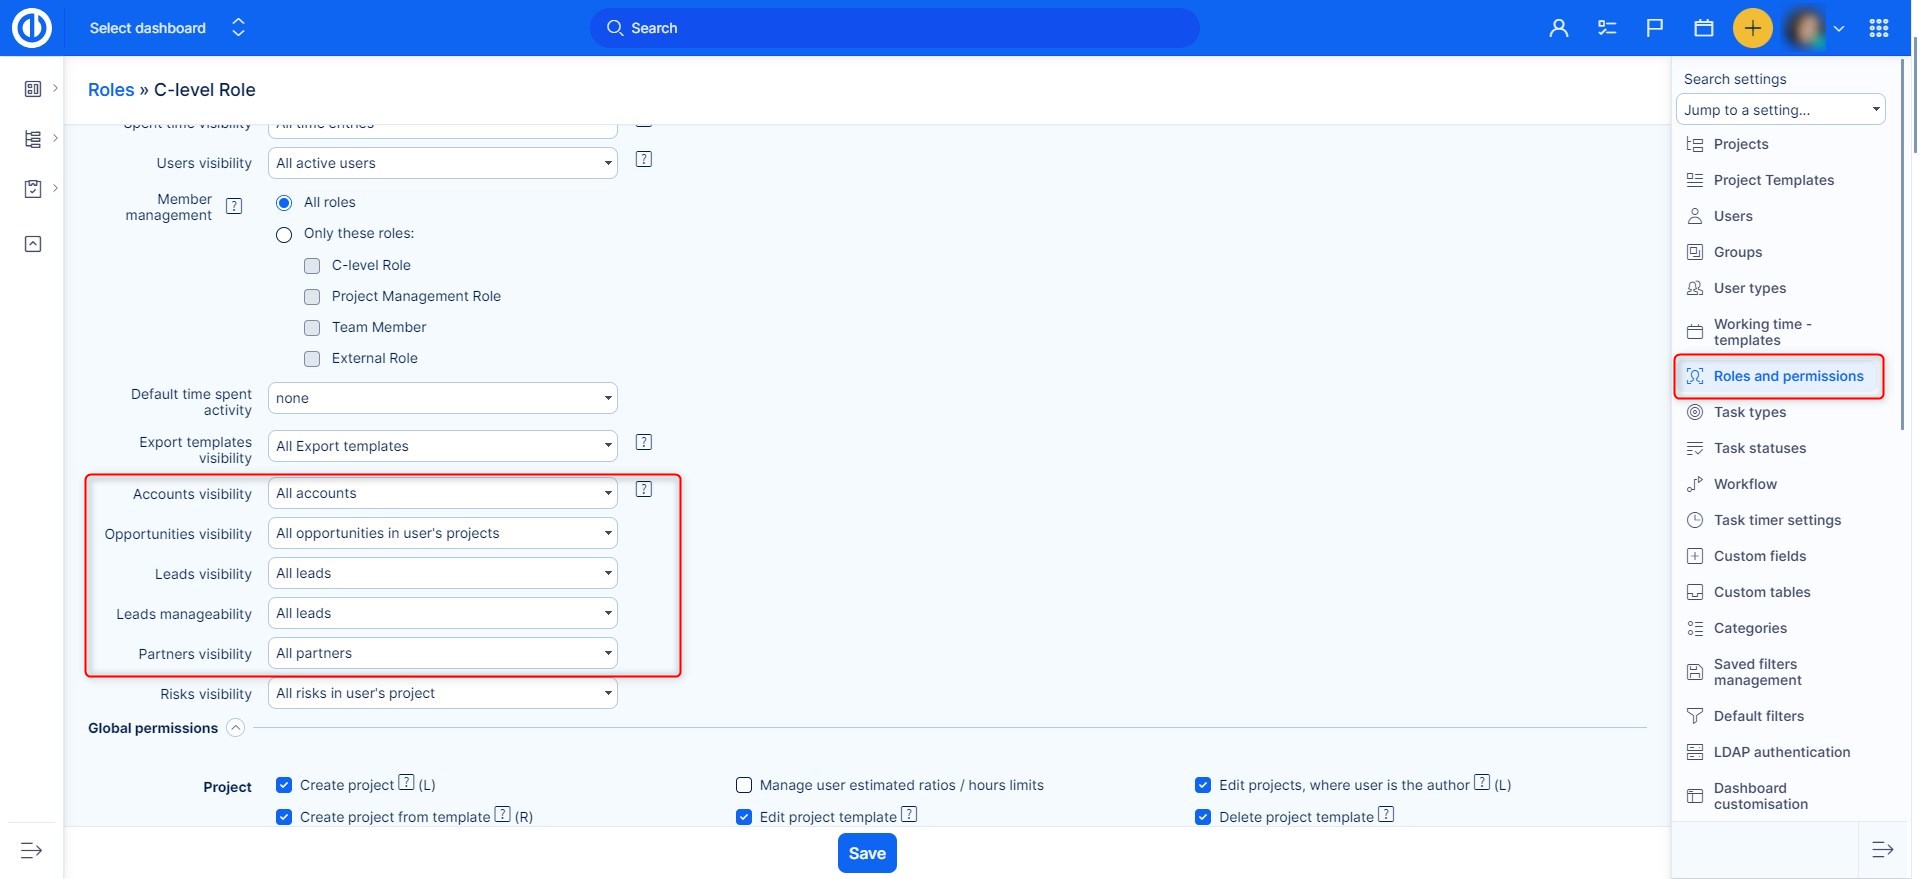
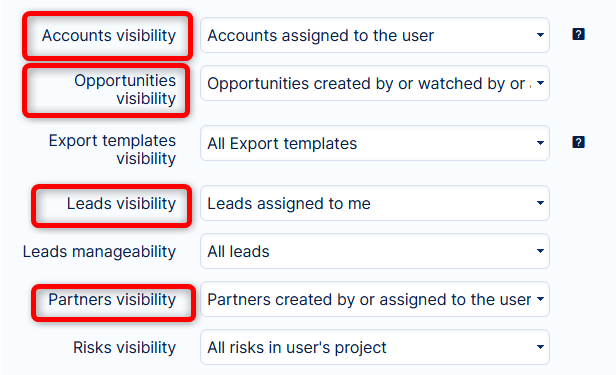
In the upper part of the Roles and permissions page, you can modify how individual user roles see accounts, opportunities, and partners.
In the CRM settings page (Global menu >> CRM >> Settings), you can add, edit or remove opportunity statuses and user targets for salespeople as well as customize Kanban view settings. Moreover, you can set up CRM fields permissions by status in the Workflow settings (Administration >> Workflow >> CRM fields permissions).
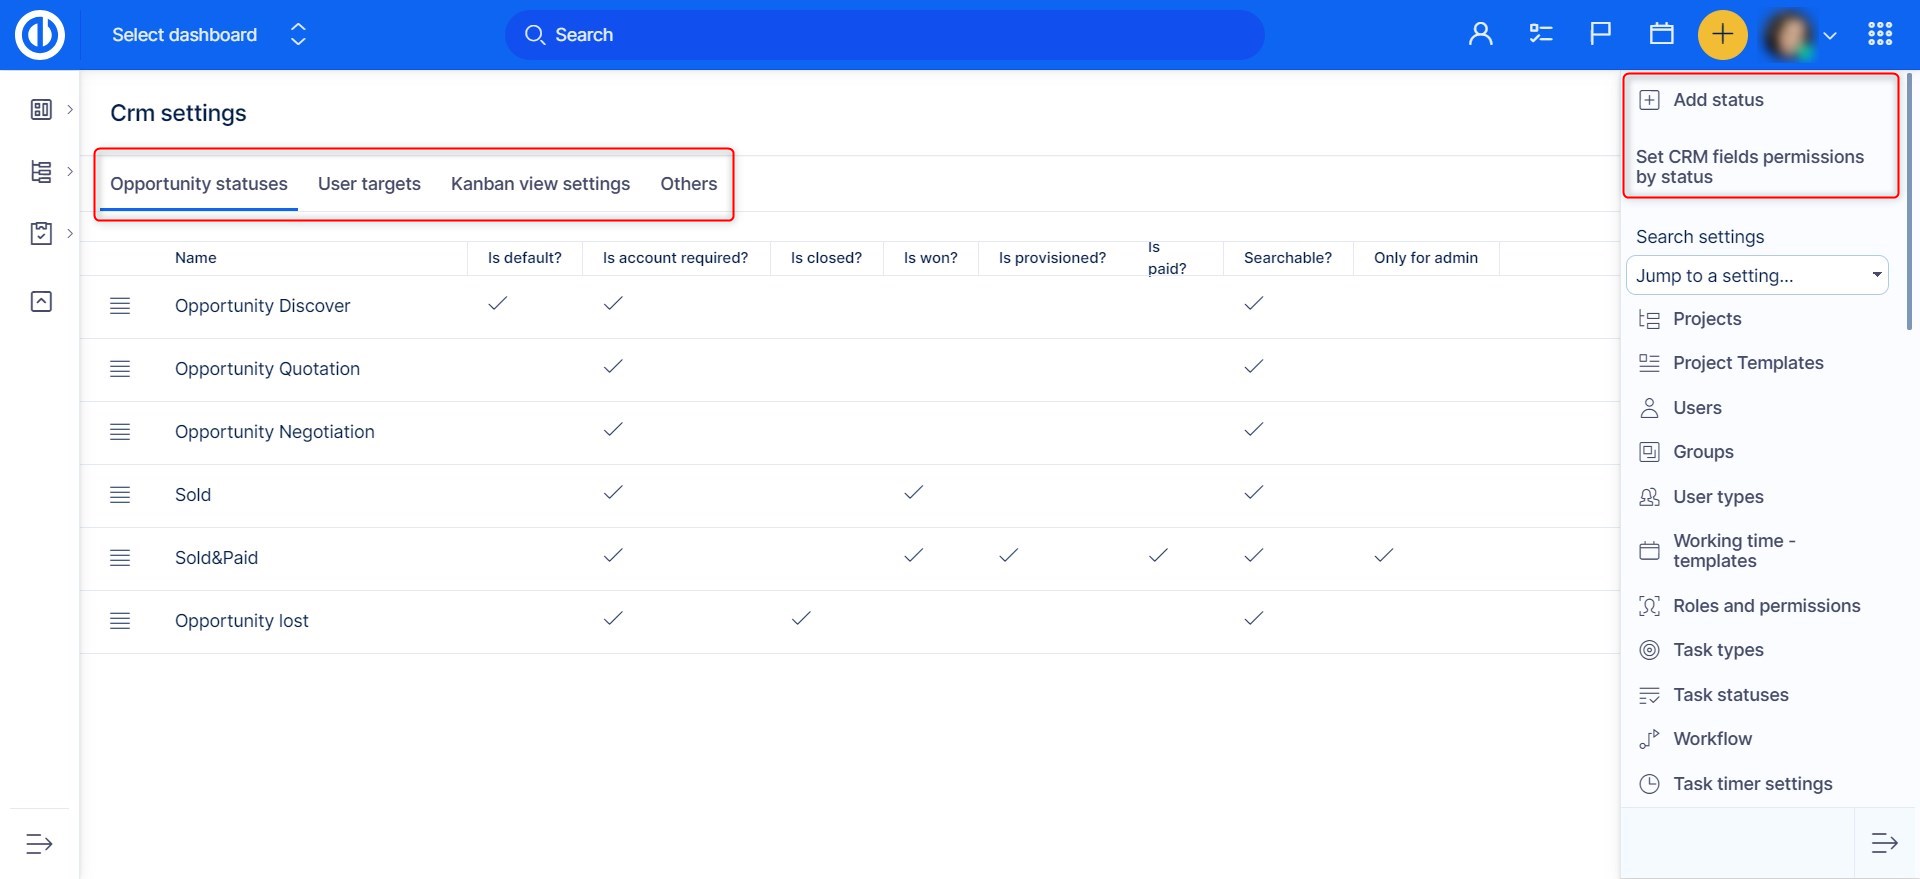
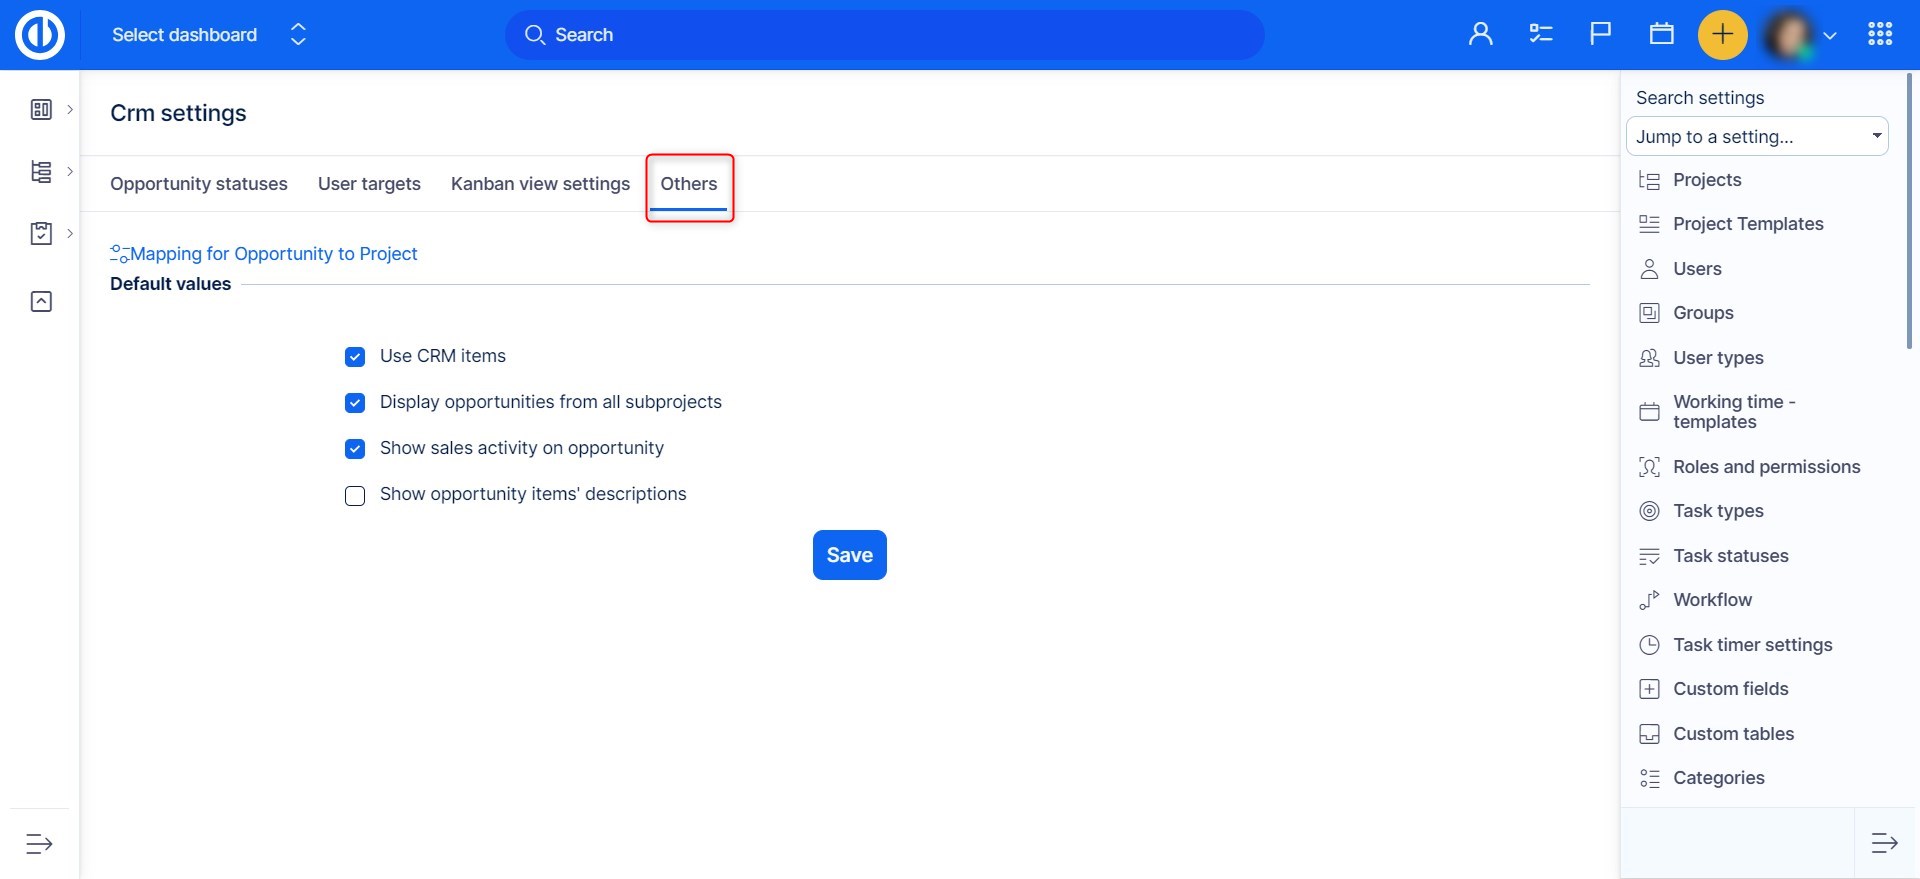
Under the „Others“ tab of the CRM settings page, you can configure various CRM-related features, namely:
- Use CRM items = Set yes for working with product items from a price book
- Display opportunities from all subprojects = Set yes by default
- Show sales activity on opportunity = Set yes to work with sales activities
- Show opportunity items' descriptions = Set yes to display product description from price book on a quote detail
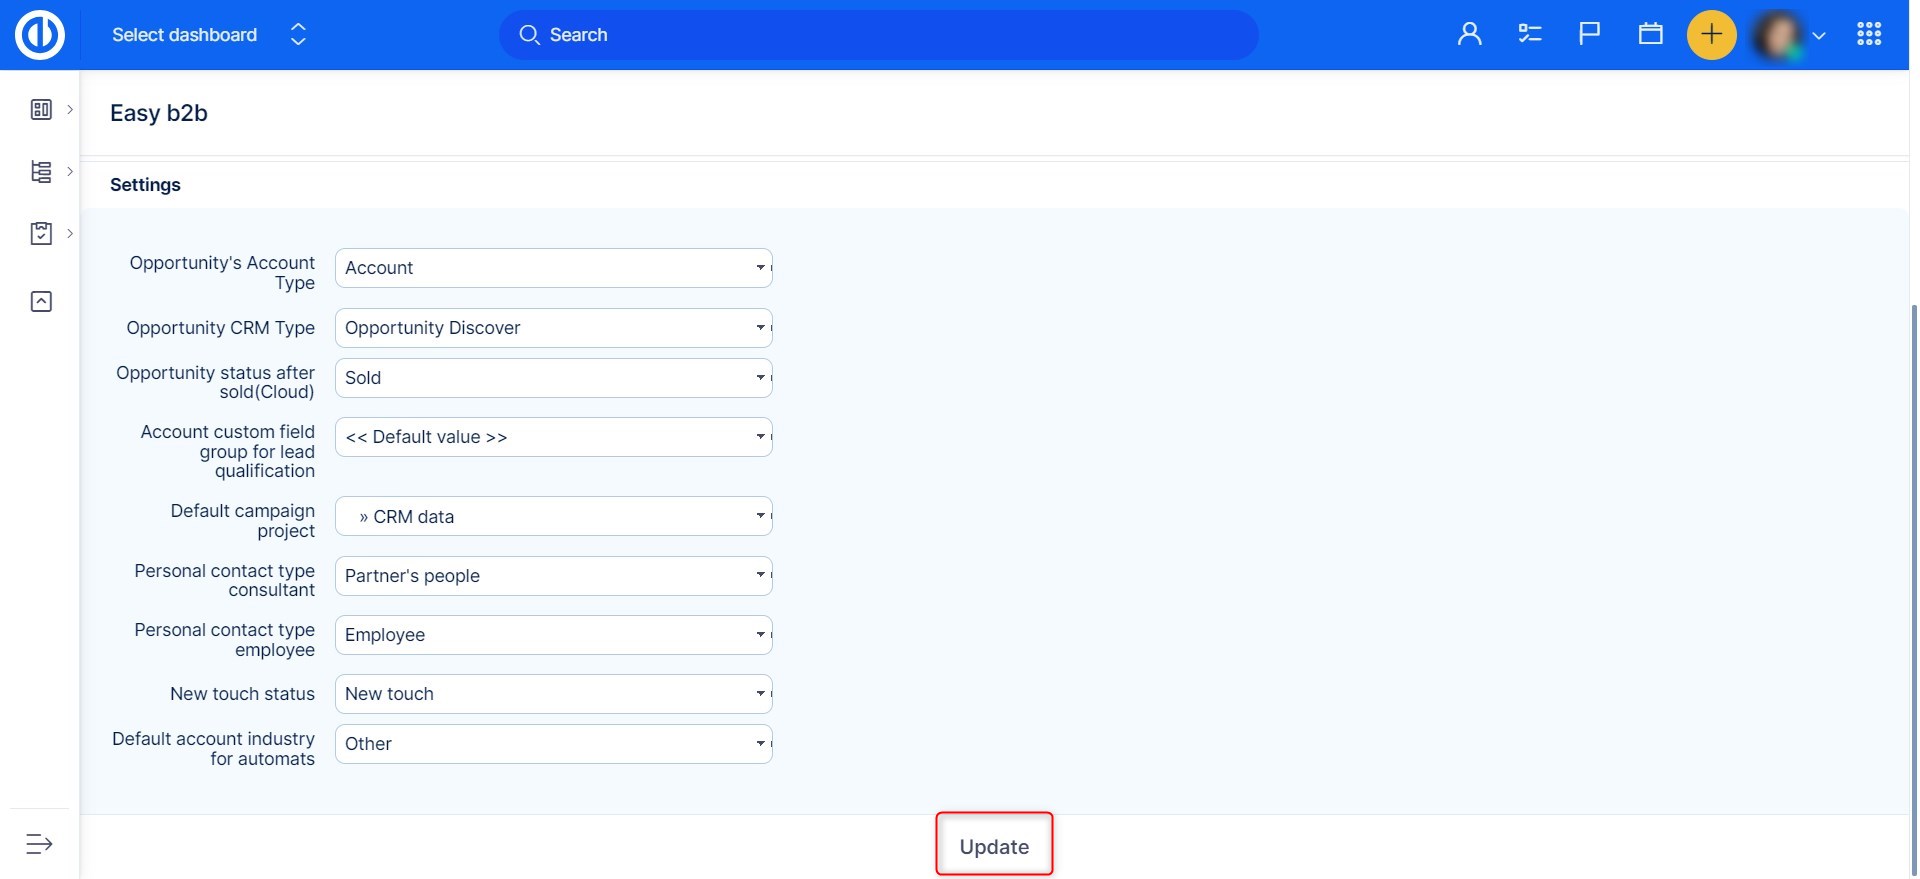
Moreover, there is an additional CRM plugin configuration page (Administration >> Plugins >> Easy b2b >> Edit or type „/rys_management/easy_b2b/edit“ after your domain URL) where you can set up many various settings, namely opportunity's account type, opportunity CRM type, opportunity status after sold (cloud), account custom field group for lead qualification, default campaign project, personal contact type consultant, personal contact type employee, new touch status, and default account industry for automats.
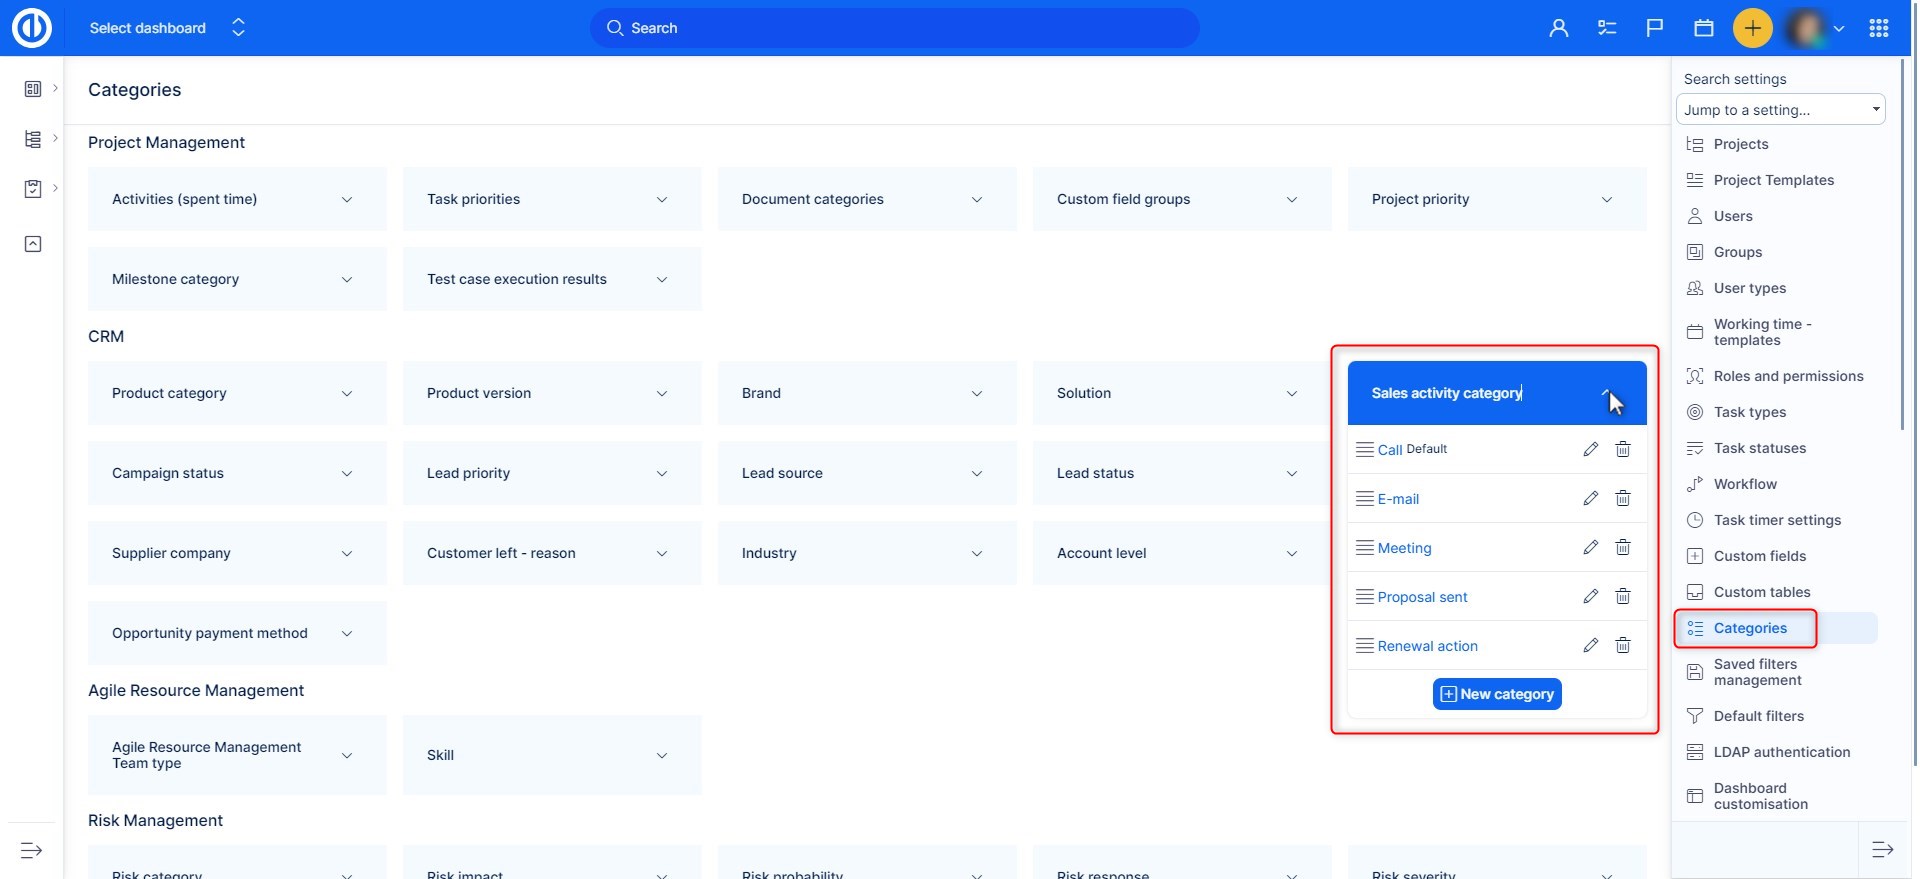
Sales activity categories can be managed in Administration >> Categories >> Sales activity category.
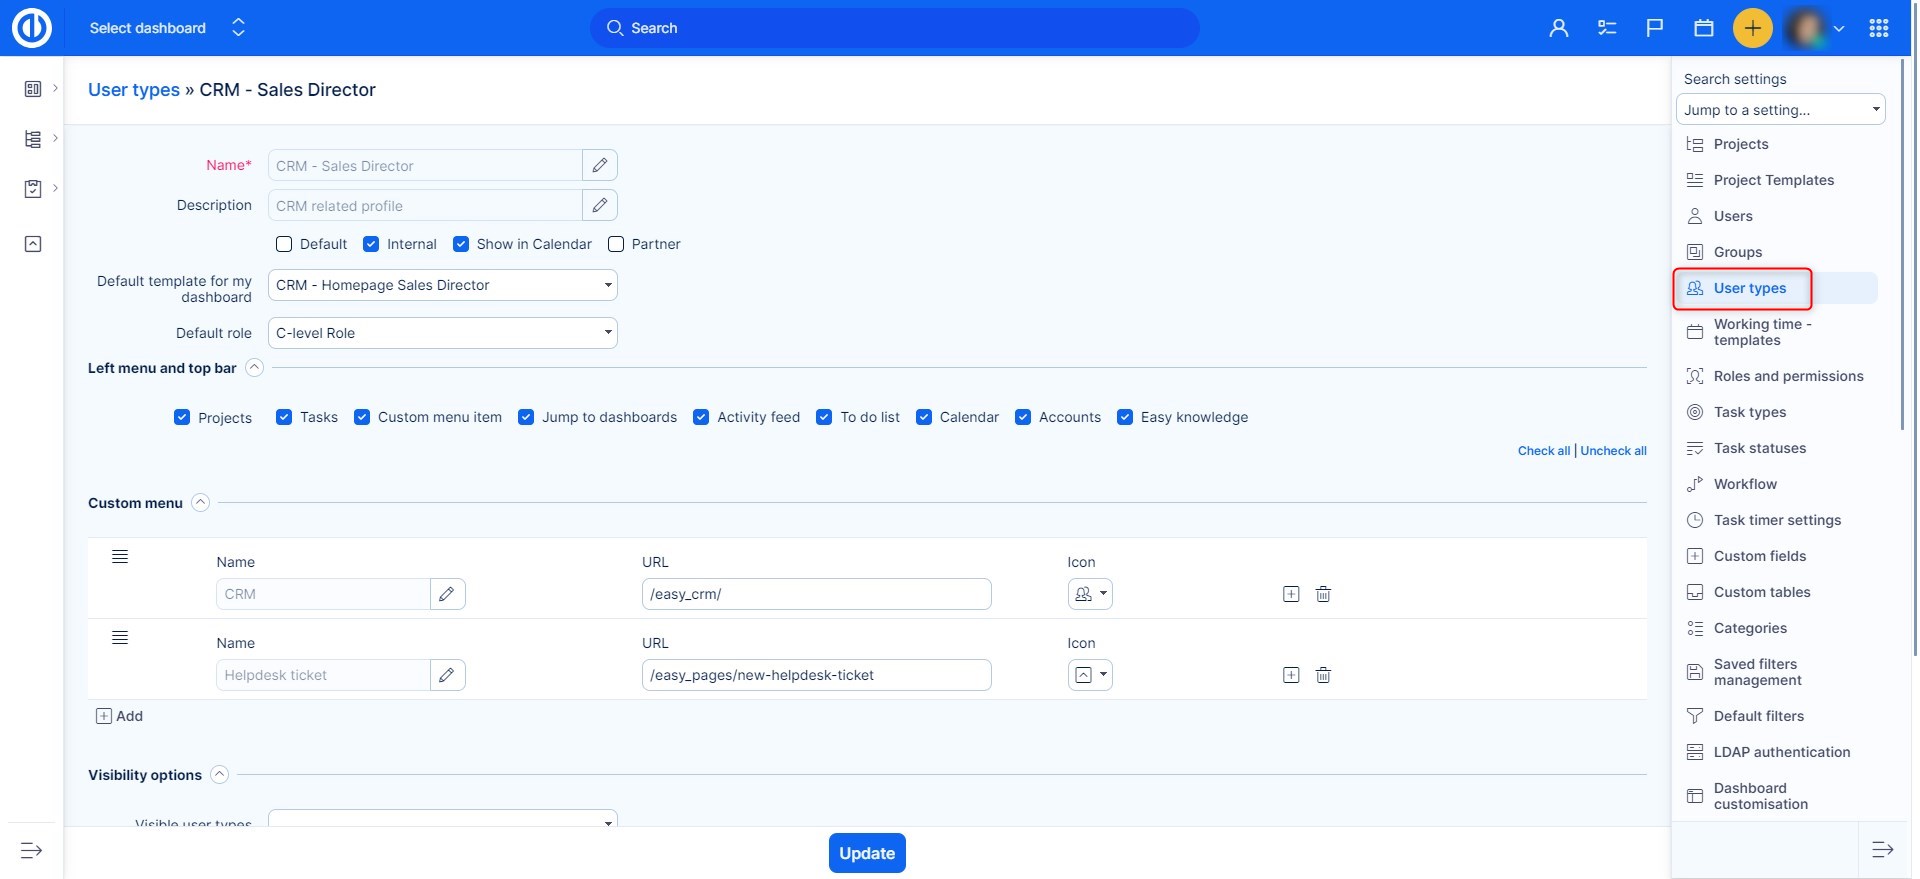
Sales people's user types can be managed in Administration >> User types >> Sales Representative / Sales Director.
Inherit View permissions of CRM entities from subordinates
Useful feature for active users of Organizational chart and CRM.
- Administration >> Plugins >> Organizational chart - Configure
- Allow sharing access
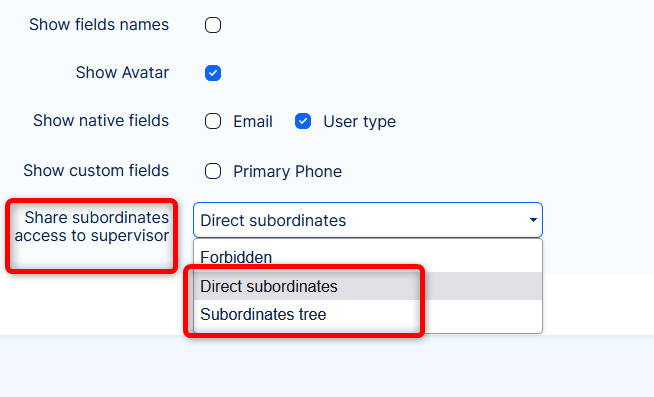
- The supervisor will also get access to CRM entities (leads, opportunities, accounts and partners)
Notes:
- Sharing only applies to View permissions => managing can't be shared, it has to be explicitly enabled for the supervisor.
- Sharing respects visibility settings of the subordinate's role.
Corner situations
- When a user tries to open the context menu through the right mouse button on the opportunity quote, there may be a rare case of the context menu not loading since the entire web page is not loaded correctly – refreshing the page solves the situation.
- When a lead is being qualified, only required fields are displayed on the form for a new opportunity, account, or personal contact creation, based on opportunity statuses configured in the custom field detail. Non-required custom fields can be filled in only in the next step when the opportunity, account, or personal contact is already created.
- If there is a change in currency on recurring Quotes, on which there is a discount, the discount will not be applied on the newly created quote. Discount needs to be added again after currency change.
- When using columns in Project list, there is no column to display a project related account. Due to history of the application, there are columns available related to accounts, however, these will not display the account data ,unfortunately.

